Now we will shift our attention to that part of programming which is often ignored. Documentation.
Documentation is a key part of programming. In fact, some might go as far as saying that Documentation is the most important aspect of Programming. Let us understand what we mean by documentation by looking at some key points. Later we will look at different ways of documenting our code.
We document our code so that:
- Anyone who is reading our code can understand what we are trying to achieve.
- Anyone who wishes to make changes to our code knows where to make the changes.
- Anyone who issuing our code can easily find out its capabilities and limitations.
- Other programmers can figure out how to use our code.
- Developers can find out when and where changes were made to a code. This is useful to understand the evolution of our code.
- We can easily recollect what, why, when, where & how something was done by us. This is necessary if we are revisiting code that we have written a long time back.
- We can add warnings and disclaimers
There may be some other reasons why we may want to document our code, but the list above summaries the most common reasons. This can easily be seen from a simple example.
func fahr_to_cent(Centigrade temp : Float) -> Float
{
return (32 + (temp * 1.8))
}
It is clear to use what the function does simply from its name. However, there is a lot more information that we can provide. Let us modify the implementation a little bit to make it more informative and readable.
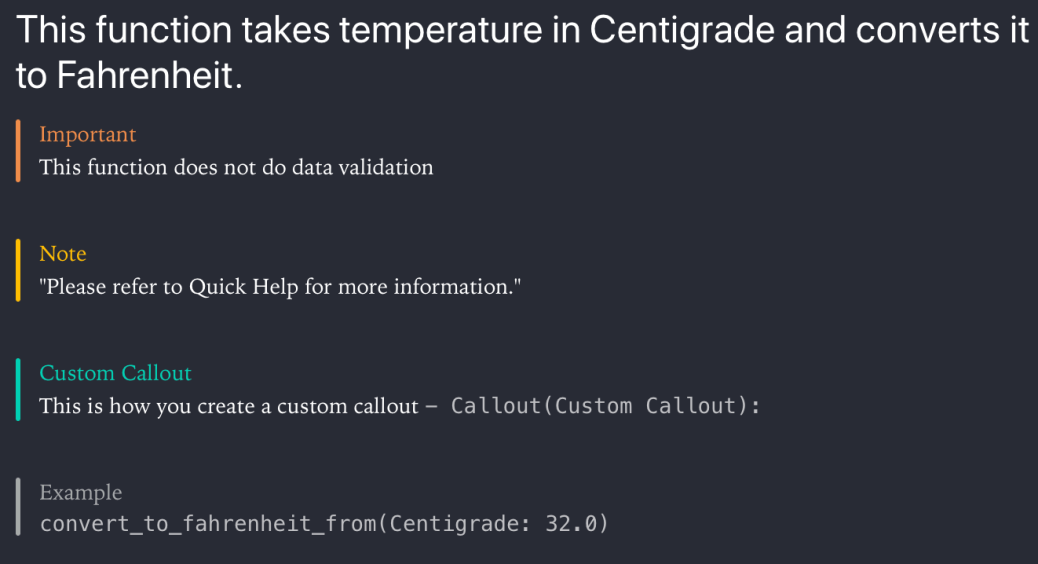
/**
This function takes temperature in Centigrade and converts it to Fahrenheit.
- important: This function does not do data validation
- parameter temp: This is the temperature in Centigrade. It can be a negative value too.
- returns: This is the temperature in Fahrenheit.
- requires: `temp > -273.0 && temp < 1000.0`
- Note: The requirement mentioned is not enforced.
- Since: iOS 11
- author: Arun Patwardhan
- copyright: Copyright (c) Amaranthine 2015
- version: 1.0
*/
func convert_to_fahrenheit_from(Centigrade temp : Float) -&gt; Float
{
return ((temp * 9.0 / 5.0) + 32.0)
}
The code above looks a lot better now. We made the function name better, but more importantly we have added documentation that better describes the function. This includes range of permitted values, version number, important notes. The comments haven’t been written randomly. They have been formatted in a way that will make them appear in quick help. So now if we have to use the function we know what to watch out for.
Now that we know why we need to document our code let us look at some of the ways this can be done.
Comments
The most common form of documentation is by using comments. Most programming languages support comments. Comments are text which is ignored by the compiler. As such they are not used to build the actual software. The sole reason why they exist is because there has to be some mechanism to write notes.
Single Line Comments
// This is a comment
A single line comment as the name says is a piece of text that can fit in one line.
Good when a short description is required. Normally this is placed before or after a variable as most variables would need a short description.
You can have multiple lines using the Single comment mechanism too.
// This is a comment
// This is a comment on the next line
Multi Line Comments
There is a better way to implement multi line comments. We can enclose the text in a /* */ range.
/* This is a comment This is a comment on the next line Useful when we have to write really large pieces of comments&amp;amp;lt;span data-mce-type="bookmark" id="mce_SELREST_start" data-mce-style="overflow:hidden;line-height:0" style="overflow:hidden;line-height:0" &amp;amp;gt;&amp;amp;lt;/span&amp;amp;gt; */
Use Case
Here are some examples of when comments can or should be used.
/*
        File Name.   : main.cpp
        Date Created : 13th February 2017
        Created By   : Arun Patwardhan
        Project Name : String Parser
        File Contents:
                - Command Line Option selector
                - Different entry points for the remaining code
        Contact      : arun@amaranthine.co.in
*/
This is a classic example of a multi line comment. This comment provides useful information about the name of the file, when it was created, who created it, contact information, the code that is found in this file.
/*
    Exception Possibilities while Reading/Writing from/to Database
    write_error : This is thrown when there is duplicate data that is being
                  written into the database.
    db_empty.   : This is thrown when you attempt to read from an empty data
                  base.
                  Use the func is_empty() method.
    invalid_data: This is thrown when the data to be written is not valid.
    data_missing: This is thrown when insufficient data is passed. If the write
                  operation requires mandatory data an exception is thrown
                  instead of writing default values.
*/
enum DBExceptions : Error
{
    case write_error(String)
    case db_empty(String)
    case invalid_data(String)
    case data_missing(String)
}
This example shows the necessary documentation while declaring a new type. In short its purpose and situations when different values might be used.
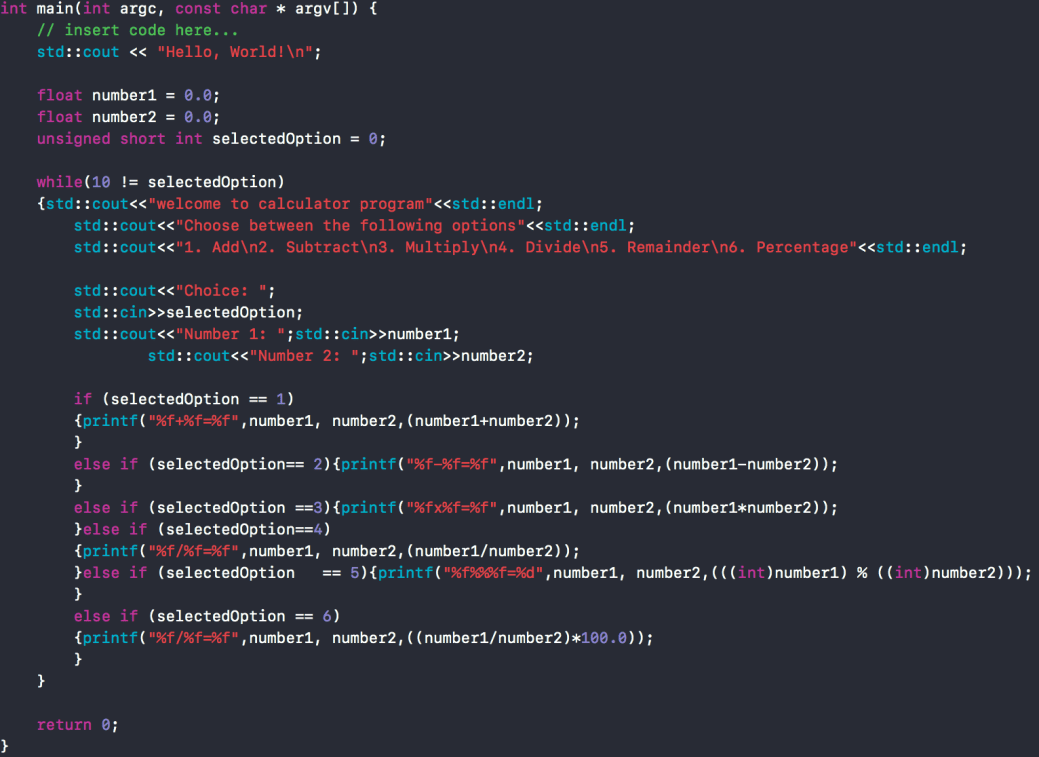
Here is an example of code for functions.
@interface Converter : NSObject
/*!
    @brief This is a temperature conversion function

    @discussion This functions takes floating point values and does a floating point conversion to make sure that we get a precise conversion.

    @param temperature This is the value in centigrade that is passed in. Note, negative values can also be passed in. Values whose results exceed the range supported by float will produce un predictable results.

    @return float Returns a floating point value
*/
-(float) convert_to_fahrenheit_from_centigrade:(float) temperature;
@end
The comment gives information about different aspects of the function. Including the rage of values supported. Note that it also uses special markup to allow for the code description to show up in the Help menu bar or when you option click the method.
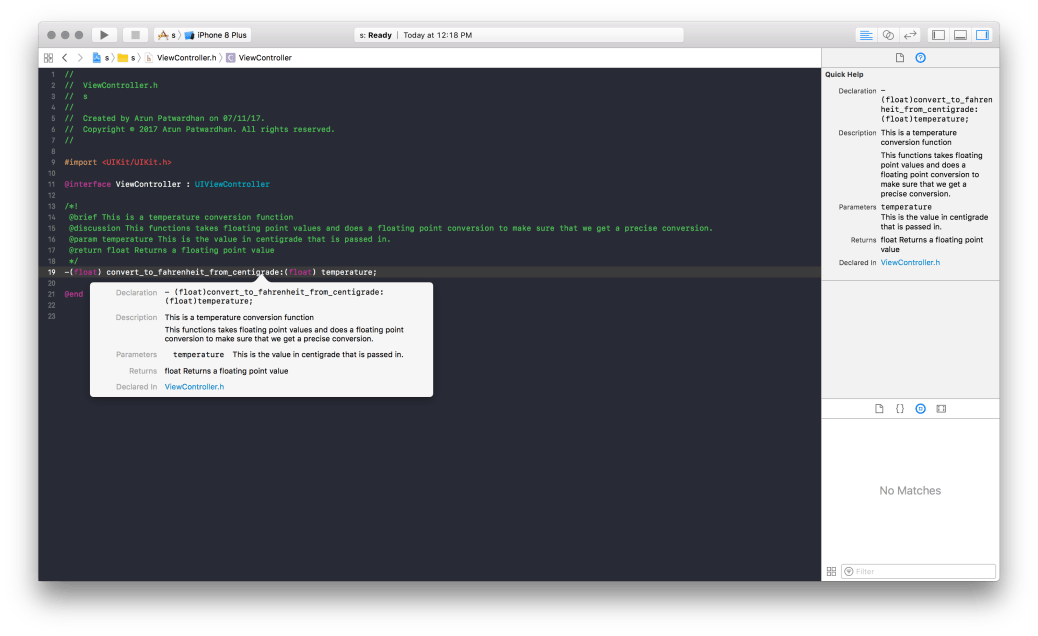
This is how the comments with markup look like. They appear in the ⌥ click menu as well as the help menu on the right hand side.
Read Me Files
Another thing one can do along with comments is to create Read Me files. Read Me files are plain text files that are bundled as a part of the project. Unlike comments which give information about a specific piece of code or an entire file, Read Me files give information about the entire project as a whole. Since they are text files we actually treat them as text.
Here is some typical information that is found in a Read Me file:
Project Name : String Parser
Project Request/Ticket Code: 13788
Orignal Project Author : Arun Patwardhan
Contact Details :
– arun@amaranthine.co.in
– http://www.amaranthine.in
Platforms on which Application Can Run
– macOS 10.10 or later
– Windows 7 or later
– Linux (Ubuntu 14 or later)
Compiler Supported – g++
Building the Application
make
Testing
strParser -f Test1 -o myOutput1
strParser -f Test2 -o myOutput2
Files
– makefile
This is the file used to build the Application.
– main.cpp
This is the entry point file. The selection of execution path on the basis of command line options is done here.
– Parser.h
This file contains the declaration for the Parser class as well as its internal structure.
– Parser.cpp
This file contains the implementation of the Parser class
– DataStructure.h
This file contains the declaration of the internal structure of the data structure.
– DataStructure.cpp
This file contains the implementation of the internal structure of the data structure.
– Validator.h
This file contains the declaration of the internal structure of the data structure.
– Validator.cpp
This file contains the implementation of the internal structure of the data structure.
– Test1
Runs a basic set of strings as input.
– Output1
Expected output after running Test1. Compare your results with the results of this file.
Libraries Required – Standard Template Library
The above is just a sample Read Me file. In real world implementations these can get a lot bigger with references to links and future developments. Some of the other things that can be mentioned are:
- Future additions
- Bugs fixed (potentially with the bug fix request ticket)
- Limitations
- Tools that are required to make this code
- Additional tools that need to be installed
- Project Status
Naming Conventions
Documentation becomes a lot easier if we follow good naming conventions. Variables, functions, types, files… which are well named in itself become self explanatory and at the very least reduce the amount of documentation required.
Additional Tools Documentation in C++, Objective-C
HeaderDoc – retired You may come across some projects that use this.
Additional References for Documentation for Swift
Here is an article on Markups for Swift.