This is the third part in the 3 part series on Apple ID & iCloud. This part touches on enterprise specific aspects.
Here are the links to Part 1 & Part 2.
This is for Swift Version 2.2 & earlier. I will be adding the snippet of code for the changes the Swift 3.x have introduced.
The Collection Type, Sequence Type & Generator Type Protocols define rules that govern how different data structures or collections of data can be used, interacted with and operated within the Swift programming language. The CollectionType is a special case of the SequenceType.
Lets take the example of the Swift For-Loop.
var arrOfStrings : [String] = [String]()

arrOfStrings.append("Jill")
arrOfStrings.append("Jack")
arrOfStrings.append("John")
arrOfStrings.append("Jane")

for name in arrOfString
{
     print("The name is \(name)")
}
Now, if we have created our own data type. We would not be able to use the above for-loop as it would not conform to the … type protocols. The for-loop is expecting a data structure that acts and behaves in a way that is governed by the … protocols.
Just like the for-loop example above there are many other features within the Swift Programming Language that expect data structures to act and behave in a particular way. By designing our data structures to conform to these protocols we can make the easily compatible with the existing code and language features out there.
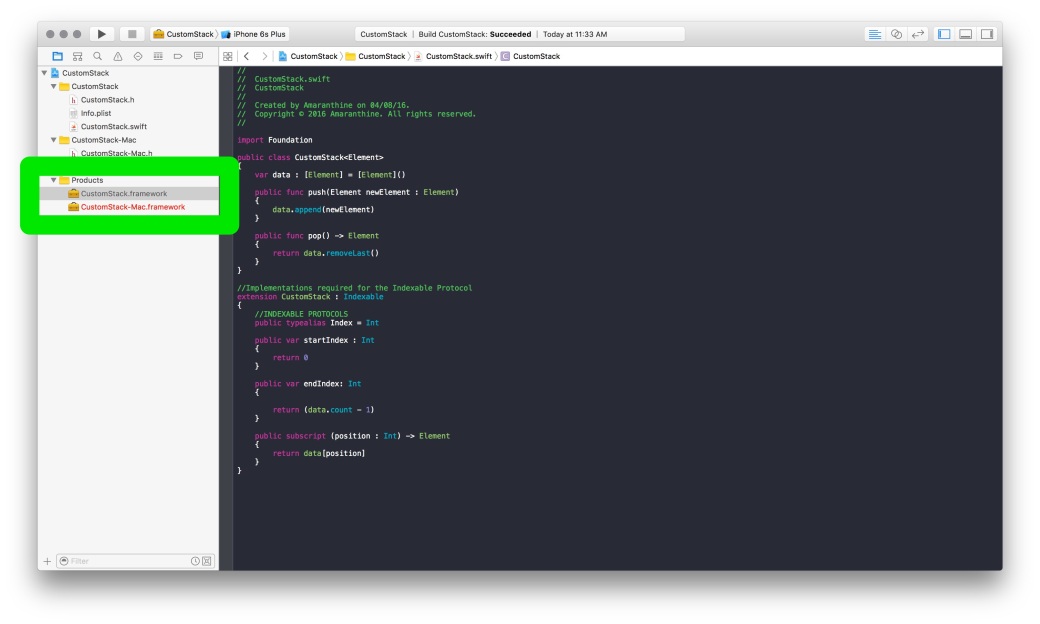
First we need to decide what kind of collection are we making. For the sake of this example I will create a Custom Stack.
class CustomStack<Element>
{
    var data : [Element] = [Element]()

    func push(Element newElement : Element)
    {
        data.append(newElement)
    }

    func pop() -> Element
    {
        return data.removeLast()
    }
}
The above code is very simple for the purpose of this exercise. Its a stack. Which is internally really an Array. It has functions to push data and pop data. We are now going to convert this type to a collection to conform to the CollectionType protocol.
As a first step we are going to make our CustomStack conform to the Indexable Protocol.
extension CustomStack : Indexable
{
    //INDEXABLE PROTOCOLS
    typealias Index = Int

    var startIndex : Int
    {
        return 0
    }

    var endIndex: Int
    {
        return (data.count - 1)
    }

    subscript (position : Int) -> Element
    {
        return data[position]
    }
}
The above change makes the data structure conform to the Indexable protocol. This is a requirement for it to be of type CollectionType. In order to conform to the Indexable protocol we need to implement a few computed properties. Let us look at the changes
typealias Index = Int
This line informs the system that the Indexing type for my data structure is an Int.
var startIndex : Int
{
    return 0
}

var endIndex: Int
{
    return (data.count - 1)
}
The next 2 are computed properties. Each provides the implementation of the startIndex and endIndex properties. Note that the type for both is Int as we have declared the Index type earlier as Int.
subscript (position : Int) -> Element
{
    return data[position]
}
The last implementation is of subscript. This provides the implementation to access an Element from the Stack using the Subscript operator.
Next we will implement the Sequence Type Protocol methods.
extension CustomStack : SequenceType
{
    typealias Generator = AnyGenerator<Element>

    func generate() -> Generator
    {
        var index = 0

        return AnyGenerator(body: {() -> Element? in
            if index < self.data.count
            {
                let res =  self.data[index]
                index += 1
                return res
            }
            return nil
        })
    }
}
Let us examine this code line by line.
typealias Generator = AnyGenerator<Element>
Objects of type Generator allow us to navigate through our collection. Quite like how iterators work in C++. This line specifies the type to be AnyGenerator for Elements.
func generate() -> Generator
Next we start the implementation of the generate function. This is required as part of the SequenceType protocol.
var index = 0
This index variable is used to track the element that is currently being accessed.
return AnyGenerator(body: {() -> Element? in
            if index < self.data.count
            {
                let res =  self.data[index]
                index += 1
                return res
            }
            return nil
        })
The return statement is the main statement. Here we are creating an object of type AnyGenerator. As an argument to the constructor call we are passing in a closure that will be used to iterate through the sequence. Note that the closure captures the index variable and holds a reference to its value even though we have left the original function.
Next we will implement the Collection Type Protocol methods. We don’t really need to implement a lot in order to conform to the CollectionType protocol. In fact, if we just conform to the CollectionType protocol and use the implementations of the previous 2 extensions we should be just fine. However, for the sake of demonstration we are implementing the subscript functionality within the CollectionType.
extension CustomStack : CollectionType
{
    typealias SubSequence = CustomStack<Element>

    subscript (bounds: Range<CustomStack.Index>) -> CustomStack.SubSequence
    {
        let newStack : CustomStack<Element> = CustomStack<Element>()

        for i in bounds.startIndex...bounds.endIndex
        {
            newStack.push(Element: data[i])
        }
        return newStack
    }
}
Let us look at the code line by line.
typealias SubSequence = CustomStack<Element>
Again, as before this line indicates that the SubSequence type is actually a CustomStack.
subscript (bounds: Range<CustomStack.Index>) -> CustomStack.SubSequence
Here we start the implementation of the subscript functionality.
let newStack : CustomStack<Element> = CustomStack<Element>()

for i in bounds.startIndex...bounds.endIndex
{
     newStack.push(Element: data[i])
}
return newStack
The rest of the code is the implementation of the subscript range behaviour. One can have different implementations to achieve the same result.
As we can see, by designing our data structure to conform to a particular set of protocols. We have made it possible for our data structure to take advantages of the different features, functionalities and even API’s available within the Swift Language and the Frameworks used as a part of iOS, macOS, watchOS & tvOS development.
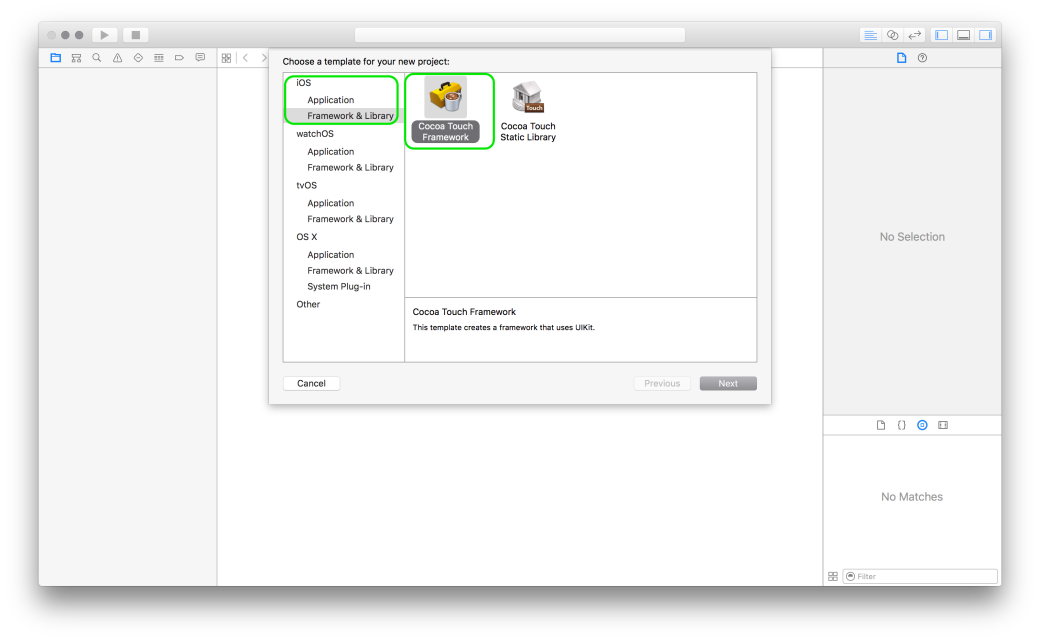
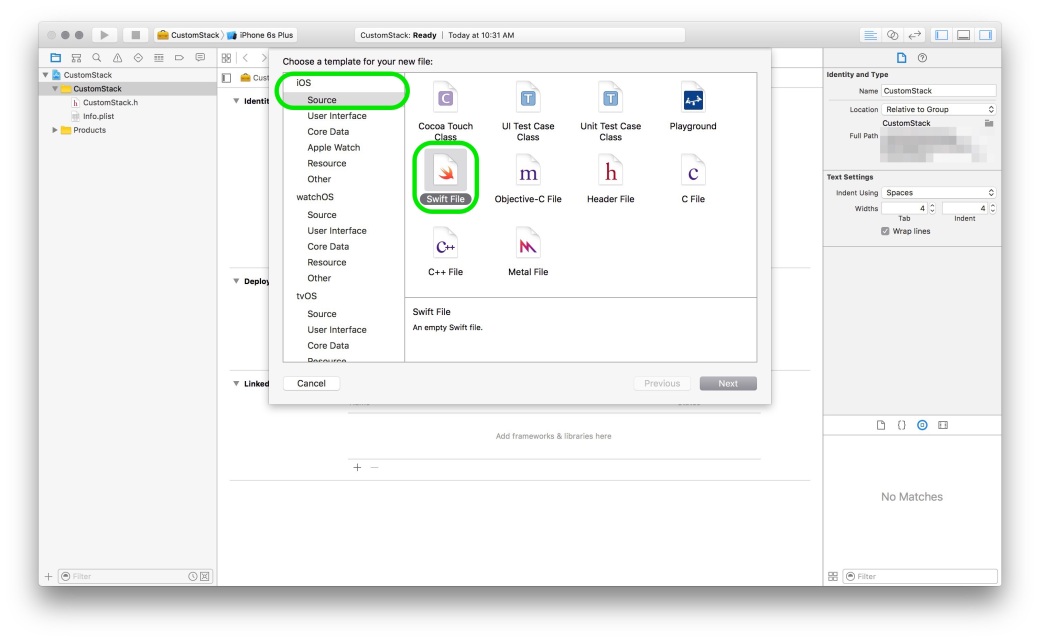
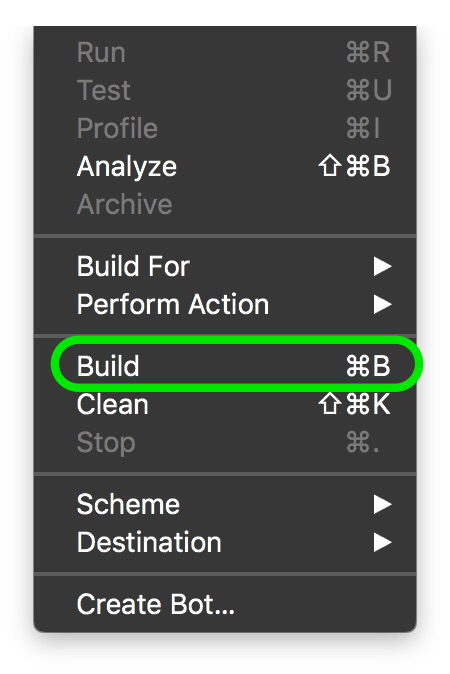
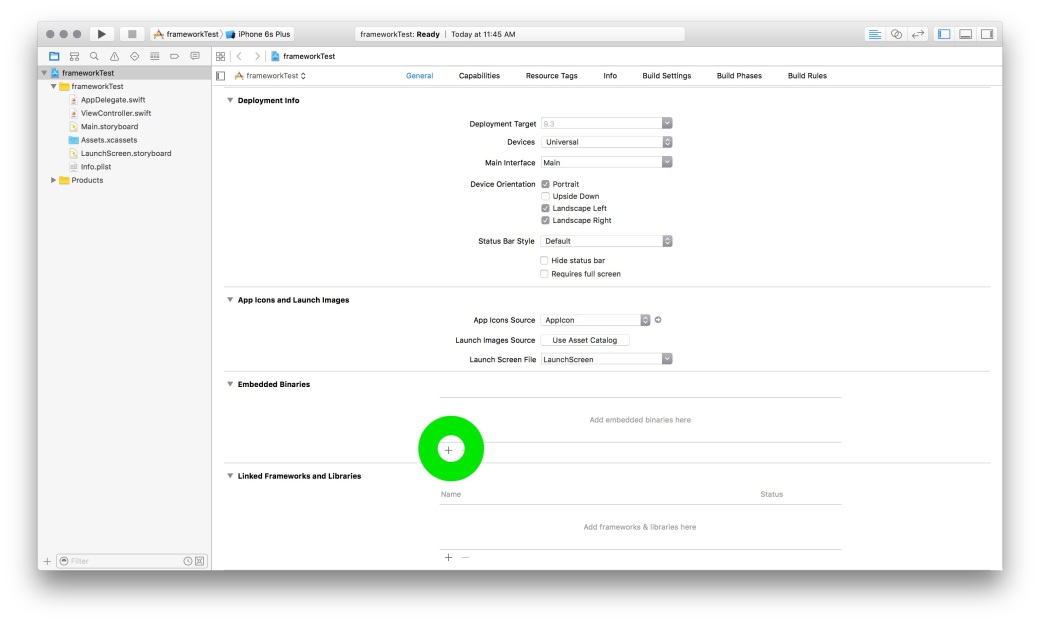
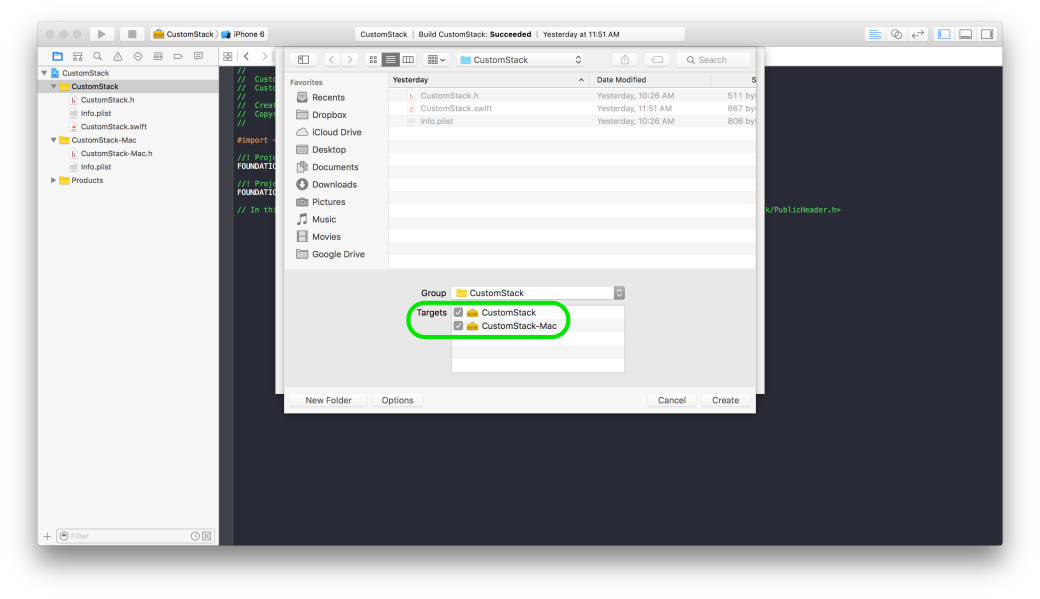
Creating Swift Frameworks is easy. The steps below walk you through creating a Swift Framework. The steps below have been performed on Xcode 7.3

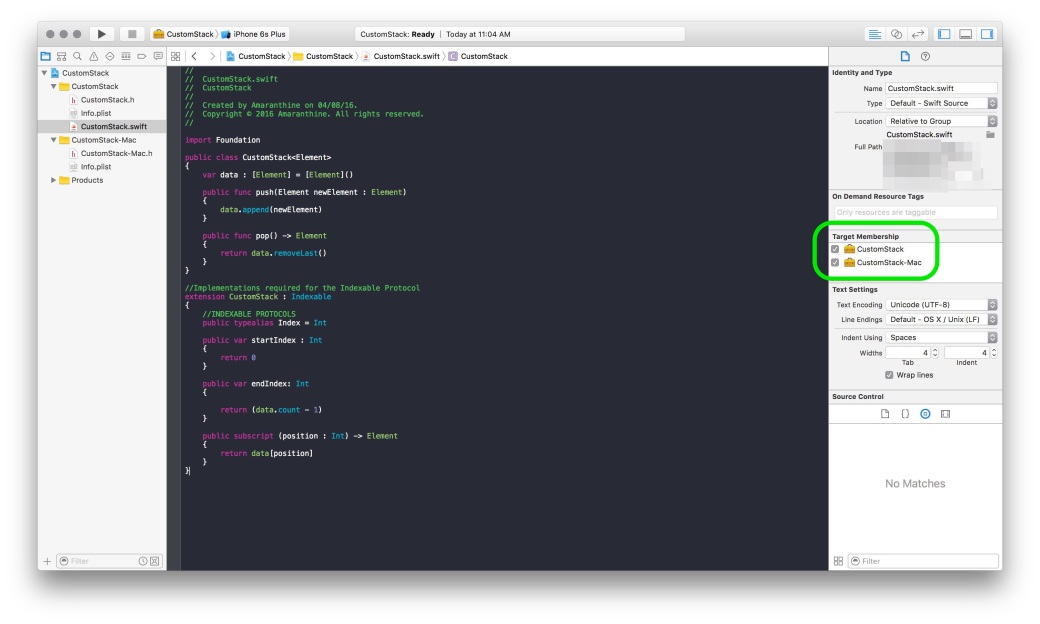
Different variables/classes/functions that are declared within a module are accessible freely within the module. Swift files contain code & are themselves found within Swift modules. So a module can mean project or a framework.So, to access the variables/functions/classes from module A in module B, we have to make those elements of module A public in order to access them in module B.
For more information, do read Apple’s Swift Documentation.
The process of creating a mixed library is straightforward. Its almost the same as above with some minor differences.
#import "<FrameworkName>/<HeaderName>.h
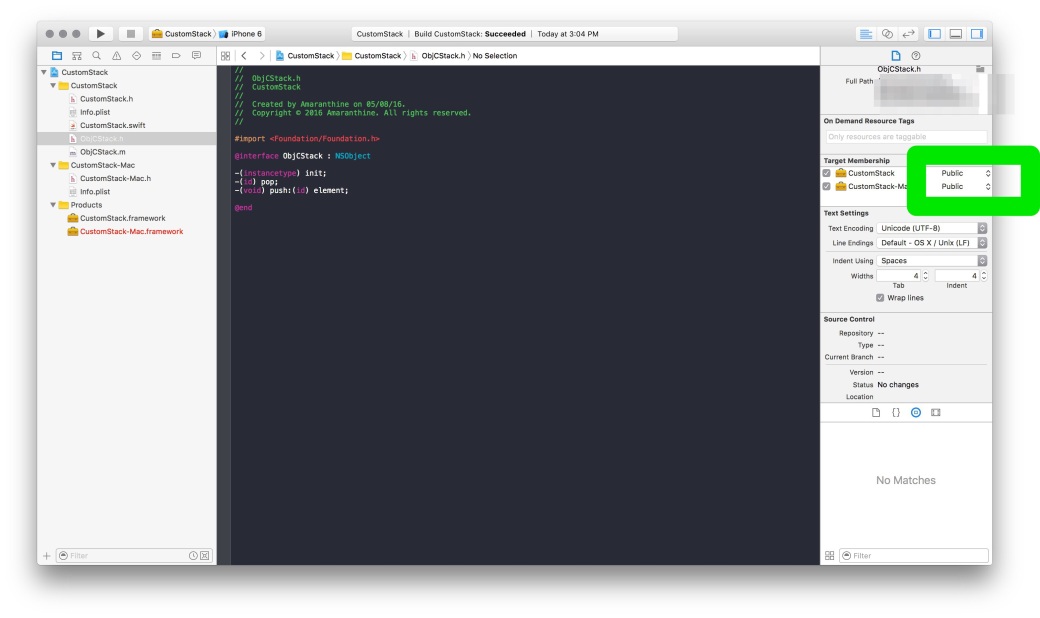
#import "<FrameworkName>/<FrameworkName>-Swift.h"
Replace the word FrameworkName with the name of your Framework.
 Swift Programming on Linux
The steps below walk you through the process of downloading, installing & using the Swift Programming language on Linux. For this I will be using Ubuntu Linux 14.04.3 LTS version.
Developers making iOS Apps regularly come across situations where they need to find out the dimensions of the screen or the icons. This guide should give a better idea about the same.

| iPhone 5S/SE | iPhone 6/6S/7/8 | iPhone 6+/6S+/7+/8+ | iPhone X | |
| Display Points |
320×568 |
375×667 |
414×736 |
375×812 |
| Pixels |
640×1136 |
750×1334 |
1242×2208 |
1125×2436 |
| Display Points to Pixels Ratio |
1:2 |
1:2 |
1:3 |
1:3 |
| Pixel Density |
326 ppi |
326 ppi |
401 ppi |
458ppi |
| App Icon Size in pixels |
120×120 |
120×120 |
180×180 |
180×180 |
| Aspect Ratio |
16:9 |
16:9 |
16:9 |
19.5:9 |

| iPad Mini 2,3,4 | iPad Air/iPad Air 2/iPad Pro 9.7” | iPad Pro 10.5 | iPad Pro 12.9” | |
| Display Points |
1024×768 |
1024×768 |
1112×834 |
1366×1024 |
| Pixels |
2048×1536 |
2048×1536 |
2224×1668 |
2732×2048 |
| Display Points to Pixels Ratio |
1:2 |
1:2 |
1:2 |
1:2 |
| Pixel Density |
326 ppi |
264ppi |
264ppi |
264ppi |
| App Icon Size in pixels |
152×152 |
152×152 |
167×167 |
167×167 |
| Aspect Ratio |
4:3 |
4:3 |
16:9 |
16:9 |
 Apple made a surprising announcement at the recent WWDC held between June 2-6 2014. While everyone was looking forward to the launch of the new OS for both the Mobile as well as Mac platforms, Apple also announced a new programming language for developers. SWIFT.
It was described as Objective-C without C. Over the past few months I have gone over the features of the language & even converted many of the apps into Objective-C. While the initial learning curve is there, it is a fairly easy language to pick up. I will be going over a few interesting features of the language in this article. But what I will also be touching upon is the future & relevance of Objective-C.
Reduction in Lines of code: One of the first things that you will notice once you start programming in Swift is the reduction in the number of lines of code. Swift does away with the long syntax which you find in Objective-C. This makes the code look a lot more compact & less intimidating.
Lets take the example of creating an object in Swift & compare the syntax with that of Objective-C
Objective – C version: NSString *myString = [[NSString alloc] initWithString:@”This is a string”];
Swift version: var myString : String = String(“This is a string”)
As we can see, there is a great deal of simplicity that comes along. Reduction in the number of lines of code is of great importance to software developers. This means more compact code & improves readability. However, this comes at a price. While Objective-C code was more elaborate & did use many more lines of code it was far easier to understand by simply reading through it. In case of Swift the code will have to be complemented with details comments about what it does.
Single File: Another new feature there in Swift is the lack of header files. People coming from a Java background would find this familiar. The declaration of classes & implementation of its functions is done in .swift file now. This removes the necessity of having to import various header files. In case, certain frameworks need to be used all that needs to be done is to import that framework at the top of the file.
import framework
Replace the keyword framework with the name of the framework you wish to include.
Mixed Language Programming: Unlike Objective-C, Swift does not work well with other languages. In fact, Swift only works with Objective-C. So if you have any API’s or pieces of code that you have written in C or C++, you will have to create Objective-C wrapper classes for that C/C++ code so that you can incorporate it into your project.
This means that Objective-C is not going to be deprecated any time soon. Also, it will be equally important to learn Objective-C & can’t be ignored by people.
COMMON QUESTIONS:
– I already know Objective-C should I also learn Swift?
There is no pressing need to immediately learn Swift, though it would be a good idea to learn it anyways. None of the apps you have already made will stop working. However, you may come across code written in Swift or would need to incorporate programs written in Swift, so having knowledge of the same would be a good idea.
– I don’t know Swift or Objective-C which should I learn?
Again, as in the previous question knowing both is a really good idea. If you are confident that you will be making apps using Swift only, then you can learn just that for starters. If you feel that there is a good chance of having to read/modify or write Objective-C code then learning Objective-C before Swift makes more sense.
CONCLUSION: Swift is a very easy to use language & will sit nicely on familiar eyes. A lot of the code that will be written in the coming apps will definitely use Swift. However, this does not mean the end of the road for Objective-C. Nor does it mean that Objective-C will become redundant or obsolete. A developer can choose to use any of the languages to make the app. It will be nice for a new developer to first learn Objective-C & then move on to Swift as it will give the user a more all round understanding of the entire development framework .
Most people who first venture off into App Development focus their efforts on the design of the App & its implementation. However, when the time to publish the app comes along then there are questions as to which developer program he/she should opt for.
Developer programs are online accounts created by Apple for the developer community. Each developer can register their own account from where they can manage the distribution of their apps, the collection of payments for purchase of apps or items within the app. The different programs offered are meant to cater to a specific audience set.
There are 4 different types of developer programs.
This is the simplest program. Anyone can enrol for this & there is no cost involved. To sign up simply go to developer.apple.com & register. This is the perfect program for those looking to start iOS App Development. It gives the member full access to the latest guides, sample codes & information about the different classes & frameworks used for the current publicly available version of iOS.
The iOS Developer Program is the paid version of the program. It costs $99 a year & is meant for those who wish to distribute apps on the App store. Apart from distribution it also gives the user options to test it on their own device. All the benefits from the Free Membership are also made available here.
The Enterprise Developer Program is another paid program. It costs $299 a year & is meant for organisations who wish to distribute apps within the organisation to their own employees. The big difference between this program and the regular iOS Developer Program is the fact that in the Enterprise Program you have full control over how your apps are distributed to your employees & have to take care of the hosting as well as distribution aspects. The apps made by an organisation do not go onto the app store & are not verified by Apple.
The University Developer Program is a free developer program meant for Universities or colleges. This program allows such educational institutes to test the apps made by students as part of the official curriculum. Limited distribution amongst students is also permitted. The program lacks the ability to perform large scale distribution or distribution on the App store.
The table below illustrates the different facilities made available to different account holders.
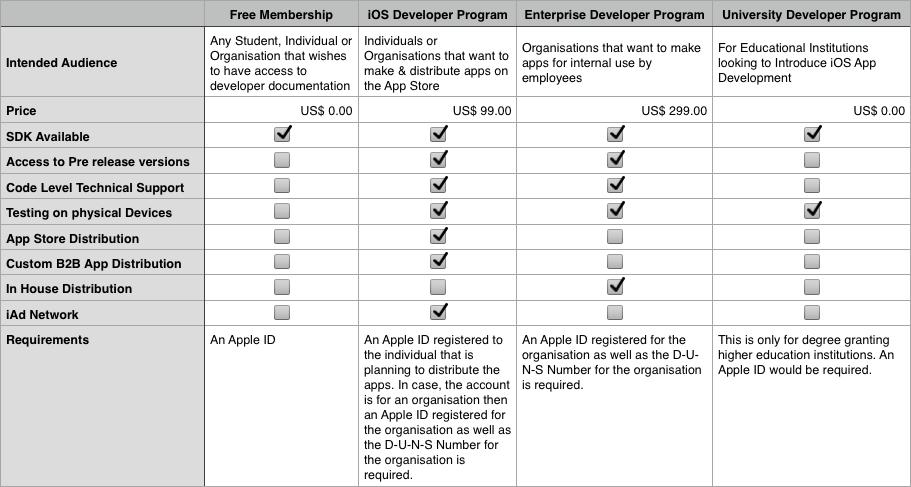
For more information related to the D-U-N-S Number:
While we all are interested & excited about making new apps & publishing them to the app store, here is something else to think about & keep in mind.
