Introduction to Server side Swift using Vapor

Table of Contents

What is server side Swift?

Server side Swift is basically a server application implemented using the Swift Programming Language. These applications then talk to different clients just like other server applications.

Why would we want to develop server side applications using Swift?

That is a good question. Why would we want to develop server side applications using Swift? If you are an iOS App developer then the biggest advantage is that there is no need to learn a new language from scratch just to build your own backend.

Also the backend and frontend development can happen at the same time and they can share the same codebase.

Of course, the biggest advantage is that we get all the benefits of Swift: Fast, Expressive, Safe, Interoperable, & Adaptable.

What do we need?

The initial development is typically done on a Mac with Xcode installed. Though you can develop the server on Linux using Swift tools too.

  • Mac computer running the latest macOS
  • Latest version of Xcode
  • Vapor tools installed on the development computer
  • Server to host your web app

Basic setup and configuration

We will now configure our development computer to develop a Vapor based server. This article assumes that you have a Mac computer with Xcode installed.

  1. Open Terminal.
  2. Confirm that you have installed Xcode command line tools.
  3. Run the following command:
brew install Vapor
  1. Confirm that it installed successfully by running the following command:
vapor โ€”help

Creating our first server side app using Swift

  1. Open Terminal.
  2. Navigate to the folder where you wish to create the project. ~/Developer is a popular location. The rest of the activities assume that the project was created in the Developer folder. However, you can create it in any other location.
  3. Once you are in the desired folder run the vapor tool to create the server project
vapor new <server app name> -n
  1. This will create the server as a Swift Package. Navigate into the project folder. The folder name will be the same as the server app name mentioned in the command above.
  2. Open the Package.swift file using the following command. This will open the project using Xcode.
open Package.swift
  1. Once Xcode opens it will immediately start downloading the package dependencies mentioned in the Package file. Wait for those to finish downloading.
  2. Let us confirm that everything is setup well. From the upper left hand corner of Xcode click the โ€˜Runโ€™ button to start the server.
  3. You should see the following message printed in the console window of Xcode:
[ NOTICE ] Server started on http://127.0.0.1:8080
  1. Now let us confirm if we can reach this site. Open Safari or a browser of your choice.
  2. Type http://127.0.0.1:8080 and press return. It should load a web page with a simple message: โ€œIt works!โ€. You can also visit localhost:8080 and get the same results.
  3. Type http://127.0.0.1:8080/hello and press return. It should load a web page with a simple message: โ€œHello, world!โ€.
  4. This confirms that the server has been setup well and configured properly.
  5. Create a new file called CommunicationController.swift under the controllers folder within the project folder. This is where we will implement all the request handlers.
  6. Navigate to the newly created file.
  7. At the top add a line to import the Vapor framework.
import Vapor
  1. Next we will declare a struct called CommunicationController which inherits from RouteCollection. You will get an error message saying that the type does not conform to the protocol. Donโ€™t worry we will add the necessary stubs in a minute. This controller will handle the routing of requests received by the server.
  2. Click on the error to apply the stubs, it will write the code for you or you can manually write the following:
func boot(routes: any Vapor.RoutesBuilder) throws {
       
}
  1. Now we will start implementing the boot. This is where we define the request types and route them to the appropriate function.
let routeGroup = routes.grouped("Source")
  1. Before we can describe the routes we need the functions that handle the respective messages. Implement the following functions in the same struct.
func getMessage(req : Request) throws -> String {
    return "This is a message received from the server."
}
    
func postMessage(req : Request) throws -> HTTPStatus {
    let value = try req.content.decode(String.self)โ€จ    
    print(#line, value.name)
    return HTTPStatus.ok
}


The getMessage simply returns a String. The post message prints the value sent to the server.

  1. Add the following two lines to the boot function, after the routeGroup declaration.
routeGroup.get("Receive", use: getMessage)
        
routeGroup.post("Send", use: postMessage)
  1. Your completed struct should look like this:
import Vapor

struct CommunicationController : RouteCollection {
    func boot(routes: any Vapor.RoutesBuilder) throws {
        let routesGroup = routes.grouped("Source")
        
        routesGroup.get("Receive", use: getMessage)
        routesGroup.post("Send", use: postMessage)
    }
    
    func getMessage(req : Request) throws -> String {
        return "This is a message received from the server."
    }
    
    func postMessage(req : Request) throws -> HTTPStatus {
        let value   : String    = try req.content.decode(String.self)
        print(#line, value)
        return HTTPStatus.ok
    }
}

The GET & POST methods have their own respective names “Receive” and “Send”. These will be a part of the URL endpoints which we will need when we are building the client.

  1. Switch to the routes file.
  2. Replace all the code in the routes function with the following statement:
try app.register(collection: CommunicationController())

Testing the server app

We will test our server with the help of a client app. We will quickly create a basic iOS App that can talk to the backend service. You can create any other frontend app that you might be comfortable with.

  1. To test the server we will make a quick iOS App. Create a new iOS App that uses the UI framework of your choice.
  2. Create a swift file called NetworkEngine.swift and write the following code in there:
import Foundation

final class NetworkEngine {
    //MARK: - Singleton
    private static var reference    : NetworkEngine?
    
    private init() { }
    
    static var shared : NetworkEngine {
        if reference == nil {
            reference = NetworkEngine()
        }
        return reference!
    }
    
    typealias NetworkResponseHandler = (Data?, URLResponse?, Error?) -> Void
    
    func communicateWith(Server url : URL, andHandleResponseWith completionHandler : @escaping NetworkResponseHandler) {
        let task = URLSession.shared.dataTask(with: url, completionHandler: completionHandler)
        task.resume()
    }
    
    func communicateWith(Request req : URLRequest, andHandleResponseWith completionHandler : @escaping NetworkResponseHandler) {
        let task = URLSession.shared.dataTask(with: req, completionHandler: completionHandler)
        task.resume()
    }
}


It is a basic wrapper for the URLSession calls.

  1. I am implementing the project as a SwiftUI project. So I will create the ContentViewVM.swift file. 
  2. Declare a constant to hold the URL to the server. Since we are testing on the same computer we will use the self url.
private let targetURL : String = "http://127.0.0.1:8080"
  1. Implement the function to get a message as shown below:
func initiateCommunication(task : @escaping () -> Void) {
        //1) Get the URL
        let destinationURL      : URL                                   = URL(string: "\(self.targetURL)/Source/Receive")!
        var req                 : URLRequest                            = URLRequest(url: destinationURL)
        req.httpMethod                                                  = "GET"
        
        //2) Create the completion handler
        let completionHandler   : NetworkEngine.NetworkResponseHandler  = {(data : Data?, response : URLResponse?, err : Error?) -> Void in
            print(String(data: data!, encoding: String.Encoding.utf8)!)
        }
        
        //3) Start communication
        NetworkEngine.shared.communicateWith(Request: req, andHandleResponseWith: completionHandler)
    }
  1. Implement the function to post a message as shown below:
func sendSomeData(input : String) {
        //1) Get the URL
        let destinationURL  : URL           = URL(string: "\(self.targetURL)/Source/Send")!
        let objToSend       : String        = input
        let jsonEncoder     : JSONEncoder   = JSONEncoder()
        let body                            = try? jsonEncoder.encode(objToSend)
        
        var req             : URLRequest    = URLRequest(url: destinationURL)
        req.httpMethod                      = "POST"
        req.httpBody                        = body
        req.addValue("application/json", forHTTPHeaderField: "content-type")
        
        NetworkEngine.shared.communicateWith(Request: req, andHandleResponseWith: {(data, response, error) in
            print(response!)
        })
    }
  1. Switch to the ContentView.swift file.
  2. Implement the ContentView as shown below:
import SwiftUI

struct ContentView: View {
    var viewModel : ContentViewVM   = ContentViewVM()
    
    var body: some View {
        VStack {
            Button("Get") {
                self.viewModel.initiateCommunication(task: {})
            }
            .padding()
            
            Button("Post") {
                self.viewModel.sendSomeData(input: "Sending this message from the test app on \(Date.now)")
            }
    }
}
  1. Run the iOS app in the simulator.
  2. Tap the โ€˜Getโ€™ button. See if you get the message from the server. It will be printed in the Xcode console.
  3. Tap the โ€˜Postโ€™ button. See if you received the message on the server. It will be printed in the Xcode console for the server project.
  4. You have successfully configured basic communication.

Next we will implement basic authentication

  1. Create a new file in the controllers folder. Call it UserAuthenticationLogic.swift.
  2. Declare a struct that represents the user.
import Vapor

struct User : Authenticatable {
    var name : String
}
  1. Now we will implement the struct that handles the authentication.
struct UserAuthenticator : AsyncBasicAuthenticator {
    func authenticate(basic : BasicAuthorization, for request : Request) async throws {
        if basic.username == "test" && basic.password == "secret" {
            request.auth.login(User(name: "Test"))
        }
    }
}


It conforms to the AsyncBasicAuthenticator protocol. Using basic authorisation it checks to see if the username and password match and login the user if it does.

  1. Switch to the CommunicationController.swift file.
  2. Replace the routes group with a group that uses the UserAuthenticator. Update the subsequent get and post statements to use the new group. Your boot function should look like this:
func boot(routes: any Vapor.RoutesBuilder) throws {
        let protectedRoutesGroup = routes.grouped(UserAuthenticator())
        
        protectedRoutesGroup.get("Receive", use: getMessage)
        protectedRoutesGroup.post("Send", use: postMessage)
    }
  1. Add the statement too require login at the start of the getMessage and postMessage functions.
_ = try req.auth.require(User.self).name
  1. To test this we will switch back to our iOS App.
  2. Update the target URL for both the initiateCommunication & sendSomeData functions. Remove the /Source from the URL.
  3. Add the following lines in the initiateCommunication function after the statement where we specify the httpMethod:
let body = "Basic \("test:secret".data(using: .utf8)!.base64EncodedString())"
req.setValue(body, forHTTPHeaderField: "Authorization")
  1. Add the following lines in the sendSomeData function right after the content type is specified for the request.
let authBody = "Basic \("test:secret".data(using: .utf8)!.base64EncodedString())"
req.setValue(authBody, forHTTPHeaderField: "Authorization")
  1. Run both the server as well as our iOS app.
  2. Test the Get and post messages just like the previous task.
  3. Play around by sending an incorrect username &/or password.
  4. The updated function should look like:
func initiateCommunication(task : @escaping () -> Void) {
    //1) Get the URL
    let destinationURL      : URL                                   = URL(string: "\(self.targetURL)/Receive")!
    var req                 : URLRequest                            = URLRequest(url: destinationURL)
    req.httpMethod                                                  = "GET"
    let body                                                        = "Basic \("test:secret".data(using: .utf8)!.base64EncodedString())"
    req.setValue(body, forHTTPHeaderField: "Authorization")
        
    //2) Create the completion handler
    let completionHandler   : NetworkEngine.NetworkResponseHandler  = {(data : Data?, response : URLResponse?, err : Error?) -> Void in
        print(String(data: data!, encoding: String.Encoding.utf8)!)
    }
        
    //3) Start communication
    NetworkEngine.shared.communicateWith(Request: req, andHandleResponseWith: completionHandler)
}

func sendSomeData(input : String) {
    //1) Get the URL
    let destinationURL  : URL           = URL(string: "\(self.targetURL)/Send")!
    let objToSend       : String        = input
    let jsonEncoder     : JSONEncoder   = JSONEncoder()
    let body                            = try? jsonEncoder.encode(objToSend)
        
    var req             : URLRequest    = URLRequest(url: destinationURL)
    req.httpMethod                      = "POST"
    req.httpBody                        = body
    req.addValue("application/json", forHTTPHeaderField: "content-type")
    let authBody                        = "Basic \("test:secret".data(using: .utf8)!.base64EncodedString())"
    req.setValue(authBody, forHTTPHeaderField: "Authorization")
        
    NetworkEngine.shared.communicateWith(Request: req, andHandleResponseWith: {(data, response, error) in
        print(response!)
    })
}

Notice that the endpoint names in the URL have changed a little bit. “Source” is no longer needed.

Hosting the server using DigitalOcean droplets

I will be hosting the server on a DigitalOcean droplet. This will be an Ubuntu server that can run our server application. You can use any other hosting medium that you wish or even use docker for this.

  1. Open DigitalOcean: https://www.digitalocean.com/
  2. Login.
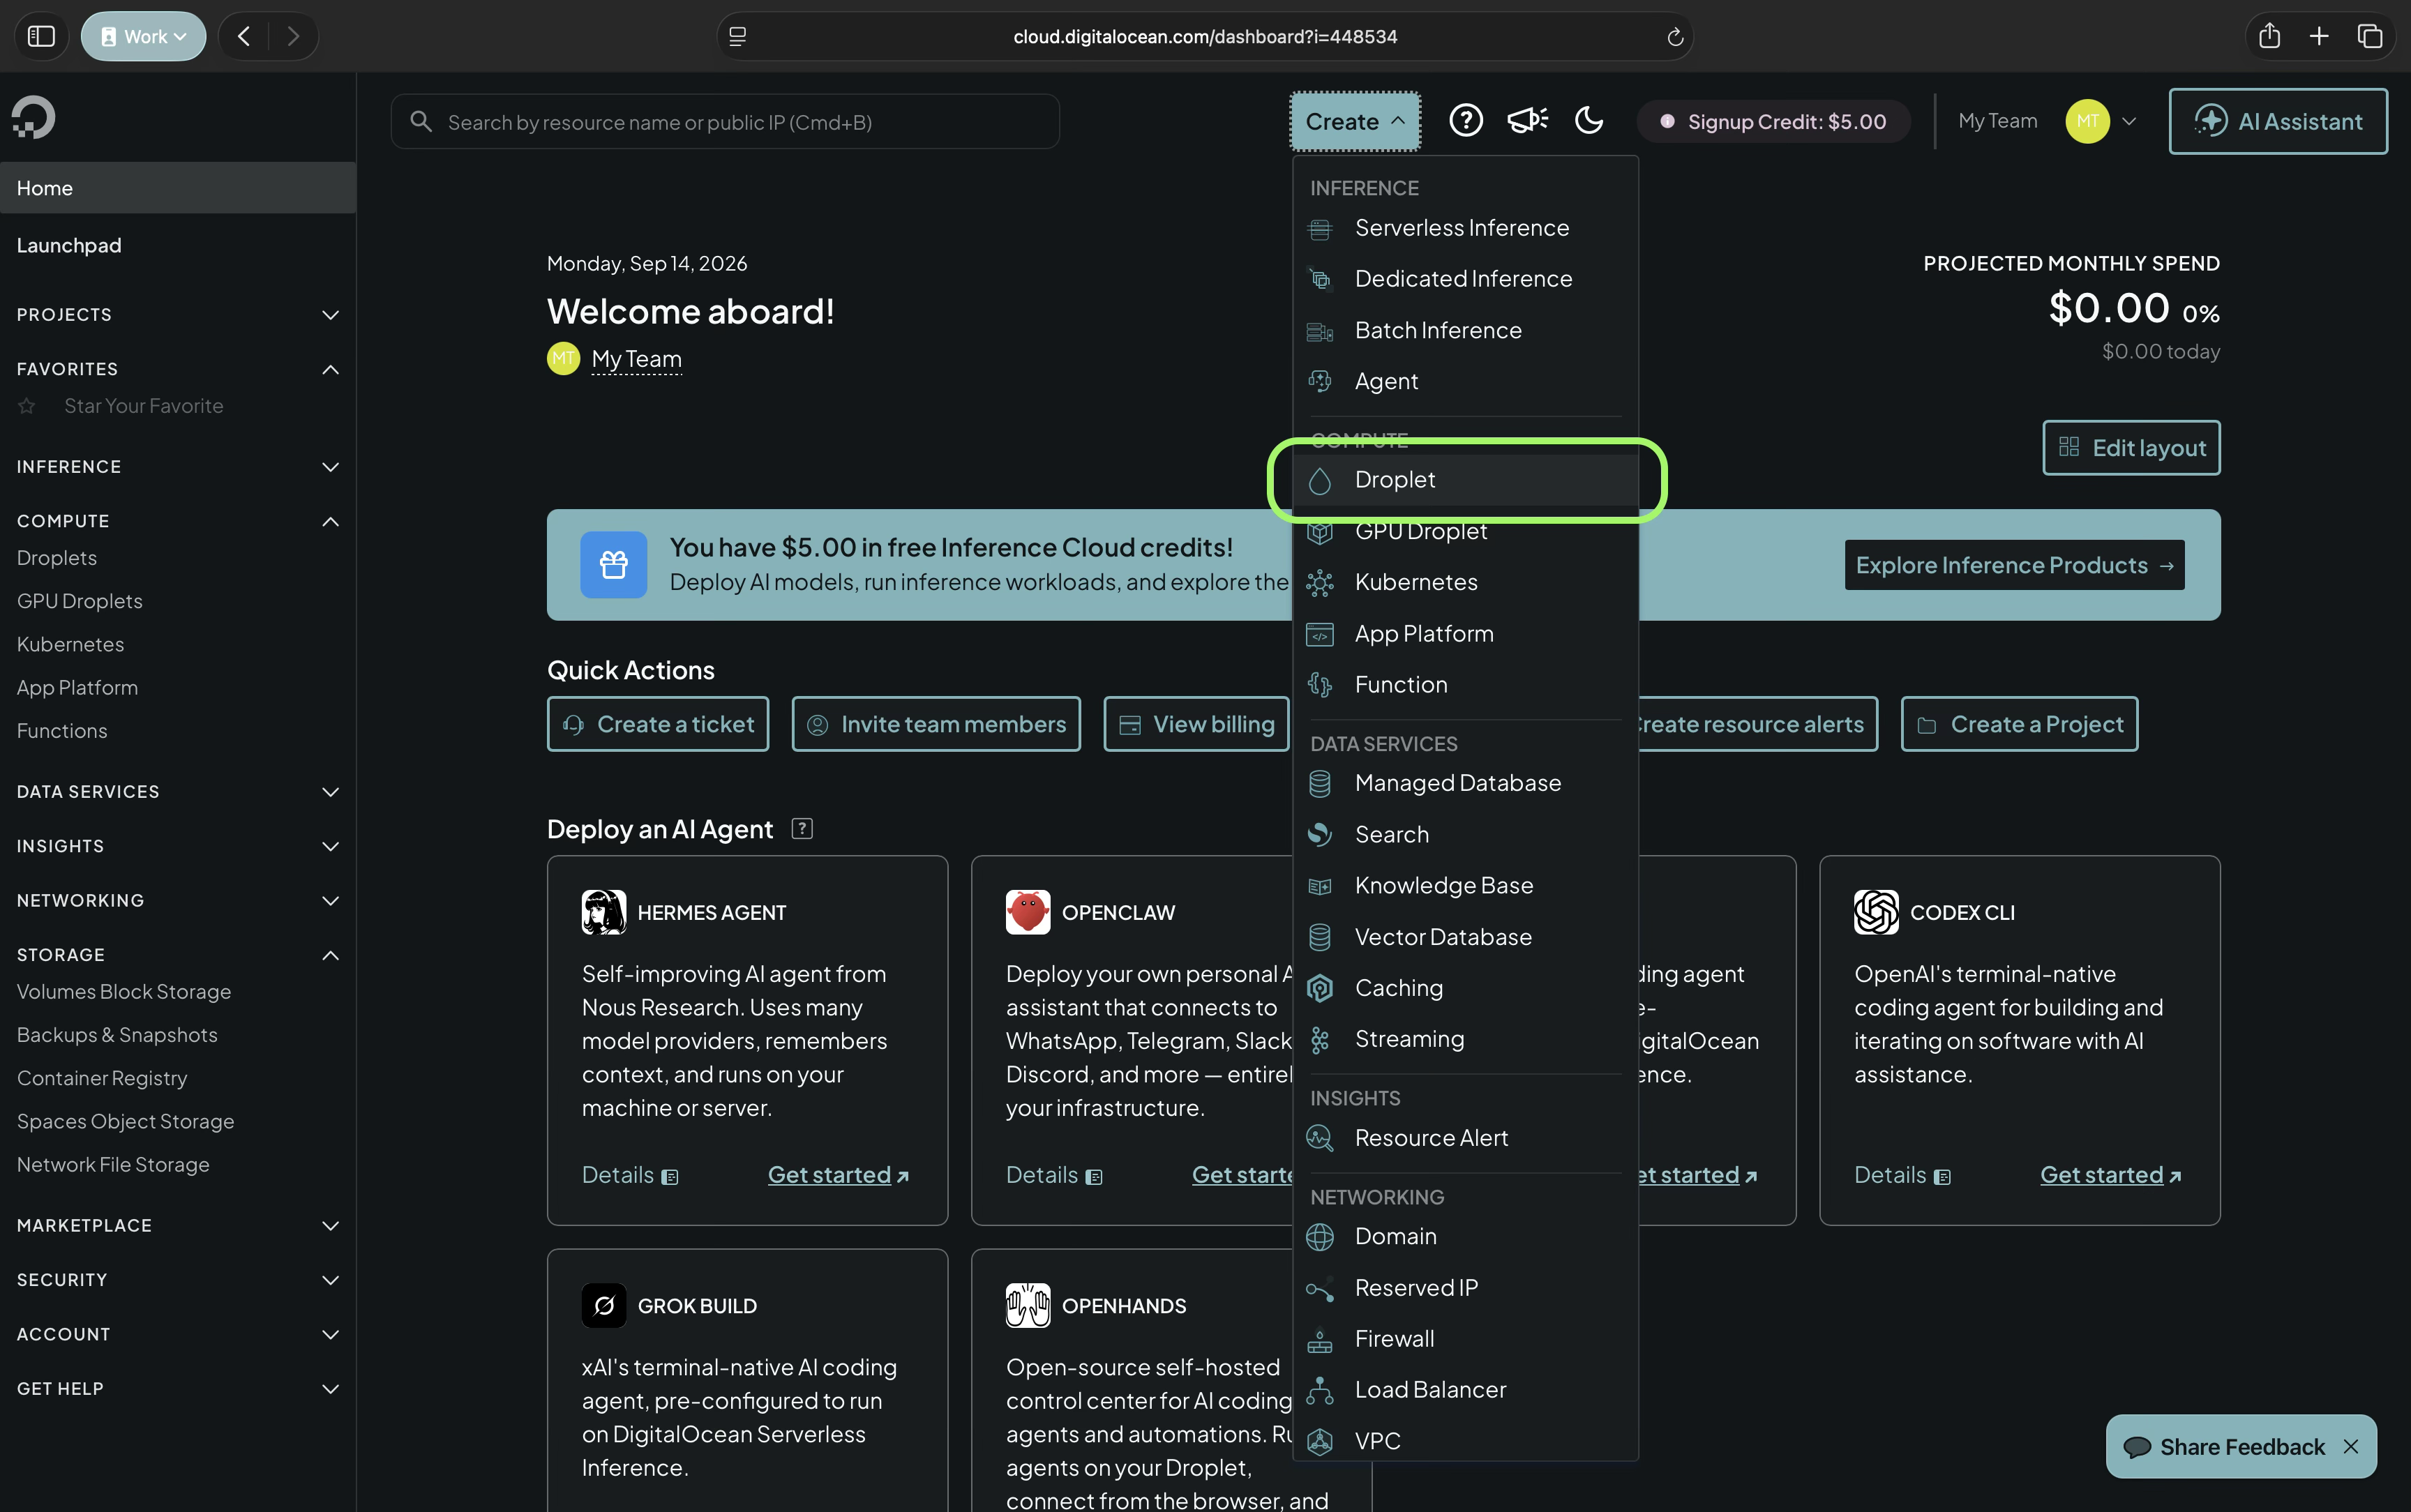
  3. Click on Create > Droplet
  1. Choose the server. This could be any one. I have chosen the one closest to my city.
  2. Choose Ubuntu 22.04 as version. Again, you can pick your preferred one from the choice.
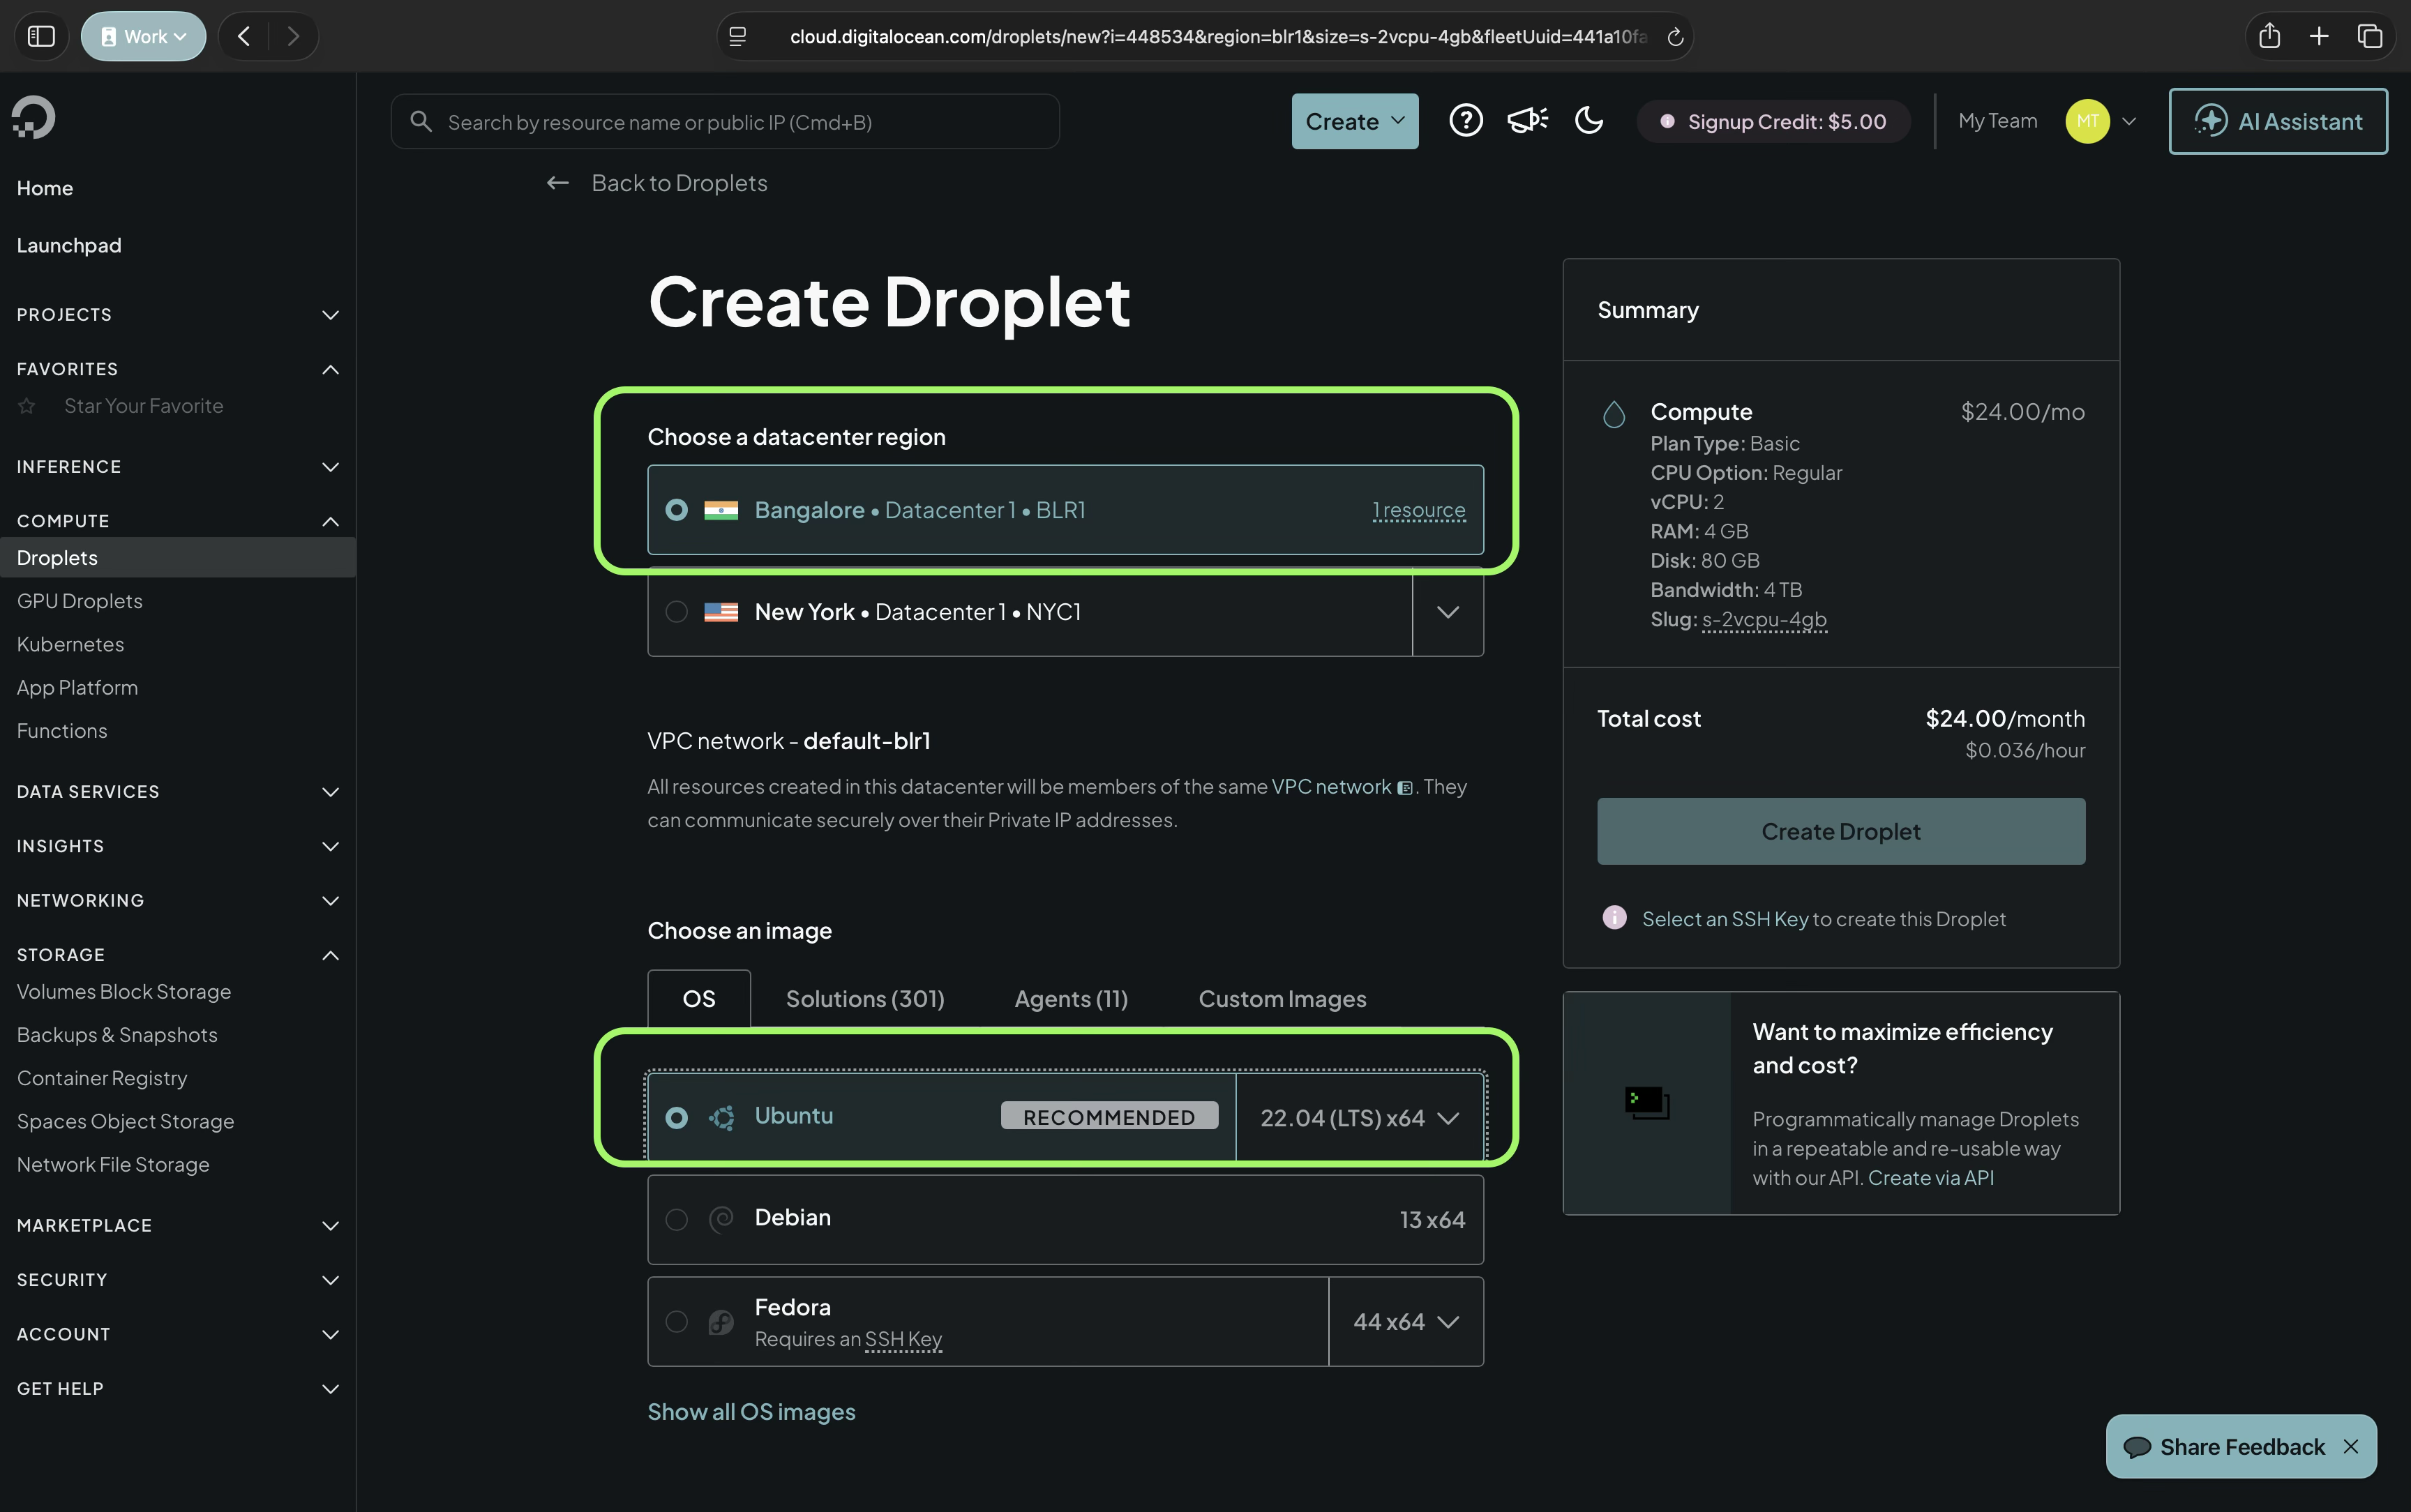
  1. Go fo basic configuration
  2. Choose basic plan. Pick this configuration carefully. It will determine the load that your service can handle.
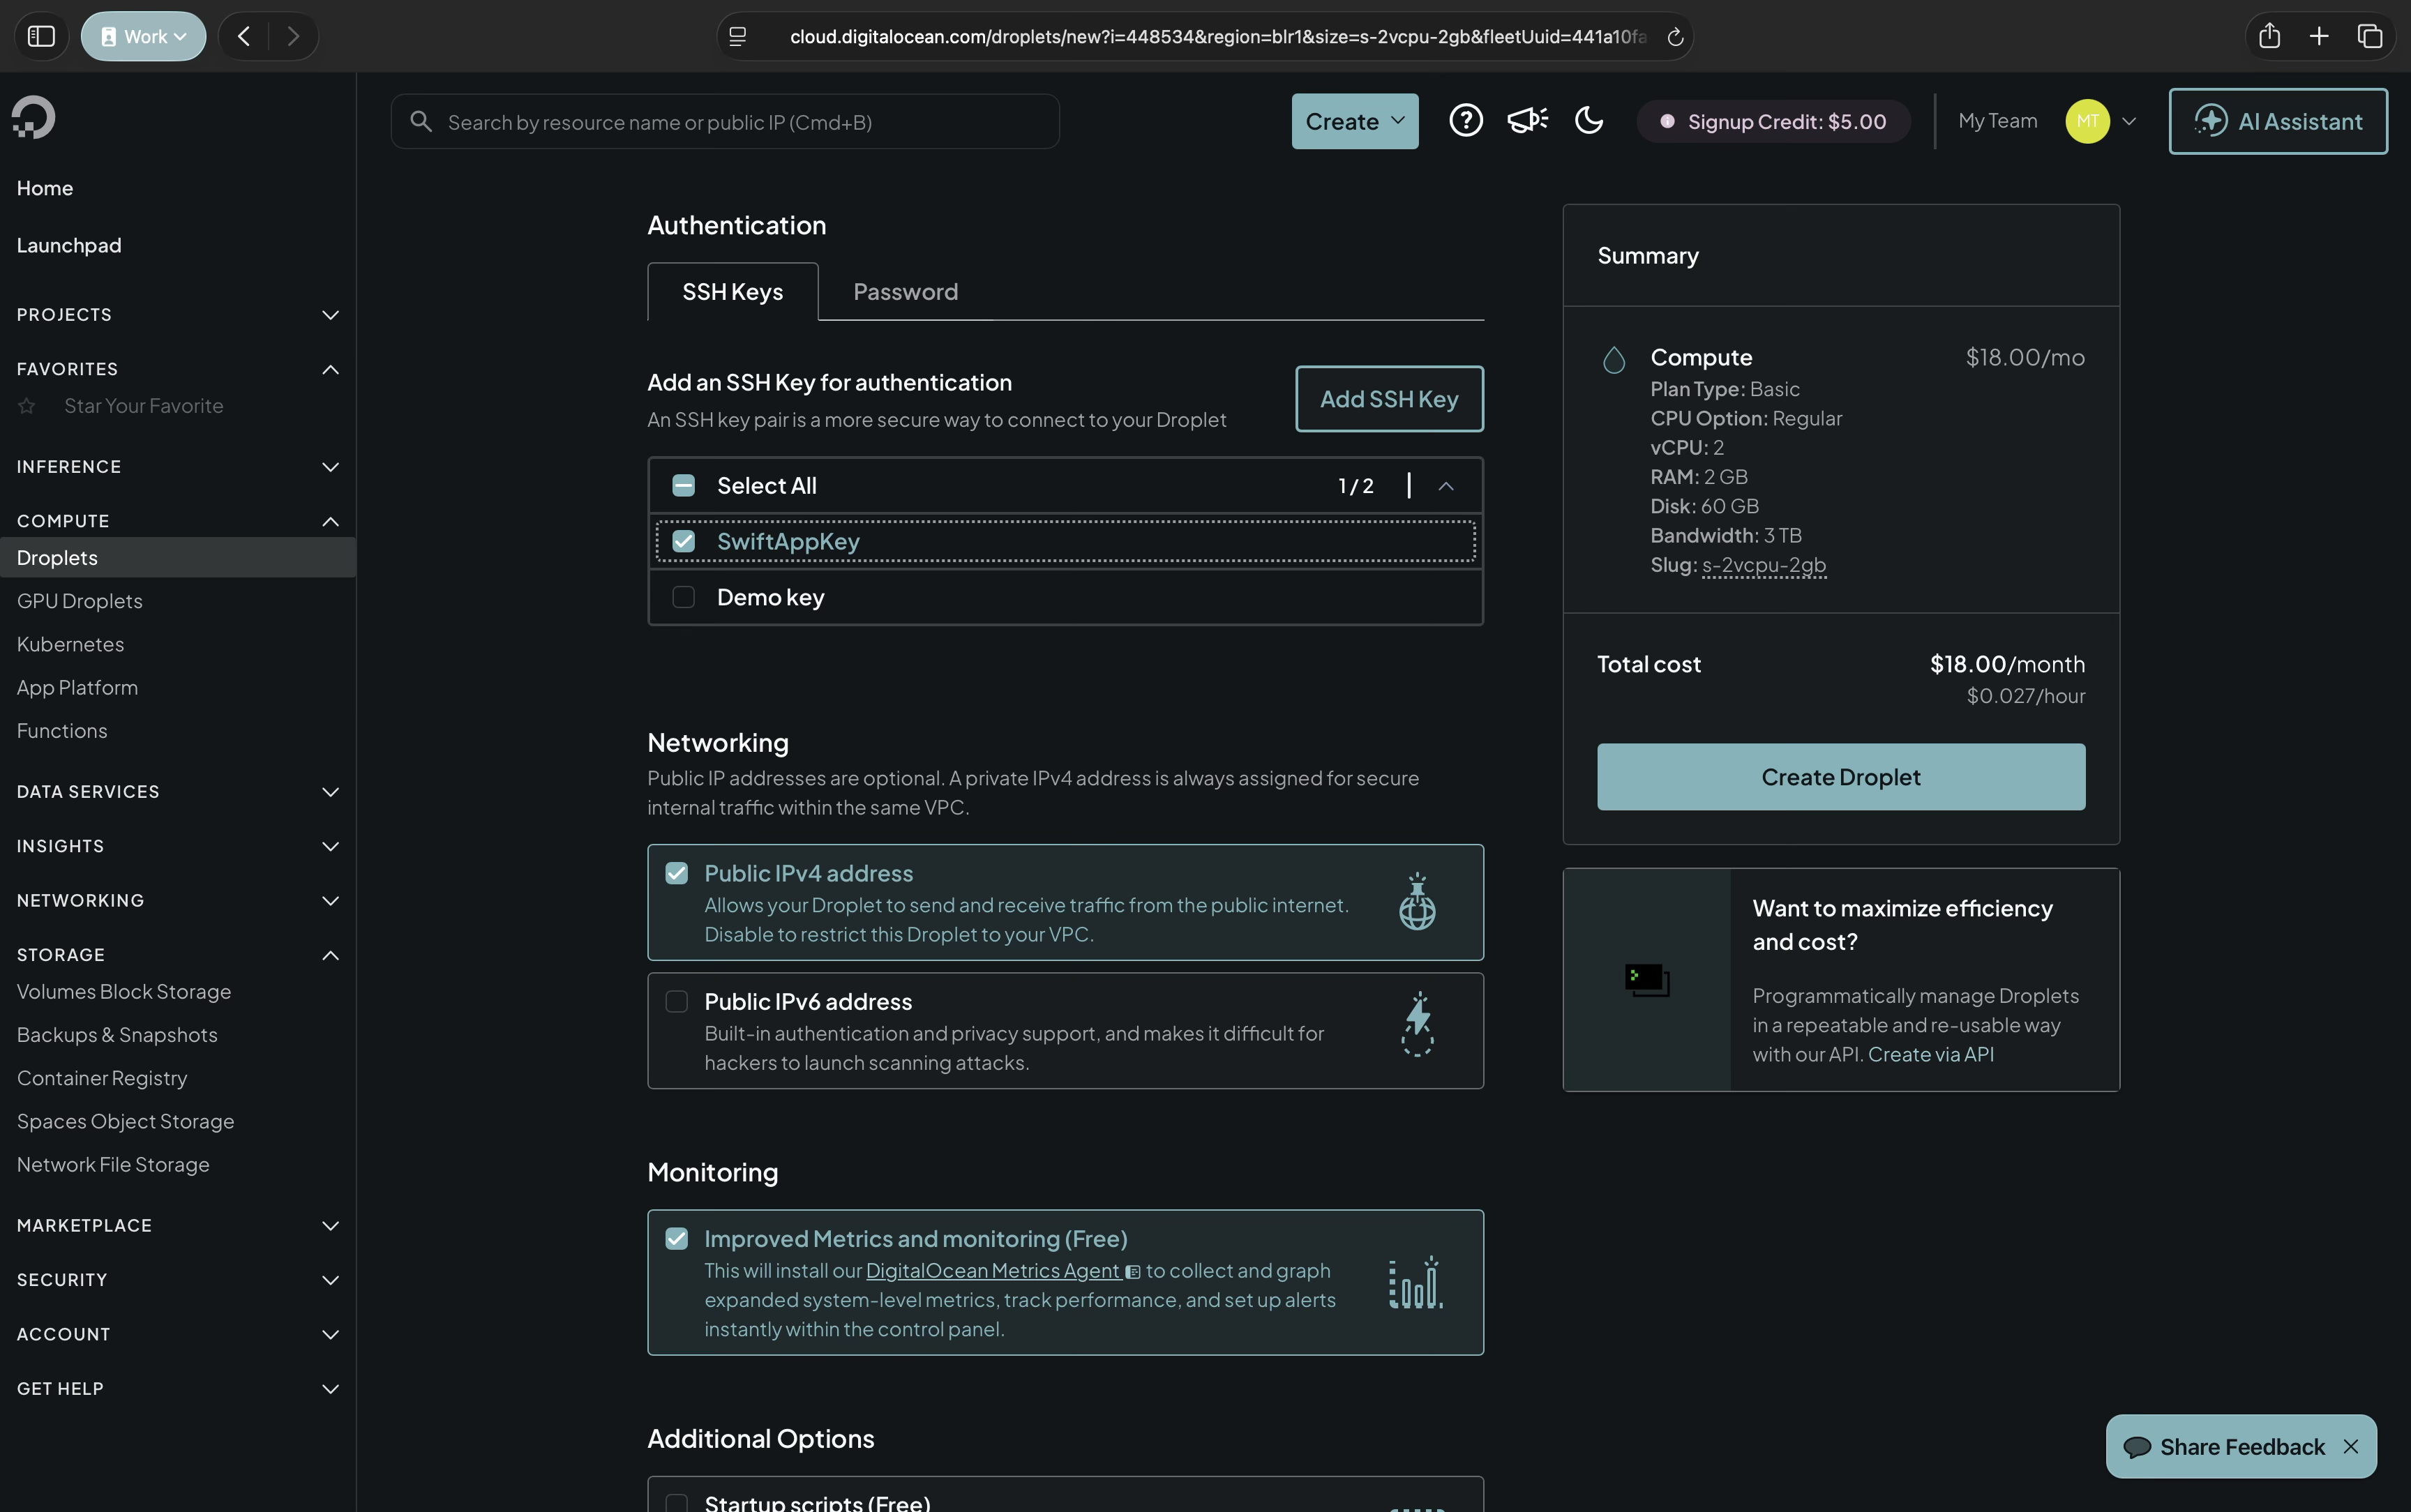
  1. Under authentication select add keys. You can add as many keys as you want.
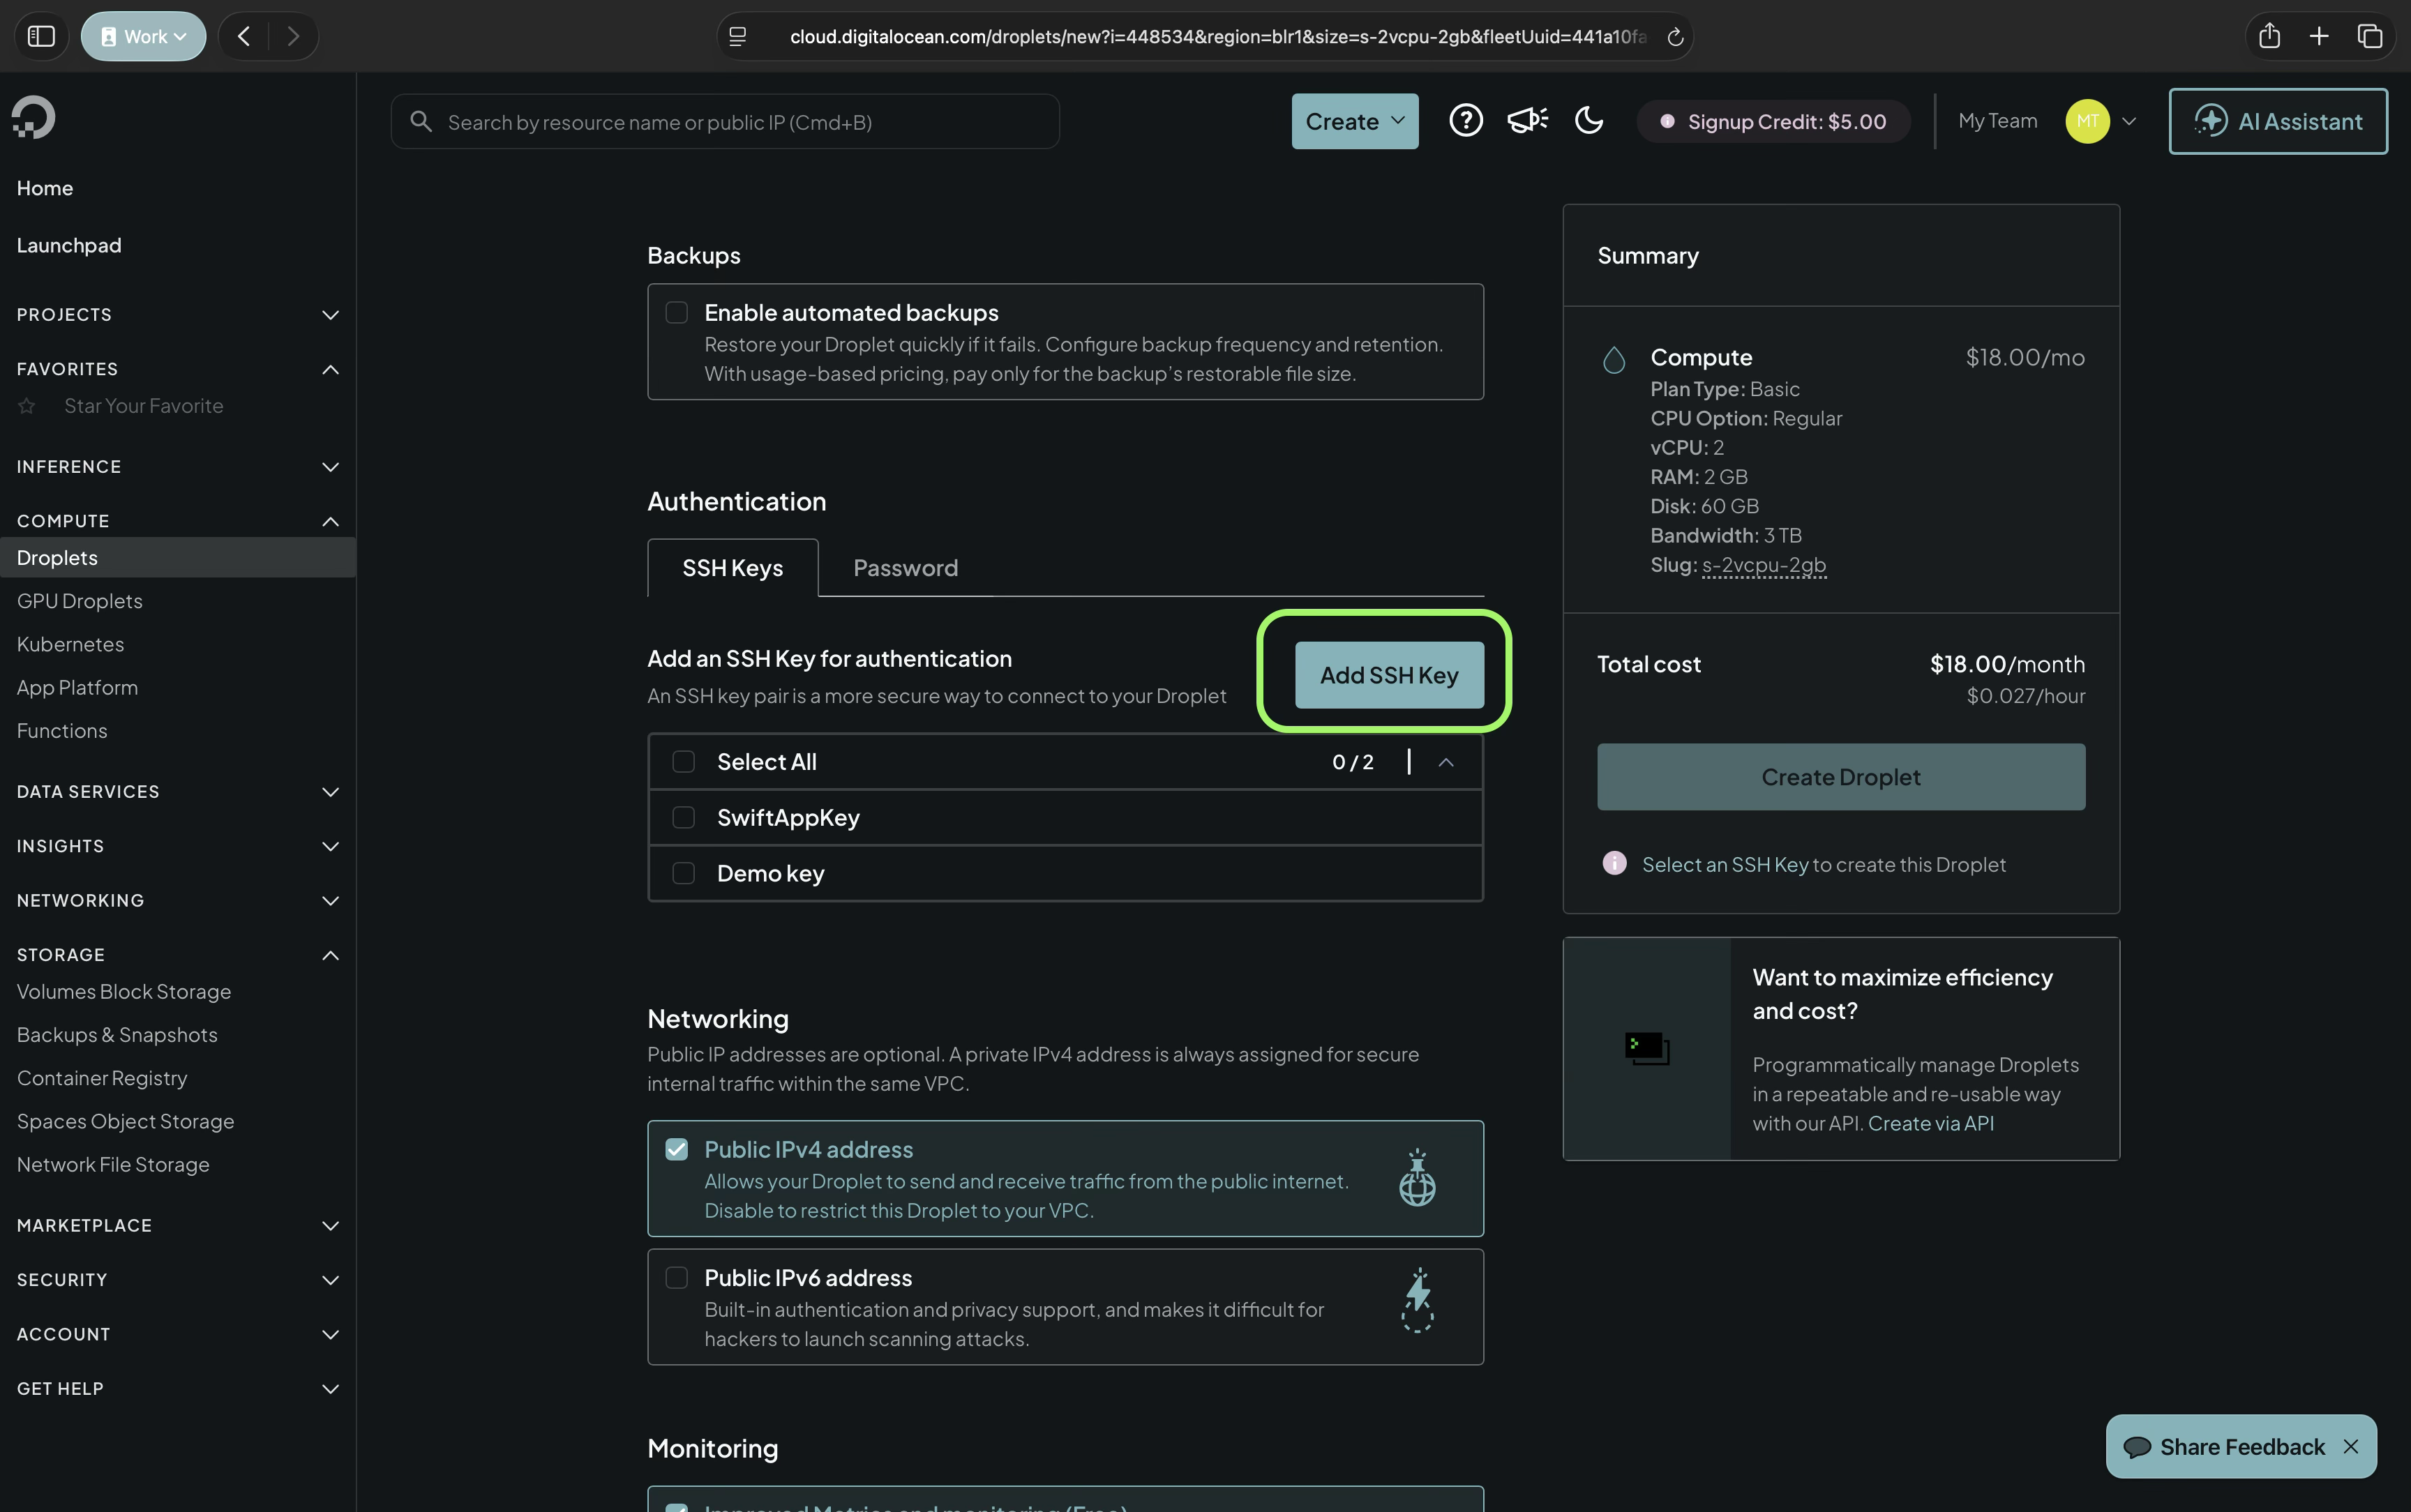
  1. Let us create a key. We will do this from the command line interface of macOS. Switch to terminal.
  2. Navigate to ~/Developer. Create it if it isnโ€™t there already.
  3. Create a hidden folder called .ssh using the command
mkdir .ssh
  1. Navigate inside the hidden folder.
cd .ssh
  1. Create a file named do_id1.txt inside the hidden folder using the command:
touch do_id2.txt


This will hold the key.

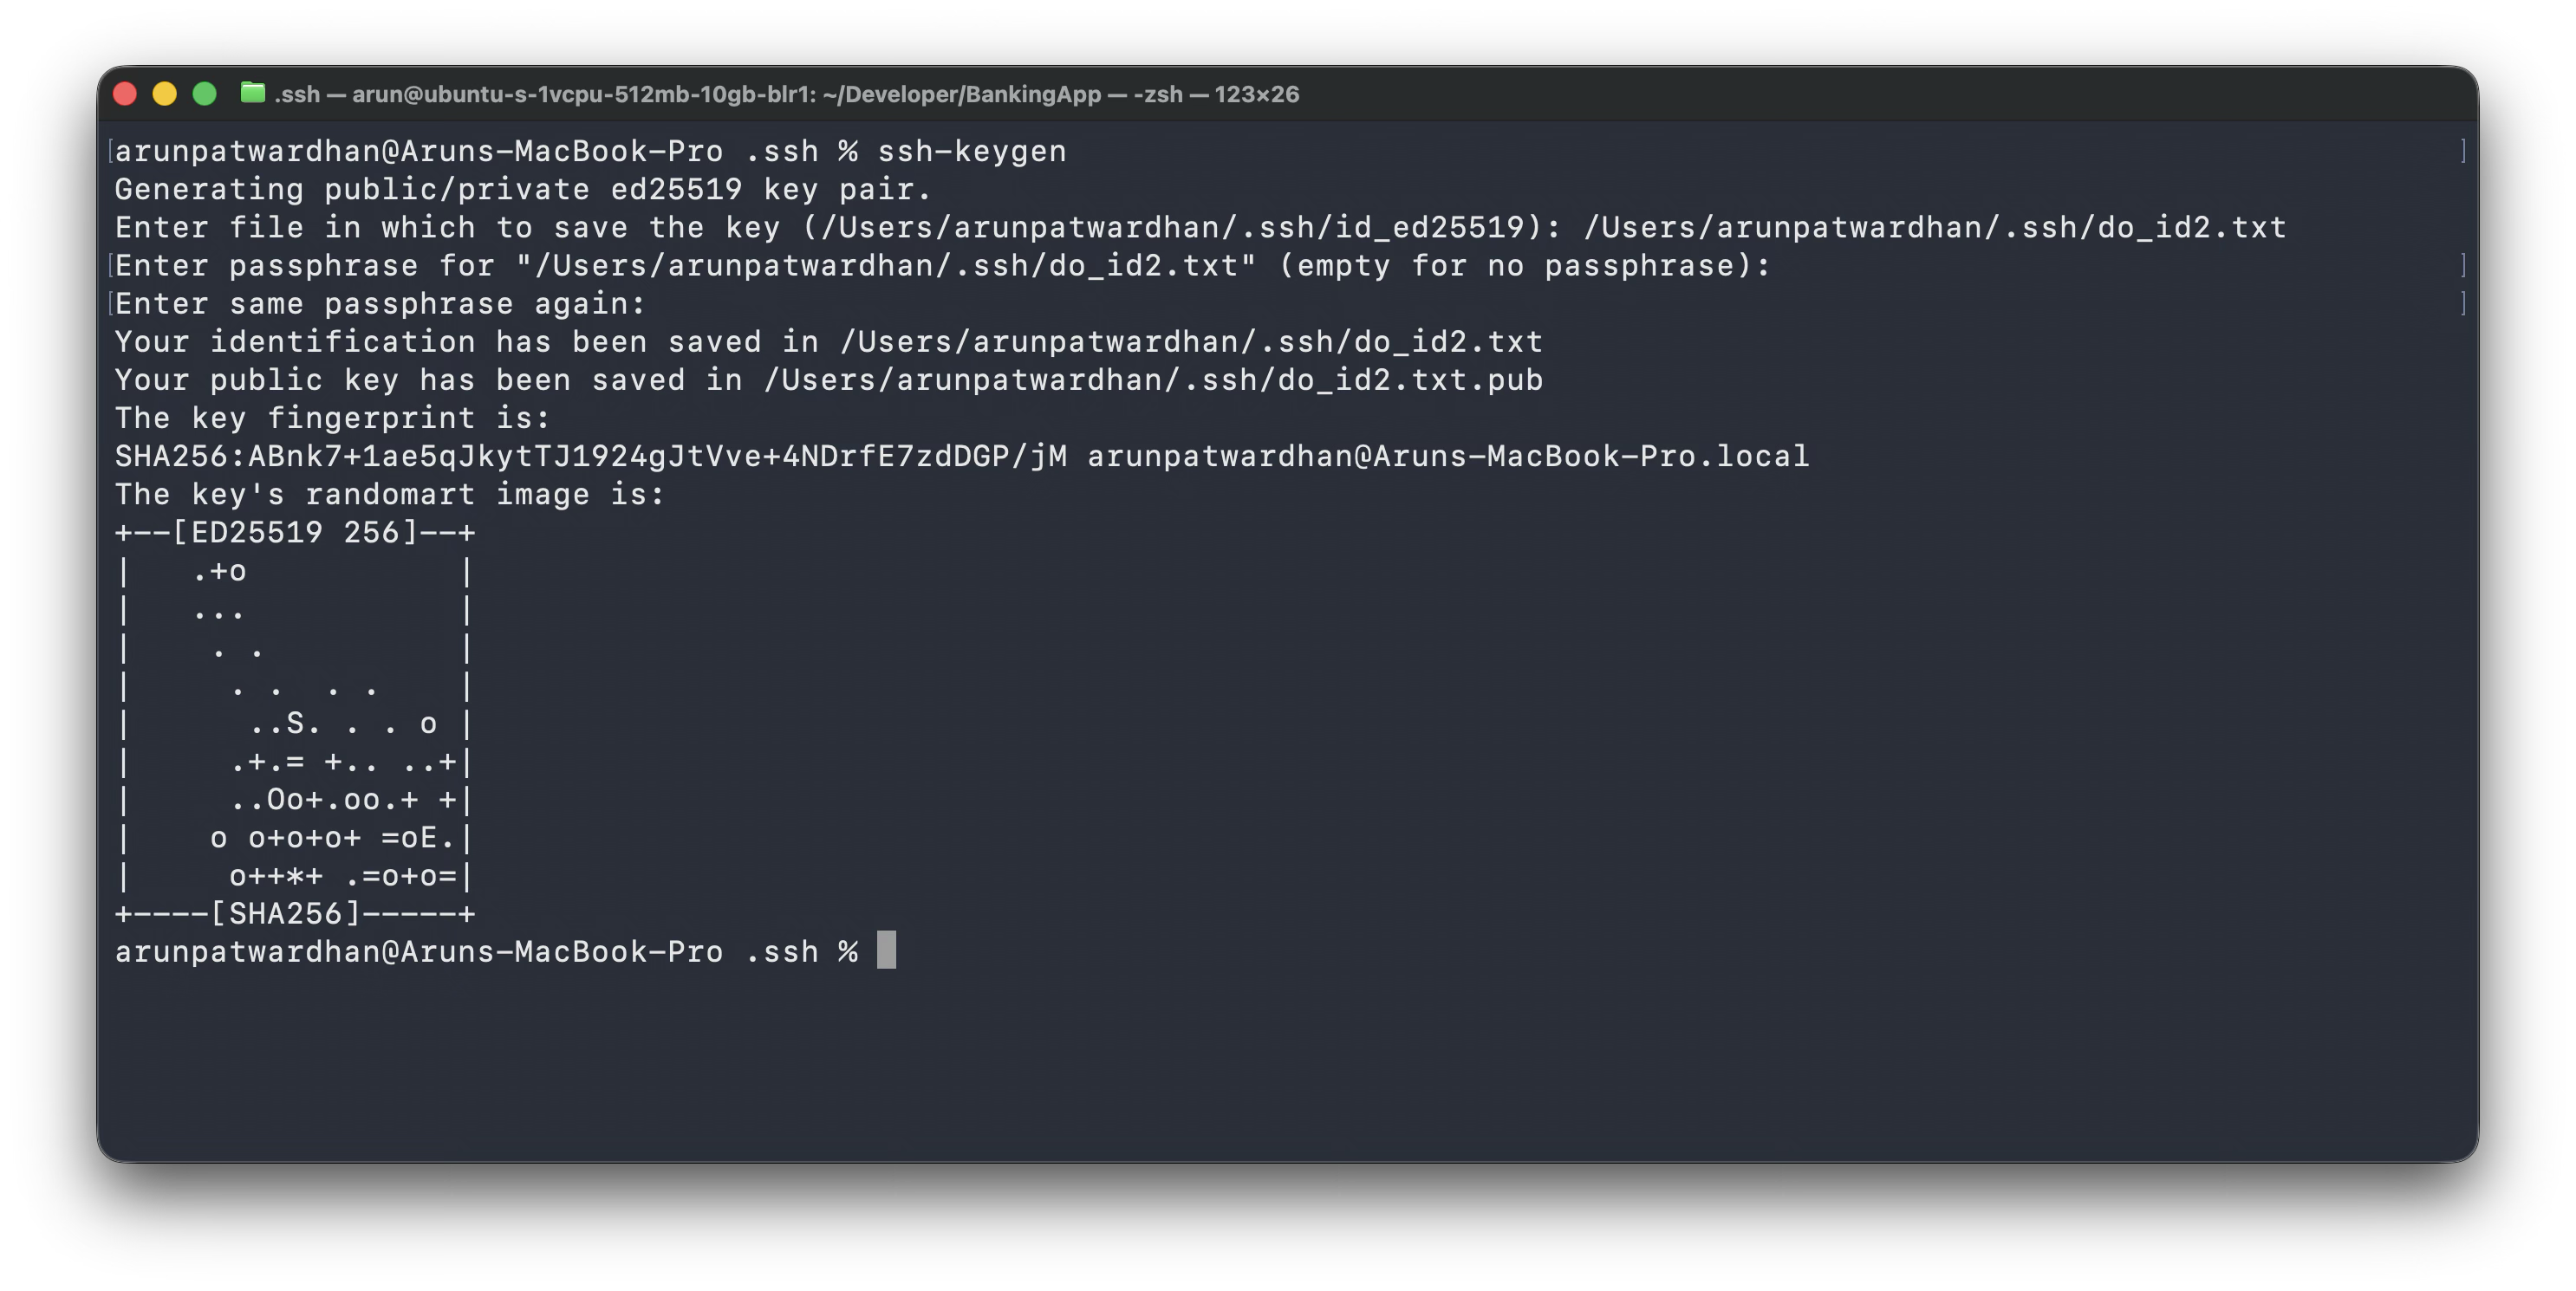
  1. Run the command:
ssh-keygen
  1. You will be prompted to enter the path of the file that will hold the key. Enter the path to the hidden folder created in step 11. This will be inside the home folder. Replace โ€˜demoโ€™ with your home folder name.:
/Users/demo/Developer/.ssh/do_id2.txt
  1. If the file already exists you will be prompted to overwrite. Type yes and press the return key.
  2. You will be prompted to enter a passphrase for your file. Note down this passphrase in a safe place as we will be needing it. Enter a passphrase.
  3. Once done take a screenshot for reference.
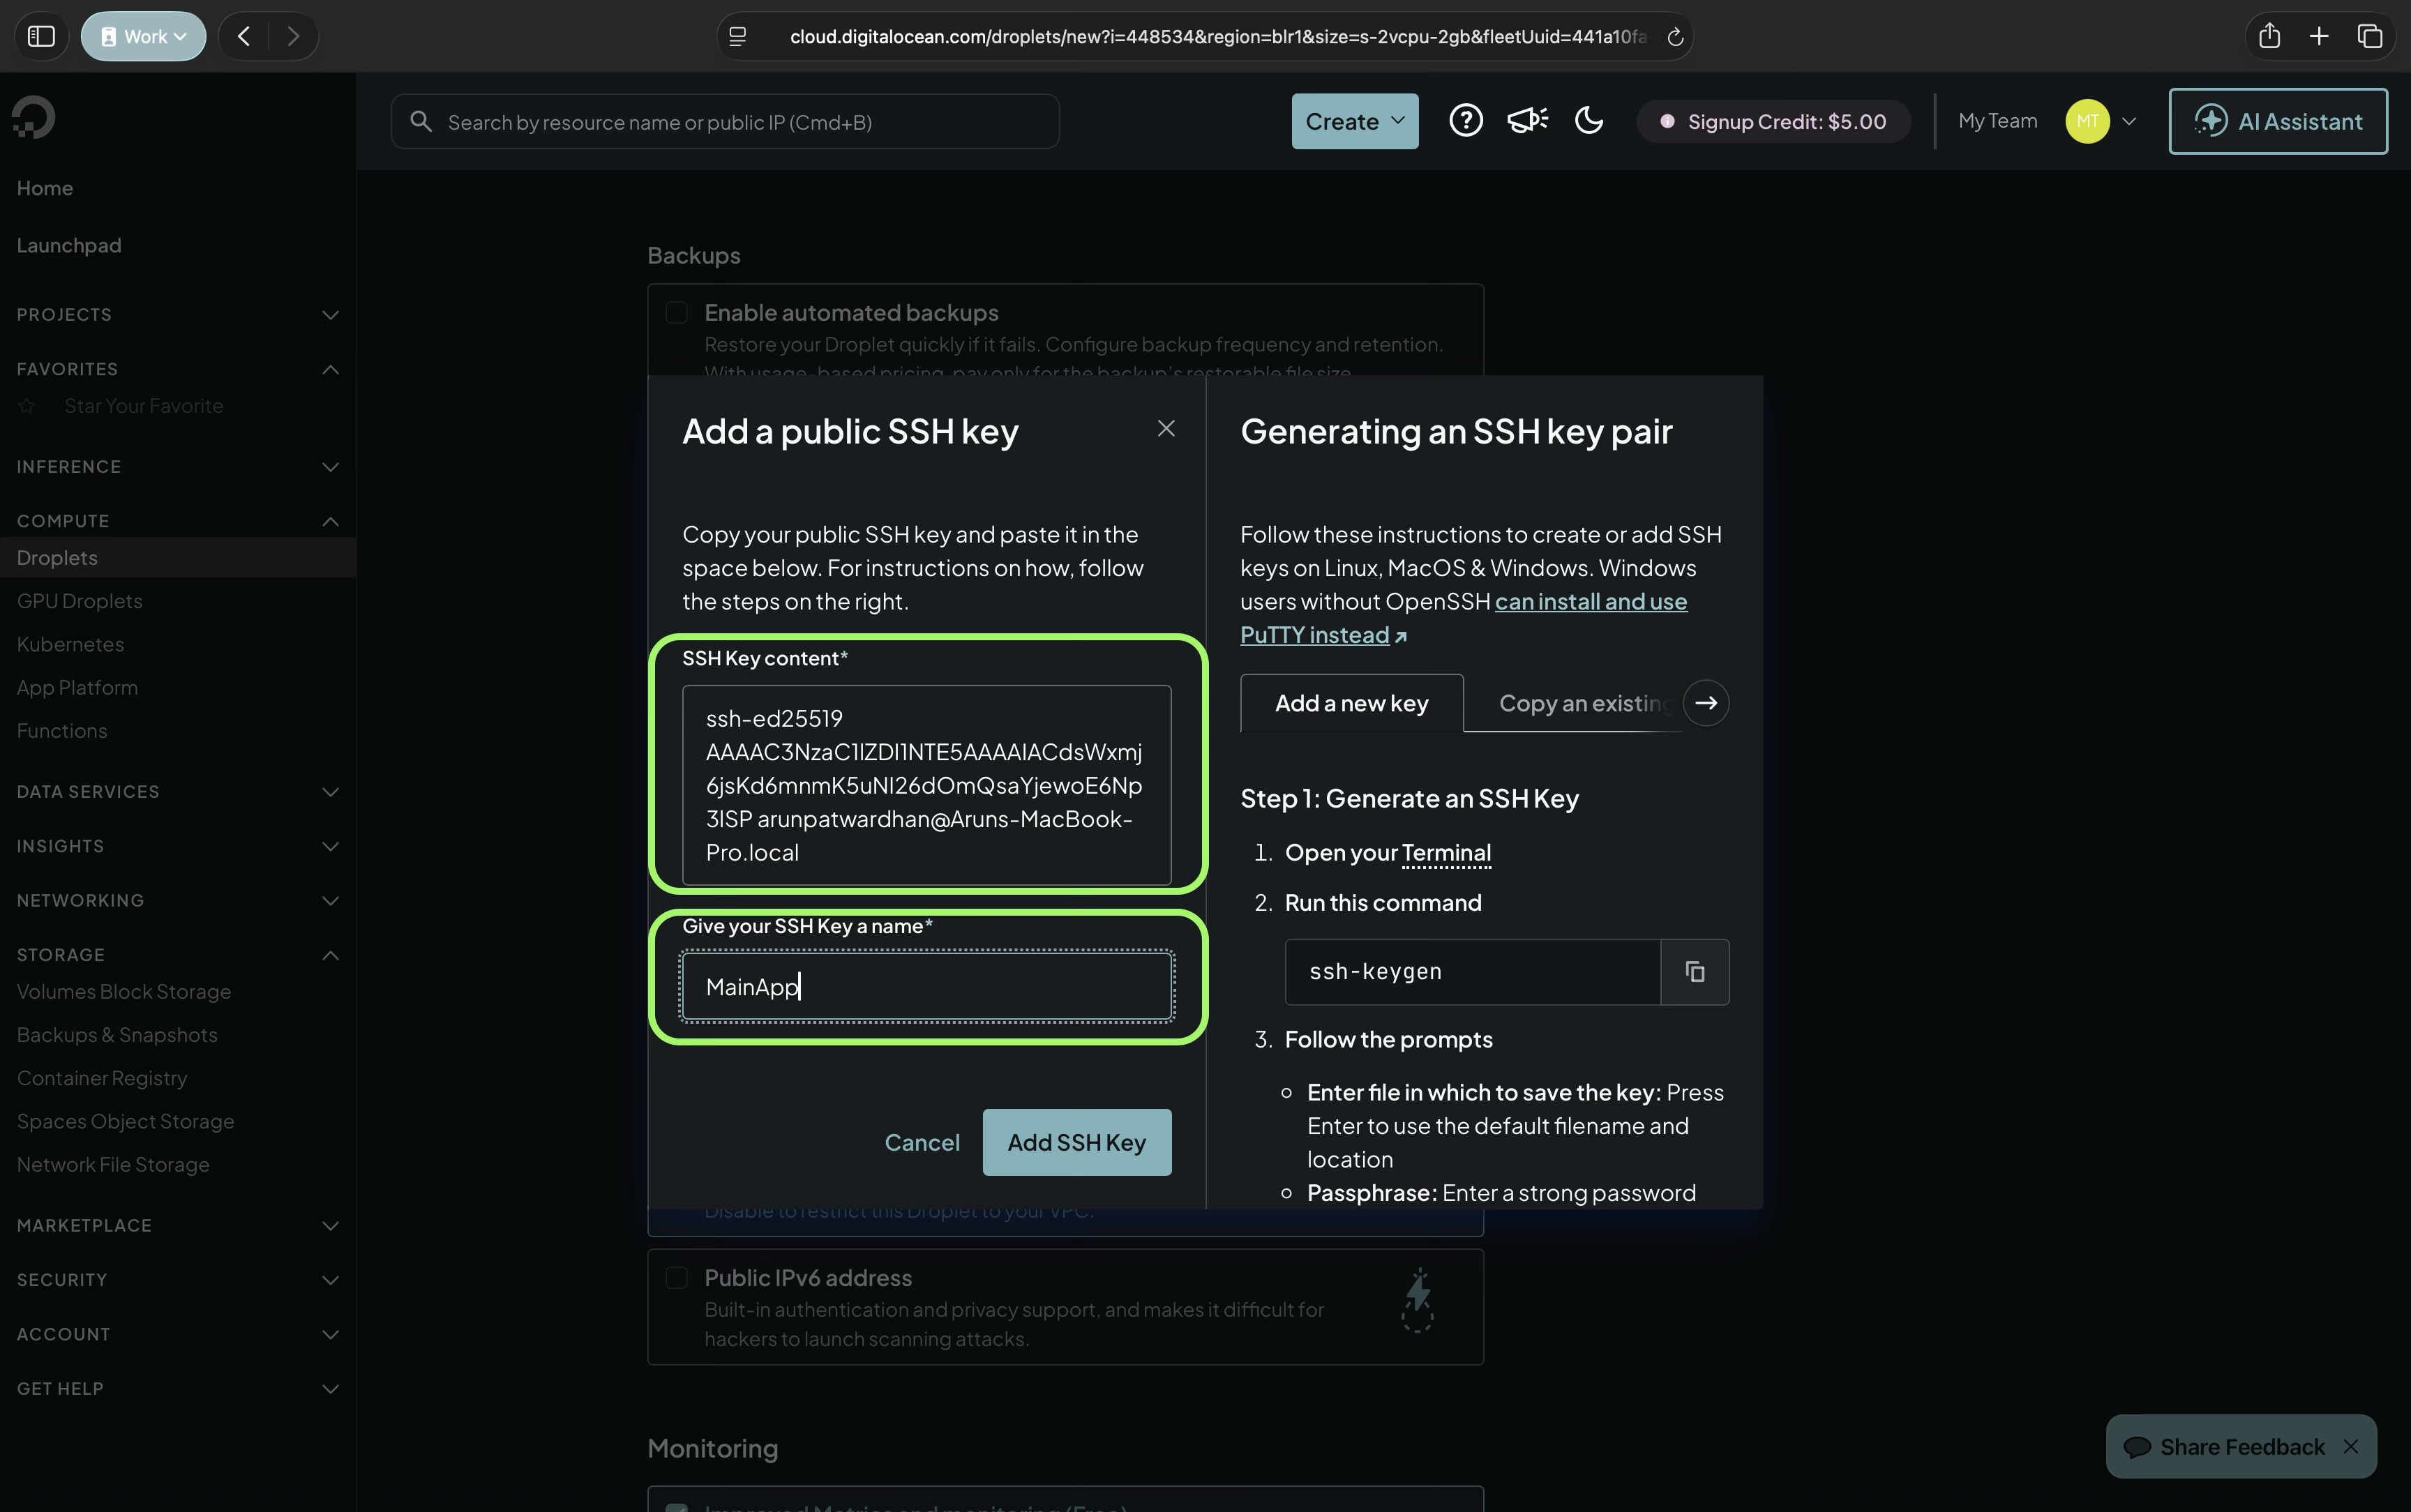
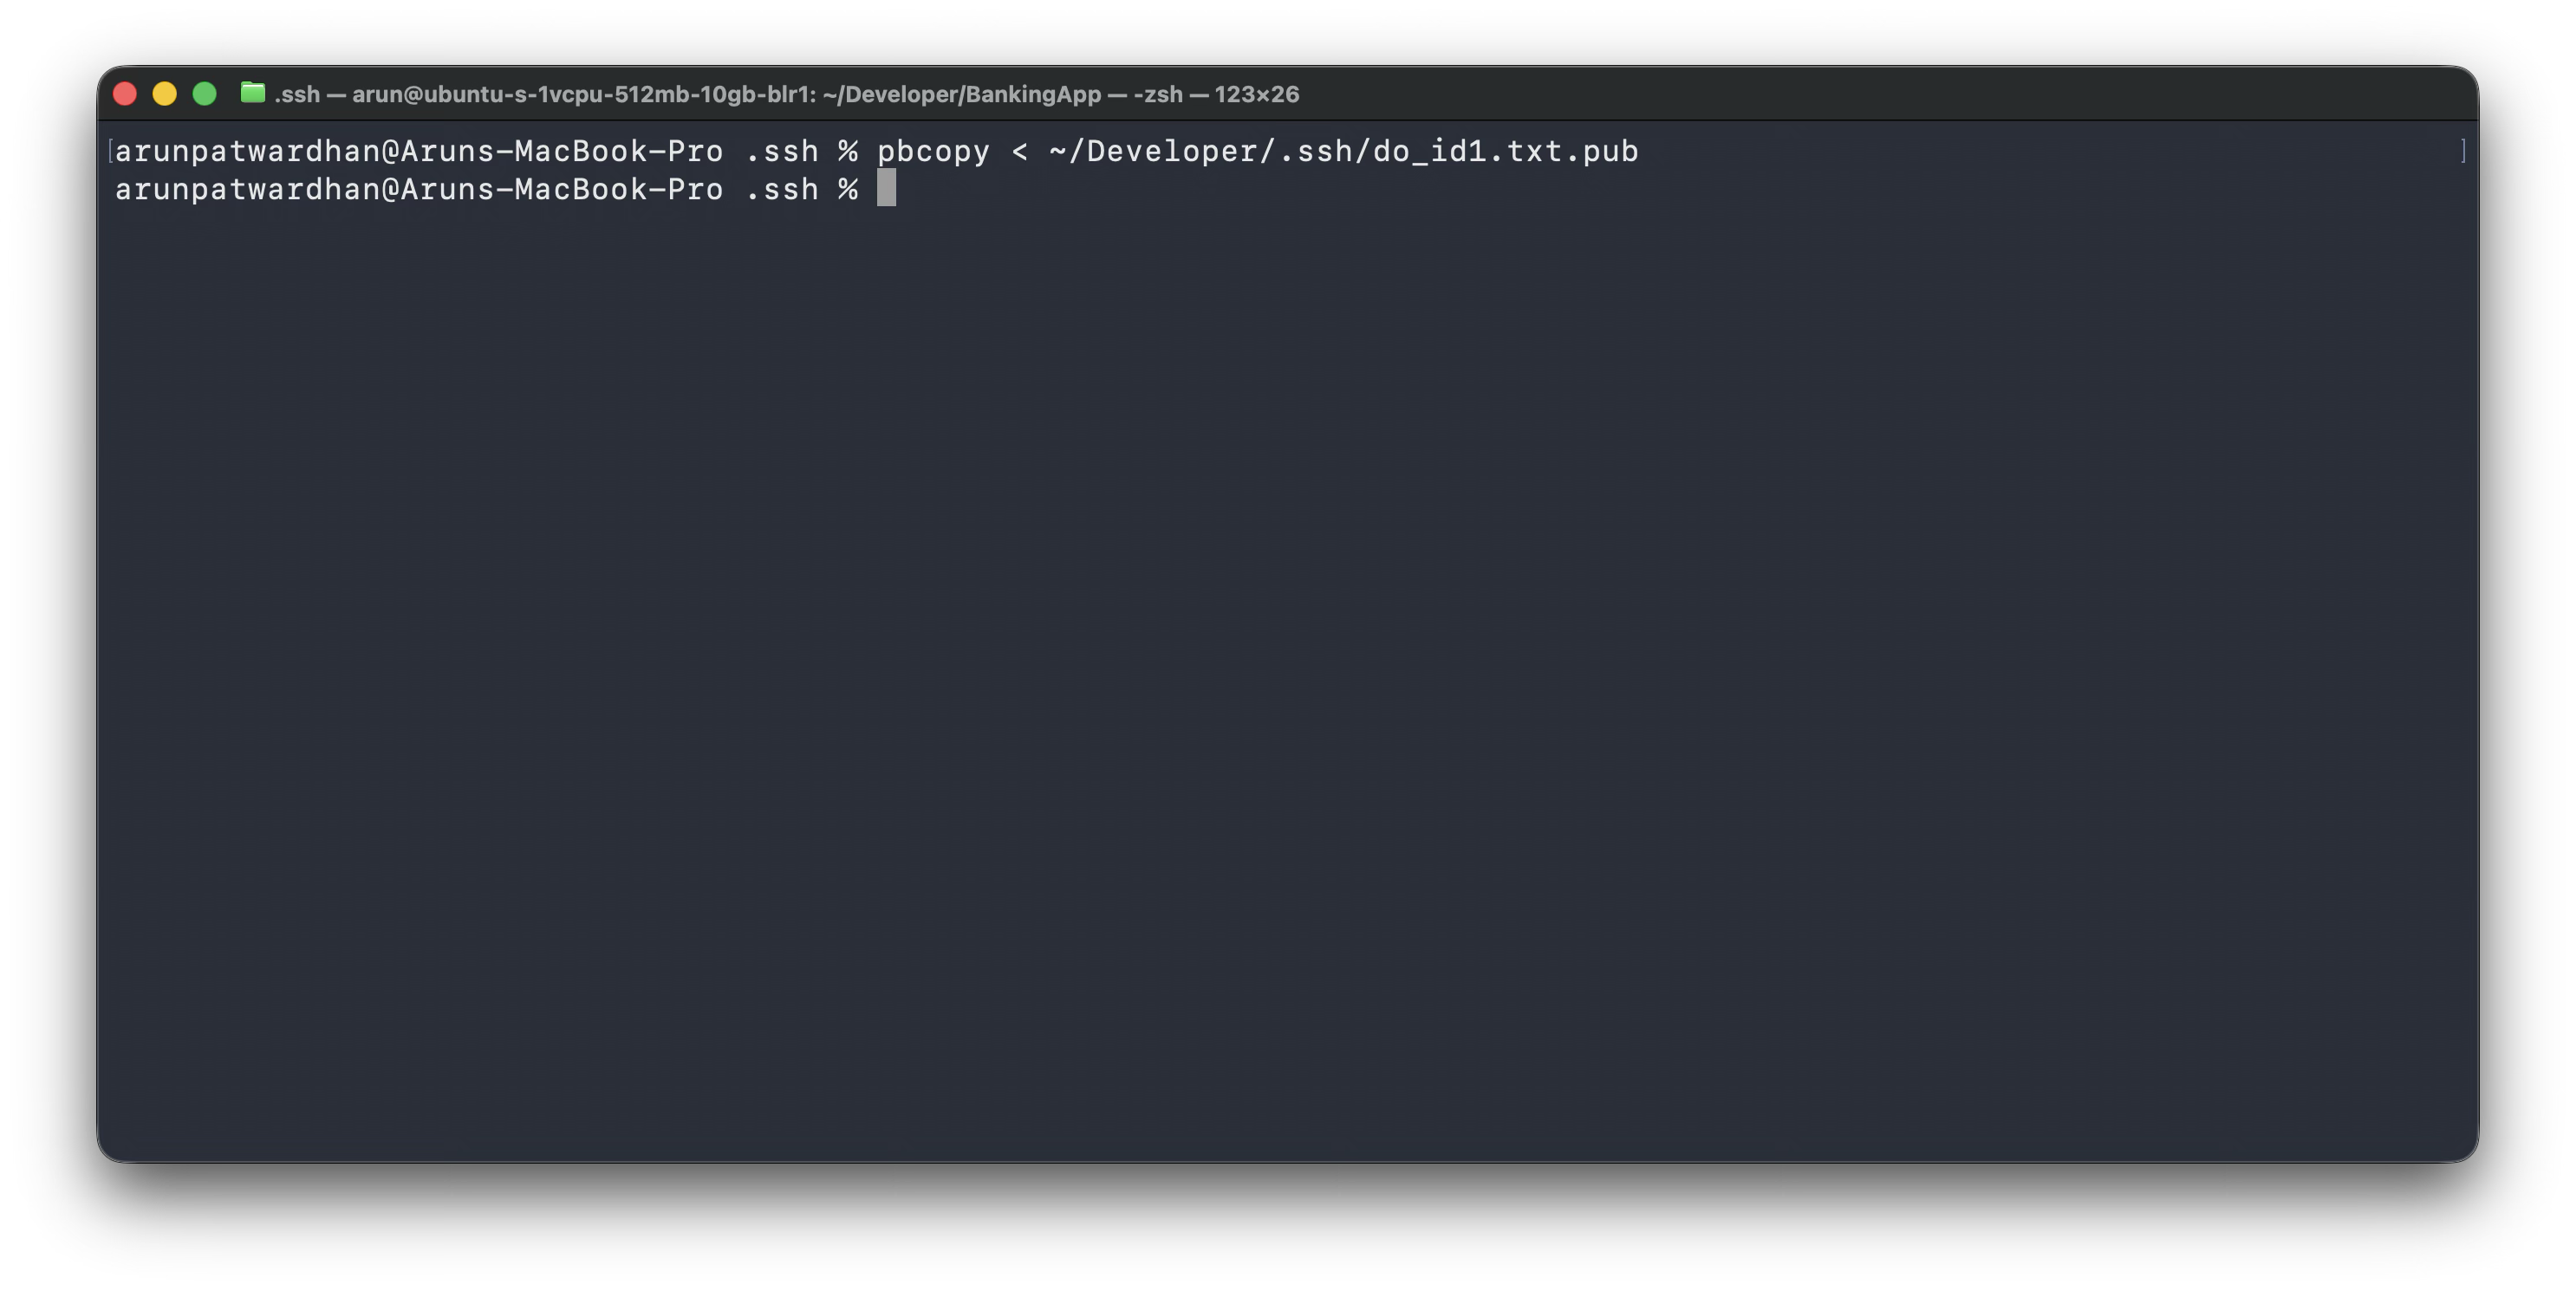
  1. We need to copy the public key and paste it into our DigitalOcean droplet. Run the command
    to copy the public key:
pbcopy < ~/Developer/.ssh/do_id1.txt.pub
  1. Paste on the DigitalOcean portal.
  2. Give it a name.
  3. Finally click on โ€˜Add SSH keyโ€™.
  1. Select the key and create the droplet.
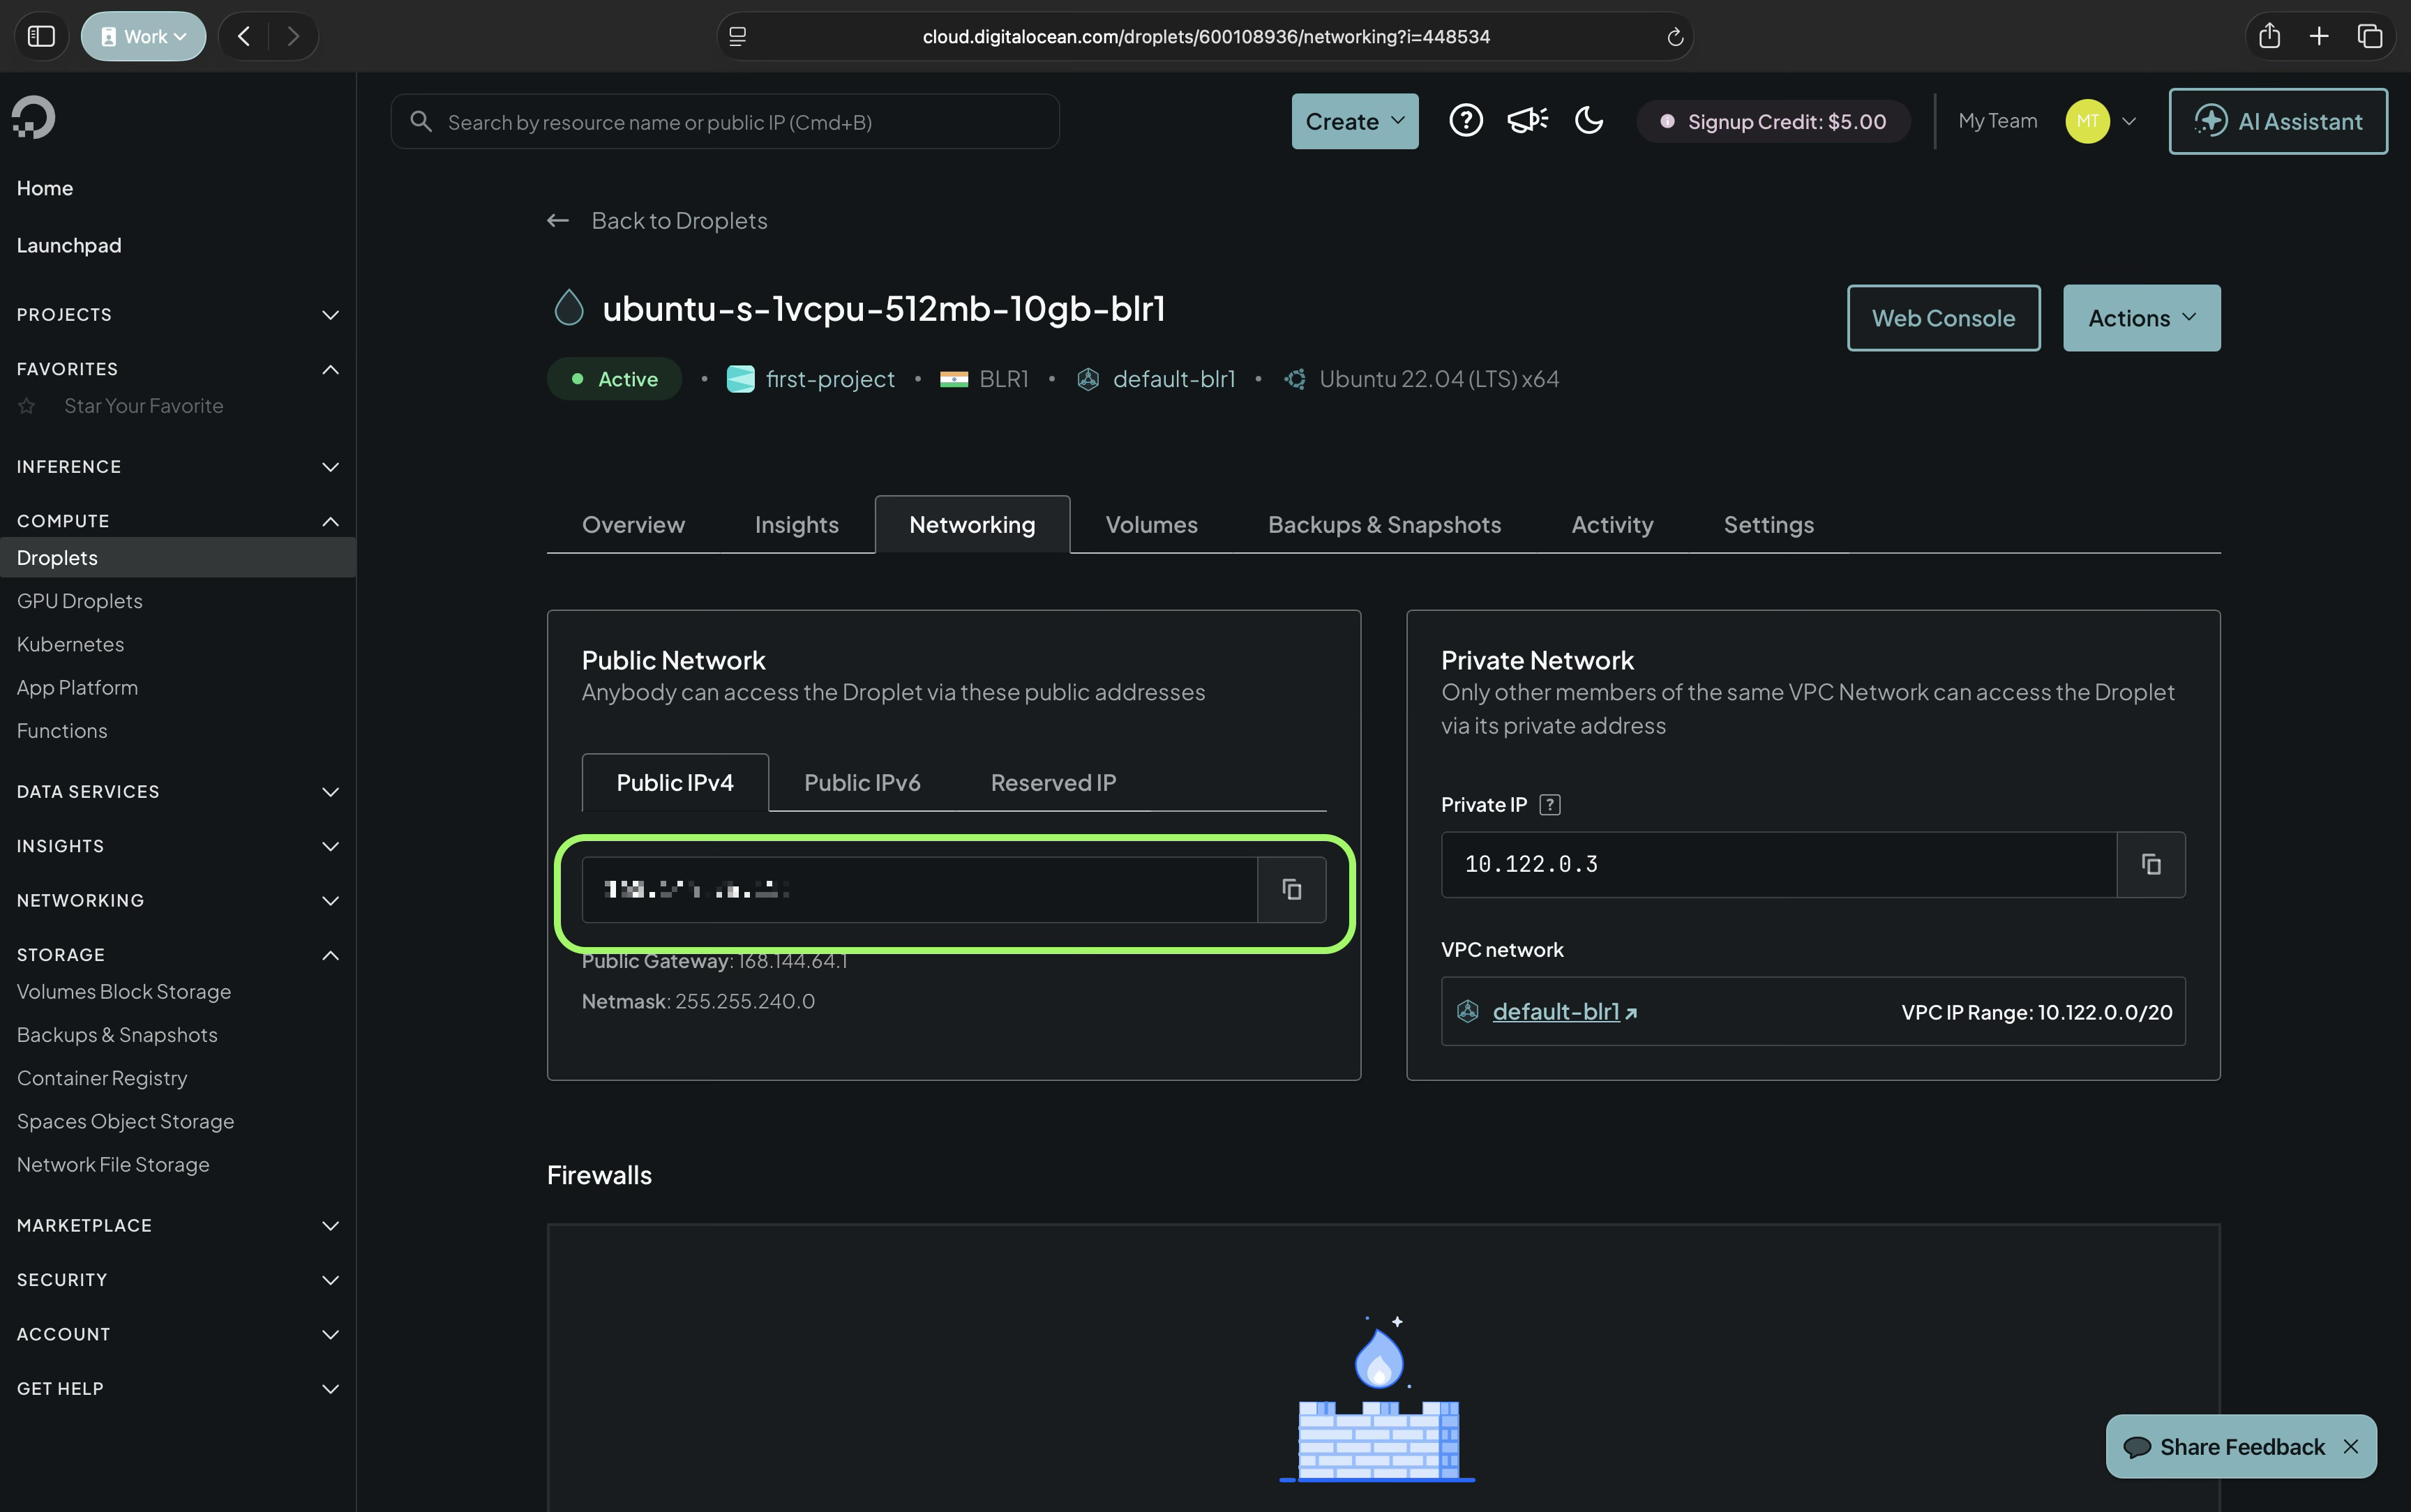
  1. Note down the public ip address.
  1. Now let us log in to our instance using SSH. Switch back to terminal.
  2. Change the permission on the key file to 600:
chmod 600 ~/Developer/.ssh/do_id1.txt
  1. Run the command to login:
ssh -i ~/Developer/.ssh/do_id1.txt root@<ip address> 
  1. Enter the passphrase from step 17
  2. You should have logged in.
  3. Lets create a new account run the command:
adduser arun
  1. Answer the prompts
  2. Add user to sudo group:
usermod -aG sudo arun
  1. Allow OpenSSH through firewall:
ufw allow OpenSSH 
  1. Enable firewall:
ufw enable
  1. Copy the keys from root user to our newly created user:
rsync --archive --chown=arun:arun ~/.ssh /home/arun
  1. Setup done.
  2. Now we will install Swift
  3. Run the command to install Swiftly:
curl -O https://download.swift.org/swiftly/linux/swiftly-$(uname -m).tar.gz && \โ€จtar zxf swiftly-$(uname -m).tar.gz && \โ€จ./swiftly init --quiet-shell-followup && \โ€จ. "${SWIFTLY_HOME_DIR:-$HOME/.local/share/swiftly}/env.sh" && \โ€จhash -r
  1. Install Vapor we will do this by building from source.:
git clone https://github.com/vapor/toolbox.git
cd toolbox
git checkout 20.0.2
  1. Build Vapor and move the binary into your path.
make install DEST=/usr/local/bin/vapor
  1. Navigate to the folder where you wish to create the project. ~/Developer is a popular location. The rest of the activities assume that the project was created in the Developer folder. However, you can create it in any other location.
  2. Once you are in the desired folder run the vapor tool to create the server project
vapor new <server app name> -n
  1. This will create the server as a Swift Package. Navigate into the project folder. The folder name will be the same as the server app name mentioned in the command above.
  2. Open port 8080 or 443 depending on what you are configuring:
sudo ufw allow 8080
  1. Run the server using the command:
swift run App serve --hostname 0.0.0.0 --port 8080

Our server is ready to host.

Transfering files to our Droplet

In most situations we wll have developed our server on a Mac. We will wish to transfer these files to the Droplet. Let us look at the steps involved in this.

  1. Download and install FileZilla on the computer from where you want to transfer the files. https://filezilla-project.org/download.php?platform=macos-arm64
  2. Open FileZilla
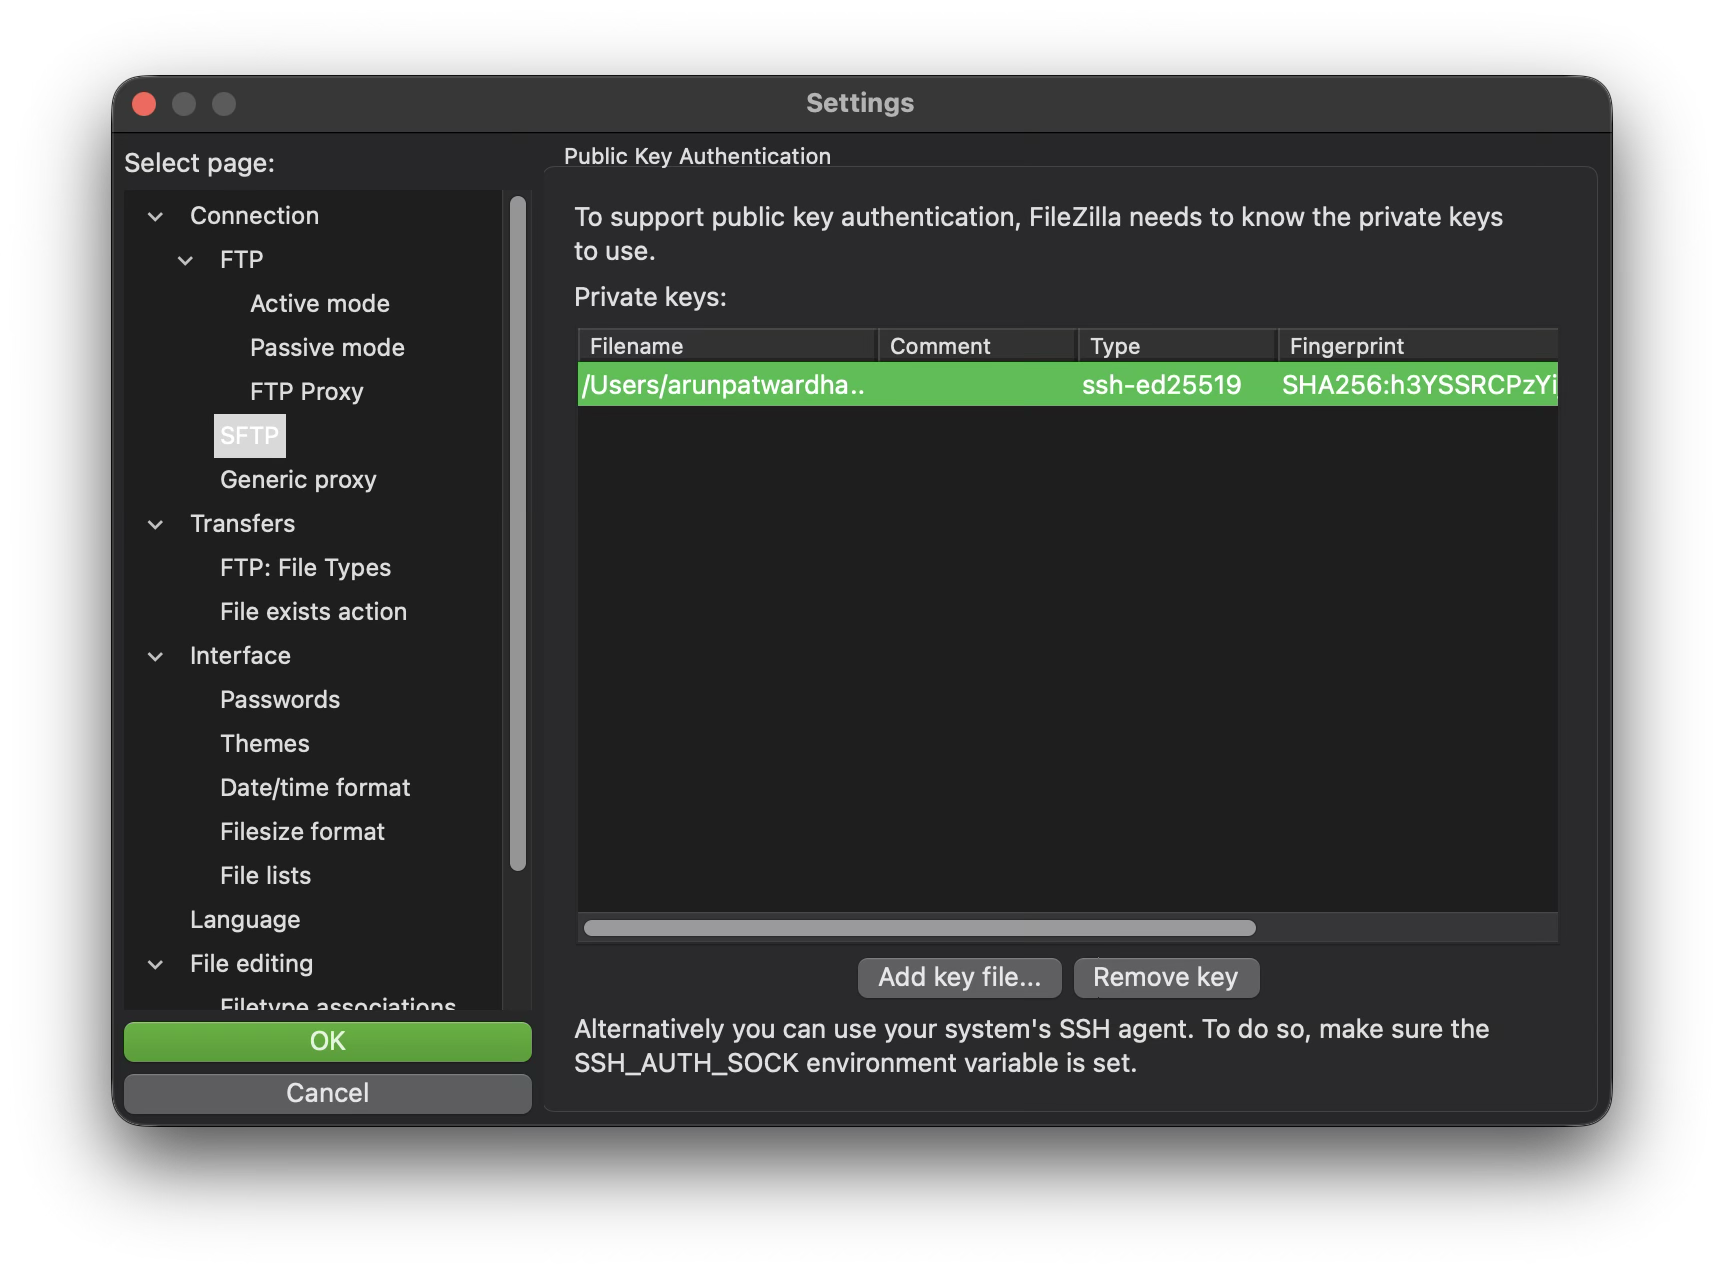
  3. Go to Settings > Connection > SFTP and upload the key txt file.
  1. Click ok.
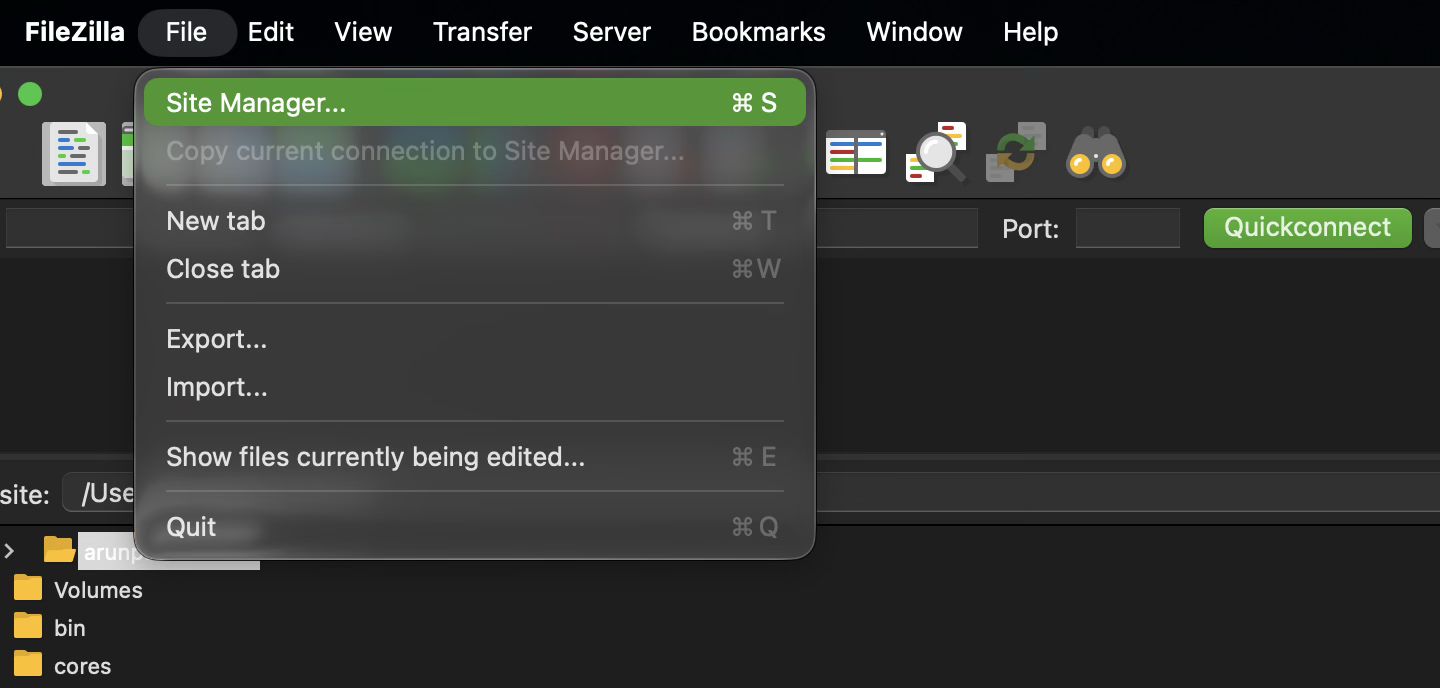
  2. Open Site manager.
  1. Click on New Site.
  2. Name it droplet
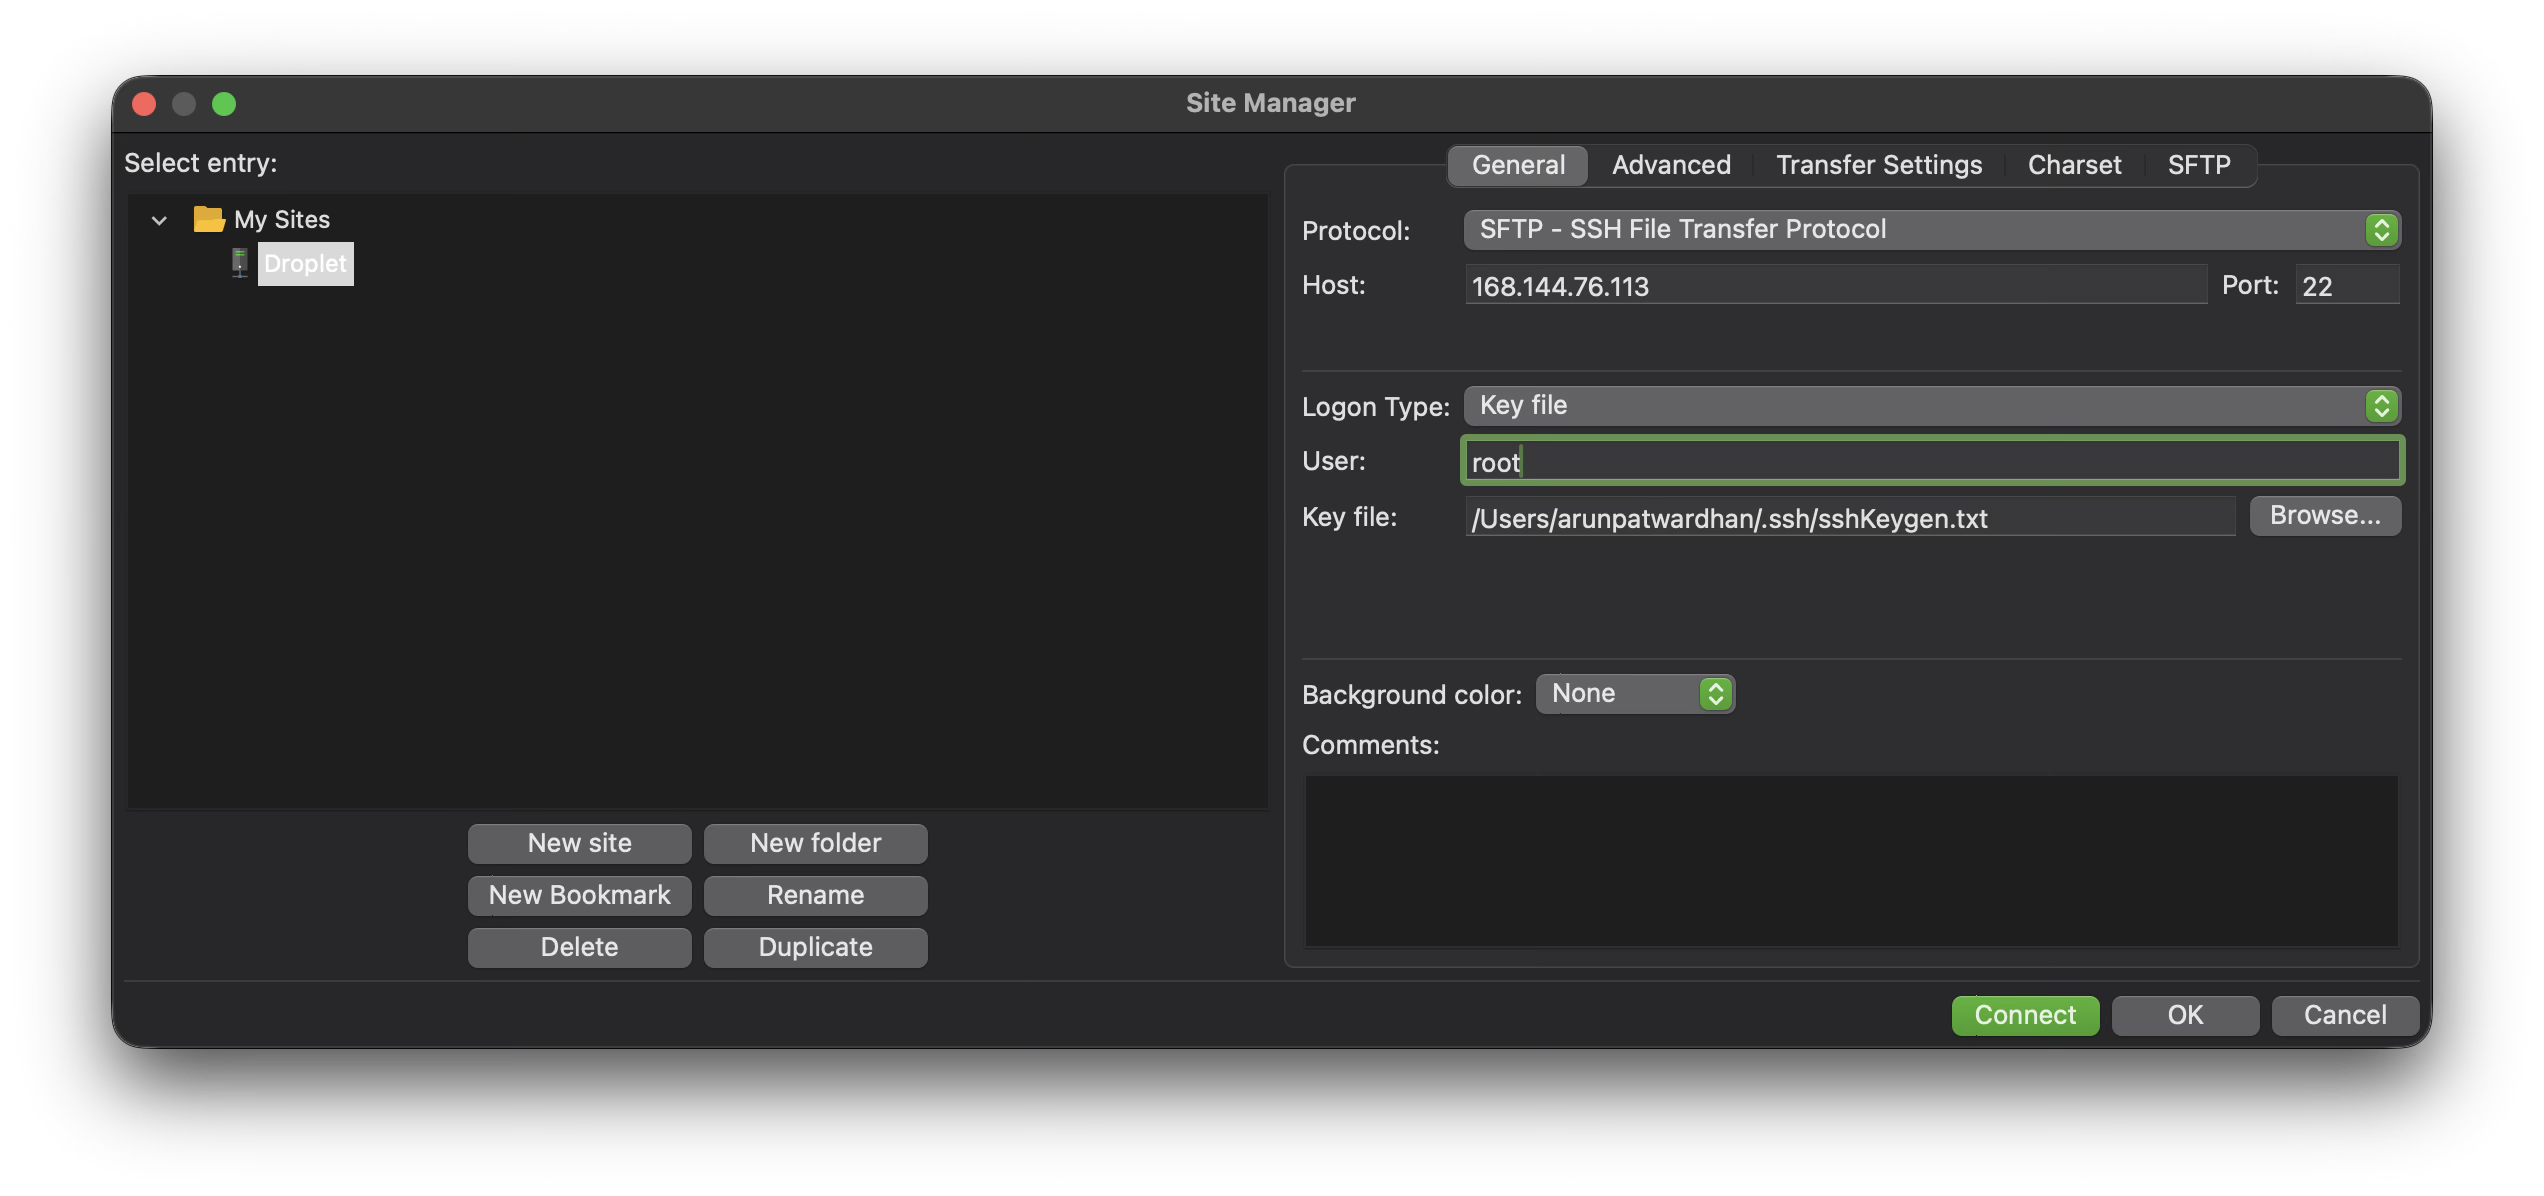
  3. Set the protocol, host name, port, user name and login type, and key file.
  1. Click on Connect.
  2. If prompted to save passwords select โ€œDo not Saveโ€.
  3. If you get an unknown host key simply click ok.
  4. Enter the passphrase which you entered when you created the keys.
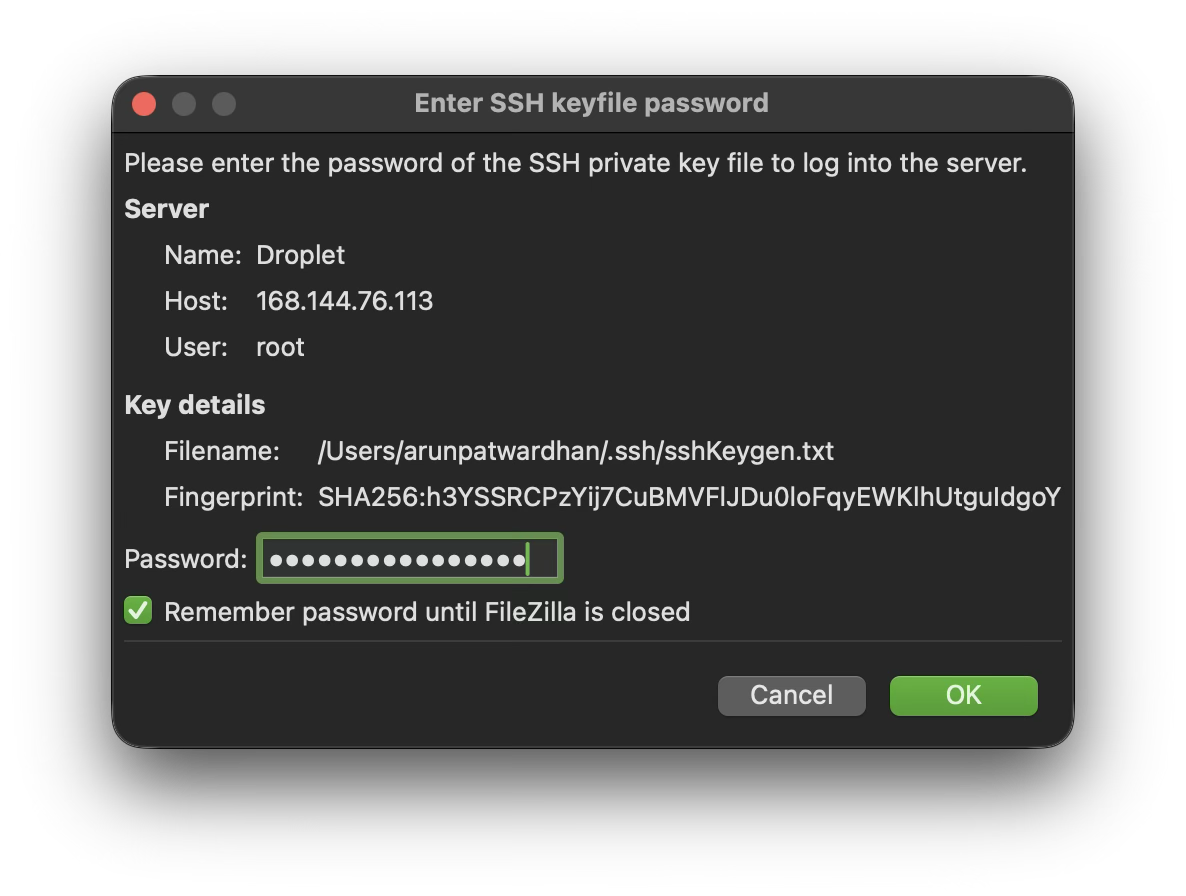
  1. Click ok.
  2. You are connected and should see the folders on the right hand side.
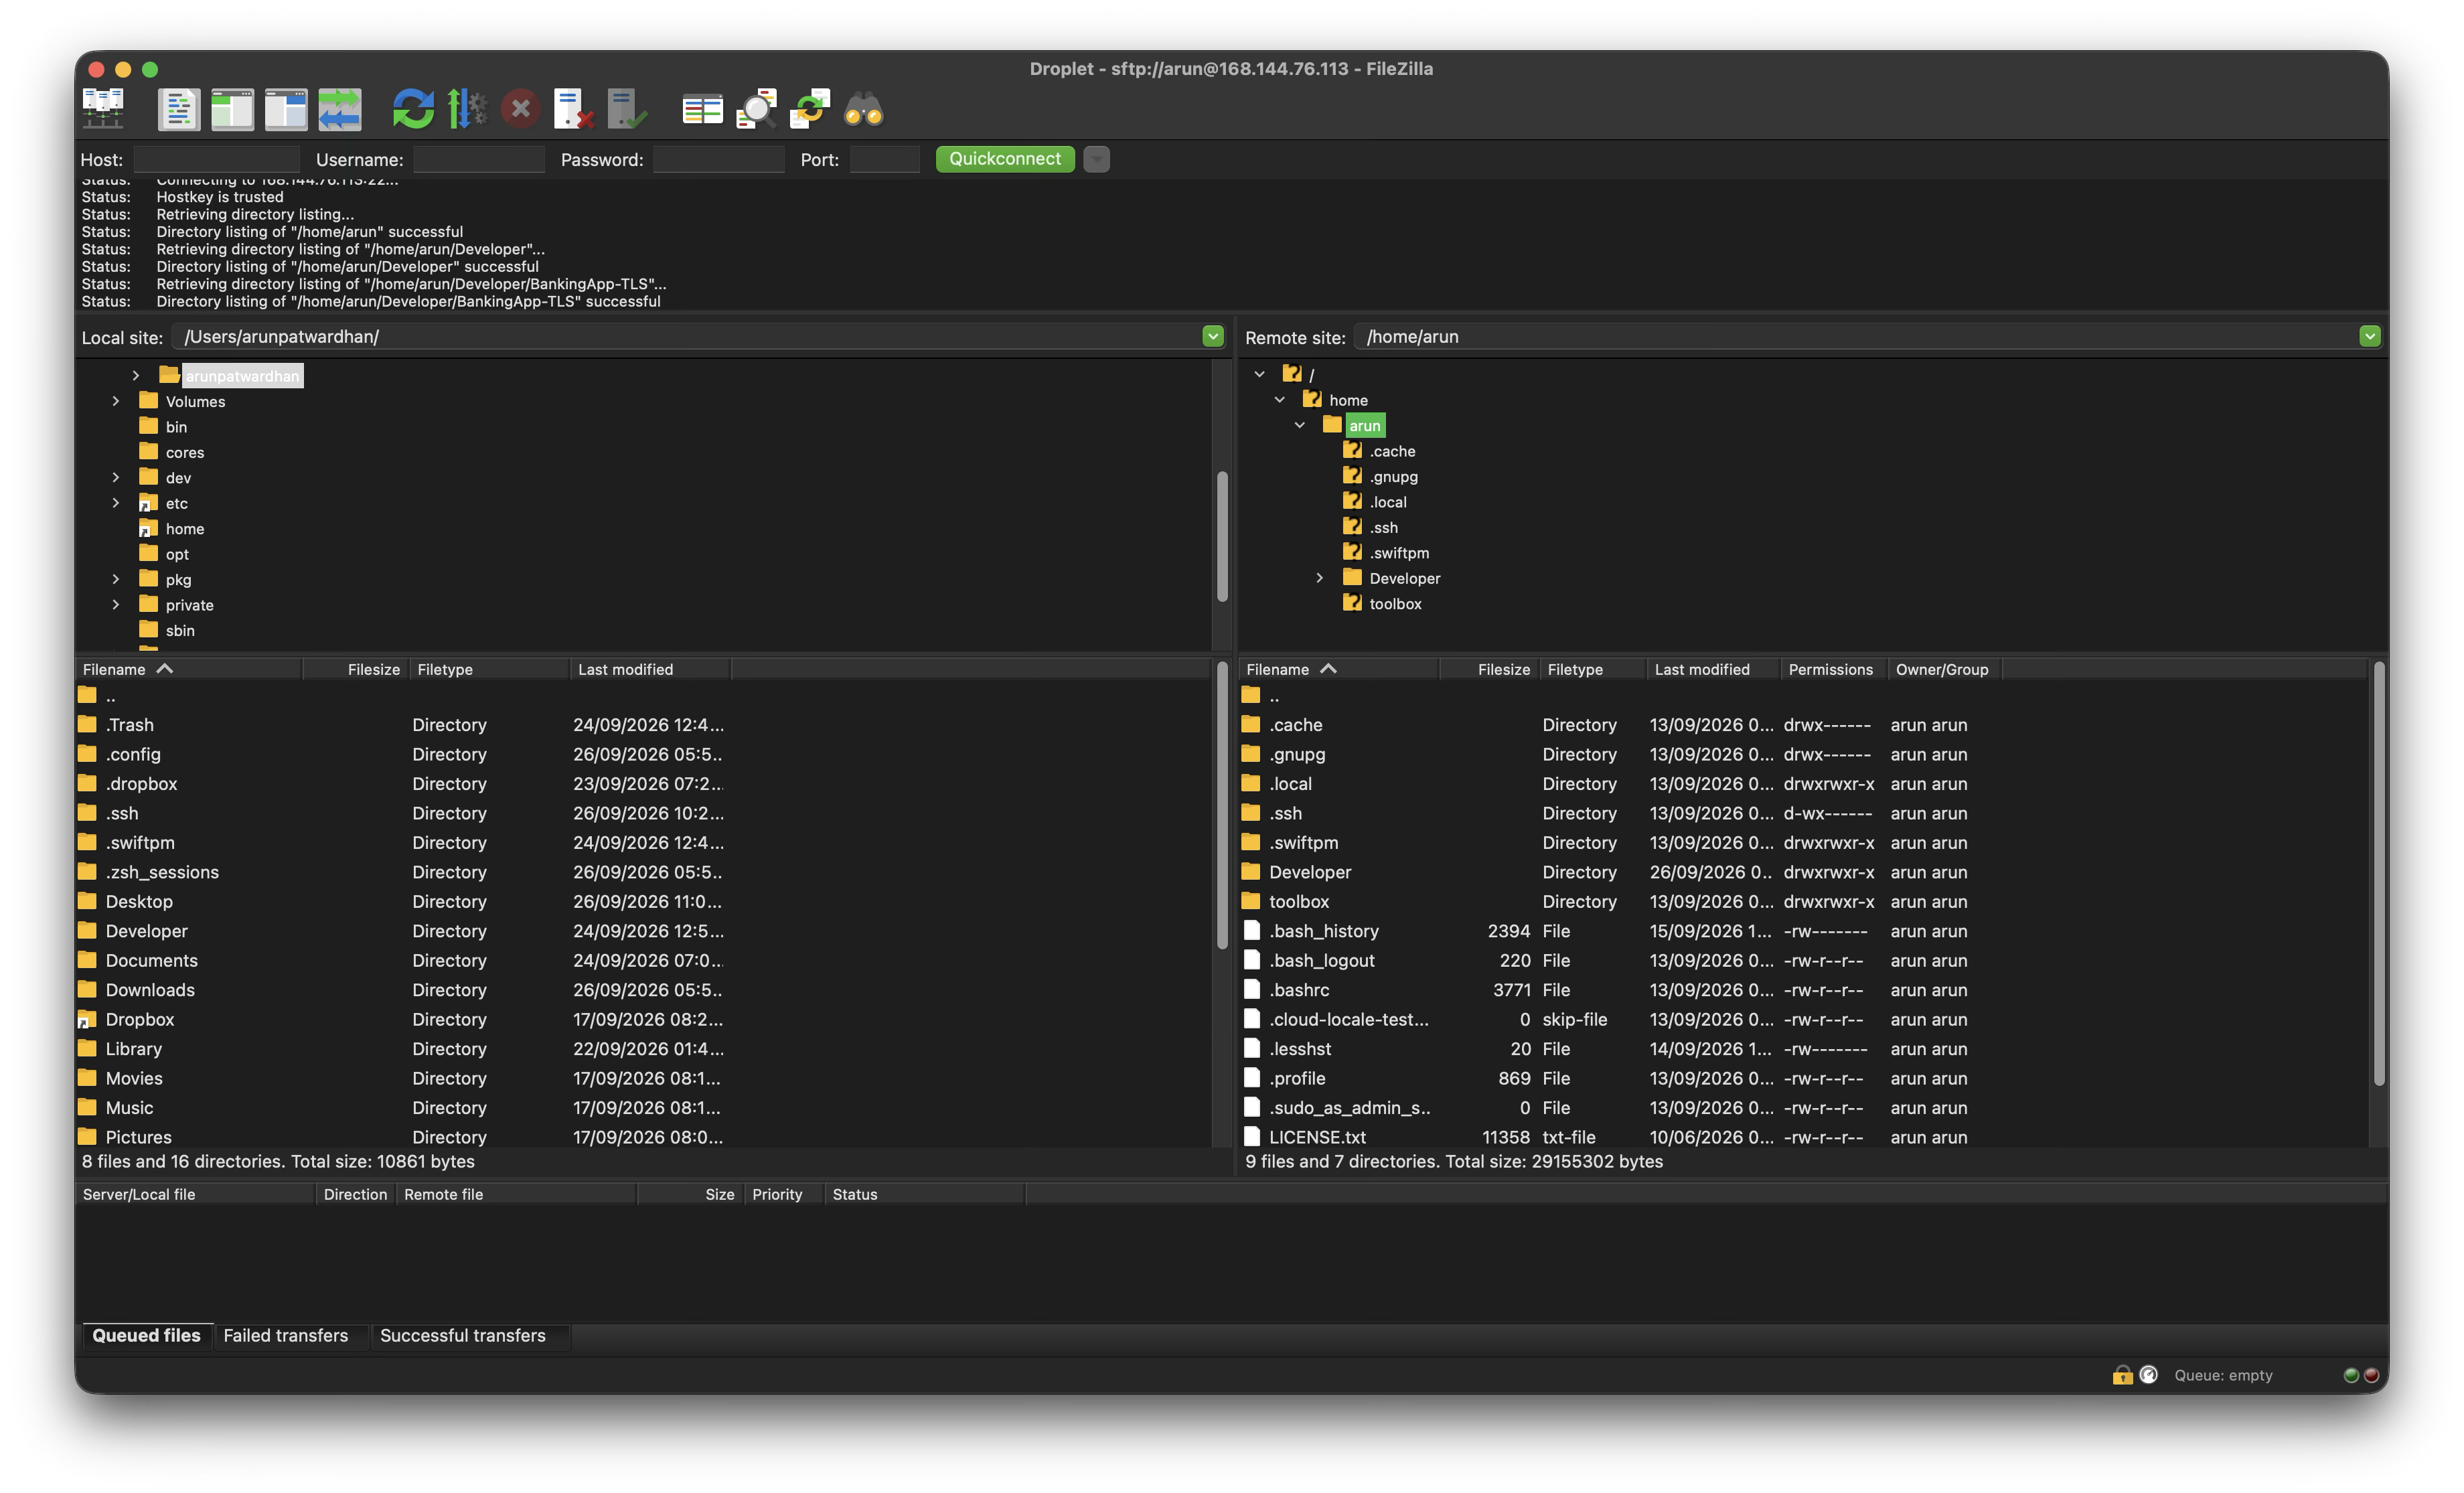
  1. Simply drag the files from the right hand side to the left hand side.
  2. To test the app start the server as show in step 45 on hosting a droplet. Then use the iOS App created earlier. The URL will have to be updated to match the Droplet’s URL. If everything is onfigured well then you should have an app that connects to the server properly.
Vapor Documentation

https://vapor.codes

DigitalOcean droplets

https://www.digitalocean.com/products/droplets

Filezilla

https://filezilla-project.org/download.php?platform=macos-arm64

Installing Swift on Linux

https://www.swift.org/install/linux

You can download the completed projects from the links below.

Sample Vapor server project

https://github.com/AmaranthineTech/CommunicationServer

Sample client app

https://github.com/AmaranthineTech/CommunicationServerClient
Shell scripting in macOS – Part 10: Distribution

This is the last article in the series of scripts. We will take the script from Part 8 and continue with it. We will be taking our folderCreator script and using it in our distribution process.

Distribution is the process of placing the script along with any supporting resources on a destination computer making it easily available for use. There are many aspects to this process, but we are going to look at a few of them:

  • Where should our script be installed?
  • How will the end user be invoking the script?
  • Does the script have its own man page?

Creating our own commands from other shell scripts

You may have noticed that whenever we use commands like defaults, echo, ls, cd, … we do not have to specify the path to the command. There is a reason for that. When we run our script the shell interpreter ‘knows’ where to go and look for these commands. There are some predefined locations available. We can get these predefined locations from the environment.

printenv PATH

This gives us an output that looks like:

/usr/local/bin:/usr/bin:/bin:/usr/sbin:/sbin

The output you see will vary from computer to computer. As we can see it is a list of folders separated by a ‘:’. These are the folders the interpreter will go through to locate the commands we use.

While we do not specify the path to a command in our script it is actually considered good practice. In fact, we will be making the same change to our script.

So if we want our own commands to be located easily it should be placed in one of these folders.

Installing commands

While installing commands there is one feature of macOS that we need to keep in mind: SIP (System Integrity Protection). Introduced in OS X 10.11 El Capitan, SIP prevents the modification of certain system files or folders even if you have root privileges. So this means that we do not have a lot of choice when it comes to installing our command. We will place it in /usr/local/bin folder.

Here is the final version of the folderCreator script. I have added paths to some commands and have kept the file name as folderCreator. The version number has been removed from the file name.

#!/bin/zsh

#-------------------------------------------------------------------------------------------------
#NAME:		Folder creator
#AUTHOR:	Arun Patwardhan
#CONTACT:	arun@amaranthine.co.in
#DATE:		15th September 2022
#WEBSITE:	https://github.com/AmaranthineTech/ShellScripts
#-------------------------------------------------------------------------------------------------

#LEGAL DISCLAIMER --------------------------------------------------------------------------------
#THE SOFTWARE IS PROVIDED "AS IS", WITHOUT WARRANTY OF ANY KIND, EXPRESS OR
#IMPLIED, INCLUDING BUT NOT LIMITED TO THE WARRANTIES OF MERCHANTABILITY,
#FITNESS FOR A PARTICULAR PURPOSE AND NONINFRINGEMENT. IN NO EVENT SHALL THE
#AUTHORS OR COPYRIGHT HOLDERS BE LIABLE FOR ANY CLAIM, DAMAGES OR OTHER
#LIABILITY, WHETHER IN AN ACTION OF CONTRACT, TORT OR OTHERWISE, ARISING FROM,
#OUT OF OR IN CONNECTION WITH THE SOFTWARE OR THE USE OR OTHER DEALINGS IN THE
#SOFTWARE.
#-------------------------------------------------------------------------------------------------

#LICENSE/TERMS AND CONDITIONS --------------------------------------------------------------------
#MIT License

#Copyright (c) Amaranthine 2021.

#Permission is hereby granted, free of charge, to any person obtaining a copy
#of this software and associated documentation files (the "Software"), to deal
#in the Software without restriction, including without limitation the rights
#to use, copy, modify, merge, publish, distribute, sublicense, and/or sell
#copies of the Software, and to permit persons to whom the Software is
#furnished to do so, subject to the following conditions:

#The above copyright notice and this permission notice shall be included in all
#copies or substantial portions of the Software.
#-------------------------------------------------------------------------------------------------

#ABOUT -------------------------------------------------------------------------------------------
# fileCreator.zsh
# 1.8
#-------------------------------------------------------------------------------------------------

#DESCRIPTION ------------------------------------------------------------------------------------- 
# - THis script is intended for creating the custom folders that are required on all corporate computers. 
# - Run this script on a new computer or a computer being reassigned to another employee.
# - This script can run on all computers.
#-------------------------------------------------------------------------------------------------

#USAGE -------------------------------------------------------------------------------------------
# - To create folders with default names run the command: ./folderCreator.zsh
# - To define your own folder names: ./folderCreator.zsh <folder1> <folder2> <folder3>
# - Available options  : Only the help option is available
# - Getting help       : Use the -h or the -help options to get more information. Or you can use the man command to view the man page.
#-------------------------------------------------------------------------------------------------

#WARNING/CAUTION ---------------------------------------------------------------------------------
#******************************************************************************************************************
#******************************************************************************************************************
#******************************************************************************************************************
#******************************************************************************************************************
# This script doesn't perform any validation of the folder names being passed in by the user. 
# If the script does not see the -h or the -help options then it will assume that the data being passed in is the name of the folder.
# The user of the script must ensure that the desired folder names are passed in.
#******************************************************************************************************************
#******************************************************************************************************************
#******************************************************************************************************************
#******************************************************************************************************************
#-------------------------------------------------------------------------------------------------

#INSTALLATION ------------------------------------------------------------------------------------
# Instructions for placing the script in the correct place are listed here. 
# Location:		/Library/Scripts/
# Permissions:	rwx r-x r-x
#-------------------------------------------------------------------------------------------------

#REQUIREMENTS ------------------------------------------------------------------------------------
# Shell:		/bin/zsh
# OS:			macOS Big Sur 11.4 or later
# Dependencies:	None
#-------------------------------------------------------------------------------------------------

#HELP/SUPPORT ------------------------------------------------------------------------------------
# You can get help by running the following commands.
# ./folderCreator.zsh -h
# ./folderCreator.zsh -help
# OR
# man folderCreator.zsh
# You can also view the log file for the same at: ~/Library/Logs/folderCreator_log_v1-8.log
#-------------------------------------------------------------------------------------------------

#HISTORY -----------------------------------------------------------------------------------------
# ------------------------------------------------------------------------------------------------
# Version 1.0: Basic script which creates the folders
# Version 1.1: Gives user the ability to specify the folder names at run time.
# Version 1.2: Adds safety checks to the scripts
# Version 1.3: Includes documentation as well as ability to get help.
# Version 1.4: Includes optimisation using for loop
# Version 1.5: Prompts the user in the GUI for names for the different folders.
# Version 1.6: Updated the log mechanism with the help of a function and here document.
# Version 1.7: Replaced the folder variables with an array
# Version 1.8: Added absolute path for commands. Final version ready for deployment.
#-------------------------------------------------------------------------------------------------

#-------------------------------------------------------------------------------------------------
# ------------------------------ SCRIPT STARTS HERE ----------------------------------------------
#-------------------------------------------------------------------------------------------------
#-------------------------------------------------------------------------------------------------
#-------------------------------------------------------------------------------------------------

#These are the default values used for the folder names incase the user doesn't provide any.
FOLDERS=("Tools" "Reports" "Help")

#Script version number
VERSION_NUMBER="1.8"

#Command name
COMMAND_NAME="folderCreator.zsh"

#1. Check to see if the user is asking for help. In which case we will have to provide information about the command.
if [[ $1 == "-h" ]] || [[ $1 == "-help" ]]; then
	echo "ABOUT 
-----
fileCreator.zsh
Version $VERSION_NUMBER

NAME 
----
$COMMAND_NAME โ€” Folder creation utility SYNOPSIS
$COMMAND_NAME folder names [ verbs ]

DESCRIPTION 
-----------
$COMMAND_NAME creates 3 folders in the home folder. In case the folder names are not provided then the command will create folders with default names 'Tools', 'Reports', \"Help\".

There is also the option of getting help via the help verb.
- This script is intended for creating the custom folders that are required on all corporate computers. 
- Run this script on a new computer or a computer being reassigned to another employee.
- This script can run on all computers.

VERBS 
-----
[ โˆ’h โˆ’help] Both the options are used to invoke the help documentation.
[ โˆ’v โˆ’version] Both the options are used to get the version number of the folderCreator command.

REQUIREMENTS 
------------
The following are the minimum requirements to get the script running.
Shell:			zsh
OS:				macOS Big Sur 11.4 or later
Dependencies:	None

INSTALLATION 
------------
$COMMAND_NAME can be installed anywhere you wish. However, there are certain locations that are recommended.
Location:		/Library/Scripts/ 
Permissions:		rwxr-xr-x

USAGE  
-----
$COMMAND_NAME folder1 folder2 folder3 
Will create folders with your own names. 

$COMMAND_NAME -h OR $COMMAND_NAME -help 
Will invoke the help utility.

$COMMAND_NAME -v OR $COMMAND_NAME -version 
will print the version number in stdout.

WARNING/CAUTION  
---------------
$COMMAND_NAME does not perform any validation of names. The only options that folderCreator accepts are -h and -help verbs or the -v and 
-version verbs. If the script does not see the -h , -help or the -v , -version options then it will assume that the data being passed in is 
the name of the folder. The user of the folderCreator command must ensure that the desired folder names are passed in. The user will also be 
prompted, via the graphical user interface, if he/she wishes to provide the names for the folders. If yes, then there will be subsequent 
prompts asking for the folder names.

EXAMPLES 
--------
$COMMAND_NAME Resources Results Assistant
This will create 3 folders Resources , Results , Assistant , in the userโ€™s home folder. 

$COMMAND_NAME
This will create 3 folders with the default names

$COMMAND_NAME Apps
This will use the Apps name for the first folder but the default names for the last 2 folders. 

NOTE
----
The user will be asked if he/she wishes to provide custom names in all the examples mentioned above. The user's value will always override 
whatever is being provided to the script or defaults.

DIAGNOSTICS 
-----------
The script produces a log file called ~/Library/Logs/folderCreator_log_v1-x.log
This file is typically located in the userโ€™s home folder log folder. The x represents the version number of $COMMAND_NAME
You can view the logs for each respective version.

COPYRIGHT  
---------
Copyright (c) Amaranthine 2015-2021. All rights reserved. https://amaranthine.in

EXIT STATUS  
-----------
In most situations, $COMMAND_NAME exits 0 on success"
	exit 0
fi

PATH_TO_LOG="$HOME/Library/Logs/folderCreator_log_v1-8.log"

# Function to log activity
function recordActivity() {
	/bin/cat << EOF >> $PATH_TO_LOG
[$(date)] $1
EOF
}


echo "$(date) Running script $0 to create folders."
echo ""

TODAY=$(date)

recordActivity "Starting"

#2. Check to see if the version number is 
if [[ $1 == "-version" ]] || [[ $1 == "-v" ]]; then
	echo "Version: $VERSION_NUMBER"
	exit 0
fi

#3. The following if statements check to see if the script is receiving any arguments. It then picks those arguments and assigns them to the respective variables for use in the script.
if [[ $1 != "" ]]; then
	FOLDERS[0]=$1
fi

if [[ $2 != "" ]]; then
	FOLDERS[1]=$2
fi

if [[ $3 != "" ]]; then
	FOLDERS[2]=$3
fi

#4. We can prompt the user to see if they wish to provide folder names themselves. This will override any values provided as arguments.
userClicked=$(/usr/bin/osascript -e 'button returned of (display dialog "Would you like to provide names for the folders or use the defaults instead?" buttons {"Custom", "Default"} default button 2 with icon POSIX file "/System/Library/CoreServices/HelpViewer.app/Contents/Resources/AppIcon.icns")')
	
# if the user decides to provide custom names then go ahead and ask the user via GUI prompts. Otherwise use the values sent as arguments or defaults.	
if [[ $userClicked == "Custom" ]]; then
	recordActivity "The user decided to provide custom names."
	
	FOLDERS[0]=$(/usr/bin/osascript -e 'text returned of (display dialog "Enter the name of folder 1" default answer "Utilities" buttons {"OK"} default button 1 with title "Folder that will hold the utilities" with icon POSIX file "/Users/Shared/Finder.icns")')
	
	FOLDERS[1]=$(/usr/bin/osascript -e 'text returned of (display dialog "Enter the name of folder 2" default answer "Tools" buttons {"OK"} default button 1 with title "Folder that will hold the tools" with icon POSIX file "/Users/Shared/Finder.icns")')
	
	FOLDERS[2]=$(/usr/bin/osascript -e 'text returned of (display dialog "Enter the name of folder 3" default answer "Help" buttons {"OK"} default button 1 with title "Folder that will hold the support documents" with icon POSIX file "/Users/Shared/Finder.icns")')
		
	recordActivity "User provided: ${FOLDER[@]}"
else
	recordActivity "User decided to use default values: ${FOLDER[@]}"
fi

#5. Go to the home folder.
cd $HOME

#6. Check to see if each of the folders exists. If it exists then do not create it. Else create the folder. 
recordActivity "Creating folders: ${FOLDER[@]}"

for item in ${FOLDER[@]}; do
	if [[ -d $item ]]; then
		recordActivity "Not creating $item as it already exists."
	else
		recordActivity "Creating $item"
		/bin/mkdir $item
	fi
	
	#7. Create the task completion file inside each folder.
	recordActivity "Creating hidden file for $item folder."
	cd $item
	#8. Generate the file names based on the folder names.
	/usr/bin/touch ".$item-FolderCreated"
	cd ..
done

echo "$(date) Task completed. Have a nice day!"
	
#-------------------------------------------------------------------------------------------------
#-------------------------------------------------------------------------------------------------
#-------------------------------------------------------------------------------------------------
# ------------------------------ END OF SCRIPT ---------------------------------------------------

In order to run this command we will have to give it execute capabilities.

chmod 755 folderCreator

This should change the icon of the script to that of an executable. If it doesn’t then go ahead and remove the extension from the file.

Copy the file to the /usr/local/bin folder. You will need to authenticate as admin to do this. There may be other executables in this folder.

Using commands

Now let us test to see if this has worked. Run the command:

folderCreator -h

We can use the which command to confirm that the correct binary is being used.

which folderCreator

Adding path to the environment

Now, it is not necessary that the executables we create should be placed in one of the standard PATH folders. We could place it anywhere else. All we would have to do is to export this new folder path to the PATH environment variable. There are a few ways of doing this.

  1. Use the export command
  2. Source another script file into your script
  3. Automatically configure bash/zsh to source the export command
Using the export command

The export command temporarily adds a value to the PATH environment variable. We could do this at the start of the script. Let us look at this as an example.

  1. Create a script, message.bash and save it in the /Users/Shared/Scripts/.
#!/bin/bash

echo "$(date) This is a random script $RANDOM"
  1. Create another script called test.bash and save it where ever you want.
#!/bin/bash

export DEVELOPER_PATH=/Users/Shared/Scripts/
export PATH=$DEVELOPER_PATH:$PATH

bash welcome.bash

which welcome.bash
  1. Run the script with the command: bash test.bash. Don’t forget to put the path when using the script.

The 2 export commands are setting the value of the PATH environment variable to the new path. Note that while doing that we still keep the existing PATH value. So the environment will contain all the existing PATHS as well as the new path.

We can immediately see the benefit of adding another folder to our PATH component. The commands on line 6 and 8 do not require the path to the welcome.bash script to be explicitly mentioned. Even though they are not in the standard search paths. In fact, any script/executable that is placed in that folder will now be directly accessible without having to specify the absolute path. Having said that it is still a good idea to put the absolute path to a command.

An important thing to keep in mind is that this change only applies to the script that we are running. This will not impact other shells or other scripts running in the same shell. The next 2 options will show us how we could possibly do that.

Source the export commands from another script

If the export commands are needed in more than one script then it might be a good idea to source them instead of rewriting them over and over again.

Start off by creating a new file called newPath.bash. It should only have the 2 export commands in them.

#!/bin/bash

export DEVELOPER_PATH=/Users/Shared/Scripts/
export PATH=$DEVELOPER_PATH:$PATH

Now we will modify our test.bash script from the previous example as shown below.

#!/bin/bash
#Using source

source /Users/Shared/newPath.bash

bash welcome.bash

which welcome.bash

You can see that we simply source the original script in here. This is extremely useful if there are multiple paths that need to be added to multiple scripts. Any change in the path only has to be made in one place making this approach far more convenient and scalable. There is still the same catch. Any change to the path is only applicable to the scope of the script. Other scripts and the shell environment itself does not get affected.

Configure bash/zsh to source our export commands.

While the pervious 2 approaches are good, they have the limitation that the changes are only applicable to the script where the sourcing is done. All the other scripts and the shell itself are not affected by it. Now this maybe a desired outcome. There are situations where you would want this to be applicable globally to all the scripts and the shell itself without having to change the PATH value manually by ourselves. This can be done by changing the scripts that are invoked when the shell is loaded.

The file that is to be invoked is located in the /etc folder. It is called zshrc. If you want to make a change to bash shell then you need to modify bashrc. Copy this file to your desktop. Change it as shown below.

# System-wide profile for interactive zsh(1) shells.

# Setup user specific overrides for this in ~/.zshrc. See zshbuiltins(1)
# and zshoptions(1) for more details.

# Correctly display UTF-8 with combining characters.
if [[ "$(locale LC_CTYPE)" == "UTF-8" ]]; then
    setopt COMBINING_CHARS
fi

# Disable the log builtin, so we don't conflict with /usr/bin/log
disable log

# Save command history
HISTFILE=${ZDOTDIR:-$HOME}/.zsh_history
HISTSIZE=2000
SAVEHIST=1000

# Beep on error
setopt BEEP

# Use keycodes (generated via zkbd) if present, otherwise fallback on
# values from terminfo
if [[ -r ${ZDOTDIR:-$HOME}/.zkbd/${TERM}-${VENDOR} ]] ; then
    source ${ZDOTDIR:-$HOME}/.zkbd/${TERM}-${VENDOR}
else
    typeset -g -A key

    [[ -n "$terminfo[kf1]" ]] && key[F1]=$terminfo[kf1]
    [[ -n "$terminfo[kf2]" ]] && key[F2]=$terminfo[kf2]
    [[ -n "$terminfo[kf3]" ]] && key[F3]=$terminfo[kf3]
    [[ -n "$terminfo[kf4]" ]] && key[F4]=$terminfo[kf4]
    [[ -n "$terminfo[kf5]" ]] && key[F5]=$terminfo[kf5]
    [[ -n "$terminfo[kf6]" ]] && key[F6]=$terminfo[kf6]
    [[ -n "$terminfo[kf7]" ]] && key[F7]=$terminfo[kf7]
    [[ -n "$terminfo[kf8]" ]] && key[F8]=$terminfo[kf8]
    [[ -n "$terminfo[kf9]" ]] && key[F9]=$terminfo[kf9]
    [[ -n "$terminfo[kf10]" ]] && key[F10]=$terminfo[kf10]
    [[ -n "$terminfo[kf11]" ]] && key[F11]=$terminfo[kf11]
    [[ -n "$terminfo[kf12]" ]] && key[F12]=$terminfo[kf12]
    [[ -n "$terminfo[kf13]" ]] && key[F13]=$terminfo[kf13]
    [[ -n "$terminfo[kf14]" ]] && key[F14]=$terminfo[kf14]
    [[ -n "$terminfo[kf15]" ]] && key[F15]=$terminfo[kf15]
    [[ -n "$terminfo[kf16]" ]] && key[F16]=$terminfo[kf16]
    [[ -n "$terminfo[kf17]" ]] && key[F17]=$terminfo[kf17]
    [[ -n "$terminfo[kf18]" ]] && key[F18]=$terminfo[kf18]
    [[ -n "$terminfo[kf19]" ]] && key[F19]=$terminfo[kf19]
    [[ -n "$terminfo[kf20]" ]] && key[F20]=$terminfo[kf20]
    [[ -n "$terminfo[kbs]" ]] && key[Backspace]=$terminfo[kbs]
    [[ -n "$terminfo[kich1]" ]] && key[Insert]=$terminfo[kich1]
    [[ -n "$terminfo[kdch1]" ]] && key[Delete]=$terminfo[kdch1]
    [[ -n "$terminfo[khome]" ]] && key[Home]=$terminfo[khome]
    [[ -n "$terminfo[kend]" ]] && key[End]=$terminfo[kend]
    [[ -n "$terminfo[kpp]" ]] && key[PageUp]=$terminfo[kpp]
    [[ -n "$terminfo[knp]" ]] && key[PageDown]=$terminfo[knp]
    [[ -n "$terminfo[kcuu1]" ]] && key[Up]=$terminfo[kcuu1]
    [[ -n "$terminfo[kcub1]" ]] && key[Left]=$terminfo[kcub1]
    [[ -n "$terminfo[kcud1]" ]] && key[Down]=$terminfo[kcud1]
    [[ -n "$terminfo[kcuf1]" ]] && key[Right]=$terminfo[kcuf1]
fi

# Default key bindings
[[ -n ${key[Delete]} ]] && bindkey "${key[Delete]}" delete-char
[[ -n ${key[Home]} ]] && bindkey "${key[Home]}" beginning-of-line
[[ -n ${key[End]} ]] && bindkey "${key[End]}" end-of-line
[[ -n ${key[Up]} ]] && bindkey "${key[Up]}" up-line-or-search
[[ -n ${key[Down]} ]] && bindkey "${key[Down]}" down-line-or-search

# Default prompt
PS1="%n@%m %1~ %# "

# Useful support for interacting with Terminal.app or other terminal programs
[ -r "/etc/zshrc_$TERM_PROGRAM" ] && . "/etc/zshrc_$TERM_PROGRAM"

if [[ -f /Users/Shared/newPath.bash ]]; then
    source /Users/Shared/newPath.bash
fi

Save this file back to the etc folder. It might be a good idea to take a backup of the original file in case we need to restore it back to undo any errors we might introduce.

Open the terminal app. Run the welcome.bash script without providing the path. See if it works.

Run the command to print the path variable:

printenv PATH

As we can see, there is no need to run the export command repeatedly. There is no need to source the file that contains those commands either.

Standard location or custom path

This approach does give us a lot of flexibility. However, we can see that there are several things we need to do before we can get everything working well. It might be better for us to place our commands in the standard /usr/local folder. That would make the deployment a lot easier.


Man pages

What are man pages?

If you have used the command line interface on macOS/Unix/Linux then you would be familiar with the man command. In case you aren’t then the man command is the command that loads the manual for the binary specified. It is a quick easy way to access the documentation and help for the command. However, man pages aren’t restricted to only binaries. They could be applied on normal files too.

There is one thing to keep in mind. It is not necessary that a man page exists for a given command. Try running the command man folderCreator. What do you get?

No manual entry for folderCreator

We get a message saying that there is no manual entry for our binary. So we need to go ahead and create one.

Before I talk about how to create them I will first address the question of whether we need to create one in the first place. Especially since we are already providing help view the -h -help options. Actually we don’t have to. However, keep in mind that most users are already familiar with the man command and their instinctive reaction is to look for the man page of your command. It would be very nice to offer them that ability.

How do we create them?

In order to create our man page we need to use certain macros that render the document for us. More information can be available via the mandoc, groff, mdoc, and man commands. I would highly recommend going through the man pages of these commands.

man pages are simple files that contain information which is formatted with the help of different macros. A typical man page contains the following sections in the specified sequence:

  1. NAME
  2. SYNOPSIS
  3. DESCRIPTION
  4. VERBS
  5. REQUIREMENTS
  6. INSTALLATION
  7. USAGE
  8. WARNINGS
  9. EXIT STATUS
  10. EXAMPLES
  11. DIAGNOSTICS
  12. COPYRIGHT
  13. CONTACT DETAILS

There are other sections available too: the man page for groff command contains excellent information about that. Armed with the information about which sections are there within the man page we need to start gathering all our details together.

One piece that we need is the manual section.If we run the man command on man:

man man

It gives us some information about the manual sections. The sections describe the kinds of commands and potentially the actions they perform. Our command would fall under the user commands section or section 1.

Where are they located?

These files are located in the /usr/local/share/man/man1 folder. Where man1 represents the section number.

Let us try to create the file. Before that we will look at some macros that we would need.

MacroDescription
.DdThis is used to specify the date when the man page was created/published.
.DtThis is used to specify the title for the man page. Its value should always be in all caps.
.OsThe name of the operating system.
.ShSection header name,
.NmThe name of the command. This is the name that will be used throughout the document.
.NdThe description of the command.
.ArArguments being passed to a command
.OpOptions being passed to a command
.PpNew paragraph
.BlStart a list
.ElEnd the list
.Ev For environment variables
.ItItalics
.SsSubsection
.AnName of the author
.SySymbolic font mode
.\"Comment
Macros used to create the man page file

You can get more details and information about these macros by running the following command:

man mdoc

We will now use these macros to render our man page. The easiest way to do this would be to use an existing man page file as a template. The idea is to use the macros to do the rendering for us. Copy paste the contents of any existing man page into your file and start replacing the content with your own content. You can always test your page by using the man command directly on your file.

man /path/to/your/manpage/file.1

A good thing to do would be to add 1 item at a time and run the above command repeatedly till you get comfortable with how everything fits together.

If you need help correcting the formatting of the file run the following command:

mandoc -T lint folderCreator.1

This is how the man page file looks. Name it folderCreator.1 where the ‘1’ indicates the section number.

.\"Copyright (c) 2015-2022 Amaranthine. All Rights Reserved.
.\"
.\"
.Dd August 10, 2021
.Dt FOLDERCREATOR 1
.Os macOS 11
.Sh NAME
.Nm folderCreator
.Nd Folder creation utility
.\"
.\" ============================================================================
.\" ========================== BEGIN SYNOPSIS SECTION ==========================
.Sh SYNOPSIS
.Nm
.Ar "folder names"
.Op verbs
.\" =========================== END SYNOPSIS SECTION ===========================
.\" ============================================================================
.\"
.\" ============================================================================
.\" ======================== BEGIN DESCRIPTION SECTION =========================
.Sh DESCRIPTION
.Nm
creates 3 folders in the home folder.
In case the folder names are not provided then the command
will create folders with default names "Tools", "Reports", "Help".
.Pp
The user is also prompted via the graphical user interface for names that should be used for the folders.
This is optional and the user can cancel it.
.Pp
There is also the option of getting help via the help verb.
.Pp
- This script is intended for creating the custom folders that are required on all corporate computers.
.Pp
- Run this script on a new computer or a computer being reassigned to another employee.
.Pp
- This script can run on all computers.
.\" ----------------------------------------------------------------------------
.\" ------------------------- BEGIN TERMINOLOGY LIST ---------------------------
.Sh VERBS
.Bl -hang
.It Op Fl h help
Both the options are used to invoke the help documentation.
.It Op Fl v version
Both the options are used to get the version number of the
.Nm
command.
.El
.\" --------------------------- END TERMINOLOGY LIST ---------------------------
.\" ----------------------------------------------------------------------------
.\" ============================================================================
.\" ======================== BEGIN REQUIREMENTS SECTION ========================
.Sh REQUIREMENTS
The following are the minimum requirements to get the script running.
.Bl -hang -offset 4n -width "xxxxxxxxxxxx" -compact
.It Shell:
zsh
.It OS:
macOS Big Sur 11.4 or later
.It Dependencies:
None
.El
.Ev HOME
.\" ============================================================================
.\" ======================== BEGIN INSTALLATION SECTION ========================
.Sh INSTALLATION
.Nm
can be installed anywhere you wish.
However, there are certain locations that are recommended.
.Bl -hang -offset 4n -width "xxxxxxxxxxxx" -compact
.It Location:
/Library/Scripts/
.It Permissions:
rwx r-x r-x
.El
.\" ============================================================================
.\" ======================== BEGIN USAGE SECTION ========================
.Sh USAGE
.Nm
.Ar folder1
.Ar folder2
.Ar folder3
.Pp
Will create folders with your own names.
.Pp
.Nm
.Ar -h
OR
.Nm
.Ar -help
.Pp
Will invoke the help utility.
.Pp
.Nm
.Ar -v
OR
.Nm
.Ar -version
.Pp
Will print the version number in stdout.
.Ss GUI Interaction
In all cases the user is always prompted for entering folder names via the graphical user interface.
Therefore this script triggers a gui popup.
In case this is not the desired behavior then the appropriate lines of code will need to be commented out.
.\" ============================================================================
.\" ======================== BEGIN WARNING/CAUTION SECTION ========================
.Sh WARNING/CAUTION
.Nm
does not perform any validation of names.
The only options that
.Nm
accepts are
.Ar -h
and
.Ar -help
verbs or the
.Ar -v
and
.Ar -version
verbs.
If the script does not see the
.Ar -h
,
.Ar -help
or the
.Ar -v
,
.Ar -version
options then it will assume that the data being passed in is the name of the folder.
The user of the
.Nm
command must ensure that the desired folder names are passed in.
The user will also be prompted, via the graphical user interface, if he/she wishes to provide the names for the folders.
If yes, then there will be subsequent
prompts asking for the folder names.
.\" ============================================================================
.\" ======================== BEGIN EXIT STATUS SECTION =========================
.Sh EXIT STATUS
In most situations,
.Nm
exits 0 on success
.\" ============================================================================
.\" ======================== BEGIN EXAMPLES SECTION ========================
.Sh EXAMPLES
.Nm
.Ar Resources
.Ar Results
.Ar Assistant
.Pp
This will create 3 folders
.Sy Resources
,
.Sy Results
,
.Sy Assistant
,
in the user's home folder.
.Pp
.Nm
.Pp
This will create 3 folders with the default names
.Pp
.Nm
.Ar Apps
.Pp
This will use the
.Sy Apps
name for the first folder but the default names for the last 2 folders.
.\" ============================================================================
.\" ======================== BEGIN DIAGNOSTICS SECTION ========================
.Sh DIAGNOSTICS
The script produces a log file called
.Sy ~/Library/Logs/folderCreator_log_v1-x.log
.Pp
This file is typically located in the user's home folder log folder.
The x represents the version number of
.Nm
.Pp
You can view the logs for each respective version.
.\" ============================================================================
.\" ======================== BEGIN COPYRIGHT SECTION ========================
.Sh COPYRIGHT
Copyright (c) Amaranthine 2015-2021.
All rights reserved.
https://amaranthine.in
.\" ============================================================================
.\" ======================== BEGIN CONTACT SECTION ========================
.Sh CONTACT DETAILS
.An Author: Arun Patwardhan
.Pp
Website: https://amaranthine.in
.Pp
Email: arun@amaranthine.co.in
view raw folderCreator.1 hosted with ❤ by GitHub

Place the man page in the following folder.

/usr/local/share/man/man1/folderCreator.1

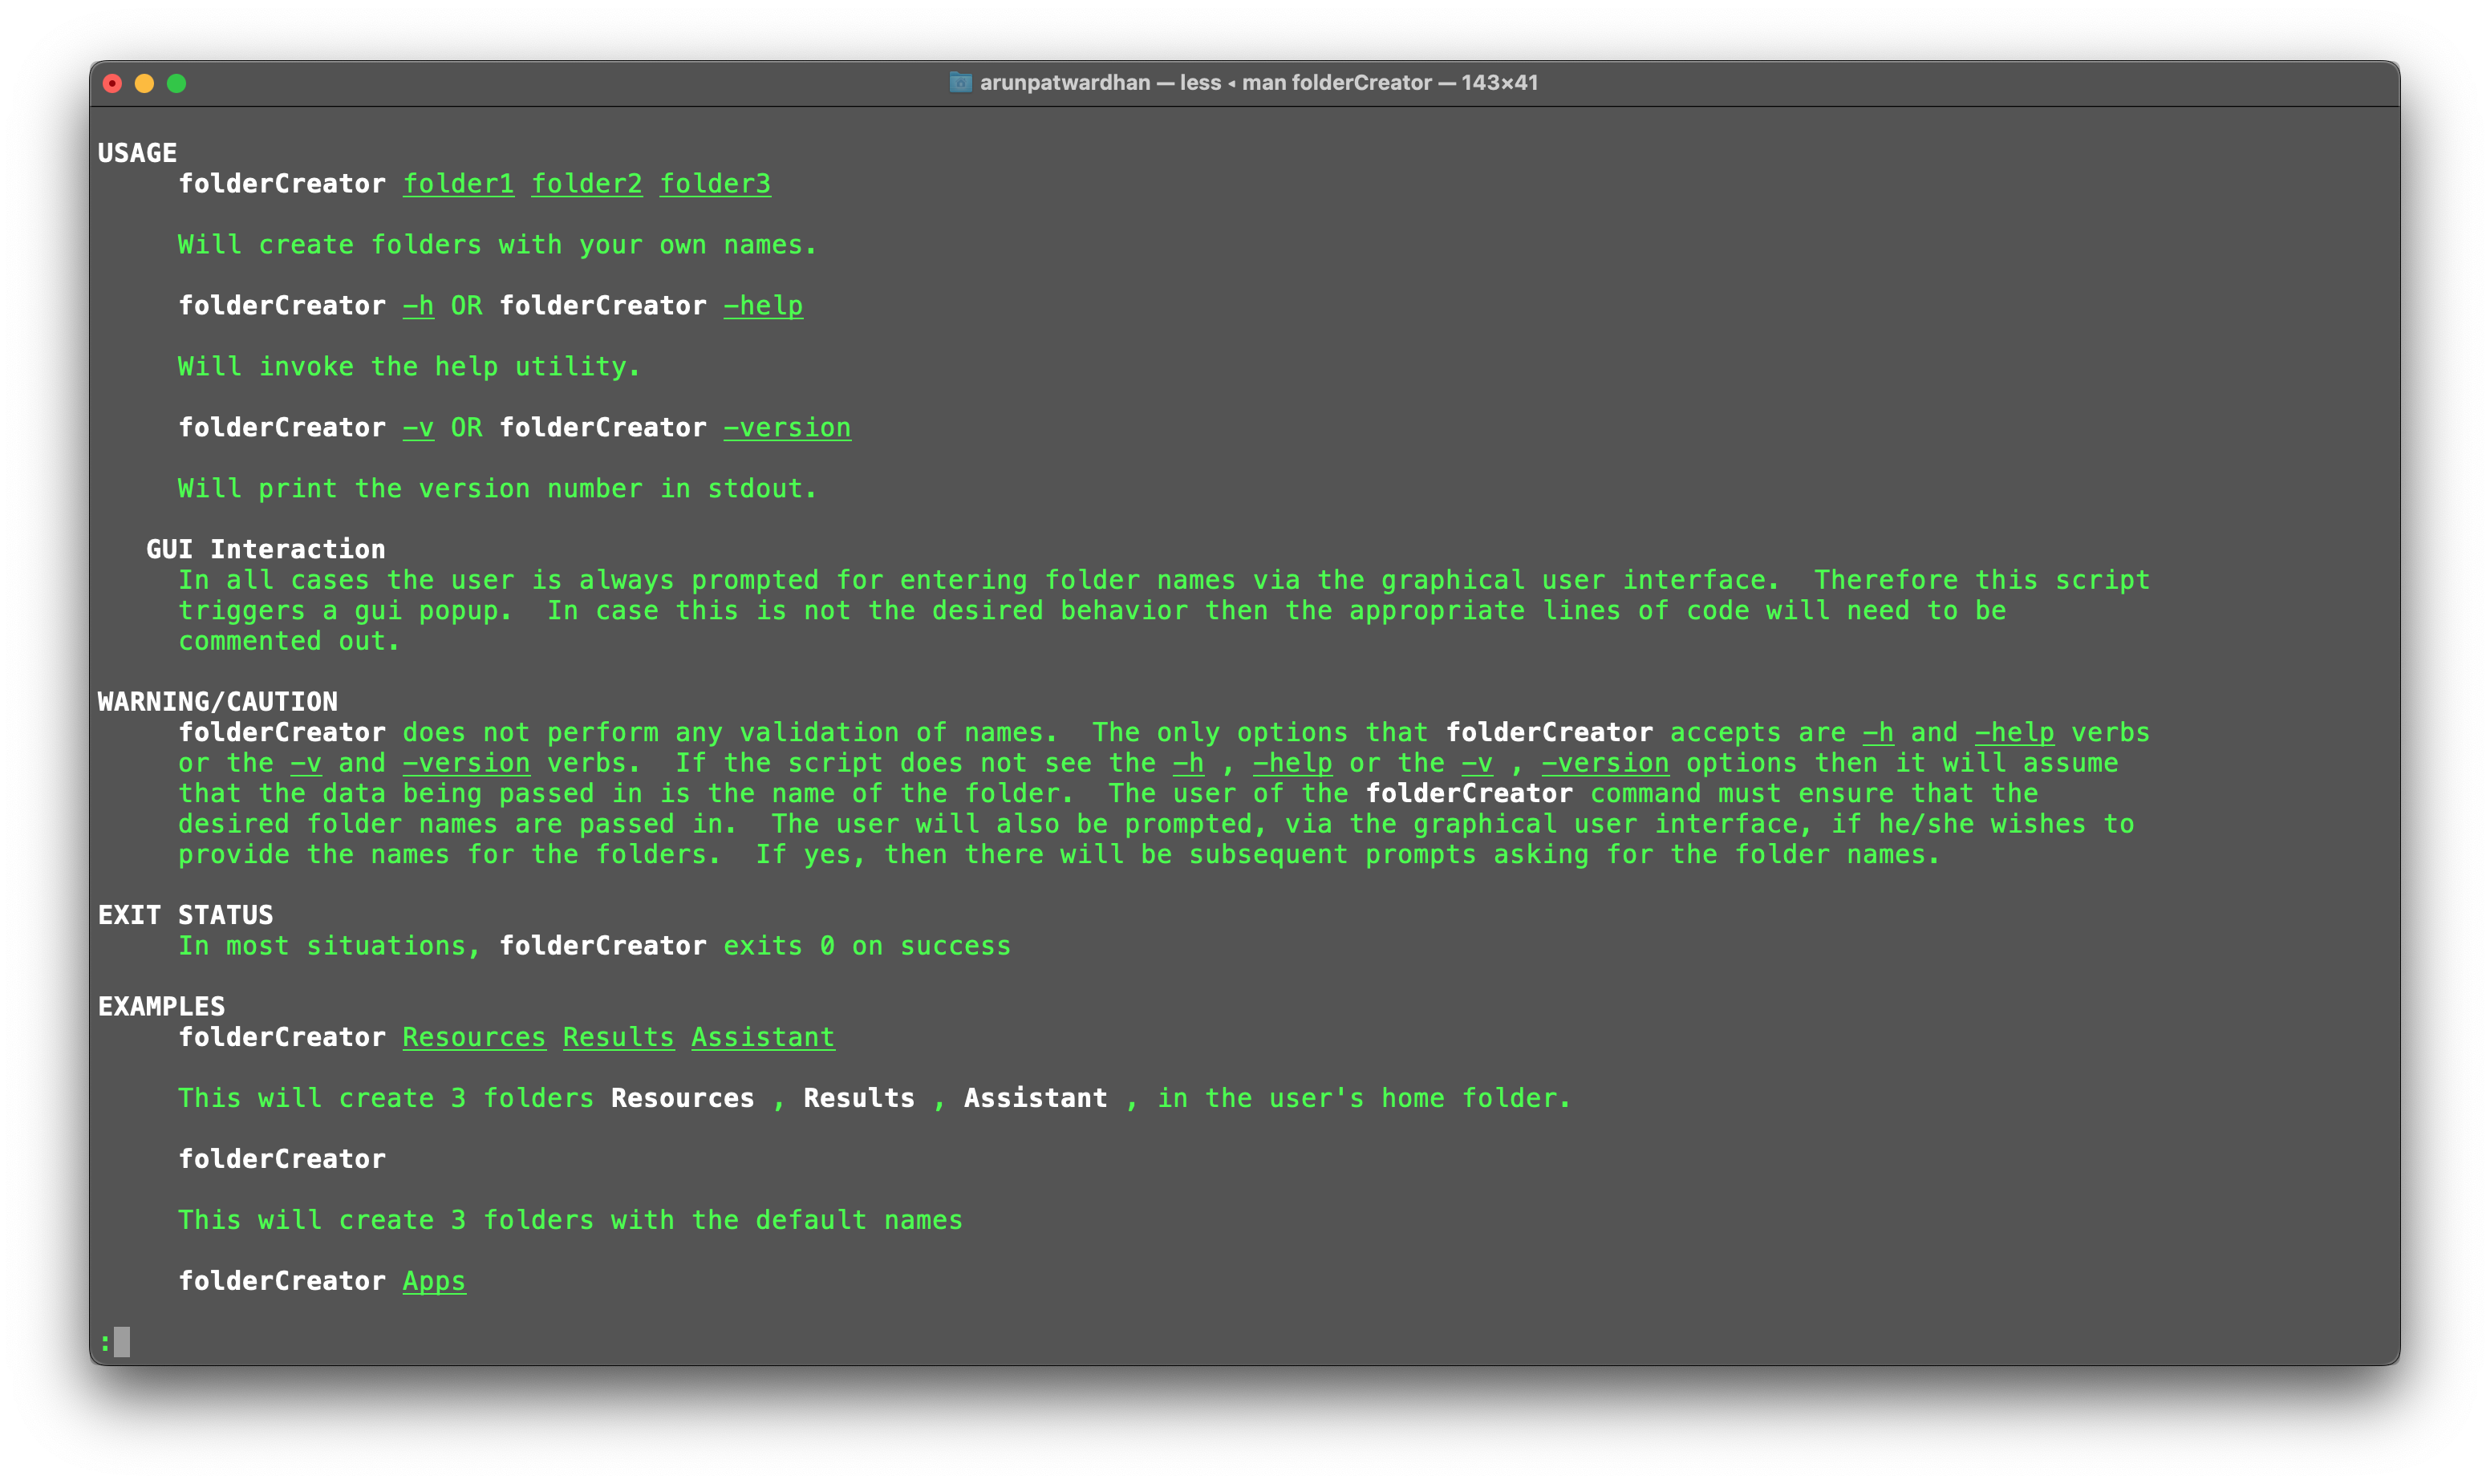
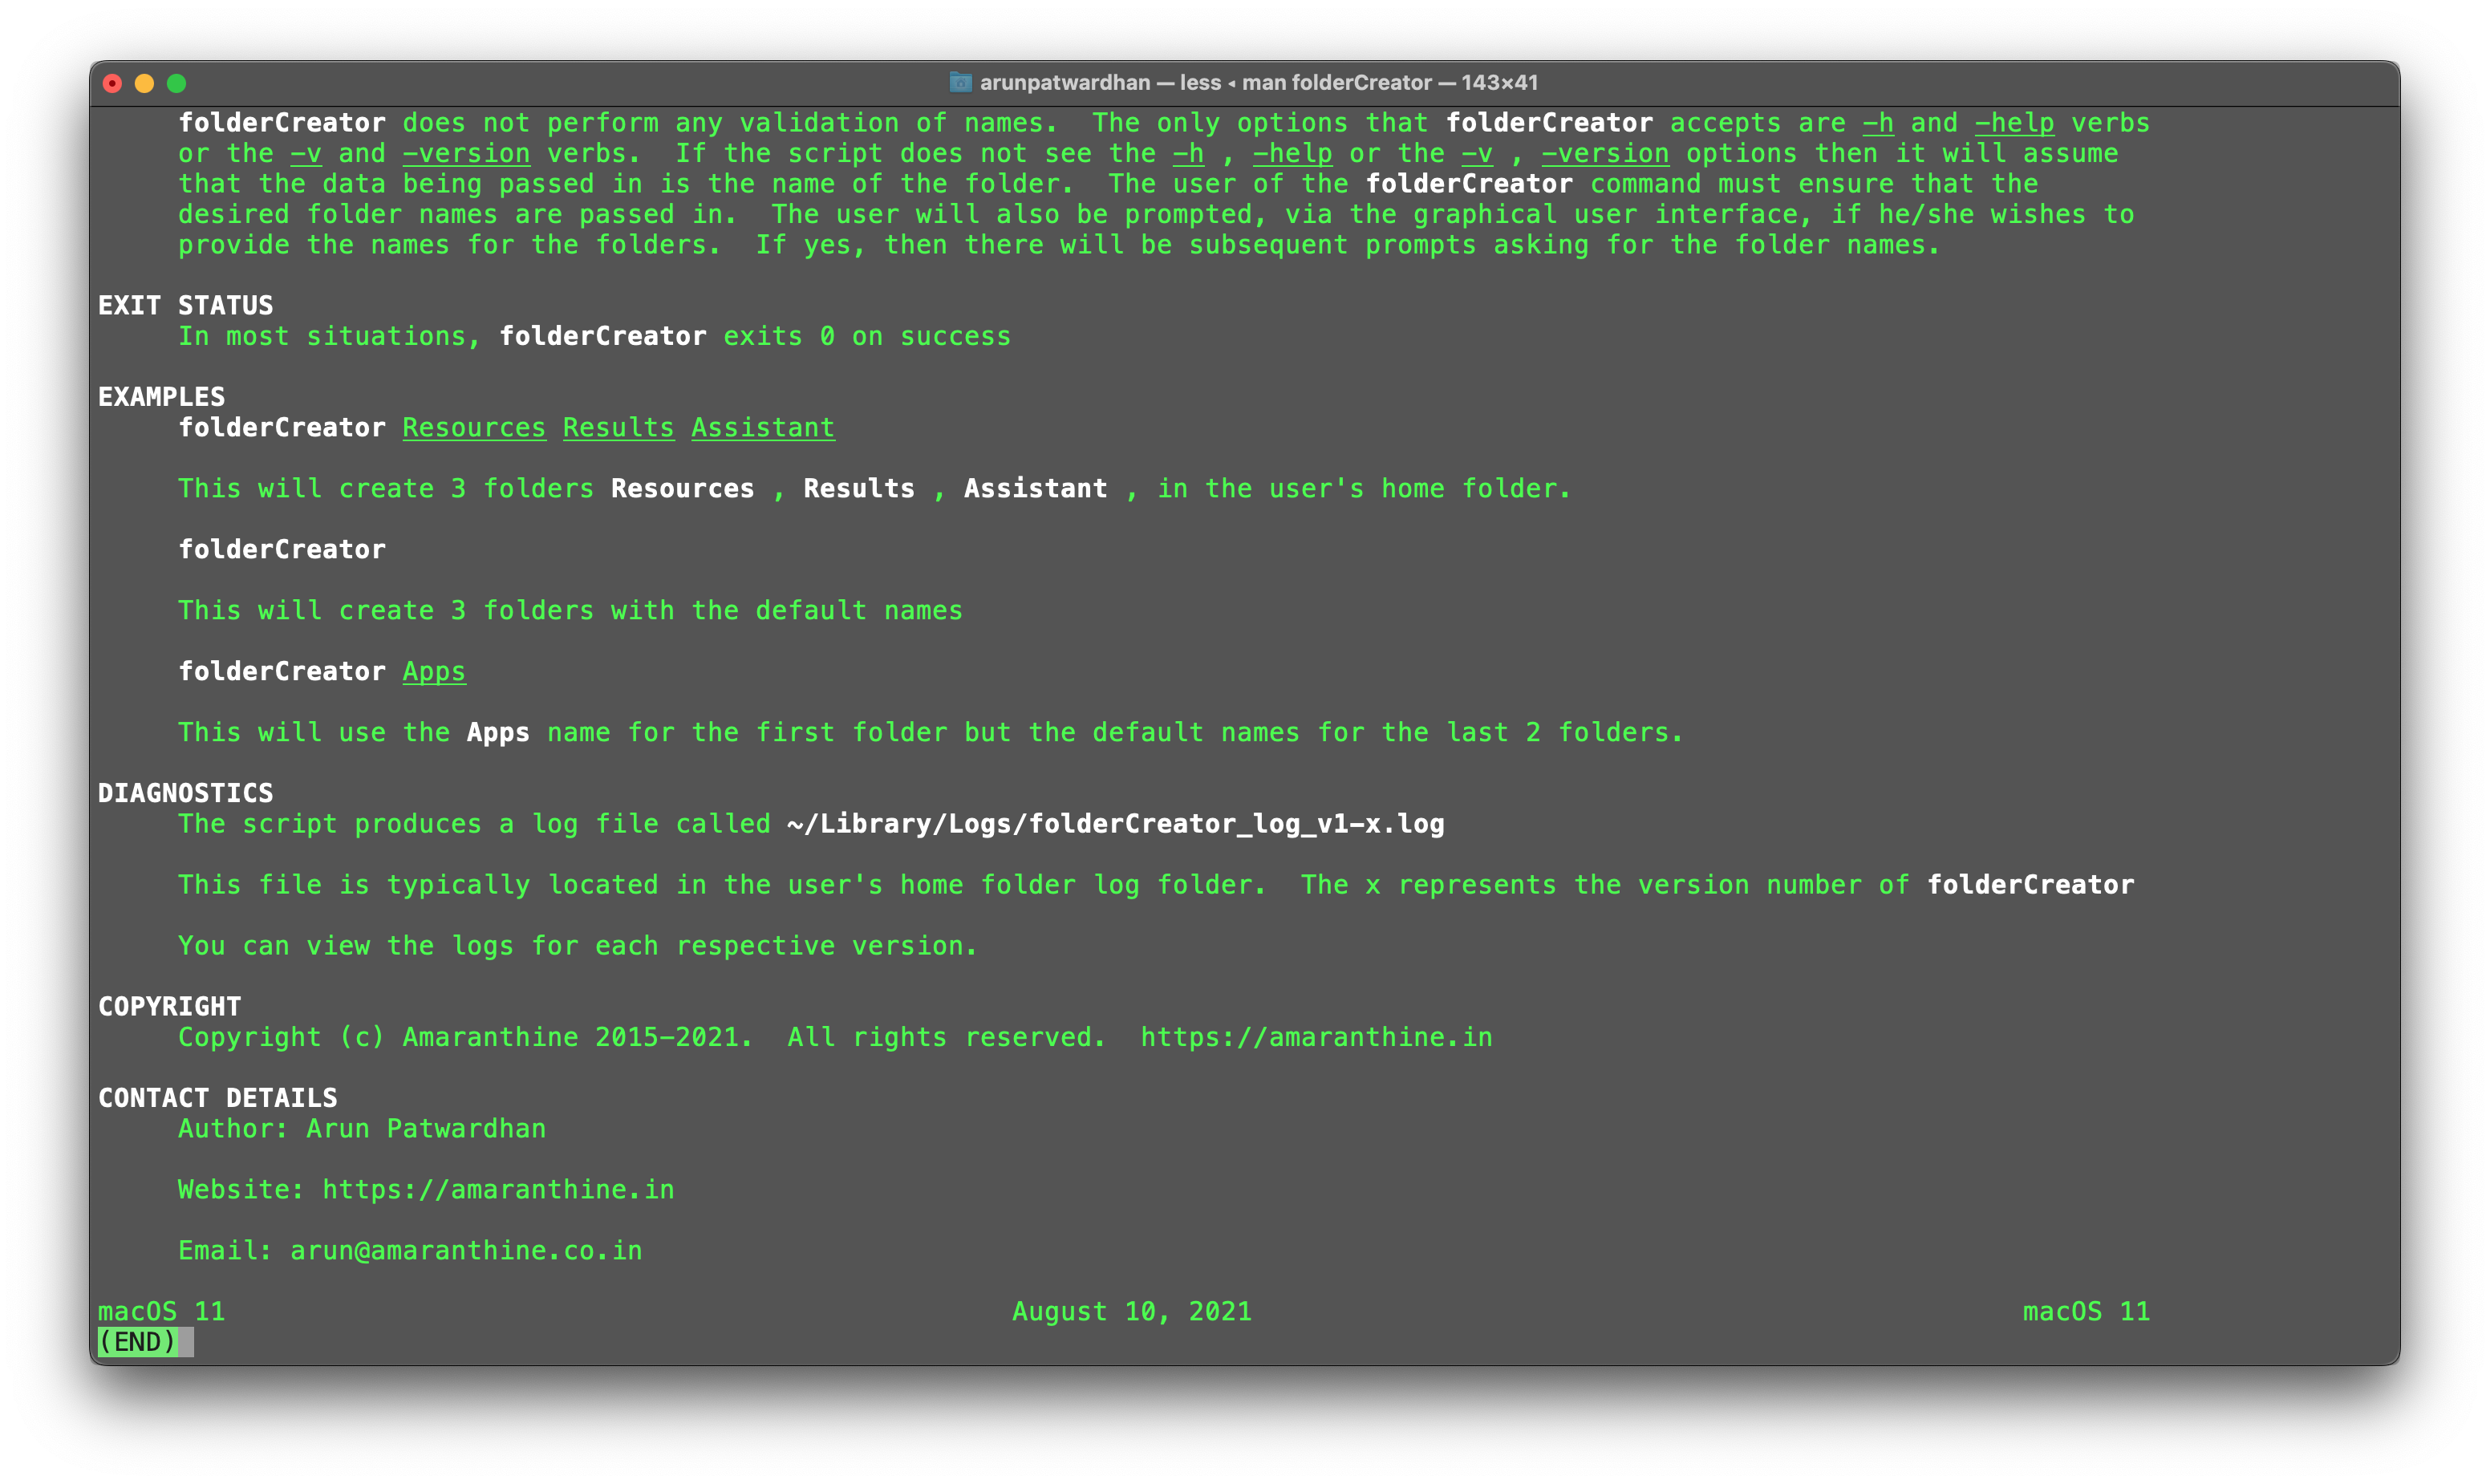
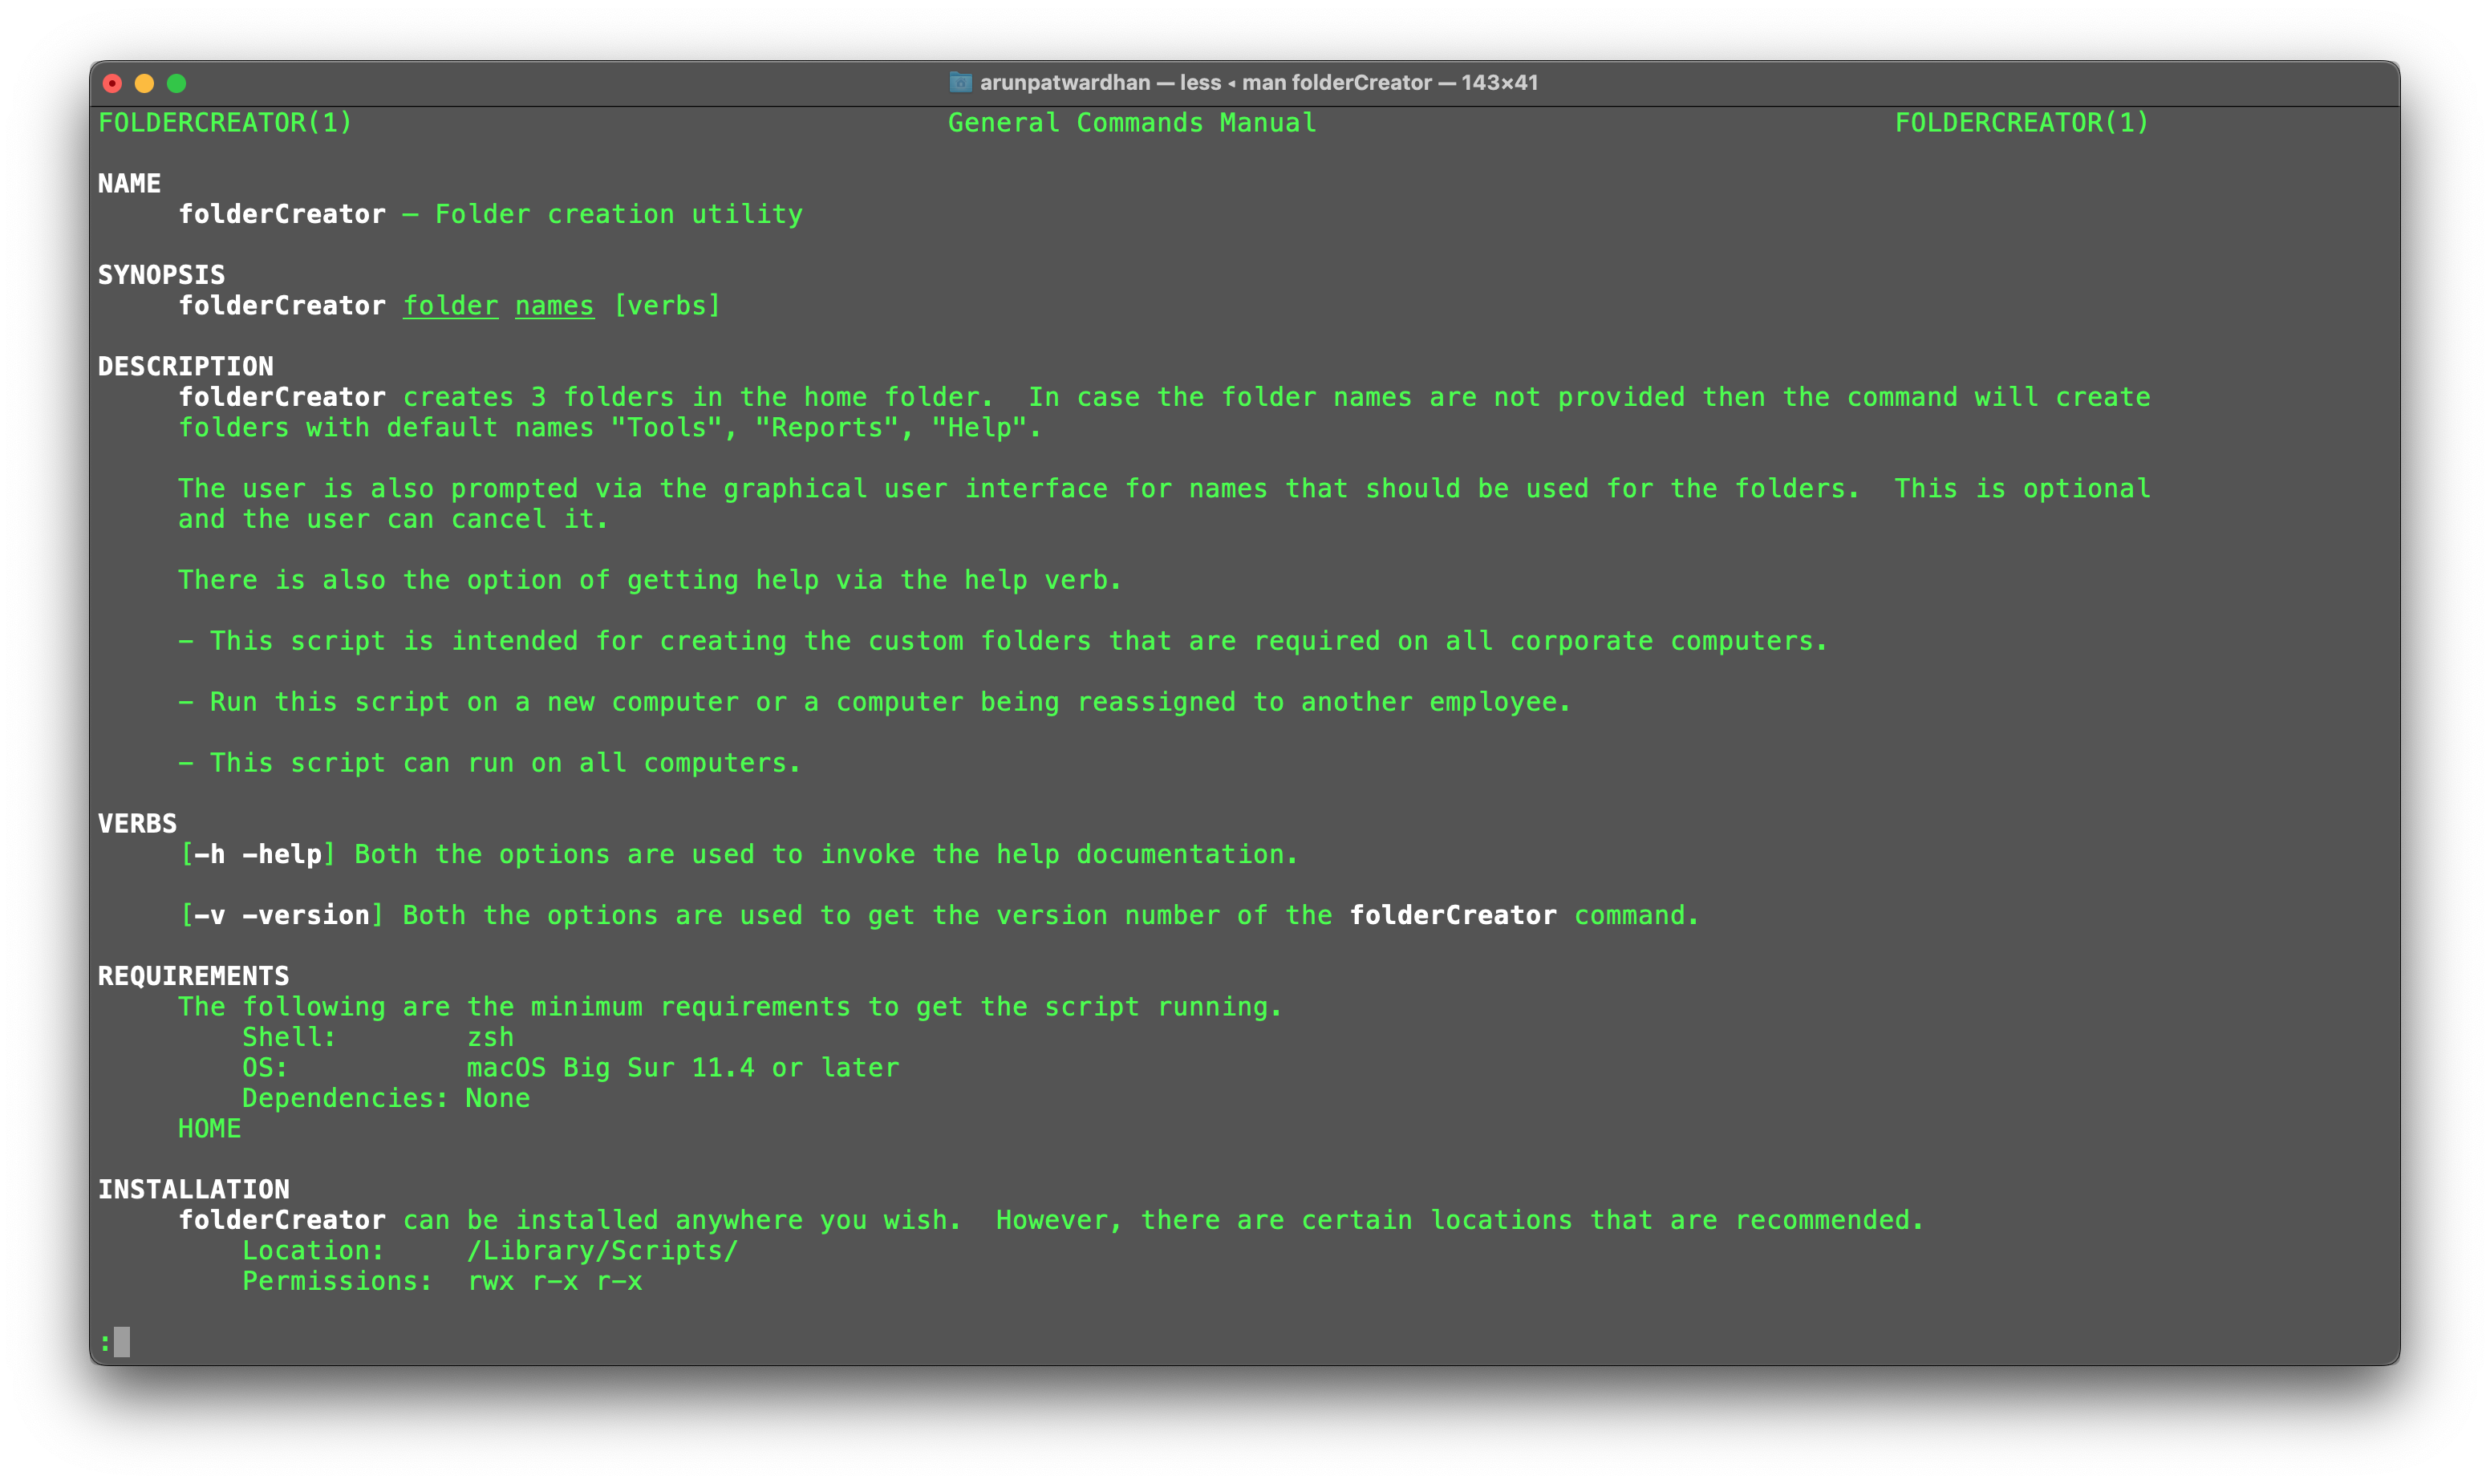
This is how it would look if we run the man command on our folderCreator script.

This is how it would look like if we opened it in the Preview application.


Video

Download

You can download the final script from here.

You can download the man page file from here.

Summary

Our script has evolved quite a bit from the first blog. We started off with a very simple script and have ended with a larger script. It still does the same thing it did originally but is now a lot better. Here are some of the key points:

  • Writing event updates to log files
  • User interaction
  • Flexibility in terms of folder names via user interaction from the GUI as well as the command line arguments
  • Easy to maintain thanks to functions
  • Arrays make it scalable
  • Loops help make the script compact
  • Variables enhance scalability
  • Periodic checks ensure the script is safe and stable
  • User can get help using
    • the -h or the -help options
    • From the comments in the script
    • by viewing the man page for the script

Of course, there is room for improvement. Some of you might come up with ways of achieving this solution differently. Which is perfectly fine. There is no such thing as a universally perfect script. The point behind the script above was to illustrate how the different features could work together.

Final thoughts

Scripting is a continuous learning process. There are so many things in it. Over time you will find that you are faced with similar challenges. One thing that a lot of script writers and programmers do is to refer to perviously written scripts to get a head start. Every time you write a script it would be a good idea to archive it and keep a copy elsewhere. This will come in handy.

Happy scripting!

Shell scripting in macOS – Part 9: Automating scripts

This article is NOT a continuation of the previous article. The topics covered in this article won’t be used in our folder creation script as the features covered are not required or can’t be appropriately used. We will use a different script instead. This article is a continuation of the Shell scripting series though.

Why automate?

Most of the times we or someone else will be running the desired script. However there is one major drawback with this. It assumes that there is ‘someone’ who can run the script and they have access to the computer that the script is supposed to run on. This is not always a given.

The above approach also has the problem of efficiency. If the script is to be run periodically or at regular intervals it can get very inefficient and is likely to affect the workflows of the organisation.

Automation solves these problems for us by allowing scripts to run by themselves.

How to automate?

There are 2 options that we will look at in this article:

  • Expect utility
  • Launch Daemons/Launch Agents

Expect utility

The expect utility isn’t strictly an automation solution. It’s a tool that can answer stdout prompts from another script/program/application. Let us see how it works with an example.

The script below is asking a series of questions from the user and is expecting a response. The response is stored in a variable which is echo’d out. To make it interesting the last question is a choice based questions. Based on some random value the script will ask question ‘a’ or question ‘b’.

#!/bin/zsh

# Questions
# --------------------------------------------------
echo "1) What is your name?"
read -s NAME
echo $NAME 

echo "2) What is your email address?"
read -s EMAIL
echo $EMAIL 

echo "3) Could you tell me your company's website address?"
read -s WEBSITE
echo $WEBSITE 

echo "4) Please provide your mobile number?"
read -s MOBILE
echo $MOBILE 

# Choice
# --------------------------------------------------
if [[ $RANDOM -gt 90000 ]]; then
	echo "Do you like option A?"
else 
	echo "Would you prefer option B?"
fi

read -s OPTION
echo $OPTION 

Now if we just run the above script we would see prompts on stdout for the different questions and simply answer them. But what if this script is going to be called by another script? That is where the expect utility comes in. Let us have a look at out script and then analyse it

#!/bin/zsh
#!/usr/bin/expect 

#Variables
ANS1="Arun"
ANS2="arun@amaranthine.co.in"
ARG1=$1

export ANS1
export ANS2
export ARG1 

/usr/bin/expect << "EOF"
set myValue1 $env(ANS1);
set myValue2 $env(ANS2);
set arg1 $env(ARG1);

spawn /Users/arunpatwardhan/Developer/questions.zsh
expect "1) What is your name?\r" 
send -- "$myValue1\r"

expect "2) What is your email address?"
send -- "$myValue2\r"

expect "3) Could you tell me your company website address?"
send -- "www.amaranthine.in\r"

expect "4) Please provide your mobile number?"
send -- "$arg1\r"

expect {
	"Do you like option A?" { send -- "Of course!\r" }
	"Would you prefer option B?" { send -- "Definitely!\r" }
}

expect eof
EOF

Let us analyse this file line by line.

The first line is our interpreter declaration. The second line is where we specify which expect we will be using.

#!/bin/zsh
#!/usr/bin/expect 

Next we declare some variables. We will use them in our expect utility soon.

#Variables
ANS1="Arun"
ANS2="arun@amaranthine.co.in"
ARG1=$1

In order to use them in our utility we need to export these variables. We will then access them via the environment.

export ANS1
export ANS2
export ARG1 

This is where we start writing our expect command. Notice that we are using the ‘here’ document that we learnt in the previous script. This allows use to send multiple expect commands to the expect utility.

/usr/bin/expect << "EOF"

The first thing that we do is create variables for the expect utility from the variables that we already have.

set myValue1 $env(ANS1);
set myValue2 $env(ANS2);
set arg1 $env(ARG1);

Then we use the spawn command to start the script whose questions we wish to answer.

spawn /Users/arunpatwardhan/Developer/questions.zsh

Next we tell the expect utility to ‘expect’ a question. We specify the question to expect in the string after the expect command.

expect "1) What is your name?\r"

Once the expectation has been met, we send out our response to the question using the send command.

send -- "$myValue1\r"

We can answer the rest of the questions the same way. We can use variables to pass in data or directly write our answers in there.

In case of a choice we write an expect block command with the help of braces.

expect {
	"Do you like option A?" { send -- "Of course!\r" }
	"Would you prefer option B?" { send -- "Definitely!\r" }
}

Finally we end with an eof being passed to expect.

expect eof

The last EOF is for the ‘here’ document.

EOF

That’s it! It’s that simple to write expect scripts. Note that there are more commands available for the expect utility. I would strongly recommend going through the man page for details about expect.

man expect

There is also a utility called autoexpect that builds the expect script for you. As of this article (tested on macOS 12.6) it is not installed by default.

One last thing I would like to mention. The expect utility should ideally be used in a larger script which is invoking other scripts. It is not meant to replace human interaction. Use caution when invoking scripts/binaries/tools that you cannot read as you are not fully aware of everything that is done by these scripts.


Launch Daemons/Launch Agents

The other and option is to use launch daemons/launch agents. I will be referring to them as daemons through the rest of this article unless something specific has to be mentioned.

Daemons solve a different problem as compared to the expect utility.

The expect utility allows for a script/binary/tool/program to complete execution by answering questions expected from a human.

Daemons on the other hand allow us to schedule and automatically run scripts and custom intervals. These are background processes that are started on specific events. Daemons and agents are exactly the same, but they have some key differences:

Launch DaemonsLaunch Agents
These are owned by the systemThese are owned by the currently logged in user
Start as soon as the system boots upStarts only after the user logs in. Stops as soon as the user logs out
Is system wideCan apply to all user accounts or to a specific user account

These are some of the points that you have to keep in mind while deciding whether to create a daemon or an agent. The process for creating them is exactly the same. It is plist file that provides all the information that is necessary for the system to schedule and run the processes.

I will be talking about launch daemons and agents as well as plist files in separate articles at a later point in time.

Example

Let us look at how to create a daemon with the help of an example.

We would like to show an informational popup that appears as soon as the user logs in and at 5 minutes interval. We would also like to show a notification of the same.

Now this could also be achieved using other approaches but it gives us an opportunity to explore how to create agents. Also the scheduling is chosen so that we can see how it is done. It is not strictly required for this situation.

So why have we decided to create it as an agent?

The main reason is because it is to run only after the user logs in. Something that a Launch Agent is perfectly suited for.

We also want this to run for every user account on the computer. So this will need to be installed in the /Library folder. Specifically:

/Library/LaunchAgents/

Now that we have decided how and where let us focus first on the script that we plan to run.

#!/bin/zsh

/usr/bin/osascript << EOF 
display notification "By using this computer you agree to terms and conditions of use set down by the company." \
					  with title "Terms & Conditions" \
					  subtitle "Acknowledge" \
					  sound name "Alert"

set theAlertText to "Terms and conditions of use"
set theAlertMessage to "By using this computer you agree to terms and conditions of use set down by the company."
display alert theAlertText \
	    message theAlertMessage \
		as informational \
		buttons {"Accept"} default button "Accept"
EOF

The script simply uses the osascript command to run a few AppleScript commands. These commands show a notification as well as an alert message to the user. Let us place this script in the /Library/Scripts/ folder. This will make it easily accessible.

Next we will focus on creating the launch agent plist. Let us first list out the items we will need to put in the plist.

KeyDescription
LabelThis is the name of our Launch Agent
ProgramArgumentsThis is the action to be performed. In our case the action is to invoke the script.
StartIntervalThis is the time interval after which the program arguments must be executed.
RunAtLoadThis is a flag that indicates that the agent must be run as soon as it is loaded.

Armed with this information we will go ahead and create our plist. There are several tools available for this:

  • Xcode
  • TextEdit
  • defaults command
  • Third party tools like CodeRunner

We will use the defaults command for this. It is a built in command that allows us to work with plist files. Here is a little script that creates our plist.

#!/bin/zsh

defaults write ~/Desktop/in.amaranthine.welcomeMessage.plist Label -string "in.amaranthine.welcomeMessage"
defaults write ~/Desktop/in.amaranthine.welcomeMessage.plist ProgramArguments -array-add "/bin/zsh" "/Library/Scripts/welcome.zsh"
defaults write ~/Desktop/in.amaranthine.welcomeMessage.plist RunAtLoad -boolean true
defaults write ~/Desktop/in.amaranthine.welcomeMessage.plist StartInterval -integer 300

In the script, the defaults command is writing several key value pairs into a plist file at the specified path. Notice the key names: Label, ProgramArguments, RunAtLoad, StartInterval. These are the values we need to specify. The above commands need not be written in a specific sequence as they are being written to an XML file.

The resulting plist file should look like this:

<?xml version="1.0" encoding="UTF-8"?>
<!DOCTYPE plist PUBLIC "-//Apple//DTD PLIST 1.0//EN" "http://www.apple.com/DTDs/PropertyList-1.0.dtd">
<plist version="1.0">
<dict>
	<key>Label</key>
	<string>in.amaranthine.welcomeMessage</string>
	<key>ProgramArguments</key>
	<array>
		<string>/bin/zsh</string>
		<string>/Library/Scripts/welcome.zsh</string>
	</array>
	<key>RunAtLoad</key>
	<true/>
	<key>StartInterval</key>
	<integer>300</integer>
</dict>
</plist>

Lets explore the different parts of this plist file. It contains a dictionary with several key value pairs.

<key>Label</key>
<string>in.amaranthine.welcomeMessage</string>

The first key value pair we encounter is ‘Label’. This is the name of our agent.

<key>ProgramArguments</key>
<array>
	<string>/bin/zsh</string>
	<string>/Library/Scripts/welcome.zsh</string>
</array>

The next key value pair is extremely important. It is telling our agent the task that needs to be performed. In this case use the zsh shell to run the welcome.zsh script. This is the same as running the following command in terminal:

/bin/zsh /Library/Scripts/welcome.zsh
<key>RunAtLoad</key>
<true/>

The second key value pair indicates that the agent must run as soon as it is loaded and not only when the user logs in. This is not strictly required but is very handy when we try to test our agent.

<key>StartInterval</key>
<integer>300</integer>

The last key value pair will schedule the agent to run at an interval of 5 minutes or 300 seconds.

You can check if the plist if properly formatted using the command:

plutil -lint /path/to/plist

Also, if you try to open the plist file in an editor it is likely that the formatting may not appear correctly. Run the following command to make it readable:

plutil -convert xml1 /path/to/plist

This does not affect the plist file in any way. So it is safe to perform.

The next bit is to place the file in correct location. Copy the plist file to the path:

/Library/LaunchAgents/

Next we will look at loading the agent

While the agent will be loaded automatically every time the user logs in. However, we would like to test the results immediately. We will use the launchctl command to load the agent.

launchctl bootstrap gui/501 /Library/LaunchAgents/in.amaranthine.welcomeMessage.plist

Let us explore the launchctl command.

The bootstrap option informs the system that an agent is being loaded.

The next bit tells launchctl that its for gui user 501. We can get the user number using the command id -u.

This is followed by the path to the plist file.

Run this command.

To find out if the launch agent has loaded correctly we will use the list option on launchctl to list out all the current agents.

launchctl list

To get more specific results:

launchctl list | grep "in.ama"

This will show a list of agents whose name starts with “in.ama”.

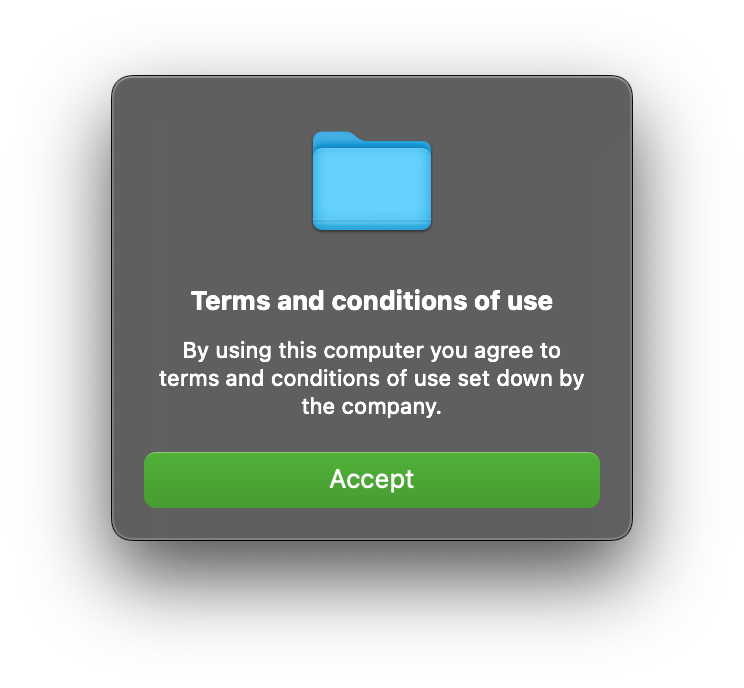
And that’s it. We have now scheduled the agent. If you have run the command to bootstrap the agent then you should see the popup appearing on the screen.

You should also see the notification:

If you wish to stop the agent run:

launchctl bootout gui/501 /Library/LaunchAgents/in.amaranthine.welcomeMessage.plist

It’s the same command as before. Except with the bootout option instead of the bootstrap.

NOTE: The agent will start running again the next time the user logs in.

Summary

As you can see there are several options available when it comes to automating scripts. This opens up more possibilities when it comes to performing management tasks on the device.

Video

Download

You can download the scripts from here:

Shell scripting in macOS – Part 8: Arrays & Dictionaries

This article is a continuation of the previous article. We will be taking the previous script and using it to build on the concepts we will learning in this article.

So far we have been working with a single piece of data. This was stored in a single variable. For each new piece of information we created a new variable. However, we often come across situations where there is more than one value for a given item. This is where collections like arrays and dictionaries come in.

Arrays

An array is a sequential collection of data. It allows us to store more than one value in a variable. This is good for situations like the contents of a folder, list of users, list of applications. Creating, reading, modifying, and iterating over an array is very easy. Let us have a look.

Creating

To create an array simply declare a variable followed by the '=' operator followed by values within round brackets.

# Declaring an array of items 
items=("ABC" "DEF" "GHI" "JKL" "MNO" "PQR")

Note that if you assign another set of values to the items variable it will replace the original values. We will see how to add values to an existing array a little later in the article.

Reading

We need to use the ${ } to read an array. This expands the array and allows us to read different values. There are different operations possible. I have listed some of those in the code snipper below.

# Getting a specific element from the array
echo "\${items[0]} 		= ${items[0]}"

# Getting all the elements of the array
echo "\${items[@]} 		= ${items[@]}"

# Getting the count of the elements in the array
echo "\${#items[@]} 	= ${#items[@]}"

# Getting a range of values
echo "\${items[@]:3:2} 	= ${items[@]:3:2}"

Modifying

To modify we simply need to use the '+' operator before the equals. This will add the value to the existing array without disturbing the other values.

# Pushing a value into the array
items+=("STU")

# Remove a specific item
unset items[2]

A small point to note. The unset is available with /bin/sh interpreter.

Iterating

for entry in "${items[@]}"
do 
	echo "-> $entry"
done

Here is a nice example of the user of arrays. The output of the list command is stored as an array in the variable named ‘directories’. Then using the for loop we can step through each folder and in turn printing its contents out.

directories=($(ls $HOME))

for folder in "${directories[@]}"
do 
	echo $folder
	eval "ls -l $HOME/$folder"
done

Dictionaries

Dictionaries are also collections just like arrays. However, there is one major difference. While arrays are indexed using integers, dictionaries are indexed using strings.

There is one small thing to note about dictionaries. They only work with bash version 4.0 or later. So if you face issues, make sure you are running bash 4.0 or later. In my example I am using zsh version 5.8.1. To find out which version you are running simply run the following command in terminal:

bash --version

or

zsh --version

Let us look at how to create and use dictionaries.

Creating

Creating a dictionary is very easy. We simply declare an associative array and give the dictionary variable a name.

declare -A contactDetails

Modifying

Editing or adding values to a dictionary is easy too. We use the variable name followed by the '[]' index brackets with the key value inside the brackets. This is followed by the '=' operator and the value to be assigned for that key after that.

contactDetails[name]="Arun"
contactDetails[email]="arun@amaranthine.co.in"
contactDetails[website]="www.amaranthine.in"
contactDetails[blog]="www.arunpatwardhan.com"
contactDetails[phone]="+91-9821000000"
contactDetails[dob]="$(date)"

Reading

We use the ‘@{ }’ operator to expand and read values from the dictionary, just as we did with an array. The only additional detail here is that we are using the key in order to get the specific value.

# Getting the value for a specific key
echo ${contactDetails[name]}

# Getting all the values
echo ${contactDetails[@]}

# Getting all the keys
echo ${(k)contactDetails[@]}

# Getting all the values
echo ${(v)contactDetails[@]}

# Getting all the keys and values
echo ${(kv)contactDetails[@]}

# Getting number of entries
echo ${#contactDetails[@]}

Iterating

There are several different ways of iterating over a dictionary. In the example below, the for loop is iterating over all the keys from the dictionary. Inside the loop we are using each key to extract the corresponding value.

for item in "${(k)contactDetails[@]}"
do 
	printf "%-10s \t%-40s" $item ${contactDetails[$item]}
	echo " "
done

Script

Let us update out script to use arrays.

#!/bin/zsh

#-------------------------------------------------------------------------------------------------
#NAME:		Folder creator
#AUTHOR:	Arun Patwardhan
#CONTACT:	arun@amaranthine.co.in
#DATE:		15th September 2022
#WEBSITE:	https://github.com/AmaranthineTech/ShellScripts
#-------------------------------------------------------------------------------------------------

#LEGAL DISCLAIMER --------------------------------------------------------------------------------
#THE SOFTWARE IS PROVIDED "AS IS", WITHOUT WARRANTY OF ANY KIND, EXPRESS OR
#IMPLIED, INCLUDING BUT NOT LIMITED TO THE WARRANTIES OF MERCHANTABILITY,
#FITNESS FOR A PARTICULAR PURPOSE AND NONINFRINGEMENT. IN NO EVENT SHALL THE
#AUTHORS OR COPYRIGHT HOLDERS BE LIABLE FOR ANY CLAIM, DAMAGES OR OTHER
#LIABILITY, WHETHER IN AN ACTION OF CONTRACT, TORT OR OTHERWISE, ARISING FROM,
#OUT OF OR IN CONNECTION WITH THE SOFTWARE OR THE USE OR OTHER DEALINGS IN THE
#SOFTWARE.
#-------------------------------------------------------------------------------------------------

#LICENSE/TERMS AND CONDITIONS --------------------------------------------------------------------
#MIT License

#Copyright (c) Amaranthine 2021.

#Permission is hereby granted, free of charge, to any person obtaining a copy
#of this software and associated documentation files (the "Software"), to deal
#in the Software without restriction, including without limitation the rights
#to use, copy, modify, merge, publish, distribute, sublicense, and/or sell
#copies of the Software, and to permit persons to whom the Software is
#furnished to do so, subject to the following conditions:

#The above copyright notice and this permission notice shall be included in all
#copies or substantial portions of the Software.
#-------------------------------------------------------------------------------------------------

#ABOUT -------------------------------------------------------------------------------------------
# fileCreator.zsh
# 1.7
#-------------------------------------------------------------------------------------------------

#DESCRIPTION ------------------------------------------------------------------------------------- 
# - THis script is intended for creating the custom folders that are required on all corporate computers. 
# - Run this script on a new computer or a computer being reassigned to another employee.
# - This script can run on all computers.
#-------------------------------------------------------------------------------------------------

#USAGE -------------------------------------------------------------------------------------------
# - To create folders with default names run the command: ./folderCreator.zsh
# - To define your own folder names: ./folderCreator.zsh <folder1> <folder2> <folder3>
# - Available options  : Only the help option is available
# - Getting help       : Use the -h or the -help options to get more information. Or you can use the man command to view the man page.
#-------------------------------------------------------------------------------------------------

#WARNING/CAUTION ---------------------------------------------------------------------------------
#******************************************************************************************************************
#******************************************************************************************************************
#******************************************************************************************************************
#******************************************************************************************************************
# This script doesn't perform any validation of the folder names being passed in by the user. 
# If the script does not see the -h or the -help options then it will assume that the data being passed in is the name of the folder.
# The user of the script must ensure that the desired folder names are passed in.
#******************************************************************************************************************
#******************************************************************************************************************
#******************************************************************************************************************
#******************************************************************************************************************
#-------------------------------------------------------------------------------------------------

#INSTALLATION ------------------------------------------------------------------------------------
# Instructions for placing the script in the correct place are listed here. 
# Location:		/Library/Scripts/
# Permissions:	rwx r-x r-x
#-------------------------------------------------------------------------------------------------

#REQUIREMENTS ------------------------------------------------------------------------------------
# Shell:		/bin/zsh
# OS:			macOS Big Sur 11.4 or later
# Dependencies:	None
#-------------------------------------------------------------------------------------------------

#HELP/SUPPORT ------------------------------------------------------------------------------------
# You can get help by running the following commands.
# ./folderCreator.zsh -h
# ./folderCreator.zsh -help
# OR
# man folderCreator.zsh
# You can also view the log file for the same at: ~/Library/Logs/folderCreator_log_v1-7.log
#-------------------------------------------------------------------------------------------------

#HISTORY -----------------------------------------------------------------------------------------
# ------------------------------------------------------------------------------------------------
# Version 1.0: Basic script which creates the folders
# Version 1.1: Gives user the ability to specify the folder names at run time.
# Version 1.2: Adds safety checks to the scripts
# Version 1.3: Includes documentation as well as ability to get help.
# Version 1.4: Includes optimisation using for loop
# Version 1.5: Prompts the user in the GUI for names for the different folders.
# Version 1.6: Updated the log mechanism with the help of a function and here document.
# Version 1.7: Replaced the folder variables with an array
#-------------------------------------------------------------------------------------------------

#-------------------------------------------------------------------------------------------------
# ------------------------------ SCRIPT STARTS HERE ----------------------------------------------
#-------------------------------------------------------------------------------------------------
#-------------------------------------------------------------------------------------------------
#-------------------------------------------------------------------------------------------------

#These are the default values used for the folder names incase the user doesn't provide any.
FOLDERS=("Tools" "Reports" "Help")

#Script version number
VERSION_NUMBER="1.7"

#Command name
COMMAND_NAME="folderCreator.zsh"

#1. Check to see if the user is asking for help. In which case we will have to provide information about the command.
if [[ $1 == "-h" ]] || [[ $1 == "-help" ]]; then
	echo "ABOUT 
-----
fileCreator_v1-7.zsh
Version $VERSION_NUMBER

NAME 
----
$COMMAND_NAME โ€” Folder creation utility SYNOPSIS
$COMMAND_NAME folder names [ verbs ]

DESCRIPTION 
-----------
$COMMAND_NAME creates 3 folders in the home folder. In case the folder names are not provided then the command will create folders with default names 'Tools', 'Reports', \"Help\".

There is also the option of getting help via the help verb.
- This script is intended for creating the custom folders that are required on all corporate computers. 
- Run this script on a new computer or a computer being reassigned to another employee.
- This script can run on all computers.

VERBS 
-----
[ โˆ’h โˆ’help] Both the options are used to invoke the help documentation.
[ โˆ’v โˆ’version] Both the options are used to get the version number of the folderCreator command.

REQUIREMENTS 
------------
The following are the minimum requirements to get the script running.
Shell:\t\t zsh
OS:\t\t macOS Big Sur 11.4 or later
Dependencies:\t None

INSTALLATION 
------------
$COMMAND_NAME can be installed anywhere you wish. However, there are certain locations that are recommended.
Location:\t /Library/Scripts/ 
Permissions: \t rwxr-xr-x

USAGE  
-----
$COMMAND_NAME folder1 folder2 folder3 
Will create folders with your own names. 

$COMMAND_NAME -h OR $COMMAND_NAME -help 
Will invoke the help utility.

$COMMAND_NAME -v OR $COMMAND_NAME -version 
will print the version number in stdout.

WARNING/CAUTION  
---------------
$COMMAND_NAME does not perform any validation of names. The only options that folderCreator accepts are -h and -help verbs or the -v and 
-version verbs. If the script does not see the -h , -help or the -v , -version options then it will assume that the data being passed in is 
the name of the folder. The user of the folderCreator command must ensure that the desired folder names are passed in. The user will also be 
prompted, via the graphical user interface, if he/she wishes to provide the names for the folders. If yes, then there will be subsequent 
prompts asking for the folder names.

EXAMPLES 
--------
$COMMAND_NAME Resources Results Assistant
This will create 3 folders Resources , Results , Assistant , in the userโ€™s home folder. 

$COMMAND_NAME
This will create 3 folders with the default names

$COMMAND_NAME Apps
This will use the Apps name for the first folder but the default names for the last 2 folders. 

NOTE
----
The user will be asked if he/she wishes to provide custom names in all the examples mentioned above. The user's value will always override 
whatever is being provided to the script or defaults.

DIAGNOSTICS 
-----------
The script produces a log file called ~/Library/Logs/folderCreator_log_v1-x.log
This file is typically located in the userโ€™s home folder log folder. The x represents the version number of $COMMAND_NAME
You can view the logs for each respective version.

COPYRIGHT  
---------
Copyright (c) Amaranthine 2015-2021. All rights reserved. https://amaranthine.in

EXIT STATUS  
-----------
In most situations, $COMMAND_NAME exits 0 on success"
	exit 0
fi

PATH_TO_LOG="$HOME/Library/Logs/folderCreator_log_v1-7.log"

# Function to log activity
function recordActivity() {
	cat << EOF >> $PATH_TO_LOG
[$(date)] $1
EOF
}


echo "$(date) Running script $0 to create folders."
echo ""

TODAY=$(date)

recordActivity "Starting"

#2. Check to see if the version number is 
if [[ $1 == "-version" ]] || [[ $1 == "-v" ]]; then
	echo "Version: $VERSION_NUMBER"
	exit 0
fi

#3. The following if statements check to see if the script is receiving any arguments. It then picks those arguments and assigns them to the respective variables for use in the script.
if [[ $1 != "" ]]; then
	FOLDERS[0]=$1
fi

if [[ $2 != "" ]]; then
	FOLDERS[1]=$2
fi

if [[ $3 != "" ]]; then
	FOLDERS[2]=$3
fi

#4. We can prompt the user to see if they wish to provide folder names themselves. This will override any values provided as arguments.
userClicked=$(/usr/bin/osascript -e 'button returned of (display dialog "Would you like to provide names for the folders or use the defaults instead?" buttons {"Custom", "Default"} default button 2 with icon POSIX file "/System/Library/CoreServices/HelpViewer.app/Contents/Resources/AppIcon.icns")')
	
# if the user decides to provide custom names then go ahead and ask the user via GUI prompts. Otherwise use the values sent as arguments or defaults.	
if [[ $userClicked == "Custom" ]]; then
	recordActivity "The user decided to provide custom names."
	
	FOLDERS[0]=$(/usr/bin/osascript -e 'text returned of (display dialog "Enter the name of folder 1" default answer "Utilities" buttons {"OK"} default button 1 with title "Folder that will hold the utilities" with icon POSIX file "/Users/Shared/Finder.icns")')
	
	FOLDERS[1]=$(/usr/bin/osascript -e 'text returned of (display dialog "Enter the name of folder 2" default answer "Tools" buttons {"OK"} default button 1 with title "Folder that will hold the tools" with icon POSIX file "/Users/Shared/Finder.icns")')
	
	FOLDERS[2]=$(/usr/bin/osascript -e 'text returned of (display dialog "Enter the name of folder 3" default answer "Help" buttons {"OK"} default button 1 with title "Folder that will hold the support documents" with icon POSIX file "/Users/Shared/Finder.icns")')
		
	recordActivity "User provided: ${FOLDER[@]}"
else
	recordActivity "User decided to use default values: ${FOLDER[@]}"
fi

#5. Go to the home folder.
cd $HOME

#6. Check to see if each of the folders exists. If it exists then do not create it. Else create the folder. 
recordActivity "Creating folders: ${FOLDER[@]}"

for item in ${FOLDER[@]}; do
	if [[ -d $item ]]; then
		recordActivity "Not creating $item as it already exists."
	else
		recordActivity "Creating $item"
		mkdir $item
	fi
	
	#7. Create the task completion file inside each folder.
	recordActivity "Creating hidden file for $item folder."
	cd $item
	#8. Generate the file names based on the folder names.
	touch ".$item-FolderCreated"
	cd ..
done

echo "$(date) Task completed. Have a nice day!"
	
#-------------------------------------------------------------------------------------------------
#-------------------------------------------------------------------------------------------------
#-------------------------------------------------------------------------------------------------
# ------------------------------ END OF SCRIPT ---------------------------------------------------

Summary

Both arrays and dictionaries now allow us to store collections of data in a single variable. This enables us to write compact scripts and deal with complex data.

Download

You can download the completed script from here.

Shell scripting in macOS – Part 6: User interaction

This article is a continuation of the previous article. We will be taking the previous script and using it to build on the concepts we will learning in this article.

Why would we need to do this?

So far our scripts have run without any communication between the script and any user. In many situations this might be enough. Often times we would need to ask the user for some information before proceeding. This could be for confirmation before performing a certain task, or to customise the script actions as they are being performed.

Ways of interacting with the user

We have a few options to do this.

  • read utility
  • GUI pop via AppleScript

Let us look at the read utility first.

Reading from stdin

The read commands captures data entered via stdin. This is typically the terminal prompt from where the user enters the data. This captured value is read into a variable.

#!/bin/bash

read -p " What is your name?": NAME 

echo $NAME 

This is a simple example. The user is prompted (on stdout) to enter their name. The user types the name and it is stored in a variable. The contents of the variable are then echoed out to stdout again.

Of course, this assumes the user is manually running the script. Later in this article we will go over how we can automate such scripts with the help of ‘expect’ utility.

Reading from a file

Reading from a file is possible thanks to the read command as well as the loop operations we learnt earlier.

Asking question via GUI

The easiest thing to do would be to prompt the user for information via a GUI popup. This makes the experience a lot better. However, we will need something else for that. We will leverage AppleScript (which is a macOS specific scripting language) to show the popup. This will be invoked from the shell script using osascript.

I will be covering the basics of AppleScript in a later article.

First we will look at how to get the dialog to appear using AppleScript. This requires the use of AppleScript display dialog command.

display dialog "Would you like to provide names for the folders or use the defaults instead?" buttons {"Custom", "Default"} default button 2

This will simply show a popup to the user with a message and 2 buttons. We can customise it further:

display dialog "Would you like to provide names for the folders or use the defaults instead?" buttons {"Custom", "Default"} default button 2 with icon POSIX file "/System/Library/CoreServices/HelpViewer.app/Contents/Resources/AppIcon.icns"

This adds a custom icon. If we run this script the user would see something like:

Make sure that the path to the custom icon is what you would want it to be.

If we wanted to find out which button the user has selected then:

button returned of (display dialog "Would you like to provide names for the folders or use the defaults instead?" buttons {"Custom", "Default"} default button 2 with icon POSIX file "/System/Library/CoreServices/HelpViewer.app/Contents/Resources/AppIcon.icns")

The button returned of tells us which button was clicked. It also adds a nice title for the popup.

The really nice thing to do would be to somehow run this from terminal. To do that we will use the osascript command. This command needs the AppleScript command to be passed is as a statement.

osascript -e '<AppleScript statement>'

Let us add our command here.

osascript -e 'button returned of (display dialog "Would you like to provide names for the folders or use the defaults instead?" buttons {"Custom", "Default"} default button 2 with icon POSIX file "/System/Library/CoreServices/HelpViewer.app/Contents/Resources/AppIcon.icns")'

Finally to get this value into a script variable we will use command substitution.

userClicked=$(/usr/bin/osascript -e 'button returned of (display dialog "Would you like to provide names for the folders or use the defaults instead?" buttons {"Custom", "Default"} default button 2 with icon POSIX file "/System/Library/CoreServices/HelpViewer.app/Contents/Resources/AppIcon.icns")')

We can now echo the variable or use it in a condition check.

Example

Let us update our code to ask the user for names they would like to give for their folder.

  1. Just after the line where we finish checking the 3 positional parameters, add this line.
#4. We can prompt the user to see if they wish to provide folder names themselves. This will override any values provided as arguments.
userClicked=$(/usr/bin/osascript -e 'button returned of (display dialog "Would you like to provide names for the folders or use the defaults instead?" buttons {"Custom", "Default"} default button 2 with icon POSIX file "/System/Library/CoreServices/HelpViewer.app/Contents/Resources/AppIcon.icns")')

This will first ask the user if they wish to provide the folder names or use the defaults. The response is captured in the shell variable userClicked.

  1. Below that we will put an if check to see what the user has selected.
# if the user decides to provide custom names then go ahead and ask the user via GUI prompts. Otherwise use the values sent as arguments or defaults.	
if [[ $userClicked == "Custom" ]]; then
	
else

fi
  1. If the condition is true we have to show dialog prompts to ask the user for the name. This is going to be similar to our first check. However, this one will also have the ability for the user to enter a value. Add 3 prompts, one for each folder. Also add an echo statement to write to the log file. The if should now look like:
if [[ $userClicked == "Custom" ]]; then
	echo "$(date) The user decided to provide custom names." >> $PATH_TO_LOG
	
	TOOLS_FOLDER=$(/usr/bin/osascript -e 'text returned of (display dialog "Enter the name of folder 1" default answer "Utilities" buttons {"OK"} default button 1 with title "Folder that will hold the utilities" with icon POSIX file "/Users/Shared/Finder.icns")')
	
	REPORTS_FOLDER=$(/usr/bin/osascript -e 'text returned of (display dialog "Enter the name of folder 2" default answer "Tools" buttons {"OK"} default button 1 with title "Folder that will hold the tools" with icon POSIX file "/Users/Shared/Finder.icns")')
	
	HELP_FOLDER=$(/usr/bin/osascript -e 'text returned of (display dialog "Enter the name of folder 3" default answer "Help" buttons {"OK"} default button 1 with title "Folder that will hold the support documents" with icon POSIX file "/Users/Shared/Finder.icns")')
		
	echo "$(date) User provided: $TOOLS_FOLDER $REPORTS_FOLDER $HELP_FOLDER" >> $PATH_TO_LOG
else
	echo "$(date) User decided to use default values: $TOOLS_FOLDER $REPORTS_FOLDER $HELP_FOLDER" >> $PATH_TO_LOG
fi

The script is now ready to accept user input. The completed script should look like:

#!/bin/zsh

#-------------------------------------------------------------------------------------------------
#NAME:		Folder creator
#AUTHOR:	Arun Patwardhan
#CONTACT:	arun@amaranthine.co.in
#DATE:		10th August 2021
#WEBSITE:	https://github.com/AmaranthineTech/ShellScripts
#-------------------------------------------------------------------------------------------------

#LEGAL DISCLAIMER --------------------------------------------------------------------------------
#THE SOFTWARE IS PROVIDED "AS IS", WITHOUT WARRANTY OF ANY KIND, EXPRESS OR
#IMPLIED, INCLUDING BUT NOT LIMITED TO THE WARRANTIES OF MERCHANTABILITY,
#FITNESS FOR A PARTICULAR PURPOSE AND NONINFRINGEMENT. IN NO EVENT SHALL THE
#AUTHORS OR COPYRIGHT HOLDERS BE LIABLE FOR ANY CLAIM, DAMAGES OR OTHER
#LIABILITY, WHETHER IN AN ACTION OF CONTRACT, TORT OR OTHERWISE, ARISING FROM,
#OUT OF OR IN CONNECTION WITH THE SOFTWARE OR THE USE OR OTHER DEALINGS IN THE
#SOFTWARE.
#-------------------------------------------------------------------------------------------------

#LICENSE/TERMS AND CONDITIONS --------------------------------------------------------------------
#MIT License

#Copyright (c) Amaranthine 2021.

#Permission is hereby granted, free of charge, to any person obtaining a copy
#of this software and associated documentation files (the "Software"), to deal
#in the Software without restriction, including without limitation the rights
#to use, copy, modify, merge, publish, distribute, sublicense, and/or sell
#copies of the Software, and to permit persons to whom the Software is
#furnished to do so, subject to the following conditions:

#The above copyright notice and this permission notice shall be included in all
#copies or substantial portions of the Software.
#-------------------------------------------------------------------------------------------------

#ABOUT -------------------------------------------------------------------------------------------
# fileCreator.zsh
# 1.5
#-------------------------------------------------------------------------------------------------

#DESCRIPTION ------------------------------------------------------------------------------------- 
# - THis script is intended for creating the custom folders that are required on all corporate computers. 
# - Run this script on a new computer or a computer being reassigned to another employee.
# - This script can run on all computers.
#-------------------------------------------------------------------------------------------------

#USAGE -------------------------------------------------------------------------------------------
# - To create folders with default names run the command: ./folderCreator.zsh
# - To define your own folder names: ./folderCreator.zsh <folder1> <folder2> <folder3>
# - Available options  : Only the help option is available
# - Getting help       : Use the -h or the -help options to get more information. Or you can use the man command to view the man page.
#-------------------------------------------------------------------------------------------------

#WARNING/CAUTION ---------------------------------------------------------------------------------
#******************************************************************************************************************
#******************************************************************************************************************
#******************************************************************************************************************
#******************************************************************************************************************
# This script doesn't perform any validation of the folder names being passed in by the user. 
# If the script does not see the -h or the -help options then it will assume that the data being passed in is the name of the folder.
# The user of the script must ensure that the desired folder names are passed in.
#******************************************************************************************************************
#******************************************************************************************************************
#******************************************************************************************************************
#******************************************************************************************************************
#-------------------------------------------------------------------------------------------------

#INSTALLATION ------------------------------------------------------------------------------------
# Instructions for placing the script in the correct place are listed here. 
# Location:		/Library/Scripts/
# Permissions:	rwx r-x r-x
#-------------------------------------------------------------------------------------------------

#REQUIREMENTS ------------------------------------------------------------------------------------
# Shell:		/bin/zsh
# OS:			macOS Big Sur 11.4 or later
# Dependencies:	None
#-------------------------------------------------------------------------------------------------

#HELP/SUPPORT ------------------------------------------------------------------------------------
# You can get help by running the following commands.
# ./folderCreator.zsh -h
# ./folderCreator.zsh -help
# OR
# man folderCreator.zsh
# You can also view the log file for the same at: ~/Library/Logs/folderCreator_log_v1-5.log
#-------------------------------------------------------------------------------------------------

#HISTORY -----------------------------------------------------------------------------------------
# ------------------------------------------------------------------------------------------------
# Version 1.0: Basic script which creates the folders
# Version 1.1: Gives user the ability to specify the folder names at run time.
# Version 1.2: Adds safety checks to the scripts
# Version 1.3: Includes documentation as well as ability to get help.
# Version 1.4: Includes optimisation using for loop
# Version 1.5: Prompts the user in the GUI for names for the different folders.
#-------------------------------------------------------------------------------------------------

#-------------------------------------------------------------------------------------------------
# ------------------------------ SCRIPT STARTS HERE ----------------------------------------------
#-------------------------------------------------------------------------------------------------
#-------------------------------------------------------------------------------------------------
#-------------------------------------------------------------------------------------------------

#These are the default values used for the folder names incase the user doesn't provide any.
TOOLS_FOLDER="Tools"
REPORTS_FOLDER="Reports"
HELP_FOLDER="Help"

#Script version number
VERSION_NUMBER="1.5"

#Command name
COMMAND_NAME="folderCreator.zsh"

#1. Check to see if the user is asking for help. In which case we will have to provide information about the command.
if [[ $1 == "-h" ]] || [[ $1 == "-help" ]]; then
	echo "ABOUT 
-----
fileCreator_v1-5.zsh
Version $VERSION_NUMBER

NAME 
----
$COMMAND_NAME โ€” Folder creation utility SYNOPSIS
$COMMAND_NAME folder names [ verbs ]

DESCRIPTION 
-----------
$COMMAND_NAME creates 3 folders in the home folder. In case the folder names are not provided then the command will create folders with default names 'Tools', 'Reports', \"Help\".

There is also the option of getting help via the help verb.
- This script is intended for creating the custom folders that are required on all corporate computers. 
- Run this script on a new computer or a computer being reassigned to another employee.
- This script can run on all computers.

VERBS 
-----
[ โˆ’h โˆ’help] Both the options are used to invoke the help documentation.
[ โˆ’v โˆ’version] Both the options are used to get the version number of the folderCreator command.

REQUIREMENTS 
------------
The following are the minimum requirements to get the script running.
Shell:\t\t zsh
OS:\t\t macOS Big Sur 11.4 or later
Dependencies:\t None

INSTALLATION 
------------
$COMMAND_NAME can be installed anywhere you wish. However, there are certain locations that are recommended.
Location:\t /Library/Scripts/ 
Permissions: \t rwxr-xr-x

USAGE  
-----
$COMMAND_NAME folder1 folder2 folder3 
Will create folders with your own names. 

$COMMAND_NAME -h OR $COMMAND_NAME -help 
Will invoke the help utility.

$COMMAND_NAME -v OR $COMMAND_NAME -version 
will print the version number in stdout.

WARNING/CAUTION  
---------------
$COMMAND_NAME does not perform any validation of names. The only options that folderCreator accepts are -h and -help verbs or the -v and 
-version verbs. If the script does not see the -h , -help or the -v , -version options then it will assume that the data being passed in is 
the name of the folder. The user of the folderCreator command must ensure that the desired folder names are passed in. The user will also be 
prompted, via the graphical user interface, if he/she wishes to provide the names for the folders. If yes, then there will be subsequent 
prompts asking for the folder names.

EXAMPLES 
--------
$COMMAND_NAME Resources Results Assistant
This will create 3 folders Resources , Results , Assistant , in the userโ€™s home folder. 

$COMMAND_NAME
This will create 3 folders with the default names

$COMMAND_NAME Apps
This will use the Apps name for the first folder but the default names for the last 2 folders. 

NOTE
----
The user will be asked if he/she wishes to provide custom names in all the examples mentioned above. The user's value will always override 
whatever is being provided to the script or defaults.

DIAGNOSTICS 
-----------
The script produces a log file called ~/Library/Logs/folderCreator_log_v1-x.log
This file is typically located in the userโ€™s home folder log folder. The x represents the version number of $COMMAND_NAME
You can view the logs for each respective version.

COPYRIGHT  
---------
Copyright (c) Amaranthine 2015-2021. All rights reserved. https://amaranthine.in

EXIT STATUS  
-----------
In most situations, $COMMAND_NAME exits 0 on success"
	exit 0
fi

echo "$(date) Running script $0 to create folders."
echo ""

TODAY=$(date)
PATH_TO_LOG="$HOME/Library/Logs/folderCreator_log_v1-5.log"

echo "$(date) Starting" >> $PATH_TO_LOG

#2. Check to see if the version number is 
if [[ $1 == "-version" ]] || [[ $1 == "-v" ]]; then
	echo "Version: $VERSION_NUMBER"
	exit 0
fi

#3. The following if statements check to see if the script is receiving any arguments. It then picks those arguments and assigns them to the respective variables for use in the script.
if [[ $1 != "" ]]; then
	TOOLS_FOLDER=$1
fi

if [[ $2 != "" ]]; then
	REPORTS_FOLDER=$2
fi

if [[ $3 != "" ]]; then
	HELP_FOLDER=$3
fi

#4. We can prompt the user to see if they wish to provide folder names themselves. This will override any values provided as arguments.
userClicked=$(/usr/bin/osascript -e 'button returned of (display dialog "Would you like to provide names for the folders or use the defaults instead?" buttons {"Custom", "Default"} default button 2 with icon POSIX file "/System/Library/CoreServices/HelpViewer.app/Contents/Resources/AppIcon.icns")')
	
# if the user decides to provide custom names then go ahead and ask the user via GUI prompts. Otherwise use the values sent as arguments or defaults.	
if [[ $userClicked == "Custom" ]]; then
	echo "$(date) The user decided to provide custom names." >> $PATH_TO_LOG
	
	TOOLS_FOLDER=$(/usr/bin/osascript -e 'text returned of (display dialog "Enter the name of folder 1" default answer "Utilities" buttons {"OK"} default button 1 with title "Folder that will hold the utilities" with icon POSIX file "/Users/Shared/Finder.icns")')
	
	REPORTS_FOLDER=$(/usr/bin/osascript -e 'text returned of (display dialog "Enter the name of folder 2" default answer "Tools" buttons {"OK"} default button 1 with title "Folder that will hold the tools" with icon POSIX file "/Users/Shared/Finder.icns")')
	
	HELP_FOLDER=$(/usr/bin/osascript -e 'text returned of (display dialog "Enter the name of folder 3" default answer "Help" buttons {"OK"} default button 1 with title "Folder that will hold the support documents" with icon POSIX file "/Users/Shared/Finder.icns")')
		
	echo "$(date) User provided: $TOOLS_FOLDER $REPORTS_FOLDER $HELP_FOLDER" >> $PATH_TO_LOG
else
	echo "$(date) User decided to use default values: $TOOLS_FOLDER $REPORTS_FOLDER $HELP_FOLDER" >> $PATH_TO_LOG
fi

#5. Go to the home folder.
cd $HOME

#6. Check to see if each of the folders exists. If it exists then do not create it. Else create the folder. 
echo "$(date) Creating folders: $TOOLS_FOLDER, $REPORTS_FOLDER, $HELP_FOLDER" >> $PATH_TO_LOG

for item in $TOOLS_FOLDER $REPORTS_FOLDER $HELP_FOLDER; do
	if [[ -d $item ]]; then
		echo "$(date) Not creating $item as it already exists." >> $PATH_TO_LOG
	else
		echo "$(date) Creating $item" >> $PATH_TO_LOG
		mkdir $item
	fi
	
	#7. Create the task completion file inside each folder.
	echo "$(date) Creating hidden file for $item folder." >> $PATH_TO_LOG
	cd $item
	#8. Generate the file names based on the folder names.
	touch ".$item-FolderCreated"
	cd ..
done

echo "$(date) Task completed. Have a nice day!"
	
#-------------------------------------------------------------------------------------------------
#-------------------------------------------------------------------------------------------------
#-------------------------------------------------------------------------------------------------
# ------------------------------ END OF SCRIPT ---------------------------------------------------

I have also performed some additional cleanup. That has been highlighted. The comments and the help have also been updated to reflect the new changes. I have also moved a couple of the echo statements further up the script. These have also been highlighted.

Video

Download

The completed script can be downloaded from here.

Shell scripting in macOS – Part 7: Miscellaneous

This article is a continuation of the previous article. We will be taking the previous script and using it to build on the concepts we will learning in this article.

We will be covering a few different features, available in shell scripting, in this article.

Functions

Often times, you will find that there are some operations that you perform repeatedly across different points in the script. It would be extremely useful to write this logic once and reuse it over and over in a quick and efficient manner. Functions allow us to do just that.

#!/bin/bash

#function syntx ----------
repeat() {
	echo "Function without the function keyword"
}

repeat 

#function with function keyword ----------
function message() {
	echo "The argument is $1"
}

message "Arun"

#function with a local variable
#--------------------------------------------------
function localVar() {
	local value="ABC"
	echo $value
}

localVar 

#function with an argument being passed in
#--------------------------------------------------
function report() {
	echo "Argument passed in: $1"
}

report "Value 1"

function argsParameters() {
	echo "\$# -> Number of arguments"
	echo "\$* -> All positional arguments as a single word"
	echo "\$@ -> All positional arguments as separate strings"
	echo "\$1 -> First argument"
	echo "\$_ -> last argument of previous command"
}

argsParameters 

#function returning value
#--------------------------------------------------
function operation() {
	echo "XYZ"
}

answer="$(operation)"
echo $answer

function retCode() {
	echo "Return code"
	return 10
}

retCode 
echo $?

Environment

#!/bin/bash

#list environment variables
echo "Print environment variables"
echo "--------------------------------------------------"
printenv 
echo ""


#print specific environment variable value
echo "Print specific environment variables"
echo "--------------------------------------------------"
printenv SHELL
printenv USER
printenv LOGNAME
printenv HOME
echo ""

#path to the printenv command
echo "Print path to printenv command"
echo "--------------------------------------------------"
which printenv

The output would look like:

Print environment variables
--------------------------------------------------
CR_RUNID=19455
TERM_PROGRAM=CodeRunner
CR_SANDBOXED=1
TERM=dumb
SHELL=/bin/zsh
TMPDIR=/var/folders/ts/gm470rbx4xv0t507dt7xmj7c0000gn/T/com.coderunnerapp.CodeRunner/
CR_INPUT=
CR_SCRIPTS_DIR=/Users/arunpatwardhan/Library/Containers/com.coderunnerapp.CodeRunner/Data/Library/Application Support/CodeRunner/Languages/Shell Script.crLanguage/Scripts
USER=arunpatwardhan
COMMAND_MODE=unix2003
SSH_AUTH_SOCK=/private/tmp/com.apple.launchd.P9J71uVoN9/Listeners
filename=envDemo.sh
__CF_USER_TEXT_ENCODING=0x1F5:0x0:0x0
CR_DEVELOPER_DIR=/Applications/CodeRunner.app/Contents/SharedSupport/Developer
CR_UNSAVED_DIR=/Users/arunpatwardhan/Library/Containers/com.coderunnerapp.CodeRunner/Data/Library/Application Support/CodeRunner/Unsaved
CR_LANGUAGE_DIR=/Users/arunpatwardhan/Library/Containers/com.coderunnerapp.CodeRunner/Data/Library/Application Support/CodeRunner/Languages/Shell Script.crLanguage
CR_ENCODING_NAME=utf-8
CR_FILENAME=envDemo.sh
PATH=/Applications/Xcode.app/Contents/Developer:/usr/local/bin:/usr/bin:/bin:/usr/sbin:/sbin:/Applications/VMware Fusion.app/Contents/Public:/Library/Apple/usr/bin:/Applications/CodeRunner.app/Contents/SharedSupport/Developer/bin
__CFBundleIdentifier=com.coderunnerapp.CodeRunner
PWD=/Users/arunpatwardhan/Developer
APP_SANDBOX_CONTAINER_ID=com.coderunnerapp.CodeRunner
CFFIXED_USER_HOME=/Users/arunpatwardhan/Library/Containers/com.coderunnerapp.CodeRunner/Data
CR_FILE=/Users/arunpatwardhan/Developer/envDemo.sh
XPC_FLAGS=0x0
CR_TMPDIR=/var/folders/ts/gm470rbx4xv0t507dt7xmj7c0000gn/T/com.coderunnerapp.CodeRunner/CodeRunner
XPC_SERVICE_NAME=0
SHLVL=2
HOME=/Users/arunpatwardhan/Library/Containers/com.coderunnerapp.CodeRunner/Data
CR_SUGGESTED_OUTPUT_FILE=/var/folders/ts/gm470rbx4xv0t507dt7xmj7c0000gn/T/com.coderunnerapp.CodeRunner/CodeRunner/envDemo
CR_VERSION=62959
LOGNAME=arunpatwardhan
LC_CTYPE=UTF-8
CR_RUN_COMMAND=bash "$filename"
compiler=
CR_ENCODING=4
_=/usr/bin/printenv
Print specific environment variables
--------------------------------------------------
/bin/zsh
arunpatwardhan
arunpatwardhan
/Users/arunpatwardhan/Library/Containers/com.coderunnerapp.CodeRunner/Data
Print path to printenv command
--------------------------------------------------
/usr/bin/printenv

Redirection

We have already covered a little bit of redirection in an earlier article. There are some more redirection options available that we will look at out here.

OperatorDescriptionExample
>Writes the output of the preceding command to the fileecho "ABC" > file
>>Appends information to the file being pointed to another fileecho "ABC" >> file
|Passes the output of the preceding command to the next commandls -l | grep "*.sh"

Using the above redirections there are some interesting actions that we can perform.

ActionDescription
command >> /dev/nullThis will completely discard the output of the command.
command 2>&1This will redirect stderr to stdout and show both together on stdout.
command 1>&2This will redirect stdout to stderr and show both together on stderr.

Here document

One interesting application fo the redirection operator is the concept of here documents. A here document is used to send multiple lines of input to a command. The general structure is:

command << endOfMessageFlag
message
message
message
endOfMessageFlag

In this case the endOfMessageFlag is used to inform the command that the message has come to an end. A popular example is ‘EOF’ but any text can be used. Here are some examples of here documents.

#Writing to a file
cat << EOF >> /Users/Shared/temp.log
"This is a demo "
$(date)
EOF

The above script write the message within the ‘EOF’ to the file: /Users/Shared/temp.log. The message being:

This is a demo.
Mon Sep 25 12:31:07 IST 2022

Here is another example:

#Multiple statements to a command
osascript << EOF
display dialog "Would you like to provide names for the folders or use the defaults instead?" buttons {"Custom", "Default"} default button 2 with icon POSIX file "/System/Library/CoreServices/HelpViewer.app/Contents/Resources/AppIcon.icns"
text returned of (display dialog "Enter the name of folder 1" default answer "Utilities" buttons {"OK"} default button 1 with title "Folder that will hold the utilities" with icon POSIX file "/System/Library/CoreServices/CoreTypes.bundle/Contents/Resources/AlertStopIcon.icns")
EOF

The ‘here’ document allows us to send multiple AppleScript statements to ‘osascript‘.

Folder creator script update

Let us try to use some of these features in our folder creator script.

#!/bin/zsh

#-------------------------------------------------------------------------------------------------
#NAME:		Folder creator
#AUTHOR:	Arun Patwardhan
#CONTACT:	arun@amaranthine.co.in
#DATE:		15th September 2022
#WEBSITE:	https://github.com/AmaranthineTech/ShellScripts
#-------------------------------------------------------------------------------------------------

#LEGAL DISCLAIMER --------------------------------------------------------------------------------
#THE SOFTWARE IS PROVIDED "AS IS", WITHOUT WARRANTY OF ANY KIND, EXPRESS OR
#IMPLIED, INCLUDING BUT NOT LIMITED TO THE WARRANTIES OF MERCHANTABILITY,
#FITNESS FOR A PARTICULAR PURPOSE AND NONINFRINGEMENT. IN NO EVENT SHALL THE
#AUTHORS OR COPYRIGHT HOLDERS BE LIABLE FOR ANY CLAIM, DAMAGES OR OTHER
#LIABILITY, WHETHER IN AN ACTION OF CONTRACT, TORT OR OTHERWISE, ARISING FROM,
#OUT OF OR IN CONNECTION WITH THE SOFTWARE OR THE USE OR OTHER DEALINGS IN THE
#SOFTWARE.
#-------------------------------------------------------------------------------------------------

#LICENSE/TERMS AND CONDITIONS --------------------------------------------------------------------
#MIT License

#Copyright (c) Amaranthine 2021.

#Permission is hereby granted, free of charge, to any person obtaining a copy
#of this software and associated documentation files (the "Software"), to deal
#in the Software without restriction, including without limitation the rights
#to use, copy, modify, merge, publish, distribute, sublicense, and/or sell
#copies of the Software, and to permit persons to whom the Software is
#furnished to do so, subject to the following conditions:

#The above copyright notice and this permission notice shall be included in all
#copies or substantial portions of the Software.
#-------------------------------------------------------------------------------------------------

#ABOUT -------------------------------------------------------------------------------------------
# fileCreator.zsh
# 1.6
#-------------------------------------------------------------------------------------------------

#DESCRIPTION ------------------------------------------------------------------------------------- 
# - THis script is intended for creating the custom folders that are required on all corporate computers. 
# - Run this script on a new computer or a computer being reassigned to another employee.
# - This script can run on all computers.
#-------------------------------------------------------------------------------------------------

#USAGE -------------------------------------------------------------------------------------------
# - To create folders with default names run the command: ./folderCreator.zsh
# - To define your own folder names: ./folderCreator.zsh <folder1> <folder2> <folder3>
# - Available options  : Only the help option is available
# - Getting help       : Use the -h or the -help options to get more information. Or you can use the man command to view the man page.
#-------------------------------------------------------------------------------------------------

#WARNING/CAUTION ---------------------------------------------------------------------------------
#******************************************************************************************************************
#******************************************************************************************************************
#******************************************************************************************************************
#******************************************************************************************************************
# This script doesn't perform any validation of the folder names being passed in by the user. 
# If the script does not see the -h or the -help options then it will assume that the data being passed in is the name of the folder.
# The user of the script must ensure that the desired folder names are passed in.
#******************************************************************************************************************
#******************************************************************************************************************
#******************************************************************************************************************
#******************************************************************************************************************
#-------------------------------------------------------------------------------------------------

#INSTALLATION ------------------------------------------------------------------------------------
# Instructions for placing the script in the correct place are listed here. 
# Location:		/Library/Scripts/
# Permissions:	rwx r-x r-x
#-------------------------------------------------------------------------------------------------

#REQUIREMENTS ------------------------------------------------------------------------------------
# Shell:		/bin/zsh
# OS:			macOS Big Sur 11.4 or later
# Dependencies:	None
#-------------------------------------------------------------------------------------------------

#HELP/SUPPORT ------------------------------------------------------------------------------------
# You can get help by running the following commands.
# ./folderCreator.zsh -h
# ./folderCreator.zsh -help
# OR
# man folderCreator.zsh
# You can also view the log file for the same at: ~/Library/Logs/folderCreator_log_v1-6.log
#-------------------------------------------------------------------------------------------------

#HISTORY -----------------------------------------------------------------------------------------
# ------------------------------------------------------------------------------------------------
# Version 1.0: Basic script which creates the folders
# Version 1.1: Gives user the ability to specify the folder names at run time.
# Version 1.2: Adds safety checks to the scripts
# Version 1.3: Includes documentation as well as ability to get help.
# Version 1.4: Includes optimisation using for loop
# Version 1.5: Prompts the user in the GUI for names for the different folders.
# Version 1.6: Updated the log mechanism with the help of a function and here document.
#-------------------------------------------------------------------------------------------------

#-------------------------------------------------------------------------------------------------
# ------------------------------ SCRIPT STARTS HERE ----------------------------------------------
#-------------------------------------------------------------------------------------------------
#-------------------------------------------------------------------------------------------------
#-------------------------------------------------------------------------------------------------

#These are the default values used for the folder names incase the user doesn't provide any.
TOOLS_FOLDER="Tools"
REPORTS_FOLDER="Reports"
HELP_FOLDER="Help"

#Script version number
VERSION_NUMBER="1.6"

#Command name
COMMAND_NAME="folderCreator.zsh"

#1. Check to see if the user is asking for help. In which case we will have to provide information about the command.
if [[ $1 == "-h" ]] || [[ $1 == "-help" ]]; then
	echo "ABOUT 
-----
fileCreator_v1-6.zsh
Version $VERSION_NUMBER

NAME 
----
$COMMAND_NAME โ€” Folder creation utility SYNOPSIS
$COMMAND_NAME folder names [ verbs ]

DESCRIPTION 
-----------
$COMMAND_NAME creates 3 folders in the home folder. In case the folder names are not provided then the command will create folders with default names 'Tools', 'Reports', \"Help\".

There is also the option of getting help via the help verb.
- This script is intended for creating the custom folders that are required on all corporate computers. 
- Run this script on a new computer or a computer being reassigned to another employee.
- This script can run on all computers.

VERBS 
-----
[ โˆ’h โˆ’help] Both the options are used to invoke the help documentation.
[ โˆ’v โˆ’version] Both the options are used to get the version number of the folderCreator command.

REQUIREMENTS 
------------
The following are the minimum requirements to get the script running.
Shell:\t\t zsh
OS:\t\t macOS Big Sur 11.4 or later
Dependencies:\t None

INSTALLATION 
------------
$COMMAND_NAME can be installed anywhere you wish. However, there are certain locations that are recommended.
Location:\t /Library/Scripts/ 
Permissions: \t rwxr-xr-x

USAGE  
-----
$COMMAND_NAME folder1 folder2 folder3 
Will create folders with your own names. 

$COMMAND_NAME -h OR $COMMAND_NAME -help 
Will invoke the help utility.

$COMMAND_NAME -v OR $COMMAND_NAME -version 
will print the version number in stdout.

WARNING/CAUTION  
---------------
$COMMAND_NAME does not perform any validation of names. The only options that folderCreator accepts are -h and -help verbs or the -v and 
-version verbs. If the script does not see the -h , -help or the -v , -version options then it will assume that the data being passed in is 
the name of the folder. The user of the folderCreator command must ensure that the desired folder names are passed in. The user will also be 
prompted, via the graphical user interface, if he/she wishes to provide the names for the folders. If yes, then there will be subsequent 
prompts asking for the folder names.

EXAMPLES 
--------
$COMMAND_NAME Resources Results Assistant
This will create 3 folders Resources , Results , Assistant , in the userโ€™s home folder. 

$COMMAND_NAME
This will create 3 folders with the default names

$COMMAND_NAME Apps
This will use the Apps name for the first folder but the default names for the last 2 folders. 

NOTE
----
The user will be asked if he/she wishes to provide custom names in all the examples mentioned above. The user's value will always override 
whatever is being provided to the script or defaults.

DIAGNOSTICS 
-----------
The script produces a log file called ~/Library/Logs/folderCreator_log_v1-x.log
This file is typically located in the userโ€™s home folder log folder. The x represents the version number of $COMMAND_NAME
You can view the logs for each respective version.

COPYRIGHT  
---------
Copyright (c) Amaranthine 2015-2021. All rights reserved. https://amaranthine.in

EXIT STATUS  
-----------
In most situations, $COMMAND_NAME exits 0 on success"
	exit 0
fi

PATH_TO_LOG="$HOME/Library/Logs/folderCreator_log_v1-6.log"

# Function to log activity
function recordActivity() {
	cat << EOF >> $PATH_TO_LOG
[$(date)] $1
EOF
}


echo "$(date) Running script $0 to create folders."
echo ""

TODAY=$(date)

recordActivity "Starting"

#2. Check to see if the version number is 
if [[ $1 == "-version" ]] || [[ $1 == "-v" ]]; then
	echo "Version: $VERSION_NUMBER"
	exit 0
fi

#3. The following if statements check to see if the script is receiving any arguments. It then picks those arguments and assigns them to the respective variables for use in the script.
if [[ $1 != "" ]]; then
	TOOLS_FOLDER=$1
fi

if [[ $2 != "" ]]; then
	REPORTS_FOLDER=$2
fi

if [[ $3 != "" ]]; then
	HELP_FOLDER=$3
fi

#4. We can prompt the user to see if they wish to provide folder names themselves. This will override any values provided as arguments.
userClicked=$(/usr/bin/osascript -e 'button returned of (display dialog "Would you like to provide names for the folders or use the defaults instead?" buttons {"Custom", "Default"} default button 2 with icon POSIX file "/System/Library/CoreServices/HelpViewer.app/Contents/Resources/AppIcon.icns")')
	
# if the user decides to provide custom names then go ahead and ask the user via GUI prompts. Otherwise use the values sent as arguments or defaults.	
if [[ $userClicked == "Custom" ]]; then
	recordActivity "The user decided to provide custom names."
	
	TOOLS_FOLDER=$(/usr/bin/osascript -e 'text returned of (display dialog "Enter the name of folder 1" default answer "Utilities" buttons {"OK"} default button 1 with title "Folder that will hold the utilities" with icon POSIX file "/Users/Shared/Finder.icns")')
	
	REPORTS_FOLDER=$(/usr/bin/osascript -e 'text returned of (display dialog "Enter the name of folder 2" default answer "Tools" buttons {"OK"} default button 1 with title "Folder that will hold the tools" with icon POSIX file "/Users/Shared/Finder.icns")')
	
	HELP_FOLDER=$(/usr/bin/osascript -e 'text returned of (display dialog "Enter the name of folder 3" default answer "Help" buttons {"OK"} default button 1 with title "Folder that will hold the support documents" with icon POSIX file "/Users/Shared/Finder.icns")')
		
	recordActivity "User provided: $TOOLS_FOLDER $REPORTS_FOLDER $HELP_FOLDER"
else
	recordActivity "User decided to use default values: $TOOLS_FOLDER $REPORTS_FOLDER $HELP_FOLDER"
fi

#5. Go to the home folder.
cd $HOME

#6. Check to see if each of the folders exists. If it exists then do not create it. Else create the folder. 
recordActivity "Creating folders: $TOOLS_FOLDER, $REPORTS_FOLDER, $HELP_FOLDER"

for item in $TOOLS_FOLDER $REPORTS_FOLDER $HELP_FOLDER; do
	if [[ -d $item ]]; then
		recordActivity "Not creating $item as it already exists."
	else
		recordActivity "Creating $item"
		mkdir $item
	fi
	
	#7. Create the task completion file inside each folder.
	recordActivity "Creating hidden file for $item folder."
	cd $item
	#8. Generate the file names based on the folder names.
	touch ".$item-FolderCreated"
	cd ..
done

echo "$(date) Task completed. Have a nice day!"
	
#-------------------------------------------------------------------------------------------------
#-------------------------------------------------------------------------------------------------
#-------------------------------------------------------------------------------------------------
# ------------------------------ END OF SCRIPT ---------------------------------------------------

One of the big advantages with using a function and a here document to generate log files is that we can change the format and structure simply by modifying the function. The message itself remains unique.

We have seen some really interesting features in this article. In the next article we will take scripting a little further by exploring Arrays and dictionaries

Download

You can download the completed script from here.

List of macOS Terminal commands

This article lists out different macOS terminal commands you might encounter. You can use this list as a starting point in your search for a command to perform a specific task. This list is by no means exhaustive.

Basic terminal commands are not listed here. Some of them are listed in the following Terminal command articles.
Terminal Commands – Basic
Terminal Commands – Part 2
Terminal Commands – Part 3

Many of the commands have also been used in the article I wrote some time back. You can have a look at the scripts to see some of the commands being used.

To get more information about the commands simply run the following command from within Terminal Application. For example, to view the manual page for tmutil simply type:

man tmutil

For fdesetup

man fdesetup
Here is a nice command to quickly open the man page in the Preview App.
man -t tmutil | open -f -a /System/Applications/Preview.app

Note

  • This is not a complete list of commands
  • Some commands are available through the macOS Recovery Volume only
  • Some commands required other resources such as the OS installer
  • Some commands are available with certain versions of the OS only

Please read the documentation for more details. Use the commands with care. Improper use of commands may result in loss of data or damage to the computer.

Commands


Installation

CommandDescription
startosinstallUsed to start the installation of macOS from the command line.
createinstallmediaUsed to create an external install disk.

Security

CommandDescription
fdesetupManage FileVault configuration.
securityManage keychain and security settings
spctlManage security assessment policy
csrutilConfigure System Integrity Protection (SIP) settings
resetpasswordPassword reset utility located in the Recovery Partition

File System

CommandDescription
hdiutilUsed to manipulate and manage disk images.
diskutilUsed to modify, verify, & repair local disks.

Data Management

CommandDescription
tmutilUsed to configure Time Machine settings in macOS
screencaptureTakes screenshot of the specified screen and saves the image at the specified location.
mdlsUsed to get metadata attributes for a given file
mdutilUsed to manage metadata stores that are used by Spotlight

Settings

CommandDescription
defaultsUsed to modify plist files. Typically used to update preference files.
ioregUsed to view the I/O kit registry
system_profilerUsed to generate system hardware & software reports.
plutilUsed to check syntax of property lists or covert property lists from one format to another
AssetCacheManagerUtilUsed to configure content caching settings.
openUsed to open documents from within the command line.
networksetupPerform network configuration.
systemsetupUsed to configure machine settings in System Preferences.
launchctlUsed to manage and inspect daemons, agents, & XPC Services

Applications

CommandDescription
codesignUsed to create, check, display code signatures.
pkgbuildUsed to build installer packages
productbuildBuilds a product archive
installerSystem software and package installer tool

User Account Management

CommandDescription
dsclThis is a command line Directory service utility that allows us to create, read, and manage Directory Service data.
sysadminctlUser account management
passwdChange user password
loginUsed to login to another user account.

Server & Device Management

CommandDescription
profilesUsed to install, remove, list, or manage Configuration profiles.
serveradminUsed to manage the services in macOS
mdmclientLocated in /usr/libexec/mdmclient it is used to manage interactions with the MDM.
asrApple Software restore: Used to copy volumes.

Scripting

CommandDescription
osascriptUsed to execute the given AppleScript

Share any commands you may know of in the comments window.

Disclaimer

The information Is Provided โ€œAs Isโ€, Without Warranty Of Any Kind, Express Or Implied, Including But Not Limited To The Warranties Of Merchantability, Fitness For A Particular Purpose And Noninfringement. In No Event Shall The Authors Or Copyright Holders Be Liable For Any Claim, Damages Or Other Liability, Whether In An Action Of Contract, Tort Or Otherwise, Arising From, Out Of Or In Connection With The information provided Or The Use Or Other Dealings In The information.

Creating iOS Apps without Storyboard – Part 2

Autolayout Programmatically

This article continues from the previous article. Earlier we saw how we can make iOS Apps without using the storyboard file. In this article we will explore how to implement Autolayout programmatically. We will continue from the previous article.

The code that I will be showing in the article will not be covering all the possible cases. The point of this article is to give you an idea on how to implement the different Autolayout solutions. Feel free to play around with the code to cover all the cases & situations.

Programmatic Constraints

We have 3 options when it comes to applying constraints programmatically:

  1. StackViews
  2. Layout Anchors
  3. NSLayoutConstraints class
  4. Visual Format Language (VFL)

Handling Size Classes in code

Handling Size classes in code is fairly easy. It is a simple question of overriding the correct function. We will look at this in greater detail when we cover the topic later in the article.

TopicPage
Implementing UIStackViews2
Implementing Layout Anchors3
NSLayoutConstraints class4
Implementing Visual Format Language5
Size Classes6
Summary & Video7

This article has been written using Xcode 10.3.

Creating iOS Apps without Storyboard – Part 1

What are “nibless” apps?

Apps which are designed without the help of Storyboard are called as “Nibless” apps. Normally we design an app with the help of a Storyboard file. Earlier they were called Xib files or Nib files. Hence the term “Nibless”.

Why should we create Apps without storyboard?

There are a number of reasons.

  1. It makes for a better experience when implementing along with version control.
  2. Allows us to create UI elements dynamically.
  3. Makes reusable UI Components easier to distribute and reuse.

How can we create Apps without Storyboard?

There are a couple of things that need to be done. Firstly the Main.storyboard file needs to be removed and the project settings need to be updated to reflect this change.. We are doing this since we won’t be using the storyboard file.
Everything will now have to be started up by us manually. Many of these tasks were taken care of by storyboard, but since that was removed we will have to do it. This means we have to manually create the window, create the view controller set it as a the root view controller.
We also have to manually create each and every component on our own. That is the very thing we were trying to achieve.

This example is implemented on Xcode 10.3 on macOS 10.14.5. We are not implementing auto layout in this article. We will look at implementing that programmatically in the next article.

  1. Let us start with an empty project. Open Xcode.
  2. Select File > New > Project
  3. Give it any name. Select the language as Swift & leave the checkboxes unchecked.
  4. Once the project loads select the Main.storyboard file and delete it.
  5. Switch to the Project settings file.
  6. Remove the entry for the main interface.
  7. It is a good idea to leave the LaunchScreen.storyboard file. The reason for this is to give the launch process a reference of the screen size it needs to produce. Else it will default down to the 0,0,320,480 which is the old iPhone size.
  8. Switch to the AppDelegate.swift file.
  9. Add the following property below the UI Window declaration.
      
    let mainScreenController : ViewController = ViewController() 
    
  10. Add the code to create the window and set root view controller in the didFinishLaunchingWithOptions method
       
    //1. Create the UIWindow object   
    self.window = UIWindow(frame: UIScreen.main.bounds)   
    
    //2. Set the root view controller   
    self.window?.rootViewController = self.mainScreenController   
    
    //3. Make the window key and visible  
    self.window?.makeKeyAndVisible()  
    
  11. Switch to the ViewController.swift file.
  12. Declare the following variables
      
    //UI Variables  
    var labelDemo   : UILabel?  
    var imageDemo   : UIImageView?  
    var buttonDemo  : UIButton = UIButton(type: UIButton.ButtonType.roundedRect) 
    var dataField   : UITextField?
    
  13. Implement the function to create labels. The process of creating a view programmatically is fairly straightforward. Barring a few variations depending on the view component nothing is drastically different.
      
    func createLabel() 
    {      
         //1. Specify the dimensions      
         let labelRect : CGRect   = CGRect(x: 100.0, y: 50.0, width: self.view.frame.size.width - 130.0, height: 60.0)     
    
         //2. Create the view object      
         labelDemo                = UILabel(frame: labelRect)      
    
         //3. Customise the view attributes      
         labelDemo?.text          = "This is my first Programmatic App."                
         labelDemo?.textColor     = UIColor.yellow      
         labelDemo?.textAlignment = NSTextAlignment.left  
         labelDemo?.numberOfLines = 0      
         labelDemo?.font          = UIFont.boldSystemFont(ofSize: 20.0)      
    
         //4. Add the view to the subview      
         self.view.addSubview(labelDemo!) 
    } 
    
    Let us examine the steps one by one.
     
    //1. Specify the dimensions 
    let labelRect : CGRect = CGRect(x: 100.0, y: 50.0, width: self.view.frame.size.width - 130.0, height: 60.0)
    
    This will define the dimensions of the view. As we are not implementing auto layout we will need to do this manually.
     
    //2. Create the view object
    labelDemo = UILabel(frame: labelRect) 
    
    Now that we have the dimensions we can go ahead and instantiate an instance of the label object using those dimensions. These 2 parts are the same as dragging a label from the object library onto the storyboard and placing it onto the storyboard per our requirements.
    //3. Customise the view attributes 
    labelDemo?.text          = "This is my first Programmatic App."     
    labelDemo?.textColor     = UIColor.yellow 
    labelDemo?.textAlignment = NSTextAlignment.center      
    labelDemo?.numberOfLines = 0 
    labelDemo?.font          = UIFont.boldSystemFont(ofSize: 20.0)
    
    This part is the same as changing the attributes in the attributes inspector. This is where we customise the label.
     
    //4. Add the view to the subview 
    self.view.addSubview(labelDemo!) 
    
    This last part also forms one part of dragging the label on to the storyboard. When we drag a view on to the storyboard it is placed within the main view that belongs to the ViewController. This statement completes the above process.
  14. Repeat the above steps for showing an image.
    func createImage()
    {
         //1. Specify the dimensions
         let imageRect  : CGRect  = CGRect(x: 30.0, y: 50.0, width: 60.0, height: 60.0)
    
         //2. Create the image model
         let imageModel : UIImage = UIImage(named: "logo.png")!
    
         //3. Create the view object
         imageDemo                = UIImageView(frame: imageRect)
    
         //4. Customise the view attributes
         imageDemo?.image         = imageModel
         imageDemo?.contentMode   = UIView.ContentMode.scaleAspectFit
    
         //5. Add the view to the subview
         self.view.addSubview(imageDemo!)
    }
    
    The code above is almost similar to the one created for labels except for the fact that we had to explicitly create a model object for the view. Images being different from strings, require this process to be done explicitly.
  15. Similarly let us implement the code for creating buttons
    func createButton()
    {
         //1. Specify the dimensions
         let buttonRect : CGRect = CGRect(x: 30.0, y: 220.0, width: 100.0, height: 50.0)
    
         //2. Provide the frame to the button
         buttonDemo.frame = buttonRect
    
         //3. Customise the view attributes
         buttonDemo.setTitle("Click Me", for: UIControl.State.normal)
         buttonDemo.addTarget(self, action: #selector(ViewController.clickMeTapped), for: UIControl.Event.touchDown)
    
         //4. Add the view to the subview
         self.view.addSubview(buttonDemo)
    }
    
    @objc func clickMeTapped(
    {
         print("Click me tapped!")
    }
    
    Again just minor variations here. Mainly the step to add a target function to be invoked when the button is tapped. We also need to write the target function itself.
  16. We will also implement the code to create a text field.
    func createTextField()
    {
        //1. Provide dimensions for the view
        let tfRect : CGRect             = CGRect(x: 30.0, y: 140.0, width: self.view.frame.size.width - 60.0, height: 50.0)
            
        //2. Create the view object
        dataField                       = UITextField(frame: tfRect)
            
        //3. Customise the attributes of the view
        dataField?.placeholder          = "Enter Name"
        dataField?.borderStyle          = UITextField.BorderStyle.roundedRect
        dataField?.keyboardType         = UIKeyboardType.namePhonePad
        dataField?.keyboardAppearance   = UIKeyboardAppearance.dark
        dataField?.returnKeyType        = UIReturnKeyType.go
            
        //4. Add the view to the subview
        self.view.addSubview(dataField!)
    }
    
  17. Next we need to call all these functions. I have implemented a single creator function for that.
    func createUIElements()
    {
         self.createLabel()
         self.createImage()
         self.createButton()
         self.createTextField()
    }
    
  18. Lastly we will call this function in the viewDidLoad method. Add the following lines to the viewDidLoad method.
    self.view.backgroundColor = UIColor.lightGray
    self.createUIElements()
    
    I have also added code to change the background colour so that we can see the background clearly.
  19. Run the project. Everything should appear normally.

Are there any benefits of creating apps without storyboard?

The points mentioned in the “why should we make programmatic apps?” section are some of the advantages. Beyond that there aren’t too many.
If you are looking at a team based project development then this approach is good.
There is no difference in terms of memory or performance when it comes down to apps design with or without storyboard.

Are there any drawbacks?

As can be seen from the example above, there are a couple of drawbacks

  1. The main drawback is that you can’t get a quick preview of how your app looks. You have to run the simulation every time you wish to see the end result.
  2. There is a lot more coding involved. Which can be daunting to those who are overly accustomed to designing with the help of storyboards

Note

A small point. I have left the LaunchScreen.storyboard file. I did not delete it. The reason I did that was to allow the app to allow the system to determine the dimensions on the device. If we do delete the file then the UIScreen.main.bounds return (0.0, 0.0, 320.0, 480.0) which are the old iPhone screen size settings.
While you can go ahead and make changes programmatically it is a lot easier to just leave the LaunchScreen.storyboard file there.

Carrying on from the previous point. It actually is okay if you leave the Main.storyboard file as is too. In which case you will have to skip steps 5,6,8,9,10. The code is still running programmatically but you do not have to create the main ViewController manually.

Download the Source Code

You can download the Xcode Project from this link.

Creating your own Drag and Drop DMG

What are Disk Images?

Disk images are a means of archiving data. They are created using a tool called Disk Utility which is a File System Management Utility of macOS. Disk Images follow the extension ‘.dmg‘ and are only compatible with macOS.

Disk Images are a popular way of distributing applications for macOS. They provide the capability of compressing large files and make delivery over the internet very easy.

In this article we are going to look at how we can create disk images for application distribution.

Creating the DMG Folder for distribution

  1. Create a Background image. This can have any design. It’s a good idea to have arrows or other visual aids to assist others during installation.
  2. Create a new Disk Image. Open Disk Utility.
  3. Click on Fileย > Newย Imageย > Blankย Image
  4. Leave the default settings as is. Choose the size that you desire.
  5. Mount the Disk Image.
  6. Create a folder called background in the mounted volume.
  7. Save the background image in the folder we just created.
  8. Now we will hide the background folder. Switch to terminal and run the following command.

That’s it. You now have your own drag drop window ready for distribution.