API
Apple has recently introduced the ability to gather certain information from Apple Business Manager/Apple School Manager using the API. This makes acessing the information using shell scripts possible.
One the big advantages of this is the ability to pull out information and share it with those members of the organisation who do not have + who don’t need access to Apple Business Manager/Apple School Manager.
Requirements
Before we get started it’s important to note that the API calls can be achieved using other languages too. I will be following up with the Swift version of the code later. For now we will be using the Python script along with the shell script per Apple’s documentation.
We need the following items to successfully make the API calls
- API Account
- Python3
- Python libraries:
authlibandPyCryptodome - Scripts to generate the client assertion
- Script to generate the bearer token
- API end points
Let us explore these requirements.
API Account
The API account is an account on Apple Business Manager/Apple School Manager that exists for the sole purpose of making API calls possible.
Python
Next we will look at Python. We will be using the python script that is provided in Apple’s documentation. This means that we need to install Python3. That can be done by simply downloading and installing python from its website or if you have Xcode installed to use Xcode to get python.
Python libraries
Now the python script uses 2 python libraries: authlib and PyCryptodome. In order to generate the client assertion we need to use JWT as well as the Elliptical curve encryption. These two libraries provide us with the necessary tools to achieve this.
Scripts
Next we will need to get the scripts from Apple’s website. You are welcome to write this using any other scripting language or programming language. But for this article we will use their script as is. The scripts achieve 3 different tasks and there is a dependency between them.
So what are these tasks? Basically the API supports OAuth 2 for authentication. It works this way. We will first use credentials to generate a client assertion. A client assetion is a JSON web token that the script creates and signs using the private key for the API account. We will use this client assertion to obtain a access token/bearer token by calling the authorisation server. The client assertion expires after a maximum of 180 days from date of issuance. The bearer token is what we will be using to make authenticated requests for the API calls. The bearer token is valid for 60 minutes. Finally we have to make the API calls themselves.
Script validity
| Authentication item | Validity duration |
|---|---|
| Client assertion | Maximum 180 days |
| Bearer token | 60 minutes |
API endpoints
There are several endpoints that we can reach. Each end point specifies the kind of information that we can pull from Apple Business Manager/Apple School Manager. This information is available from Apple’s developer documentation. All the end points have a common part for the url
https://api-business.apple.com/v1
The table below lists the differet endpoints and their use.
| Name | Description | URL |
|---|---|---|
| Get all devices | Gets all the devices that are there in Apple Business Manager/Apple School Manager | /orgDevices |
| Get device | Get information about a specific device | /orgDevices/{id} |
| AppleCare coverage | Get the AppleCare coverage information for a specific device | /orgDevices/{id}/appleCareCoverage |
| Device management services | Gets a list of MDM servers connected to this Apple Business Manager | /mdmServers |
| Device serial numbers for management service | Gets a list of all the devices that have been assigned to a particular MDM server | /mdmServers/{id}/relationships/devices |
| Assigned device management service ID for device | Gets the ID for the MDM server that a particular device has been assigned to | /orgDevices/{id}/relationships/assignedServer |
| Assign or unassign device | Assign or unassign devices to/from a particular MDM server | /orgDeviceActivities |
| Device activity information | Gets the activity information for a particular device. | /orgDeviceActivities/{id} |
All these things are acheived with the help of 3 scripts.
- Client asertion script: This is written in Python.
- Bearer token script: This is a shell script.
- API call script: This is the main script that makes calls to the API end points.
Armed with all this information we are now ready to make the API calls.
Preparing to use the API
Going forward i will only be mentioning Apple Business Manager, however, the steps apply to both.
Create the API account
The API account is created on Apple Business Manager/Apple School Manager portal.
- Login to your Apple Business Manager account.
- Open the preferences.
- Click on the API tab.

- Click on Get Started.
- Provide and account name.
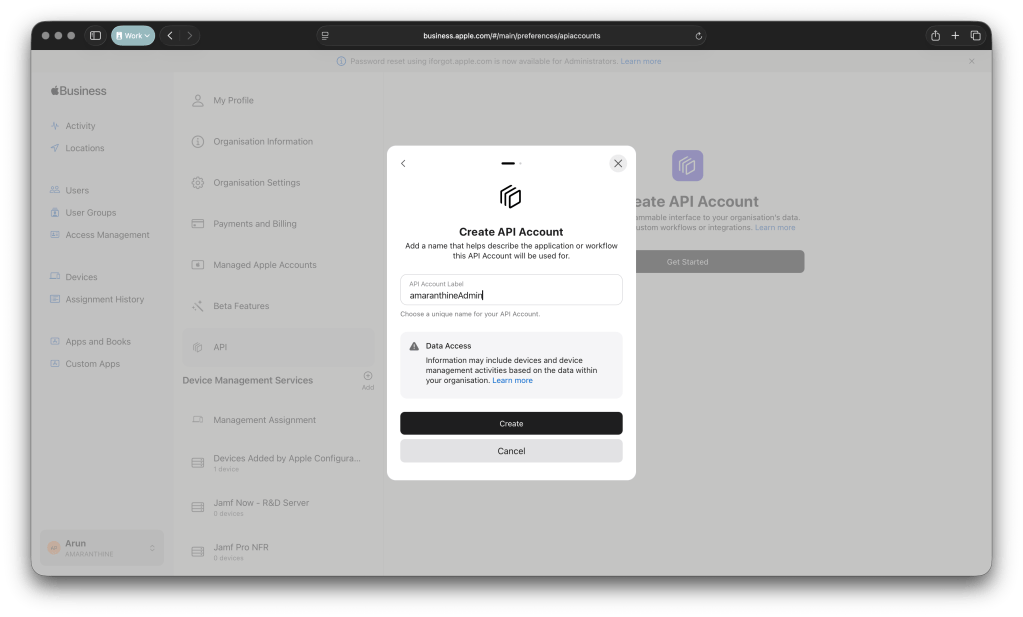
- Click on create.
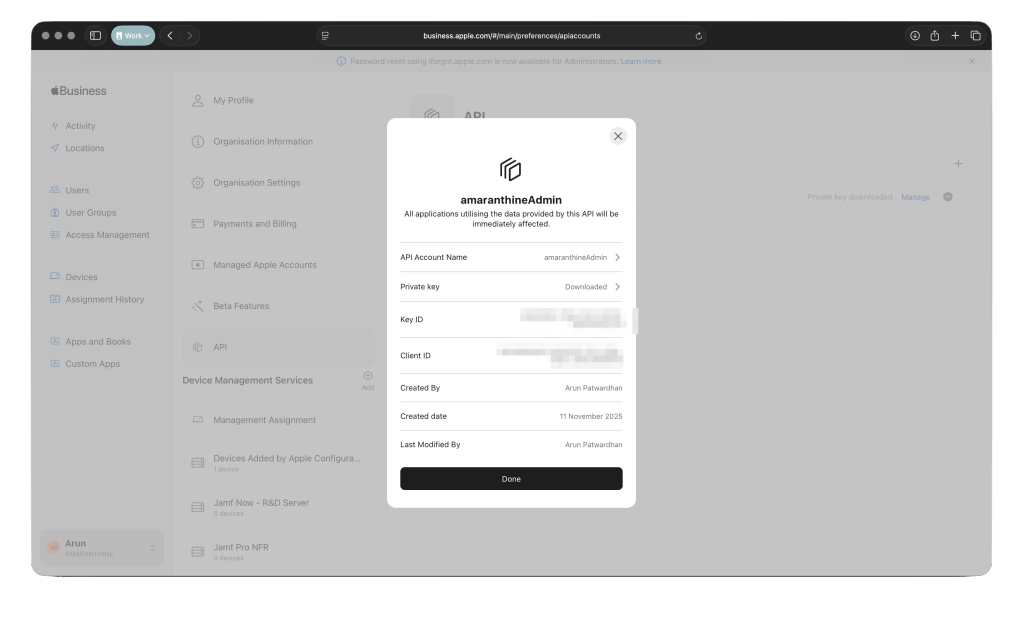
- You will be prompted to generate a private key. Click on generate and save the private key securely. We will need it later.
- You should now see your account listed in Apple Business Manager.

- Click on manage to see the details about your account. That is where you will get the client id and the key id. We will be needing those values later.
Install Python
There are several ways of acquiring and installing Python. The simplest is to download it from the python website.
Install the dependencies
Install authlib and Crypto using the following commands:
pip3 install authlib
pip3 install PyCryptodome
Do not install Crypto or pycrypto as those don’t support the ECC algorithm
Make sure python 3 is installed.
Saving the private key
We will save the previously downloaded key in a single location. Let us assume that its on the Desktop. It could be anywhere.
Acquiring the access token
We are going to place all our files on the desktop. They could however be placed anywhere.
NOTE: I have used the same scripts that Apple has provided excepting for the script that is used to make the actual API calls.
If you want you can download the scripts from github or copy the scripts from below.
Getting the client assertion
The first thing to do is to get the client assertion. This is where the python script comes in. Save this script onto your desktop.
Copy the client id for your api account into the clinet_id and team_id variables. Copy the key id for your api account into the key id variable.

#!/usr/bin/env python3
import os
import authlib
import Crypto
import datetime as dt
import uuid as uuid
from authlib.jose import jwt
from Crypto.PublicKey import ECC
private_key_file = "/path/to/certificate.pem"
client_id = "BUSINESSAPI.--------------------------------------------------"
team_id = "BUSINESSAPI.--------------------------------------------------"
key_id = "--------------------------------------------------"
audience = "https://account.apple.com/auth/oauth2/v2/token"
alg = "ES256"
# Define the issue timestamp.
issued_at_timestamp = int(dt.datetime.utcnow().timestamp())
# Define the expiration timestamp, which may not exceed 180 days from the issue timestamp.
expiration_timestamp = issued_at_timestamp + 86400*180
# Define the JWT headers.
headers = dict()
headers['alg'] = alg
headers['kid'] = key_id
# Define the JWT payload.
payload = dict()
payload['sub'] = client_id
payload['aud'] = audience
payload['iat'] = issued_at_timestamp
payload['exp'] = expiration_timestamp
payload['jti'] = str(uuid.uuid4())
payload['iss'] = team_id
# Open the private key.
with open(private_key_file, 'rt') as file:
	private_key = ECC.import_key(file.read())

# Encode the JWT and sign it with the private key.
client_assertion = jwt.encode(
	header=headers,
	payload=payload,
	key=private_key.export_key(format='PEM')
).decode('UTF-8')
# Save the client assertion to a file.
with open('client_assertion.txt', 'w') as output:
	output.write(client_assertion)
Now we will run this script from terminal. Run it with the command:
python3 ~/Desktop/abm-asm-apiAssertionGenerator.py
This will create a file called client_assertion.txt in your owrking directory. It should be a large piece of text containing random characters. This is because our script encrypted this information. It should look something like this:
MJIOJ90MIJNm9hi-*&Y*&BT*&IJOjijbiuh98mm98mh98HN(MUh98hgn87N&G*GT%MJIOJ90MIJNm9hi-*&Y*&BT*&IJOjijbiuh98mm98mh98HN(MUh98hgn87N&G*GT%98mh98HN(MUh98hgn87N&G*GT%MJIOJ90MIJNm9hi-*&Y*&BT*&IJOjijbiuh98mm98mh98HN(MUh98hgn87N&G*GT%78tbg66757vr65rv5r56e6v64ve464x3xsIHUNUNH89nhU*gyhi-*&Y*&BT*&IJOjijbiuh98mm98mh98HN(MUh98hgn87N&G*GT%78tbg66757vr65rv5r56e6v64ve464x3xsIHUNUNH89nhU*gy
Copy it. We will need it for the next step.
This script needs to be run once every 180 days as the client assertion thats generated is valid for that duration.
Generating the bearer token
Now that we have the client assertion we can use it to get the access token/bearer token.
Copy the client id from your api account into the client_id variable.
#!/bin/zsh
client_id="BUSINESSAPI.--------------------------------------------------"
client_assertion="MJIOJ90MIJNm9hi-*&Y*&BT*&IJOjijbiuh98mm98mh98HN(MUh98hgn87N&G*GT%MJIOJ90MIJNm9hi-*&Y*&BT*&IJOjijbiuh98mm98mh98HN(MUh98hgn87N&G*GT%98mh98HN(MUh98hgn87N&G*GT%MJIOJ90MIJNm9hi-*&Y*&BT*&IJOjijbiuh98mm98mh98HN(MUh98hgn87N&G*GT%78tbg66757vr65rv5r56e6v64ve464x3xsIHUNUNH89nhU*gyhi-*&Y*&BT*&IJOjijbiuh98mm98mh98HN(MUh98hgn87N&G*GT%78tbg66757vr65rv5r56e6v64ve464x3xsIHUNUNH89nhU*gy"

/usr/bin/curl -s -X POST \
-H 'Host: account.apple.com' \
-H 'Content-Type: application/x-www-form-urlencoded' \
"https://account.apple.com/auth/oauth2/token?grant_type=client_credentials&client_id=${client_id}&client_assertion_type=urn:ietf:params:oauth:client-assertion-type:jwt-bearer&client_assertion=${client_assertion}&scope=business.api" > /Users/Shared/response.json

# Extract the access token from the entire response
/usr/bin/plutil -extract access_token raw /Users/Shared/response.json
Run the script from terminal using the command:
zsh ~/Desktop/abm-asm-bearerToken.zsh
This should print the bearer token on stdout.
UHNHN89NN9898*(*(HUGYG&**GGGYUY98ny78y7y&N*&*&GGFRDrderd4sertr(*hugyguyg---BYUG6r7vftf5tds5y&N*&*&GGFRDrderd4sertr(*hugyguyg---BYUG6r7vftf5tds5y&N*&*&GGFRDrderd4sertr(*hugyguyg---BYUG6r7vftf5tds59898*(*(HUGYG&**GGGYUY98ny78y7y&N*9898*(*(HUGYG&**GGGYUY98ny78y7y&N*
Copy it. We will need it while maing the API calls.
This needs to be regenerated once every hour.
Using the API
Now that we have the bearer token we are ready to make API calls. We will use the curl command to get the information from the URL. We just need to change the end point per the table listed above.
#!/bin/bash
ACCESS_TOKEN="IUHNHN89NN9898*(*(HUGYG&**GGGYUY98ny78y7y&N*&*&GGFRDrderd4sertr(*hugyguyg---BYUG6r7vftf5tds5y&N*&*&GGFRDrderd4sertr(*hugyguyg---BYUG6r7vftf5tds5y&N*&*&GGFRDrderd4sertr(*hugyguyg---BYUG6r7vftf5tds59898*(*(HUGYG&**GGGYUY98ny78y7y&N*9898*(*(HUGYG&**GGGYUY98ny78y7y&N*"

#1. Get all devices
# --------------------
/usr/bin/curl -X GET "https://api-business.apple.com/v1/orgDevices" -H "Authorization: Bearer ${ACCESS_TOKEN}"

#2. Get specific device
# --------------------
/usr/bin/curl -X GET "https://api-business.apple.com/v1/orgDevices/----------" -H "Authorization: Bearer ${ACCESS_TOKEN}"

#3. Get MDM servers
# --------------------
/usr/bin/curl -X GET "https://api-business.apple.com/v1/mdmServers" -H "Authorization: Bearer ${ACCESS_TOKEN}"

#4. Get AppleCare coverage
# --------------------
/usr/bin/curl -X GET "https://api-business.apple.com/v1/orgDevices/----------/appleCareCoverage" -H "Authorization: Bearer ${ACCESS_TOKEN}"

#5. Get devices assigned to an MDM server
# --------------------
/usr/bin/curl -X GET "https://api-business.apple.com/v1/mdmServers/----------/relationships/devices" -H "Authorization: Bearer ${ACCESS_TOKEN}"

#6. Get MDM server for a specific device
# --------------------
/usr/bin/curl -X GET "https://api-business.apple.com/v1/orgDevices/----------/relationships/assignedServer" -H "Authorization: Bearer ${ACCESS_TOKEN}"

#7. Get device activity
# --------------------
/usr/bin/curl -X GET "https://api-business.apple.com/v1/orgDeviceActivities/----------" -H "Authorization: Bearer ${ACCESS_TOKEN}"
Run the script by commenting out the other different end points so that you can explore each end point separately:
zsh ~/Desktop/abm-asm-apiCheck.zsh
It might be a good idea to save the output to a JSON file so that we dont have to make repeated calls to get different parts of the data.
Parsing the API output
Once the output is saved to a JSON file we can use commands like jq to parse through the information. This could also be used to generate a CSV file from the output. Here are some examples of the same.
Suppose we run the command:
usr/bin/curl -X GET "https://api-business.apple.com/v1/mdmServers" -H "Authorization: Bearer 'IUHNHN89NN9898*(*(HUGYG&**GGGYUY98ny78y7y&N*&*&GGFRDrderd4sertr(*hugyguyg---BYUG6r7vftf5tds5y&N*&*&GGFRDrderd4sertr(*hugyguyg---BYUG6r7vftf5tds5y&N*&*&GGFRDrderd4sertr(*hugyguyg---BYUG6r7vftf5tds59898*(*(HUGYG&**GGGYUY98ny78y7y&N*9898*(*(HUGYG&**GGGYUY98ny78y7y&N*'" > /Users/Shared/mdms.json
This will generate a JSON file that looks like this:
| { | |
| "data" : [ { | |
| "type" : "mdmServers", | |
| "id" : "98V3T8W934YT8VYNT8TC2483V8239N8323", | |
| "attributes" : { | |
| "serverName" : "Devices Added by Apple Configurator 2", | |
| "createdDateTime" : "2023-11-11T11:35:24.811Z", | |
| "serverType" : "APPLE_CONFIGURATOR", | |
| "updatedDateTime" : "2023-11-11T11:35:24.811Z" | |
| }, | |
| "relationships" : { | |
| "devices" : { | |
| "links" : { | |
| "self" : "https://api-business.apple.com/v1/mdmServers/98V3T8W934YT8VYNT8TC2483V8239N8323/relationships/devices" | |
| } | |
| } | |
| } | |
| }, { | |
| "type" : "mdmServers", | |
| "id" : "98W3T4CY49MY9JCFIQWJFCQ3449TH8C43TNV893248C", | |
| "attributes" : { | |
| "serverName" : "Jamf Now Server", | |
| "createdDateTime" : "2020-09-18T11:15:30.248Z", | |
| "serverType" : "MDM", | |
| "updatedDateTime" : "2024-11-18T07:39:34.954Z" | |
| }, | |
| "relationships" : { | |
| "devices" : { | |
| "links" : { | |
| "self" : "https://api-business.apple.com/v1/mdmServers/98W3T4CY49MY9JCFIQWJFCQ3449TH8C43TNV893248C/relationships/devices" | |
| } | |
| } | |
| } | |
| }, { | |
| "type" : "mdmServers", | |
| "id" : "YTSFWC674Q6CFB76C367C4B67GW6GTXCQ7G46G8Q3", | |
| "attributes" : { | |
| "serverName" : "Microsoft Intune", | |
| "createdDateTime" : "2025-10-06T06:41:22.173Z", | |
| "serverType" : "MDM", | |
| "updatedDateTime" : "2025-10-06T06:41:29.723Z" | |
| }, | |
| "relationships" : { | |
| "devices" : { | |
| "links" : { | |
| "self" : "https://api-business.apple.com/v1/mdmServers/YTSFWC674Q6CFB76C367C4B67GW6GTXCQ7G46G8Q3/relationships/devices" | |
| } | |
| } | |
| } | |
| } ], | |
| "links" : { | |
| "self" : "https://api-business.apple.com/v1/mdmServers" | |
| }, | |
| "meta" : { | |
| "paging" : { | |
| "limit" : 100 | |
| } | |
| } | |
| } |
Now that we have the file we can pass this information to the jq command. Here are some examples:
less /Users/Shared/mdms.json | jq '.data'
This will return the array of MDM servers. The output will look like:
{
    "type" : "mdmServers",
    "id" : "98V3T8W934YT8VYNT8TC2483V8239N8323",
    "attributes" : {
      "serverName" : "Devices Added by Apple Configurator 2",
      "createdDateTime" : "2023-11-11T11:35:24.811Z",
      "serverType" : "APPLE_CONFIGURATOR",
      "updatedDateTime" : "2023-11-11T11:35:24.811Z"
    },
    "relationships" : {
      "devices" : {
        "links" : {
          "self" : "https://api-business.apple.com/v1/mdmServers/98V3T8W934YT8VYNT8TC2483V8239N8323/relationships/devices"
        }
      }
    }
  }, {
    "type" : "mdmServers",
    "id" : "98W3T4CY49MY9JCFIQWJFCQ3449TH8C43TNV893248C",
    "attributes" : {
      "serverName" : "Jamf Now Server",
      "createdDateTime" : "2020-09-18T11:15:30.248Z",
      "serverType" : "MDM",
      "updatedDateTime" : "2024-11-18T07:39:34.954Z"
    },
    "relationships" : {
      "devices" : {
        "links" : {
          "self" : "https://api-business.apple.com/v1/mdmServers/98W3T4CY49MY9JCFIQWJFCQ3449TH8C43TNV893248C/relationships/devices"
        }
      }
    }
  }, {
    "type" : "mdmServers",
    "id" : "YTSFWC674Q6CFB76C367C4B67GW6GTXCQ7G46G8Q3",
    "attributes" : {
      "serverName" : "Microsoft Intune",
      "createdDateTime" : "2025-10-06T06:41:22.173Z",
      "serverType" : "MDM",
      "updatedDateTime" : "2025-10-06T06:41:29.723Z"
    },
    "relationships" : {
      "devices" : {
        "links" : {
          "self" : "https://api-business.apple.com/v1/mdmServers/YTSFWC674Q6CFB76C367C4B67GW6GTXCQ7G46G8Q3/relationships/devices"
        }
      }
    }
  }
less /Users/Shared/mdms.json | jq '.data[0].id'
This will return the ‘id’ for the first MDM server. The output will look like this:
98V3T8W934YT8VYNT8TC2483V8239N8323
less /Users/Shared/mdms.json | jq '.data[0].attributes'
This will give us the attributes for the first MDM server. The output will look like this:
{
      "serverName" : "Devices Added by Apple Configurator 2",
      "createdDateTime" : "2023-11-11T11:35:24.811Z",
      "serverType" : "APPLE_CONFIGURATOR",
      "updatedDateTime" : "2023-11-11T11:35:24.811Z"
}
less /Users/Shared/mdms.json | jq '.data[0].attributes.serverType'
This will give us the server type attribute value. The output will look like this:
APPLE_CONFIGURATOR
Playing around with these commands its easy to format the data in a way that makes it easy to read. For example, the following snippet of code creates a CSV file.
count=$(less /Users/Shared/mdms.json | jq '.data | length')
echo "id,Server name,Create date,Server type" >> /Users/Shared/mdmServers.csv
for ((i=0; i<$count; i++)); do
	echo "$(less /Users/Shared/mdms.json | jq '.data['$i'].id'),$(less /Users/Shared/mdms.json | jq '.data['$i'].attributes.serverName'),$(less /Users/Shared/mdms.json | jq '.data['$i'].attributes.createdDateTime'),$(less /Users/Shared/mdms.json | jq '.data['$i'].attributes.serverType')" > /Users/Shared/mdmServers.csv
done
The CSV file when opened in an application like Numbers would look like:
| id | Server name | Create date | Server type |
98V3T8W934YT8VYNT8TC2483V8239N8323 | Devices Added by Apple Configurator 2 | 2023-11-11T11:35:24.811Z | APPLE_CONFIGURATOR |
98W3T4CY49MY9JCFIQWJFCQ3449TH8C43TNV893248C | Jamf Now Server | 2020-09-18T11:15:30.248Z | MDM |
YTSFWC674Q6CFB76C367C4B67GW6GTXCQ7G46G8Q3 | Microsoft Intune | 2025-10-06T06:41:22.173Z | MDM |
As you can see there are several options when it comes to parsing the output and formatting it in a way that suits us the best.
Downloading the scripts
So there you go. That’s it about the new API’s from Apple. You can try these out for yourself. I have made the scripts available on Github. You can download the scripts from there.