Automating tasks on the Mac is very useful for a wide variety of reasons. In this article we are going to look at the different technologies available for automating tasks.
TOOLS
Automator
The simplest way of achieving automation. Automator which is a built in application allows you to create task workflows by simply dragging in a set of predefined routines into a specified sequence. Let us explore how it works by creating a watermarking print plugin
Let us look at how we can create a print plugin that automatically adds a watermark to the pdf file.
- First get hold of an image that you will use as a watermark.
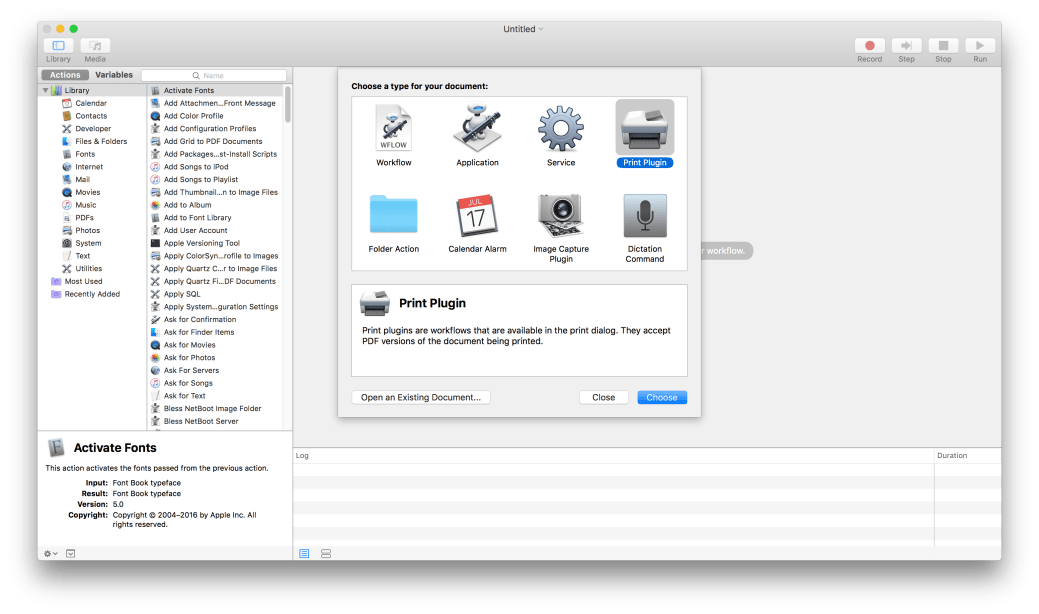
- Open Automator.
- Click on “New Document”
- Choose Print Plugin as the type of task to create
- From the left hand side drag the “Watermark PDF Documents” option. You will be able to locate this from the PDF library on the extreme right.

- Add the image that will be used as a watermark. Customise the settings to your desired level. You may have to use trial and error till you get the desired output.
- Similarly drag the Move finder Items to the right. You will be able to locate this from the Files & Folders library.

- Save the task as WatermarkCreator.
- Open a text file.
- Select File > Print
- Click on the PDF drop down in the print dialog.

- Select the newly created task.

- You have now successfully setup your own watermark creator.
Shell Scripting
For those coming from a Linux/Unix background this might be a familiar option. Very often users need to run a series of terminal commands repeatedly. While it is not difficult to do this, wouldn’t it be nice if we could write all the commands in a single file? Shell Scripts help users do just that.
To create a shell script:
- Open TextEdit
- Write the following code in there (We will write code to create a series of files and folders in our home folder for a user called admin):
#! /bin/sh
cd /Users/admin/
if [ -d "/Users/admin/Applications/" ]; then
echo "Applications Folder Exists"
else
mkdir Applications
fi
if [ -d "/Users/admin/Sites/" ]; then
echo "Sites Folder Exists"
else
mkdir Sites
fi
if [ -d "/Users/admin/Developer/" ]; then
echo "Developer Folder Exists"
else
mkdir Developer
fi
cd Developer
if [ -d "/Users/admin/Developer/iOSProjects/" ]; then
echo "iOSProjects Folder Exists"
else
mkdir iOSProjects
fi
if [ -d "/Users/admin/Developer/macOSProjects/" ]; then
echo "macOSProjects Folder Exists"
else
mkdir macOSProjects
fi
- Save the file with the name FolderCreator on the Desktop.
- Open the Terminal Application
- Let us make the script executable. To do that, run the commands:
cd ~/Desktop
chmod 777 FolderCreator
- Now run the command:
./FolderCreator
You have now easily created your own shell script. For more information about terminal commands you can read the following articles: Terminal Commands for OS X – Basic, Terminal Commands for OS X – Part 2, Terminal Commands – Part 3, & Configuring/Troubleshooting OS X Using Command Line
AppleScript
AppleScript is Apple’s proprietary scripting technology. It comes bundled as a part of macOS. To create AppleScript tasks we need to use the built in AppleScript editor.
Here is an example of a small AppleScript
tell application “Finder” to set the view for all Finder Windows as column view
tell application “Finder” to close every Finder Window
tell application “Safari”
open location “<a href="http://www.arunpatwardhan.com">http://www.arunpatwardhan.com</a>
open location “<a href="http://www.amaranthine.in/feedback">http://www.amaranthine.in/feedback</a>
open location “<a href="http://www.amaranthine.in/gallery">http://www.amaranthine.in/gallery</a>
end tell
Copy that block of commands in your AppleScript editor and see what comes up.
There are many more things that can be done with AppleScript. You can have popup windows asking users for commands, turn off the computer. Change the settings for different parts of the OS and for different applications. All this with commands written in a single file. All the user has to do is double click the file.
For more information about AppleScript visit Apple’s Developer site.
Launch Agents, Launch Daemons
NOTE: Scheduling Launch Agents/Launch Daemons improperly may leave your computer in an unusable state. Always test this on a computer that does not contain important data. If you are unsure, please consult someone with knowledge of the same before proceeding ahead.
Launch Agents/Launch Daemons allow you to schedule tasks which are to be performed at intervals. You can also use them to ensure that tasks are kept running and that the user does not have the possibility to quit them. To setup a launch daemon:
- First create a Plist file that looks like the one below. I have created a script called echoer and placed it in the /Users/admin/Applications folder where admin is the user.
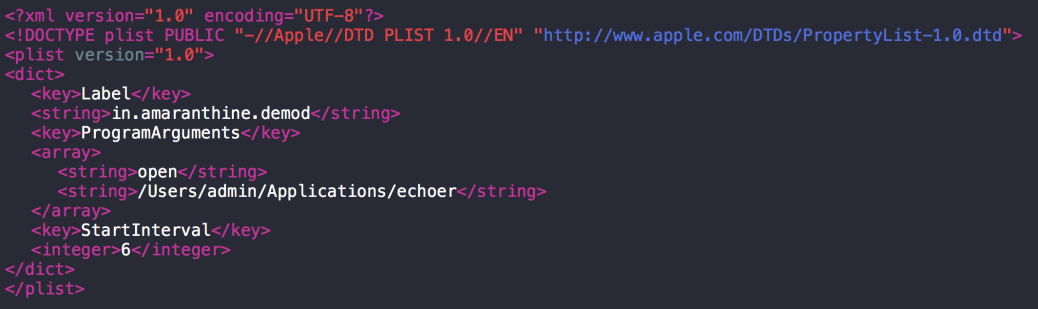
- Place the file in the ~/Library/LaunchAgents folder. Name it in.amaranthine.demod.plist
- Run the command in terminal to load the Launch Agent.
launchctl load ~/Library/LaunchAgent/in.amaranthine.demod.plist
That’s it you have just setup a simple launch agent which will ensure that your script runs every 6 seconds.
For more information or to create detailed Launch Agents/Launch Daemons visit:Creating Launch Agents & Launch Daemons
Login Items
An easy way to automatically load, Applications/Files/Folder, as soon as well login is to use Login Items. This is very easy to do.
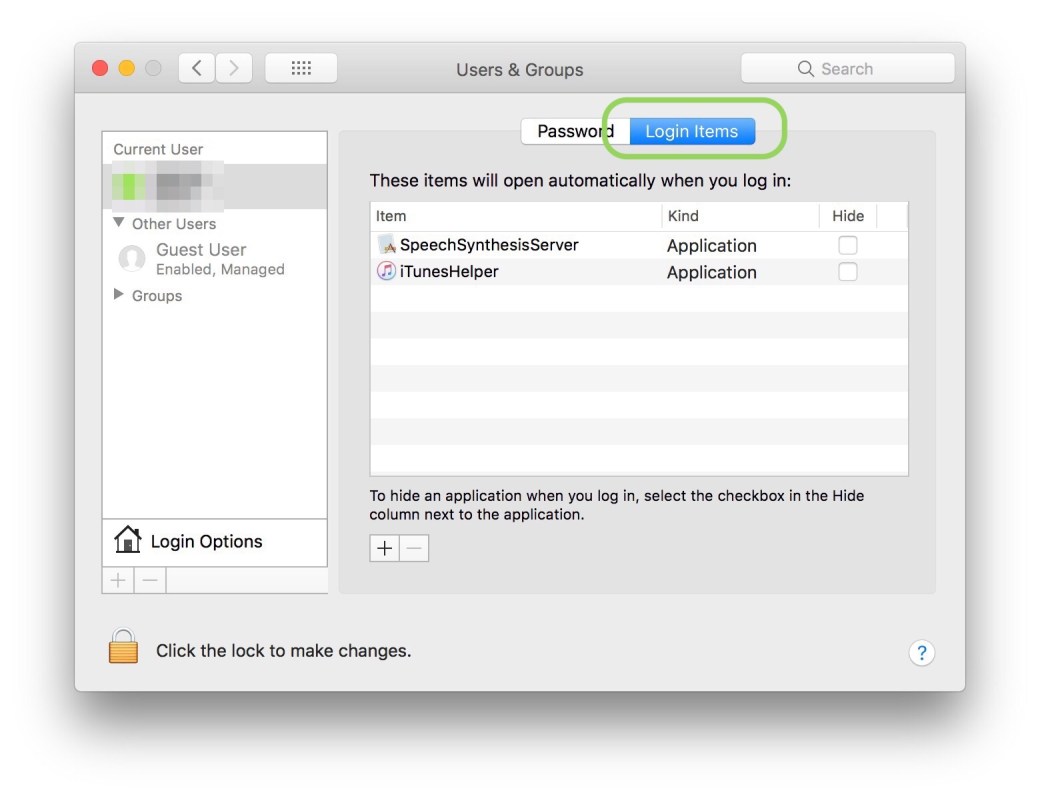
- Open System Preferences > Users & Groups
- Switch to the Login Items tab.
- Click on the ‘+’ sign at the bottom to add new Applications. Let’s add Maps so that it launches as soon as we login. You should see it appear in the list.
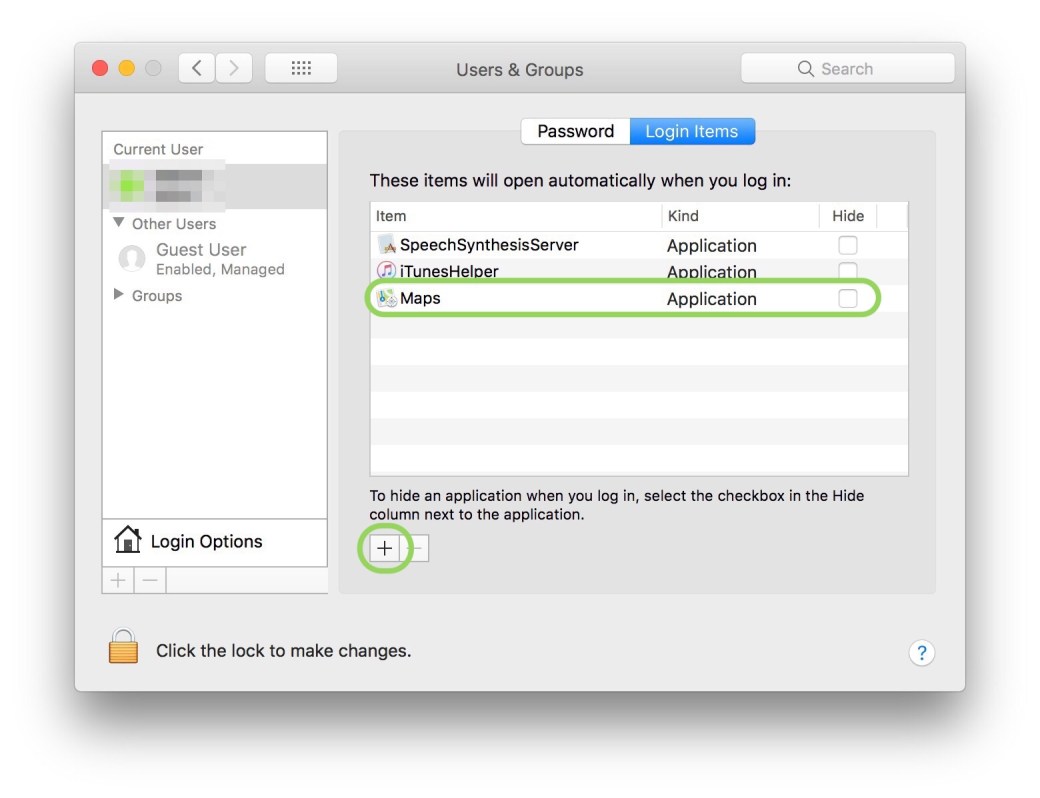
That’s it. You have setup login items. You can repeat this process for as many applications as you wish.
Others
PHP, Perl, Python, Javascript, Swift allow you to create custom automated tasks and routines. These require knowledge of programming.
Choosing the right approach
Which one to choose depends on a lot of factors but we can break it down to 2:
- You are a technically qualified person and understand things like programming, scripting and command line
- You are an end user working either at home or in office.
End User
If you are an End user then you should really stick to Automator and Login Items. These are the ones that are the easiest to implement and least likely to cause any issues. You could venture and explore other options if you have a good understanding of them. Or you can ask the IT or Tech Support teams to help you with scripting and other technologies.
Tech Support or IT Person
Any of the tools mentioned above can be used by you. Make sure that you have a good command over the tools and are able to troubleshoot issues arising out of their usage.
Note: The programs/applications/tools and languages mentioned in this article may not cover all the available options. Also, anyone who uses or implements the items mentioned in the article does so at their own risk. The author does not take responsibility for any loss or damage that may arise from the use of the programs/applications/tools and languages mentioned above.
