In an earlier article we discussed how to create documentation for Swift projects and frameworks. In this article we will look at how to use DocC to generate documentation for shell scripts.
DocC is a documentation rendering tool built into Xcode that allows developers to easily build documentation for their code. Traditionally, developers would create documentation for their code via comments and then separately create documentation files for reference for other developers. DocC combines the 2 steps into a single step, making it easy for developers to write documentation and for others to read that documentation.
With a little modification we will be able to do the same for our shell scripts.
NOTE: We will be making use of concepts covered in an earlier article. Please make sure you go through that before going through the steps.
Adding DocC documentation for shell scripts
DocC is designed to help app developers easily create documentation for their code. So as such it is geared towards creating documentation for that. However, we can tweak things a little bit and use this process for our scripts.
We will be creating a macOS App project.This will act as a starting point. Don’t worry! We won’t be writing any code. You do not need to learn any programming language for this. So lets begin.
Open Xcode
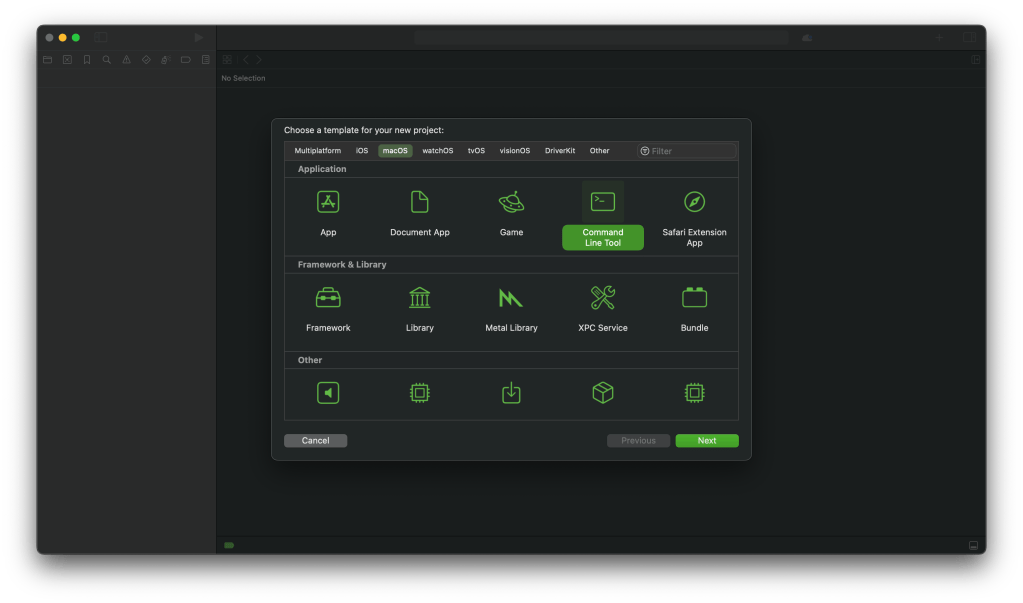
Create a new macOS app project. Select File > New > Project from the menu bar.
Choose “Command line” from the template wizard.
Call it “FolderCreator” as thats the script we are using in this demo.
Provide your company’s url in reverse format as the Organisation identifier. For example, com.companyname, org.organisationname, and so on.
Choose the language as Swift. Save it on the desktop.
Add the script file to your project. We will be using the script from our scripting series. You can find the script here.
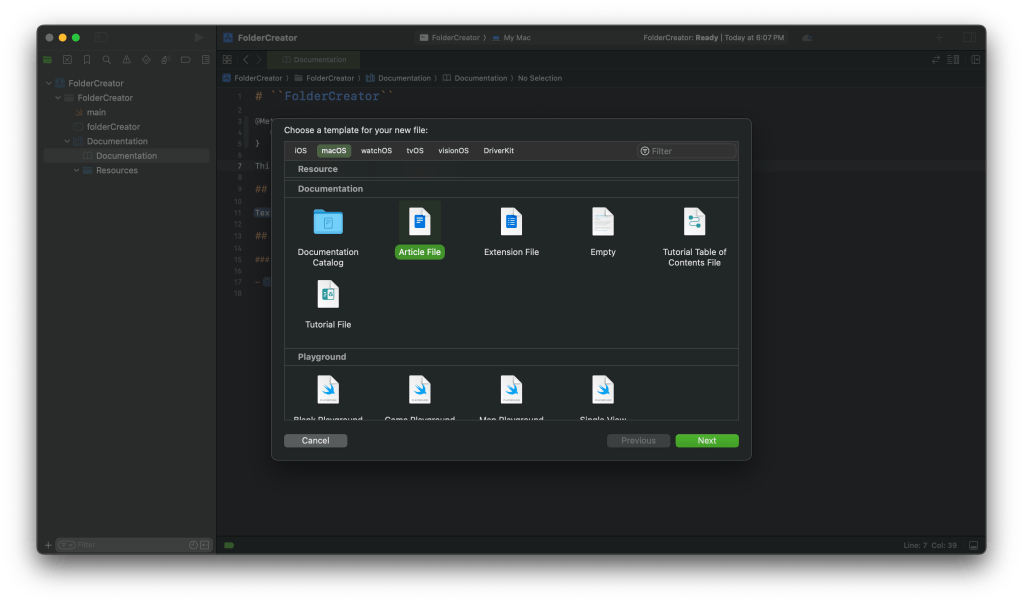
If we go ahead and build the documentation then we won’t find anything helpful. That’s because the documentation compiler is designed to read code and not our script. So it doesn’t contain anything useful. We will have to build the documentation for our script manually. Lets start by adding the documentation catalog. Select File > New > File, under the documentation heading select documentation catalog.
We will add metadata that specifies that this is the documentation for a script. The formatting style is similar to that of markdown documents. Much like the readme files you find in github.
We will add a description, a table listing out the different articles and a topics section that references articles.
Finally we will add a tab navigator to reference external links and resources.
Your completed file should look like:
# ``FolderCreator``

@Metadata {
   @TitleHeading("Shell Script")
}

This script is used to create folders.

## Overview

This script is used to create upto 3 folders on the computer.

| Topic        | Description  | Link |
| ---------    | --------------------------------------- | ---------- |
| License      | License information | <doc:LicenseInformation> |
| History      | Version history | <doc:History> |
| Usage        | How to use the script | <doc:Usage> |
| Requirements | Prerequisites for running the script | <doc:Requirements> |
| Installation | How to install the script | <doc:Installation> |
| Help | Getting help | <doc:Help> |
| Script | Script file for reference | <doc:ScriptFile> |
| Man page | Man page file for reference | <doc:ManPage> |
| Download files | Download the different script versions | <doc:DownloadFiles> |
| Learn scripting | Blog article on learning how to write scripts | <doc:LearnScripting> |

## Topics

### Articles
- <doc:Help>

### Downloads
- <doc:DownloadFiles>

### Tutorials
- <doc:LearnScripting>

@TabNavigator {
   @Tab("Github page") {
       [https://github.com/AmaranthineTech](https://github.com/AmaranthineTech)
   }


   @Tab("Blog") {
       [https://arunpatwardhan.com](https://arunpatwardhan.com)
   }


   @Tab("Youtube") {
       [Amaranthine YouTube Channel](https://www.youtube.com/@amaranthine5616)
   }
}
Let us add and article. We will add an article for usage. Click on File > New > File. Select Article from the template wizard.
In the overview add the information about using our script.
Your completed file should look like this:
# Usage

How to run the script

## Overview

 - To create folders with default names run the command:
```shell
folderCreator
```
 - To define your own folder names:
```shell
folderCreator <folder1> <folder2> <folder3>
```

 - Available options  : Only the help option is available
 - Getting help       : Use the -h or the -help options to get more information. Or you can use the man command to view the man page. Provided the man page was installed along with the command.
```shell
folderCreator -h
folderCreator -help
man folderCreator
```
> Important: It is assumed that the man page for the script has been deployed before use. For more information on how to deploy the man page visit [Shell scripting in macOS – Part 10: Distribution](https://arunpatwardhan.com/2023/02/02/shell-scripting-in-macos-part-10-distribution/). You can also view the <doc:Installation> article.
Similarly add articles for Help, History, License information, Requirements, Learn scripting, Installation, and Download files. You can look at the comments from the script to build the information.
Add an article that will show the raw manpage file.
Copy and paste the entire manpage in that file as an “md syntax.
Your completed page should look like:
# ManPage
@Metadata {
    @PageKind(sampleCode)
    @CallToAction(url: "https://github.com/AmaranthineTech/ShellScripts/blob/main/folderCreator.1", purpose: link)
}
Man page file
## folderCreator man page
```md
.\"Copyright (c) 2015-2022 Amaranthine. All Rights Reserved.
.\"
.\"
.Dd August 10, 2021
.Dt FOLDERCREATOR 1
.Os macOS 11
.Sh NAME
.Nm folderCreator
.Nd Folder creation utility
.\"
.\" ============================================================================
.\" ========================== BEGIN SYNOPSIS SECTION ==========================
.Sh SYNOPSIS
.Nm
.Ar "folder names"
.Op verbs
.\" =========================== END SYNOPSIS SECTION ===========================
.\" ============================================================================
.\"
.\" ============================================================================
.\" ======================== BEGIN DESCRIPTION SECTION =========================
.Sh DESCRIPTION
.Nm
creates 3 folders in the home folder.
In case the folder names are not provided then the command
will create folders with default names "Tools", "Reports", "Help".
.Pp
The user is also prompted via the graphical user interface for names that should be used for the folders.
This is optional and the user can cancel it.
.Pp
There is also the option of getting help via the help verb.
.Pp
- This script is intended for creating the custom folders that are required on all corporate computers.
.Pp
- Run this script on a new computer or a computer being reassigned to another employee.
.Pp
- This script can run on all computers.
.\" ----------------------------------------------------------------------------
.\" ------------------------- BEGIN TERMINOLOGY LIST ---------------------------
.Sh VERBS
.Bl -hang
.It Op Fl h help
Both the options are used to invoke the help documentation.
.It Op Fl v version
Both the options are used to get the version number of the
.Nm
command.
.El
.\" --------------------------- END TERMINOLOGY LIST ---------------------------
.\" ----------------------------------------------------------------------------
.\" ============================================================================
.\" ======================== BEGIN REQUIREMENTS SECTION ========================
.Sh REQUIREMENTS
The following are the minimum requirements to get the script running.
.Bl -hang -offset 4n -width "xxxxxxxxxxxx" -compact
.It Shell:
zsh
.It OS:
macOS Big Sur 11.4 or later
.It Dependencies:
None
.El
.Ev HOME
.\" ============================================================================
.\" ======================== BEGIN INSTALLATION SECTION ========================
.Sh INSTALLATION
.Nm
can be installed anywhere you wish.
However, there are certain locations that are recommended.
.Bl -hang -offset 4n -width "xxxxxxxxxxxx" -compact
.It Location:
/Library/Scripts/
.It Permissions:
rwx r-x r-x
.El
.\" ============================================================================
.\" ======================== BEGIN USAGE SECTION ========================
.Sh USAGE
.Nm
.Ar folder1
.Ar folder2
.Ar folder3
.Pp
Will create folders with your own names.
.Pp
.Nm
.Ar -h
OR
.Nm
.Ar -help
.Pp
Will invoke the help utility.
.Pp
.Nm
.Ar -v
OR
.Nm
.Ar -version
.Pp
Will print the version number in stdout.
.Ss GUI Interaction
In all cases the user is always prompted for entering folder names via the graphical user interface.
Therefore this script triggers a gui popup.
In case this is not the desired behavior then the appropriate lines of code will need to be commented out.
.\" ============================================================================
.\" ======================== BEGIN WARNING/CAUTION SECTION ========================
.Sh WARNING/CAUTION
.Nm
does not perform any validation of names.
The only options that
.Nm
accepts are
.Ar -h
and
.Ar -help
verbs or the
.Ar -v
and
.Ar -version
verbs.
If the script does not see the
.Ar -h
,
.Ar -help
or the
.Ar -v
,
.Ar -version
options then it will assume that the data being passed in is the name of the folder.
The user of the
.Nm
command must ensure that the desired folder names are passed in.
The user will also be prompted, via the graphical user interface, if he/she wishes to provide the names for the folders.
If yes, then there will be subsequent
prompts asking for the folder names.
.\" ============================================================================
.\" ======================== BEGIN EXIT STATUS SECTION =========================
.Sh EXIT STATUS
In most situations,
.Nm
exits 0 on success
.\" ============================================================================
.\" ======================== BEGIN EXAMPLES SECTION ========================
.Sh EXAMPLES
.Nm
.Ar Resources
.Ar Results
.Ar Assistant
.Pp
This will create 3 folders
.Sy Resources
,
.Sy Results
,
.Sy Assistant
,
in the user's home folder.
.Pp
.Nm
.Pp
This will create 3 folders with the default names
.Pp
.Nm
.Ar Apps
.Pp
This will use the
.Sy Apps
name for the first folder but the default names for the last 2 folders.
.\" ============================================================================
.\" ======================== BEGIN DIAGNOSTICS SECTION ========================
.Sh DIAGNOSTICS
The script produces a log file called
.Sy ~/Library/Logs/folderCreator_log_v1-x.log
.Pp
This file is typically located in the user's home folder log folder.
The x represents the version number of
.Nm
.Pp
You can view the logs for each respective version.
.\" ============================================================================
.\" ======================== BEGIN COPYRIGHT SECTION ========================
.Sh COPYRIGHT
Copyright (c) Amaranthine 2015-2021.
All rights reserved.
https://amaranthine.in
.\" ============================================================================
.\" ======================== BEGIN CONTACT SECTION ========================
.Sh CONTACT DETAILS
.An Author: Arun Patwardhan
.Pp
Website: https://amaranthine.in
.Pp
Email: arun@amaranthine.co.in
```
Also create a page to show the actual script. This is useful. Anyone reading our documentation will also quickly be able to see our script.
And thats it. We have all the necessary information in there. You can download my completed project from the section below. Use it to compare the documentation that you wrote.
Distributing the documentation
There are several ways to distribute the documentation. I have covered those in the previous article. The best option is to host it on a website and make it available to anyone who wishes to use it. That is what I have done. You can view the website here: https://amaranthinescript.github.io/documentation/foldercreator
Use with other scripts
The good thing about the how we created our documentation is that those steps apply to all other kinds of scripts. Instead of our shell script you can add any other script such as AppleScript in there and create documentation for the same.
Yes the process is a bit manual but it does allow script writers to quickly create highly readable documentation.
DocC is a built-in documentation rendering tool that allows developers to easily build documentation for their code. Traditionally, developers would create documentation for their code via comments and then separately create documentation files for reference for other developers. DocC combines the 2 steps into a single step, making it easy for developers to write documentation and for others to read that documentation.
Requirements
This functionality is built into Xcode, so no other tool is required. You may need a hosting server incase you wish to host a web based version of the documentation. In this article we will be using Github pages to host our documentation.
Markdown comments
A key component to generate the documentation are comments that you have written. The comments must be formatted in a particular way so that Xcode can read them and use them to build the documentation. I have already covered this in an earlier article though we will have a look at some of those in a bit.
Creating additional documentation resources
The documentation tools generate documentation based on several resources:
Markdown comments
Type definitions, property declaration, and function declarations
available attribute
All these sources combined together provide a lot of information. But we are not just limited to these sources. We can add 2 other kinds of resources to our projects.:
Articles
Tutorial
Articles allow us to provide a little more context to the documentation. This is where advanced concepts such as functionality, underlying behavior, and things to know are presented to the user. It is possible to add diagrams and pictures to explain the concepts too.
Tutorials on the other hand allow the creator of the code to offer help to anyone who uses the API so that they can learn how to use the different features with the help of step by step instructions.
Both articles and tutorials add to the resources to make the documentation richer and more helpful.
Creating documentation for apps and packages
The process of creating documentation for apps/packages/frameworks is largely similar.
We will be using an example to understand how this goes. I will show only a small snippets of the code/comments here. You can download the completed project at the bottom of the file.
We will take a structured approach towards the design of our documentation.
First we will add the availability attributes
Second we will put comments for our code
Third we will add articles to our code
Fourth we will provide tutorials for our code
Adding availability attributes
Adding @available attributes is an important and useful part of the documentation process. It helps other users of your code know thing like which version of the language is required. What’s the minimum OS version that is required, and so on. All this becomes part of the documentation too. Let us look at how we can do this.
The code below represents a type called author. It’s a complete code but it’s missing the availability attributes. In fact, you should also see Xcode report an error for the link where we use Date.now saying that it’s only available from macOS 12 or later and that we should put an availability attribute for the same.
public struct Author {
    public var name         : String    = ""
    public var email        : String    = ""
    public var dateOfBirth  : Date      = Date.now
    public var phone        : String    = ""
    public var photo        : Data?
    public var website      : URL?
}

extension Author : CustomStringConvertible {
    public var description: String {
        let df : DateFormatter  = DateFormatter()
        df.dateStyle            = .medium
        df.timeStyle            = .medium

        return """
        Author
        ----------
        Name:       \(self.name)
        Email:      \(self.email)
        Birthday:   \(df.string(from: self.dateOfBirth))
        Phone:      \(self.phone)
        Website:    \(self.website?.description ?? "")
        """
    }
}

extension Author : Equatable {
    public static func ==(lhs : Author, rhs : Author) -> Bool {
        lhs.name == rhs.name && lhs.dateOfBirth == rhs.dateOfBirth
    }
}
Let’s add the attributes and see how it looks. The code show now look like this:
@available(swift 5.0)
@available(iOS 14, macOS 12, *)
public struct Author {
    public var name         : String    = ""
    public var email        : String    = ""
    public var dateOfBirth  : Date      = Date.now
    public var phone        : String    = ""
    public var photo        : Data?
    public var website      : URL?
}

@available(swift 5.0)
@available(iOS 14, macOS 12, *)
extension Author : CustomStringConvertible {
    public var description: String {
        let df : DateFormatter  = DateFormatter()
        df.dateStyle            = .medium
        df.timeStyle            = .medium

        return """
        Author
        ----------
        Name:       \(self.name)
        Email:      \(self.email)
        Birthday:   \(df.string(from: self.dateOfBirth))
        Phone:      \(self.phone)
        Website:    \(self.website?.description ?? "")
        """
    }
}

@available(swift 5.0)
@available(iOS 14, macOS 12, *)
extension Author : Equatable {
    public static func ==(lhs : Author, rhs : Author) -> Bool {
        lhs.name == rhs.name && lhs.dateOfBirth == rhs.dateOfBirth
    }
}
Adding comments
Let us continue with our previous example. Next we will add comments to the code. We will go use the markup features we saw in the earlier article. The comments should provide more details about the type. Things like version, copyright, date created, author, tips, contact details. In the case of functions you can have information about arguments and return types too. Let us add that to our code.
//
//  File.swift
//
//
//  Created by Arun Patwardhan on 04/07/23.
//

import Foundation

/**
 Represents the author of the book.

 **Protocols**

 Conforms to `CustomStringConvertible` and `Equatable`

 - version: 1.0
 - note: The `name` and `dateOfBirth` are deemed to be unique properties.
 - since: iOS 14, macOS 11
 - author: Arun Patwardhan
 - copyright: Amaranthine (c) 2023
 - date: 3rd July 2023
 - requires: Swift 5.x
 - Tip: See the article on creating markup comments [Adding formatted Text to Swift](https://arunpatwardhan.com/2017/11/09/adding-formatted-text-to-swift-in-xcode/)

 [arun@amaranthine.co.in](mailto:arun@amaranthine.co.in)
 */
@available(swift 5.0)
@available(iOS 14, macOS 12, *)
public struct Author {
    public var name         : String    = ""
    public var email        : String    = ""
    public var dateOfBirth  : Date      = Date.now
    public var phone        : String    = ""
    public var photo        : Data?
    public var website      : URL?
}

@available(swift 5.0)
@available(iOS 14, macOS 12, *)
extension Author : CustomStringConvertible {
    public var description: String {
        let df : DateFormatter  = DateFormatter()
        df.dateStyle            = .medium
        df.timeStyle            = .medium

        return """
        Author
        ----------
        Name:       \(self.name)
        Email:      \(self.email)
        Birthday:   \(df.string(from: self.dateOfBirth))
        Phone:      \(self.phone)
        Website:    \(self.website?.description ?? "")
        """
    }
}

@available(swift 5.0)
@available(iOS 14, macOS 12, *)
extension Author : Equatable {
    public static func ==(lhs : Author, rhs : Author) -> Bool {
        lhs.name == rhs.name && lhs.dateOfBirth == rhs.dateOfBirth
    }
}
Note that we did not add comments to the extensions of the type. Also, it isn’t always necessary to add comments. Sometimes the types are fairly simple and self explanatory.
Creating the Documentation catalog
Now that we have added comments let’s add the DocC documentation.
In fact, you don’t have to do much. Simply select build documentation and it should create it for you with the code, comments, and availability information that is already there.
To create our documentation just select Product > Build Documentation from the menu.
You can see that already a lot of information is available without having to add any documentation.
The documentation we add will just build on this.
Creating Documentation Catalogs
The resources that we need for documentation are added within a documentation catalog. Items like Articles, Tutorial, Sample code, images are all added to the documentation catalog. These items are used to build our documentation. Let us add a documentation catalog to our project.
With our package open select File > New > File from the menu bar.
Choose the Documentation catalog option from the template wizard.
Click Next.
You should see the catalog added to your project.
Select the file called Documentation within the Documentation folder. This is the top level documentation file. We will place information about the package in here.
Rename this file to match the name of our project.
Next add the code shown below to our file. We will examine the different items in a moment.
# ``AmaranthineLibrary``
The types available in ths package are to be used in applications that work with books and collections of books.
## Overview

In this documentation we will look at the different types available. The idea behind these types is to support the creation of apps that work in different libraries. This should allow all kinds of institutions to quickly develop their own solutions for in-house libraries.
### Types
| Type      | Description  |
| --------- | --------------------------------------- |
| `Genre`   | This describes the `Genre` of the book. |
| `Book`    | This represents a single book           |
| `Author`  | This describes the author of the book   |
| `Library` | This describes the Library type.        |
Under the resources folder add any image of your choice. I have an image called “library” and have added that in there.
That’s it for now. Let us look at what we have written.
First up a lot of the formatting you see is similar to markdown style. This means that many thing like headings with a ‘#’, designing tables are already familiar. Let us look at the first line.
# ``AmaranthineLibrary``
The double back tick is used to link to symbols in our project. In this case it is the framework itself. This can be a nested symbol too which is then indicated by a path. We will see an example of this when we create an article for the Author type.
Next we have text description giving us information about the framework. This is followed by the heading for Overview.

This line of code adds an image to the documentation. The text in the square brackets is the description followed by the name of the image file in round brackets. This name is the same as the name used while uploading the image in step 8. It is also possible to provide variations of the image. You can provide images with different scales and support for dark mode as long as you follow the correct naming convention.
<image name>~dark<scale>.<file extension>
For example, I could have provided different version of the library image.
library~dark@2x.png
library@2x.png
The system picks the correct one based on the need.
| Type | Description | | --------- | --------------------------------------- | | `Genre` | This describes the `Genre` of the book. | | `Book` | This represents a single book | | `Author` | This describes the author of the book | | `Library` | This describes the Library type. |
This creates a simple table. A single back tick is used to make the text appear in the code syntax.
- <enum:Genre>
This is another form of a link. This links directly to the Genre type documentation page. There are other ways of creating links to documentation pages. We see them in the code snippet below.
Now we haven’t created these articles yet but this is how we would create links to them. The name matches the name of the article itself. It could also be a link to a tutorial page.
@Small {
    MIT License
}
Finally this allows us to include any fine print text we wish to add to our page. Build the documentation and look at the output. Notice that we get errors for the links to the articles as we have created them yet. For now we will delete the links to the LibraryInformation and the Tutorial table of contents.
Next we will look at creating articles.
Creating Articles
Articles allow us to provide more information about the different types that we have declared in our code. As I mentioned earlier. It allows us to add more information to the existing documentation that has been built. Let us go ahead and create the article for the Book type.
Click on File > New > File from the menu bar.
Select the document type as Article from the template wizard.
Name it BookInformation
Create it.
Add the following code to the article.
# BookInformation

The ``Book`` type represents a single book.
## Overview

The type is built up using several different properties. ``Book/author``, ``Book/genre``, ``Book/pageCount``, ``Book/publishedOn``, ``Book/title``, and ``Book/isbn``. Is a ``Book`` is to be uniquely identified then the ``Book/isbn`` property can be used for the same.
Add an image called ‘book’ to the resources folder.
Let us have a look at the different things added.
# BookInformation
The ``Book`` type represents a single book.
First up we have the title of the article. Then we have its description. Within the description there is a link for the Book type. Included using the double back ticks. This is a good way to help people reading the documentation to directly go over to the type itself.
## Overview

The type is built up using several different properties. ``Book/author``, ``Book/genre``, ``Book/pageCount``, ``Book/publishedOn``, ``Book/title``, and ``Book/isbn``. Is a ``Book`` is to be uniquely identified then the ``Book/isbn`` property can be used for the same.
Then we have the overview title with the image of a book. This is followed by a description along with links to properties within the type. Links to such properties are established using The path approach. Where we first mention the Type followed by a slash followed by the property. The rest of the article lists out the protocols that our type conforms to and the output format incase its to be printed.
Similarly we will add an article for the Author. Create a new article called author information. Add the code below.
The ``Author`` type represents the author of the book.
## Overview

This type is built up using 3 properties: ``Author/name``, ``Author/email``, and ``Author/dateOfBirth``. An instance of ``Author`` is said to be unique if both the ``Author/name`` as well as the ``Author/dateOfBirth`` are unique.
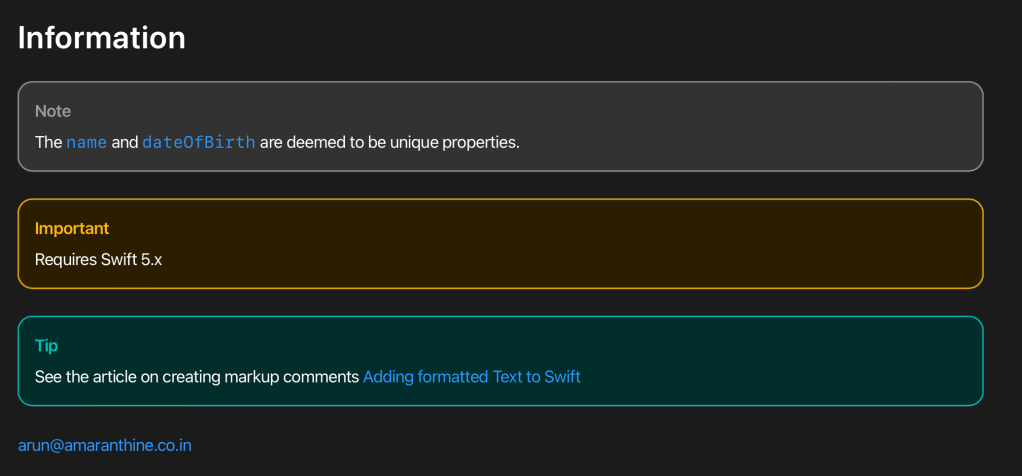
## Information > Note: The ``Author/name`` and ``Author/dateOfBirth`` are deemed to be unique properties.
> Important: Requires Swift 5.x
> Tip: See the article on creating markup comments [Adding formatted Text to Swift](https://arunpatwardhan.com/2017/11/09/adding-formatted-text-to-swift-in-xcode/)
Next we have the metadata. This tell Xcode how to handle the document creation. Should it merge the auto generated documentation with the contents of our article or should the contents of the article override the information. Here we are saying it overrides.
## Information > Note: The ``Author/name`` and ``Author/dateOfBirth`` are deemed to be unique properties.
> Important: Requires Swift 5.x
> Tip: See the article on creating markup comments [Adding formatted Text to Swift](https://arunpatwardhan.com/2017/11/09/adding-formatted-text-to-swift-in-xcode/)
This bit of code is also different. It creates sections for tips, notes, important information. It renders in the documentation with color highlights.
Build the documentation and see how it looks.
There are many other links and formatting options available.
You can control the page layout using tabs, tables.
You can add small disclosure text
Links can be added to specific properties and functions.
Extra top level documents: These are not articles related to a specific type but rather general information about the project.
Availability for the documentation
Comments: Items that are not rendered but are present for the creator of the documentation to take notes
Page appearance
Don’t forget to look at the completed code to see the different kinds of formats that have been used.
Next we will look at creating tutorials.
Creating tutorials
Tutorials as the name suggests are simple guides that walk through the usage of your code. Its a great way to help users of your code to learn how to use the types and functions that you have declared.
Tutorials are easy to create. Lets start of by creating the table of contents file.
Click on File > New > File from the menu bar.
Choose Tutorial Table of Contents.
Give it a name
Create it.
It should come pre-populated with some formatted text to show the table of contents.
Replace that with the code shown below. We will explore the different parts of the text in a moment.
@Tutorials(name: "Using the different types available") { @Intro(title: "How to use the different types") { In this tutorial we will look at creating and using the different types.
@Image(source: library.png, alt: "Library") }
@Volume(name: "Creating types") {
First we will look at how to create instances of the different types. @Image(source: create.png, alt: "Create")
@Chapter(name: "Author") { In this chapter we look at how to create objects of type ``AmaranthineLibrary/Author``. @Image(source: author.png, alt: "Author") @TutorialReference(tutorial: "doc:AuthorTutorial") }
@Chapter(name: "Genre") { In this chapter we look at how to create objects of type ``AmaranthineLibrary/Genre``. @Image(source: genre.png, alt: "Genre") @TutorialReference(tutorial: "doc:GenreTutorial") }
@Chapter(name: "Book") { In this chapter we look at how to create objects of type ``AmaranthineLibrary/Book``. @Image(source: book.png, alt: "Book") @TutorialReference(tutorial: "doc:BookTutorial") }
@Chapter(name: "Library") { In this chapter we look at how to create objects of type ``AmaranthineLibrary/Library``. @Image(source: library.png, alt: "Library") @TutorialReference(tutorial: "doc:LibraryTutorial") } }
@Volume(name: "Working with the library") { Next we will look at how all the types work together as a part of the library.
@Image(source: assemble.png, alt: "Assemble")
@Chapter(name: "Working with the library") { In this chapter we look at how to use the ``AmaranthineLibrary/Library`` object. @Image(source: library.png, alt: "Library") @TutorialReference(tutorial: "doc:UsingTheLibraryTutorial") } }
@Resources { Explore more resources for learning about the different features that we have used in Swift.
@Videos(destination: "https://www.youtube.com/channel/UC127UHd8V7bxPQYnd9QrN8w") { To view various blog articles and videos.
- [My Blog](https://www.arunpatwardhan.com/) }
@SampleCode(destination: "https://github.com/AmaranthineTech") { Download and explore sample code projects.
@Tutorials(name: "Using the different types available")
Right at the top we have the title for the tutorial. All the chapter and volume listings are within this block.
@Intro(title: "How to use the different types") {
        In this tutorial we will look at creating and using the different types.

        @Image(source: library.png, alt: "Library")
    }
Then we have the introduction for the tutorial. Here we can give a brief introduction about the tutorial itself. We can add artwork to help illustrate things for the user.
@Volume(name: "Creating types") {

        First we will look at how to create instances of the different types.
        @Image(source: create.png, alt: "Create")

        @Chapter(name: "Author") {
            In this chapter we look at how to create objects of type ``AmaranthineLibrary/Author``.
            @Image(source: author.png, alt: "Author")
            @TutorialReference(tutorial: "doc:AuthorTutorial")
        }

        ...
    }
Next we provide the list of chapters. We can directly provide the list of chapters, or, if our tutorial covers different sections we can have multiple volumes each with a list of chapters. That is what I have done in this example.
The name of the volume, some text explains what is covered in this volume. With the chapter blocks in it. The chapters have a similar structure with name, text, image, and a link to the tutorial document.
@Resources { Explore more resources for learning about the different features that we have used in Swift.
@Videos(destination: "https://www.youtube.com/channel/UC127UHd8V7bxPQYnd9QrN8w") { To view various blog articles and videos.
- [My Blog](https://www.arunpatwardhan.com/) }
@SampleCode(destination: "https://github.com/AmaranthineTech") { Download and explore sample code projects.
At the end there is a resources block. This is a great place to put links to other resources that the reader may find useful. These can be categorized to give the reader more information. Here are some of the categories:
Documentation
Sample code
Videos
Forums
Downloads
Each of these can contain multiple links. Before we build the documentation let us add a tutorial document. In order to do that let us remove the extra volumes and chapters from the table of contents for the moment. This can be added later. Your final code should look like:
@Tutorials(name: "Using the different types available") { @Intro(title: "How to use the different types") { In this tutorial we will look at creating and using the different types.
@Image(source: library.png, alt: "Library") }
@Volume(name: "Creating types") {
First we will look at how to create instances of the different types. @Image(source: create.png, alt: "Create")
@Chapter(name: "Book") { In this chapter we look at how to create objects of type ``AmaranthineLibrary/Book``. @Image(source: book.png, alt: "Book") @TutorialReference(tutorial: "doc:BookTutorial") } }
@Resources { Explore more resources for learning about the different features that we have used in Swift.
@Videos(destination: "https://www.youtube.com/channel/UC127UHd8V7bxPQYnd9QrN8w") { To view various blog articles and videos.
- [My Blog](https://www.arunpatwardhan.com/) }
@SampleCode(destination: "https://github.com/AmaranthineTech") { Download and explore sample code projects.
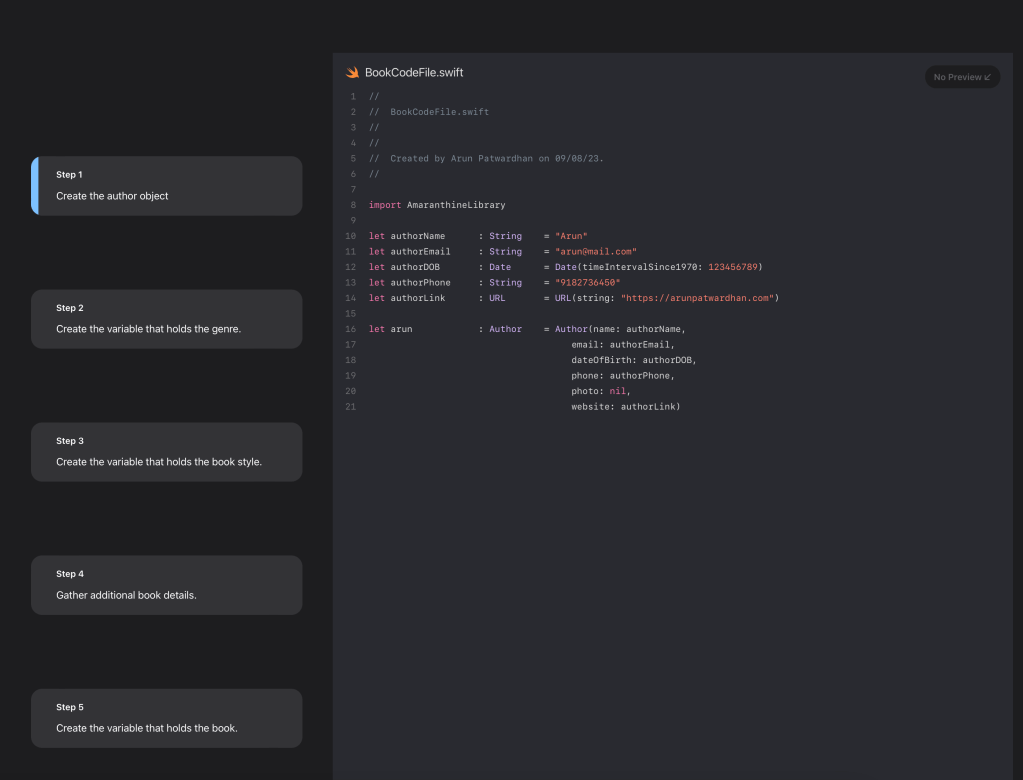
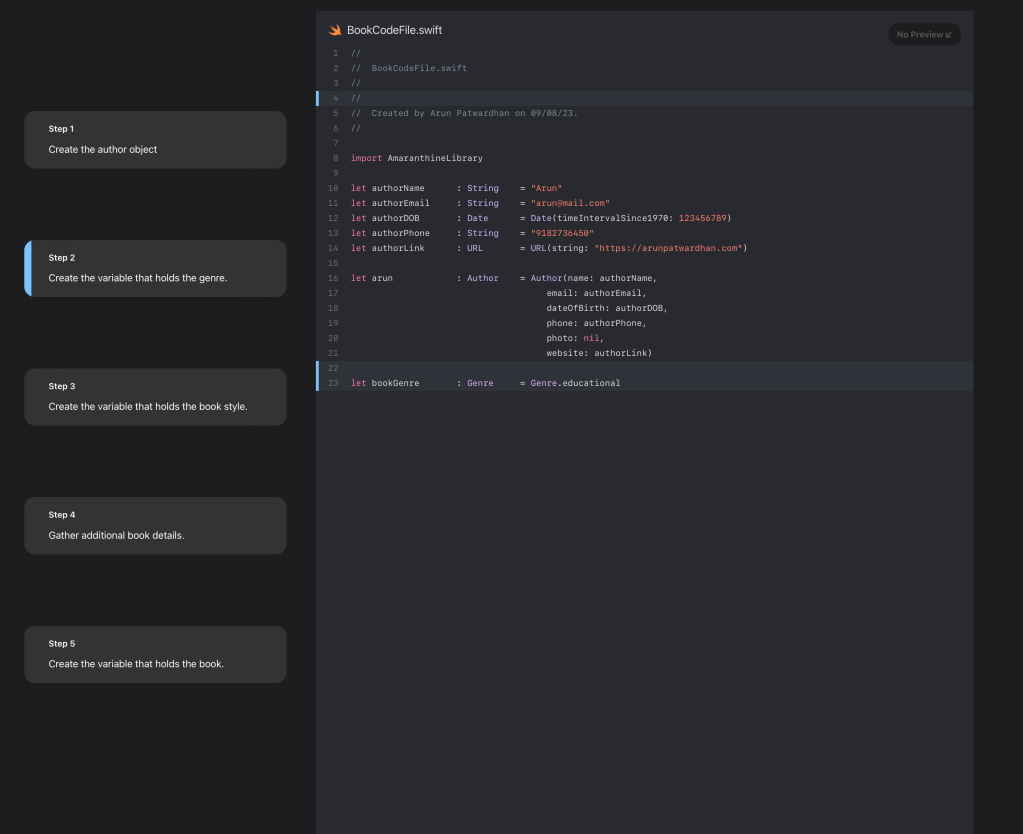
Then we have the steps within the @Steps block. Each step is in its own @Step block. Note the difference between the two. The outer one is @Steps to indicate it holds a series of steps. Inside this is the @Step which represents a single step.
Each step contains the description for that step along with its @Code block. The way the tutorial works is that it walks the reader through a series of tasks that it performs. What is to be done is described in the text and a sample preview for the code is generated through the code file mentioned in the code block.
We will need to upload a series of code files. Each file contains additional code. Listing them in sequence generates the flow. Add the following files to the resources folder of your documentation. Name them BookCodeFile.swift, BookCodeFile-1.swift, BookCodeFile-2.swift, BookCodeFile-3.swift, and BookCodeFile-4.swift.
BookCodeFile.swift
//
//  BookCodeFile.swift
//
//
//  Created by Arun Patwardhan on 09/08/23.
//

import AmaranthineLibrary

let authorName      : String    = "Arun"
let authorEmail     : String    = "arun@mail.com"
let authorDOB       : Date      = Date(timeIntervalSince1970: 123456789)
let authorPhone     : String    = "9182736450"
let authorLink      : URL       = URL(string: "https://arunpatwardhan.com")

let arun            : Author    = Author(name: authorName,
                                     email: authorEmail,
                                     dateOfBirth: authorDOB,
                                     phone: authorPhone,
                                     photo: nil,
                                     website: authorLink)
BookCodeFile-1.swift
//
//  BookCodeFile.swift
//
//
//  Created by Arun Patwardhan on 09/08/23.
//

import AmaranthineLibrary

let authorName      : String    = "Arun"
let authorEmail     : String    = "arun@mail.com"
let authorDOB       : Date      = Date(timeIntervalSince1970: 123456789)
let authorPhone     : String    = "9182736450"
let authorLink      : URL       = URL(string: "https://arunpatwardhan.com")

let arun            : Author    = Author(name: authorName,
                                     email: authorEmail,
                                     dateOfBirth: authorDOB,
                                     phone: authorPhone,
                                     photo: nil,
                                     website: authorLink)

let bookGenre       : Genre     = Genre.educational
BookCodeFile-2.swift
//
// BookCodeFile.swift
//
//
// Created by Arun Patwardhan on 09/08/23.
//
import AmaranthineLibrary
let authorName : String = "Arun"
let authorEmail : String = "arun@mail.com"
let authorDOB : Date = Date(timeIntervalSince1970: 123456789)
let authorPhone : String = "9182736450"
let authorLink : URL = URL(string: "https://arunpatwardhan.com")
let arun : Author = Author(name: authorName,
email: authorEmail,
dateOfBirth: authorDOB,
phone: authorPhone,
photo: nil,
website: authorLink)
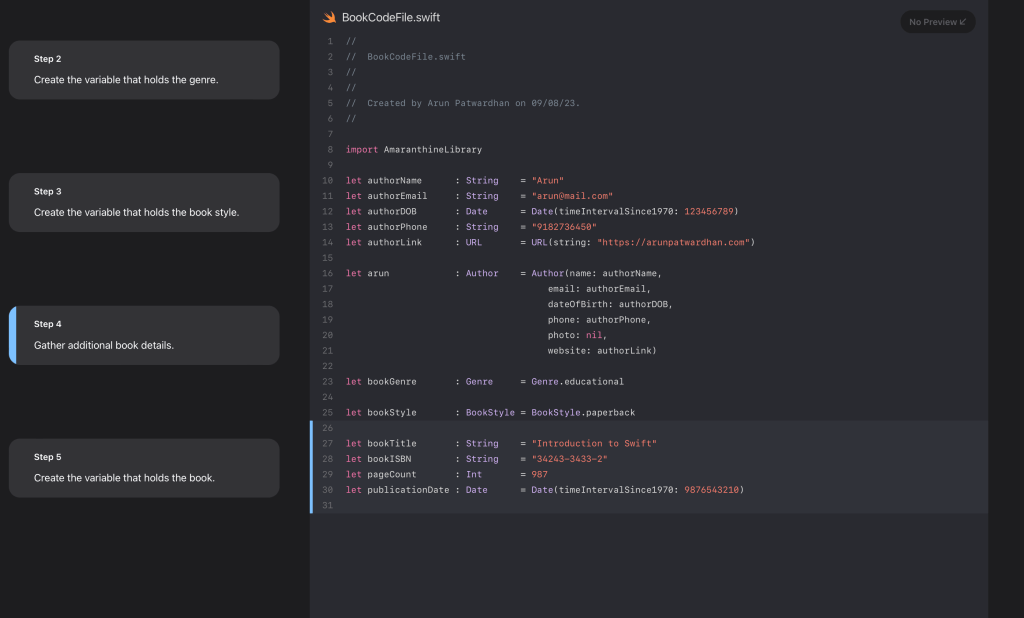
let bookGenre : Genre = Genre.educational
let bookStyle : BookStyle = BookStyle.paperback
BookCodeFile-3.swift
//
//  BookCodeFile.swift
//
//
//  Created by Arun Patwardhan on 09/08/23.
//

import AmaranthineLibrary

let authorName      : String    = "Arun"
let authorEmail     : String    = "arun@mail.com"
let authorDOB       : Date      = Date(timeIntervalSince1970: 123456789)
let authorPhone     : String    = "9182736450"
let authorLink      : URL       = URL(string: "https://arunpatwardhan.com")

let arun            : Author    = Author(name: authorName,
                                     email: authorEmail,
                                     dateOfBirth: authorDOB,
                                     phone: authorPhone,
                                     photo: nil,
                                     website: authorLink)

let bookGenre       : Genre     = Genre.educational

let bookStyle       : BookStyle = BookStyle.paperback

let bookTitle       : String    = "Introduction to Swift"
let bookISBN        : String    = "34243-3433-2"
let pageCount       : Int       = 987
let publicationDate : Date      = Date(timeIntervalSince1970: 9876543210)
BookCodeFile-4.swift
//
//  BookCodeFile.swift
//
//  BookCodeFile.swift
//
//
//  Created by Arun Patwardhan on 09/08/23.
//

import AmaranthineLibrary

let authorName      : String    = "Arun"
let authorEmail     : String    = "arun@mail.com"
let authorDOB       : Date      = Date(timeIntervalSince1970: 123456789)
let authorPhone     : String    = "9182736450"
let authorLink      : URL       = URL(string: "https://arunpatwardhan.com")

let arun            : Author    = Author(name: authorName,
                                     email: authorEmail,
                                     dateOfBirth: authorDOB,
                                     phone: authorPhone,
                                     photo: nil,
                                     website: authorLink)

let bookGenre       : Genre     = Genre.educational

let bookStyle       : BookStyle = BookStyle.paperback

let bookTitle       : String    = "Introduction to Swift"
let bookISBN        : String    = "34243-3433-2"
let pageCount       : Int       = 987
let publicationDate : Date      = Date(timeIntervalSince1970: 9876543210)

let swiftTextBook   : Book      = Book(title: bookTitle,
                                       author: arun,
                                       publishedOn: publicationDate,
                                       isbn: bookISBN,
                                       pageCount: pageCount,
                                       genre: bookGenre,
                                       format: bookStyle)
Build the documentation and see how it renders the tutorial. It should look like this:
You can add preview images to your tutorial too to give a visual preview for your code. This is really useful when you are creating tutorials for UI based elements.
Adding assessments
One nice feature of tutorial is the ability to add assessments.
Assessments are a good way of helping readers determine if they have understood specific aspects of the code well. It’s also a good way to drive home key concepts related to the code.
Assessments are added to the tutorial and is located at the bottom of the tutorial section. Add the following to our Book Tutorial:
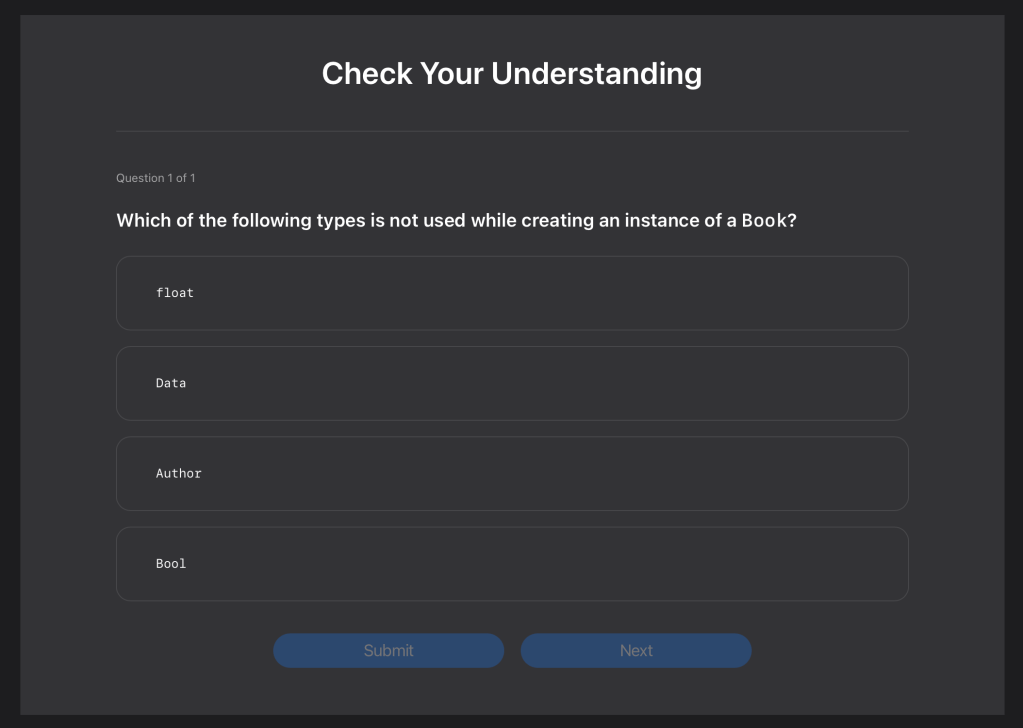
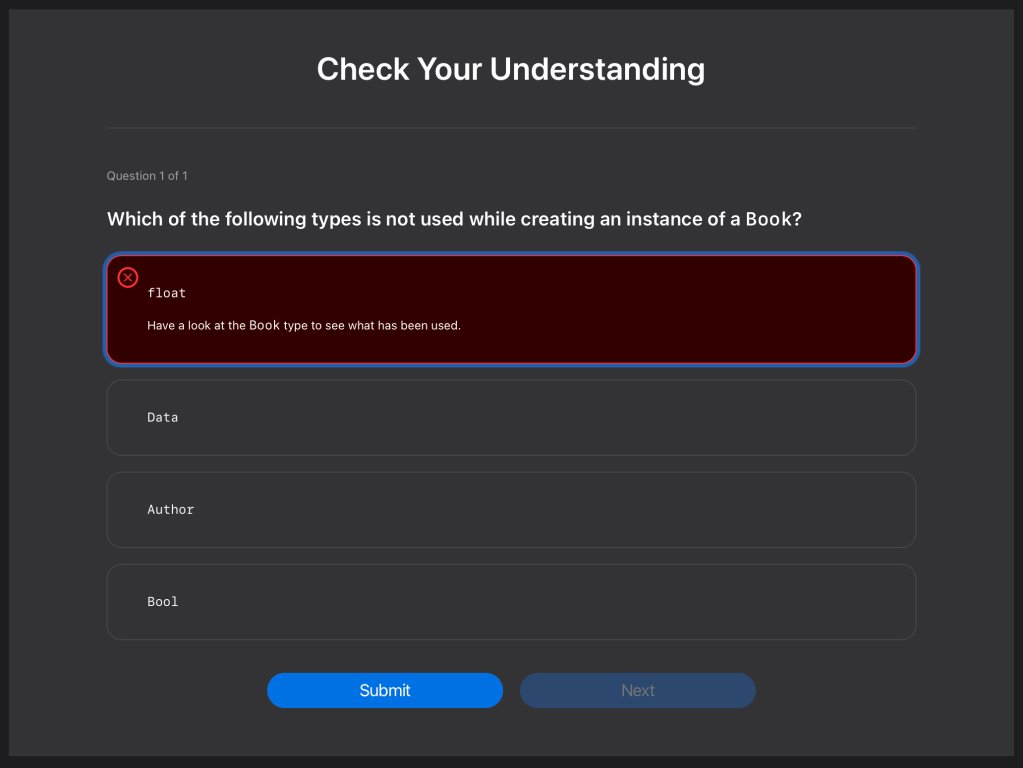
@Assessments {
        @MultipleChoice {

            Which of the following types is not used while creating an instance of a `Book`?

            @Choice(isCorrect: false) {
                `float`

                @Justification(reaction: "Try again!") {
                    Have a look at the `Book` type to see what has been used.
                }
            }

            @Choice(isCorrect: false) {
                `Data`

                @Justification(reaction: "Try again!") {
                    Have a look at the `Book` type to see what has been used.
                }
            }

            @Choice(isCorrect: true) {
                `Author`

                @Justification(reaction: "That's right!") {
                    A `Book` has an `Author`.
                }
            }

            @Choice(isCorrect: false) {
                `Bool`

                @Justification(reaction: "Try again!") {
                    Have a look at the `Book` type to see what has been used.
                }
            }
        }
    }
Let us explore each item in this.
@Assessments {
First we have our assessments block. All our multi choice questions go in here.
@MultipleChoice {

            Which of the following types is not used while creating an instance of a `Book`?
Then we have the multi choice block along with the question itself.
@Choice(isCorrect: false) {
                `float`

                @Justification(reaction: "Try again!") {
                    Have a look at the `Book` type to see what has been used.
                }
            }
A MulitpleChoice block contains 2-4 choices. Each choice is represented with its own @Choice block. A choice block has a boolean flag indicating if its the right answer, the choice value, and a hint in the form of a justification to guide the reader to the correct value in case the choice isn’t correct.
Your complete tutorial should now look like:
@Tutorial(time: 10) { @Intro(title: "Creating an instance of Book.") { We will look at the steps involved in creating an instance of Book. }
@Section(title: "Create an Book object") { @ContentAndMedia { We will look at the steps involved in creating an instance of Book.
Which of the following types is not used while creating an instance of a `Book`?
@Choice(isCorrect: false) { `float`
@Justification(reaction: "Try again!") { Have a look at the `Book` type to see what has been used. } }
@Choice(isCorrect: false) { `Data`
@Justification(reaction: "Try again!") { Have a look at the `Book` type to see what has been used. } }
@Choice(isCorrect: true) { `Author`
@Justification(reaction: "That's right!") { A `Book` has an `Author`. } }
@Choice(isCorrect: false) { `Bool`
@Justification(reaction: "Try again!") { Have a look at the `Book` type to see what has been used. } } } } }
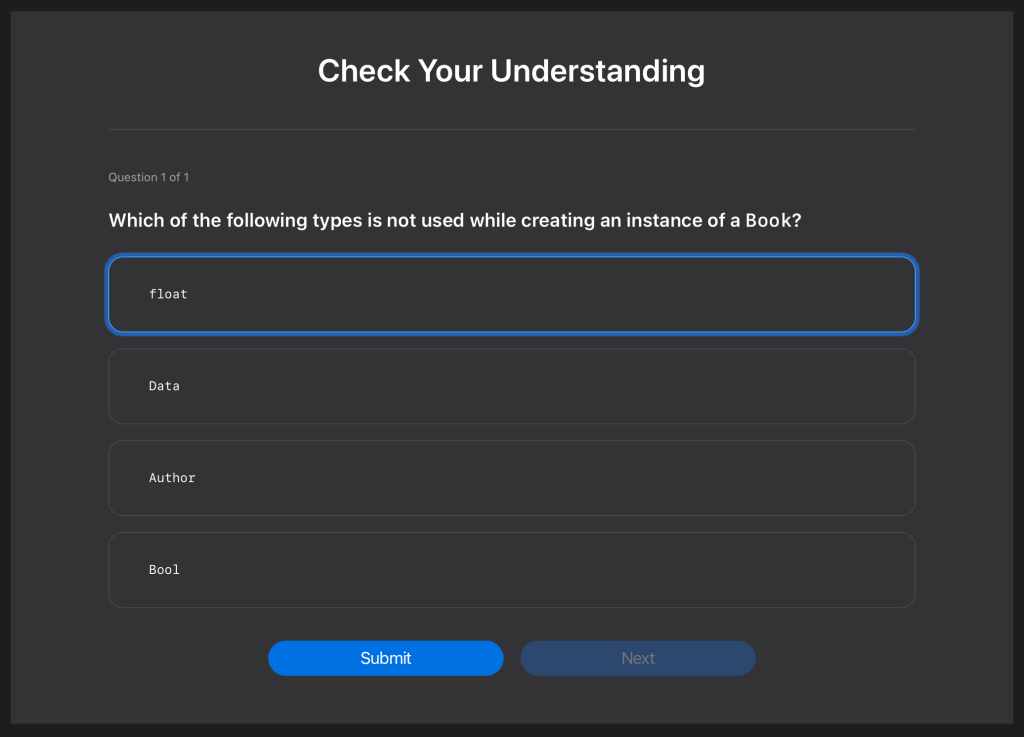
Build the documentation. Explore the tutorial and its assessment. It should look like this. The incorrect answers are highlighted in red while the correct one is in green.
That’s it. That covers the basic elements of creating documentation and tutorials for your code. Don’t forget to look at the completed code below.
Top level documentation and other markdown attributes
There are many kinds of attributes available for markdown. We have already seen some of them above. Lets look at a few more.
@MetaData
This attribute allows us to specify how DocC should build this document. Here are some of the items you can mention in there:
Attribute
Description
Possible values
@DocumentationExtension
Used to indicate if the contents of the article should override the default documentation or be appended to it.
override, append
@PageColor
Used to specify the color to be used for the banner at the top of the page
blue, gray, green, orange, purple, red, yellow
@TechnologyRoot
Used to indicate that this is a top level document and that it is not related to any specific type or code in the framework. This is useful when we want to provide some other information not related to the API in question.
@Available
Indicates the availability of the documentation itself.
Platform: iOS, macOS, watchOS, tvOS
@CallToAction
This is used to provide links to resources or downloads associated with that particular page.
Purpose argument can have: download, link
@PageKind
Used to specify if the page added is an article or a sample code that is being displayed.
article, samplecode
@PageImage
Used to provide an image for the page.
Purpose argument can have: icon, card
@DisplayName
Used to provide a custom name for a page rather than the symbol’s name.
String
@SupportedLanguage
Used to specify which programming language supports the specific feature.
swift, objc, objective-c
@Options
Similarly we can configure some options for the documentation. This controls how the documentation is rendered. It could be for a specific page or for all the pages in the API. Here are some of the options that we can configure.
Attribute
Description
possible values
@AutomaticSeeAlso
Used to indicate if the see also section is automatically created or not.
enabled, disabled
@AutomaticTitleHeading
Used to indicate if the title head is automatically created or not.
enabled, disabled
@TopicsVisualStyle
Used to specify how the topics on a page should be shown.
list, compactGrid, detailedGrid, hidden
@AutomaticArticleSubheading
Used to indicate if the article subheading is automatically created or not.
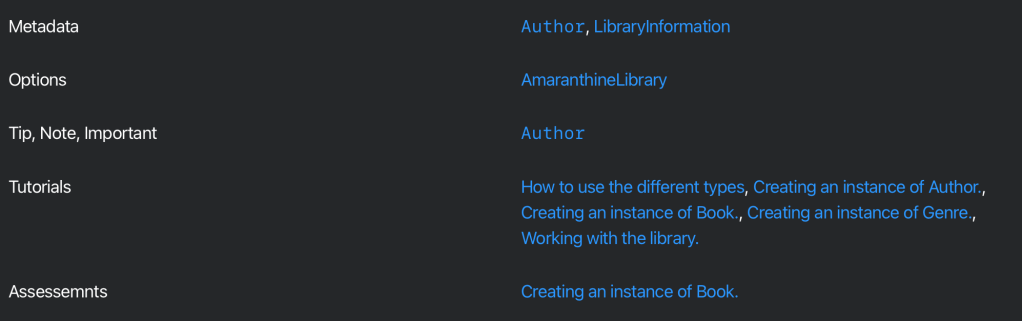
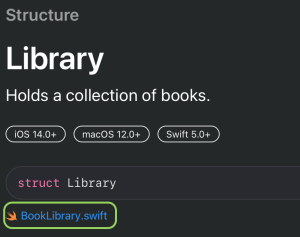
The above code generates a systematic structure like this:
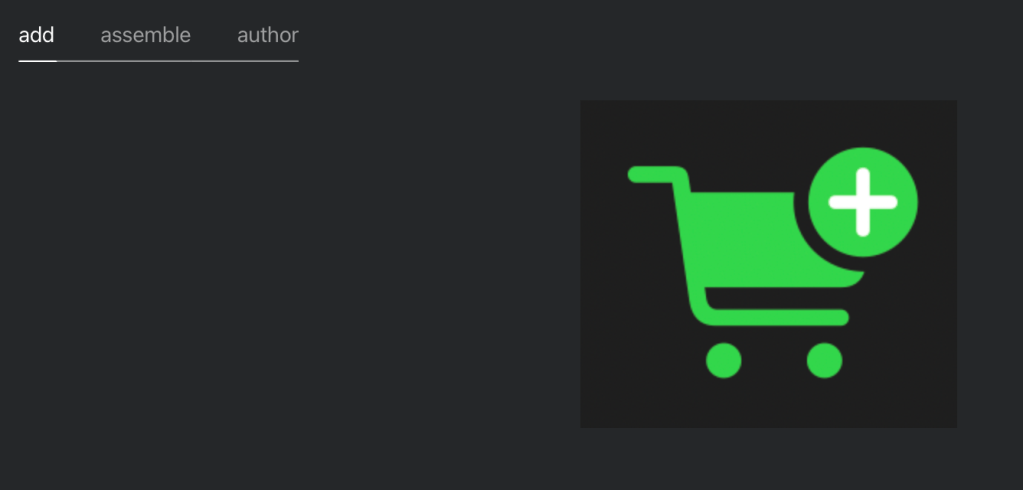
@TabNavigator
We can offer information on a page with the help of a tab navigator too. This allows us to quickly show multiple options or related information in a structured way.
@TabNavigator { @Tab("add") {  }
@Tab("assemble") {  }
@Tab("author") {  }
@Tab("book") {  }
@Tab("checkout") {  }
@Tab("create") {  }
@Tab("find") {  }
@Tab("genre") {  }
@Tab("library") {  } }
This renders it as:
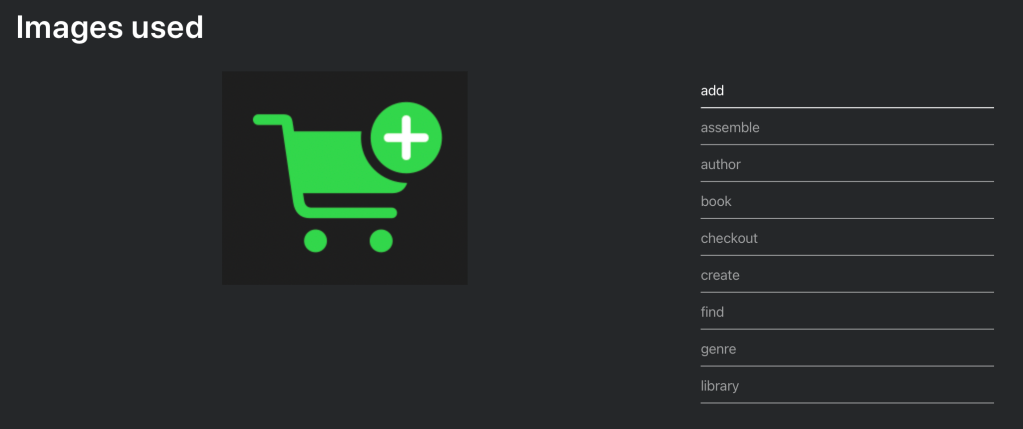
If there are fewer tabs then it renders slightly differently.
This renders into a simple list of links. You can choose to have it in a compactGrid style or detailedGrid style.
@Small
There is also a way to add small disclaimer or licensing text using the @Small block.
@Small {
    MIT License

    Copyright (c) 2015 Amaranthine

    Permission is hereby granted, free of charge, to any person obtaining a copy
    of this software and associated documentation files (the "Software"), to deal
    in the Software without restriction, including without limitation the rights
    to use, copy, modify, merge, publish, distribute, sublicense, and/or sell
    copies of the Software, and to permit persons to whom the Software is
    furnished to do so, subject to the following conditions:

    The above copyright notice and this permission notice shall be included in all
    copies or substantial portions of the Software.

    THE SOFTWARE IS PROVIDED "AS IS", WITHOUT WARRANTY OF ANY KIND, EXPRESS OR
    IMPLIED, INCLUDING BUT NOT LIMITED TO THE WARRANTIES OF MERCHANTABILITY,
    FITNESS FOR A PARTICULAR PURPOSE AND NONINFRINGEMENT. IN NO EVENT SHALL THE
    AUTHORS OR COPYRIGHT HOLDERS BE LIABLE FOR ANY CLAIM, DAMAGES OR OTHER
    LIABILITY, WHETHER IN AN ACTION OF CONTRACT, TORT OR OTHERWISE, ARISING FROM,
    OUT OF OR IN CONNECTION WITH THE SOFTWARE OR THE USE OR OTHER DEALINGS IN THE
    SOFTWARE.
}
This renders it as:
@Comment
Just like we can have comments in our code, we can have comments for our documentation too. The documentation builder does not render them and it is only meant for the author(s) of the documentation. This is a good way to put notes in for things that need to be done.
@Comment {
    Dont forget to change the name of this file.
}
Exporting documentation
Now that we have seen different ways of documenting our code its time to start sharing it with our users. Of course when ever users of our package add the package to their project they can simply build the documentation as we have been doing so far. But in some situations users would like to go through the documentation before hand or would like to access it to check something. It is possible to export our documentation to make it accessible to them.
There are a couple of ways of exporting our documentation:
Directly export the documentation from the graphical user interface
Using the docc command from the command line interface
Let us look at both.
Exporting the documentation via the GUI
First build the documentation for your project.
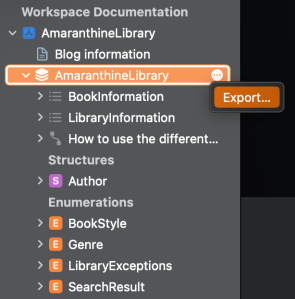
Select the top level documentation file from the documentation window.
Hover over the right hand side of the documentation name. You should see a more button with 3 dots appear.
Click on the 3 dots and choose “Export”
Choose where you wish to save the archive.
Export it.
Now open the archive by double clicking on the file.
You should see the same documentation but under the imported catalog section.
Export using the command line
First make sure that your project is allready pushed and commited to the github archive.
Now we will be using the Swift-DocC plugin to generate the documentation. We need to add it as a dependency to the Swift Package. Update the Package.swift file to include the dependency.
// swift-tools-version: 5.8
// The swift-tools-version declares the minimum version of Swift required to build this package.

import PackageDescription

let package = Package(
    name: "AmaranthineLibrary",
    platforms: [
        .iOS(.v14),
        .macOS(.v11),
      ],
    products: [
        // Products define the executables and libraries a package produces, and make them visible to other packages.
        .library(
            name: "AmaranthineLibrary",
            targets: ["AmaranthineLibrary"]),
    ],
    dependencies: [
        // Dependencies declare other packages that this package depends on.
        // .package(url: /* package url */, from: "1.0.0"),
        .package(url: "https://github.com/apple/swift-docc-plugin", from: "1.0.0"),
    ],
    targets: [
        // Targets are the basic building blocks of a package. A target can define a module or a test suite.
        // Targets can depend on other targets in this package, and on products in packages this package depends on.
        .target(
            name: "AmaranthineLibrary",
            dependencies: []),
        .testTarget(
            name: "AmaranthineLibraryTests",
            dependencies: ["AmaranthineLibrary"]),
    ]
)
Next we will run the swift command to generate documentation. Run the following command in your package folder.
swift package generate-documentation --source-service github --source-service-base-url https://github.com/AmaranthineTech/AmaranthineLibrary/blob/main --checkout-path /Users/instructor/Developer/AmaranthineLibrary/
Update the paths to match your own implementation. I have cloned the git repository in the /Users/instructor/Developer/ folder.
When you run the command it will tell you where the doccarchive is saved.
Copy the doccarchive and share it.
Open it to view the links to the different files. These links are generated thanks to the --source-service and --source-service-base-url options.
The links to the files should look like this:
This is one of the big advantages of generating the archive via the command line. You could also use the xcodebuild and xcrun to generate the documentation too.
Hosting the documentation
Exporting documentation is one way of sharing the documentation with users. But it would be even better if we could publish it as a webpage. Let us look at how to do that.
There are a couple of ways of publishing the documentation to a website.
File server
Web server with custom routing
Static pages on github
We will look at how to host them as static pages on github.
In order to host static pages on Github you will need a Github account. You can create one for free if you want.
There are 3 broad steps involved in hosting our documentation webpage on Github.
Creating the Github repository for hosting the webpages
Generating the publishable version of our documentation
Uploading the documentation to Github.
Let’s look at those 3 steps in detail.
Step 1: Creating a Github repository for hosting the web pages.
We are going to use a feature called Github Pages. As explained on the website:
GitHub Pages is a static site hosting service that takes HTML, CSS, and JavaScript files straight from a repository on GitHub, optionally runs the files through a build process, and publishes a website.
Github Documentation
There are 3 types of sites that can be hosted:
Type
Description
Sample URL
Project
The site is connected to a project on Github
User
The site is hosted in a repository owned by a personal user account.
<username>.github.io
Organisation
The site is hosted in a repository owned by an organisation account.
<organisation>.github.io
Depending on your needs you can go in for any one of those. For this demo we will be going in for an Organisation site.
The name of the repository will be in the format mentioned in the sample url above. So let us go ahead and create one.
Create an organisation on Github if needed. You can use an existing one if you want.
Next we will create a repository to host our website. Click on repository and create new.
We need to provide the name of our repository. It should follow the format: <organisation name>.github.io .
Provide a description, this is optional.
Set the site as public or private depending on your requirements.
Create the repository.
Navigate to the repository
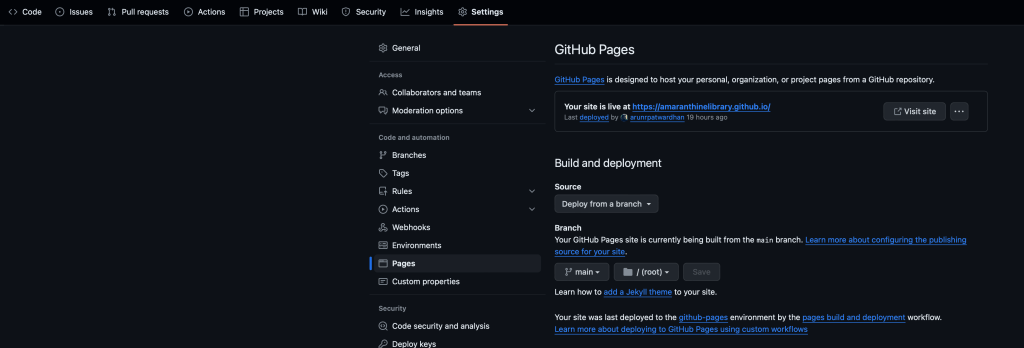
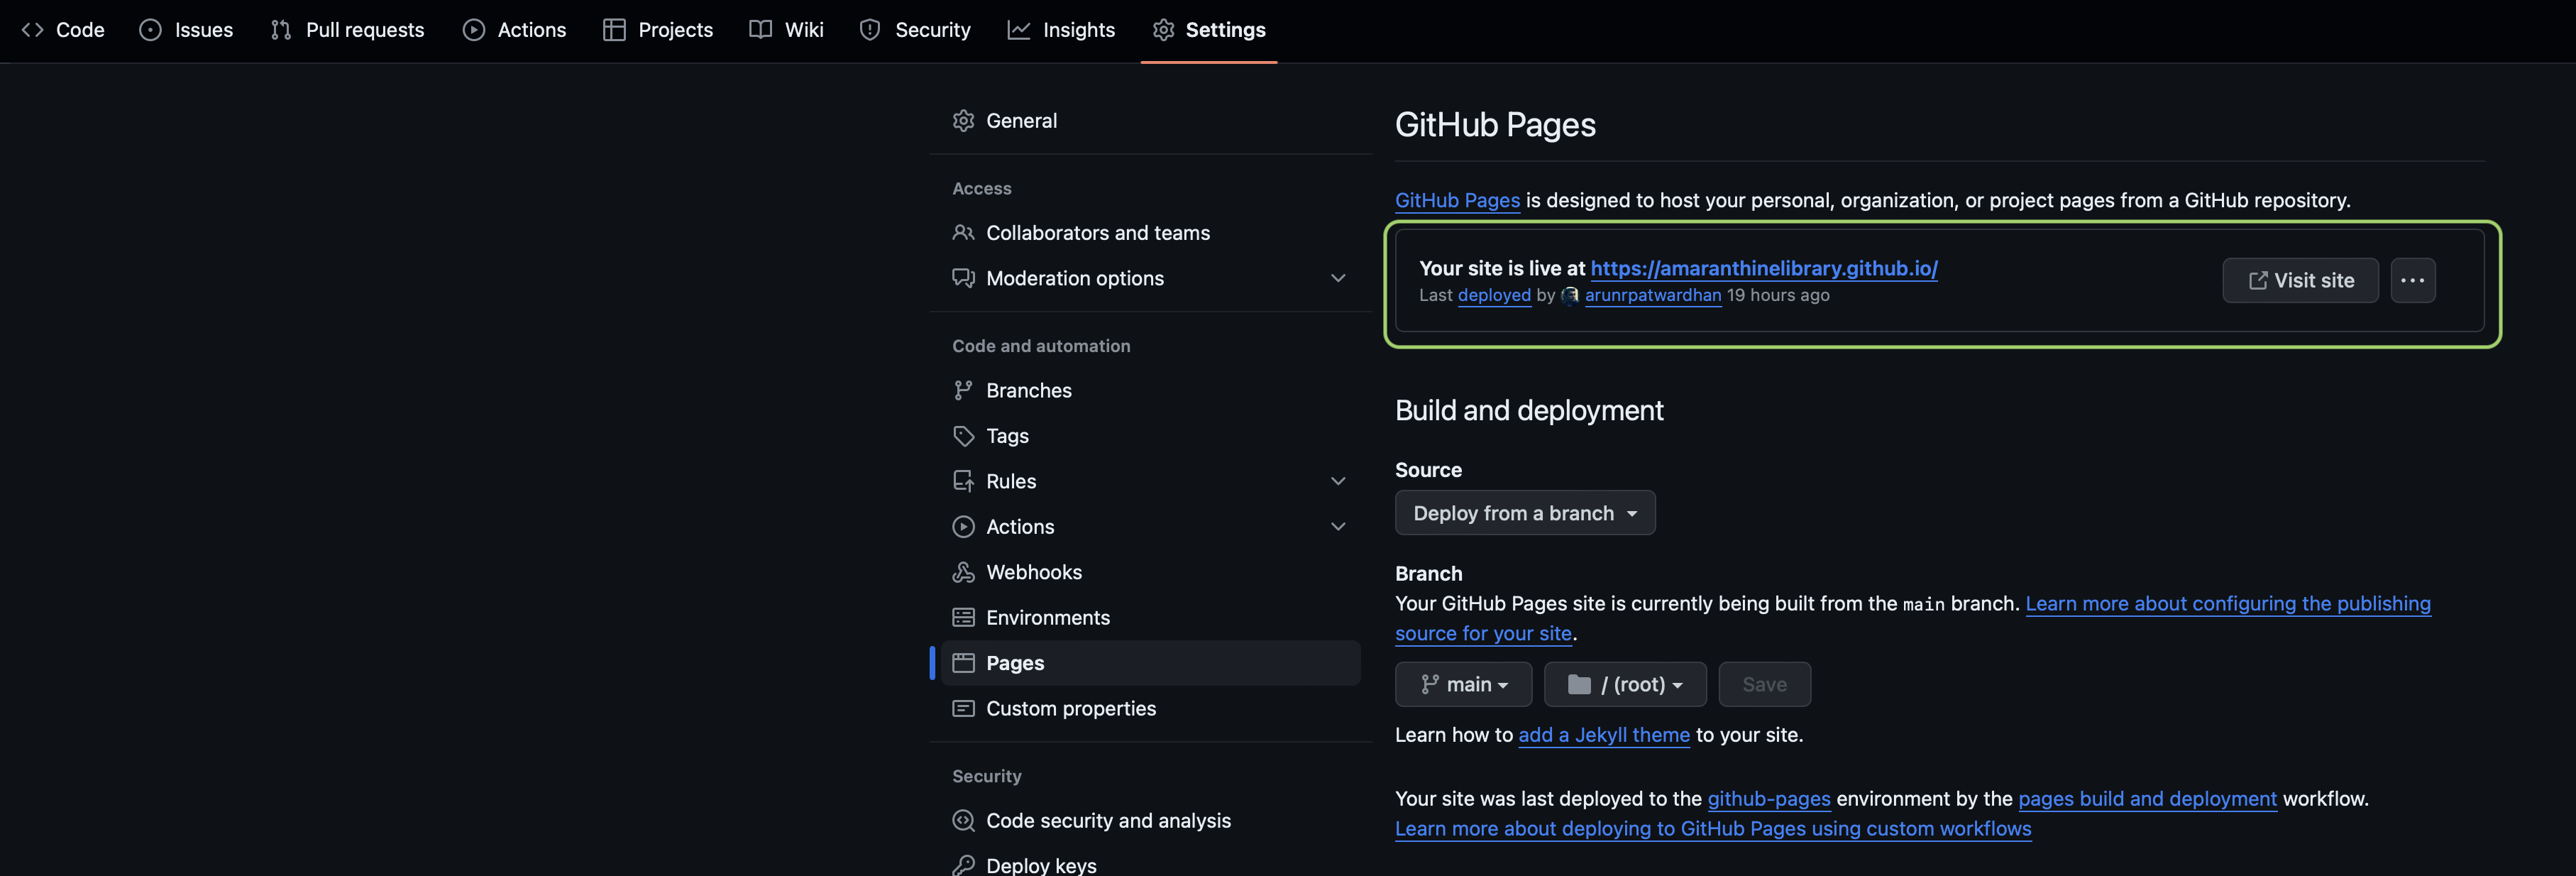
Go to settings
Select the pages tab.
Make sure “Deploy from a branch” is sected under source.
Under branch select main and the folder as /root.
Your pages screen should look like this:
Go back to your code section of the repository.
Add a new file called readme.md. Put some basic text in it.
Switch back to the settings > pages section of the repository.
You should see a link to the repository.
Click on Visit site. You should see your readme.md file open in your browser. We will be replacing it with our docc documentation.
Let us clone this repository on our computer.
Now we can add our files there. Run the following commands. I will be creating the repository in the ~/Developer folder on my computer.
cd ~/Developer
git clone https://github.com/AmaranthineLibrary/amaranthinelibrary.github.io
cd amaranthinelibrary.github.io
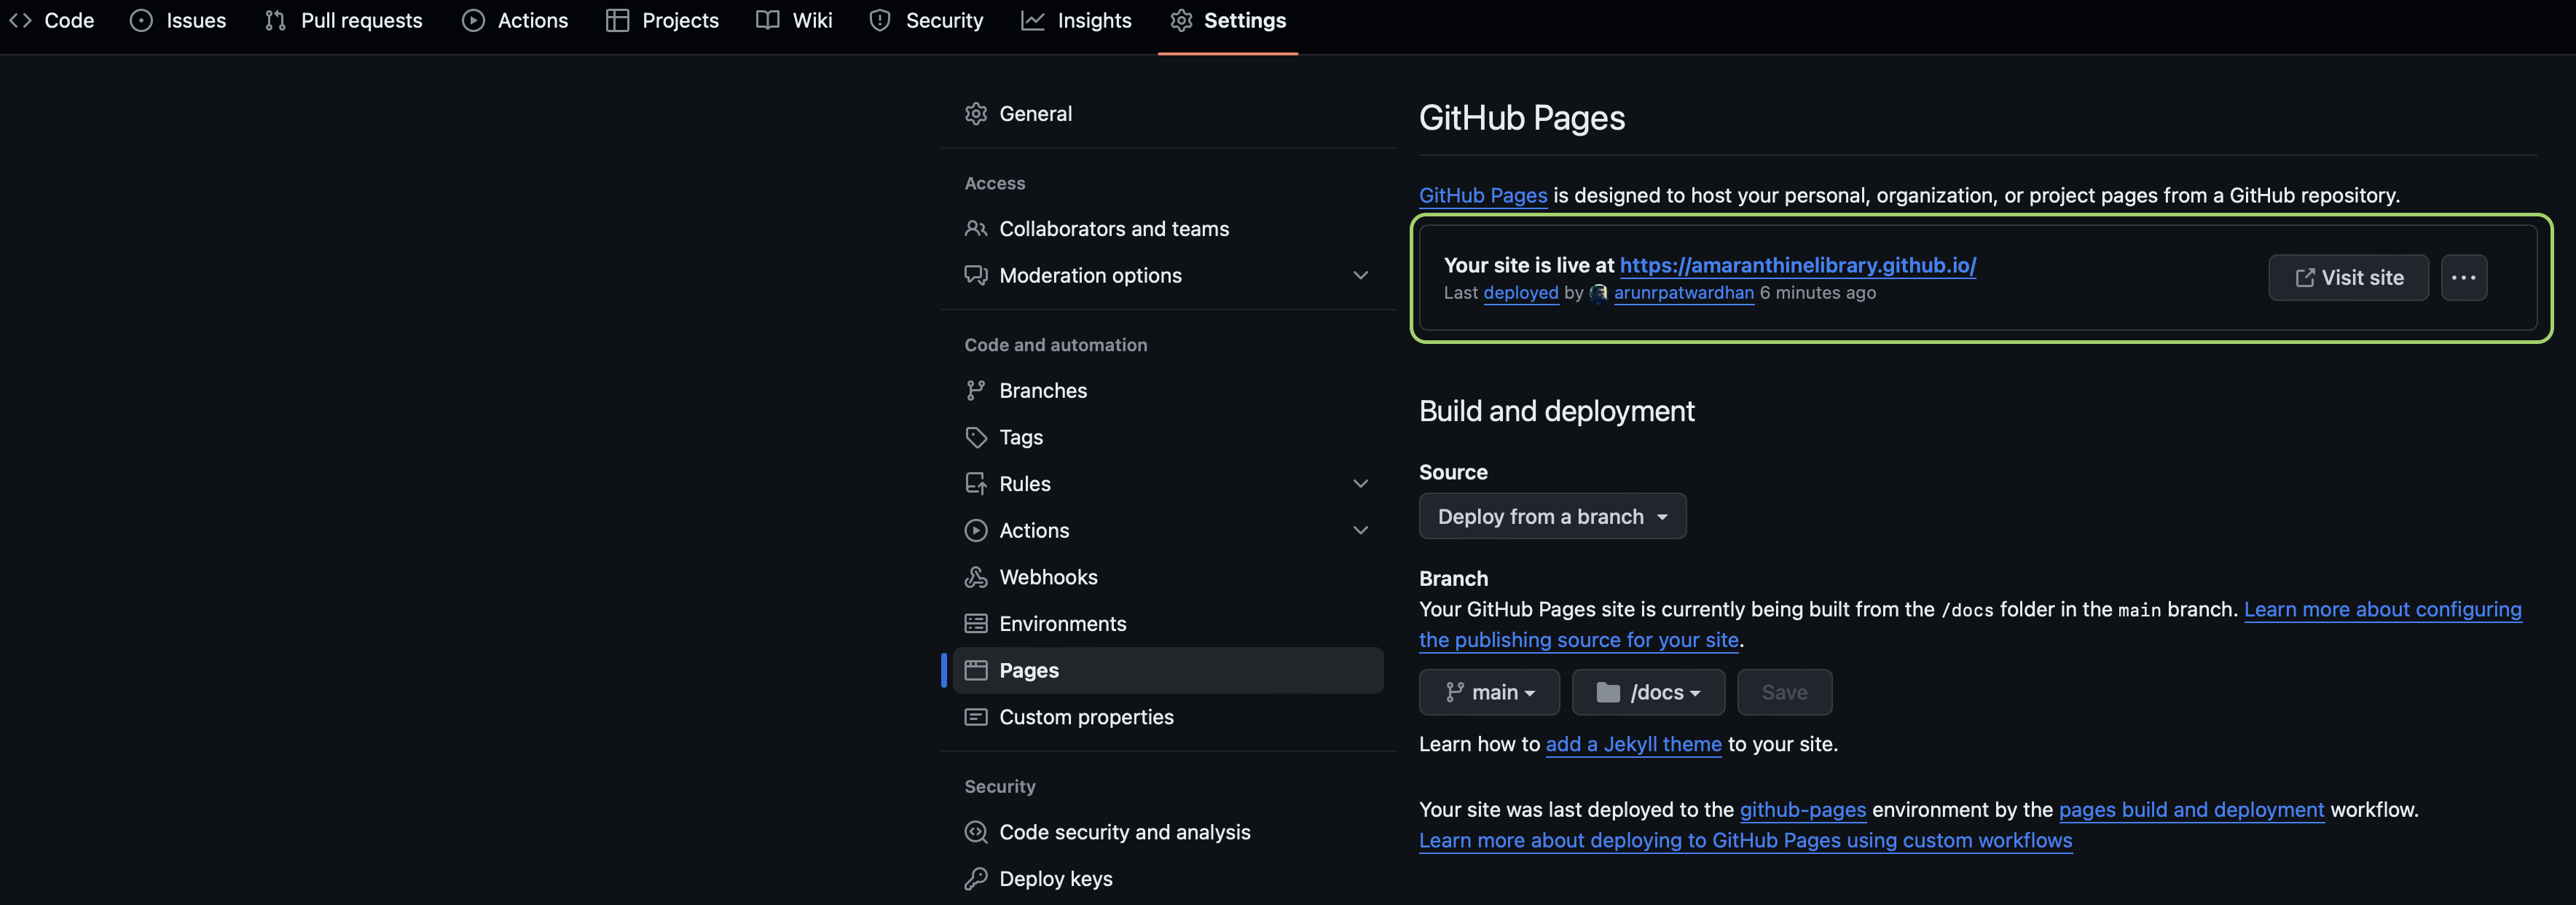
mkdir docs
Step 2: Generating a publishable version of our documentation
Now that our repository is ready we will generate the documentation.
There are couple of ways of generating that documentation. However, we will simply extract it from the archive we created previously.
There are 2 because i added a top level documentation.
Final thoughts
There you go. We have successfully created, viewed, exported, and hosted documentation for our API using Swift DocC.
As you can see the process is fairly simple and straightforward. Yes, it does appear like its a lot of work, but building this practice will go a long way in making your code more useful, and easy to understand for anyone that’s using your code.
The best way to work with DocC is to start writing the comments, availability attributes, articles, and tutorials as you develop your code. This is far better than leaving it as a standalone activity.
So go ahead, use DocC in as many places as possible, even app projects. It will make life very simple.
Download
You can download the Swift Package Manager project here.
Now we will shift our attention to that part of programming which is often ignored. Documentation.
Documentation is a key part of programming. In fact, some might go as far as saying that Documentation is the most important aspect of Programming. Let us understand what we mean by documentation by looking at some key points. Later we will look at different ways of documenting our code.
We document our code so that:
Anyone who is reading our code can understand what we are trying to achieve.
Anyone who wishes to make changes to our code knows where to make the changes.
Anyone who issuing our code can easily find out its capabilities and limitations.
Other programmers can figure out how to use our code.
Developers can find out when and where changes were made to a code. This is useful to understand the evolution of our code.
We can easily recollect what, why, when, where & how something was done by us. This is necessary if we are revisiting code that we have written a long time back.
We can add warnings and disclaimers
There may be some other reasons why we may want to document our code, but the list above summaries the most common reasons. This can easily be seen from a simple example.
It is clear to use what the function does simply from its name. However, there is a lot more information that we can provide. Let us modify the implementation a little bit to make it more informative and readable.
/**
This function takes temperature in Centigrade and converts it to Fahrenheit.
- important: This function does not do data validation
- parameter temp: This is the temperature in Centigrade. It can be a negative value too.
- returns: This is the temperature in Fahrenheit.
- requires: `temp > -273.0 && temp < 1000.0`
- Note: The requirement mentioned is not enforced.
- Since: iOS 11
- author: Arun Patwardhan
- copyright: Copyright (c) Amaranthine 2015
- version: 1.0
*/
func convert_to_fahrenheit_from(Centigrade temp : Float) -&gt; Float
{
return ((temp * 9.0 / 5.0) + 32.0)
}
The code above looks a lot better now. We made the function name better, but more importantly we have added documentation that better describes the function. This includes range of permitted values, version number, important notes. The comments haven’t been written randomly. They have been formatted in a way that will make them appear in quick help. So now if we have to use the function we know what to watch out for.
Now that we know why we need to document our code let us look at some of the ways this can be done.
Comments
The most common form of documentation is by using comments. Most programming languages support comments. Comments are text which is ignored by the compiler. As such they are not used to build the actual software. The sole reason why they exist is because there has to be some mechanism to write notes.
Single Line Comments
// This is a comment
A single line comment as the name says is a piece of text that can fit in one line.
Good when a short description is required. Normally this is placed before or after a variable as most variables would need a short description.
You can have multiple lines using the Single comment mechanism too.
// This is a comment
// This is a comment on the next line
Multi Line Comments
There is a better way to implement multi line comments. We can enclose the text in a /* */ range.
/* This is a comment
This is a comment on the next line
Useful when we have to write really large pieces of comments&amp;amp;lt;span data-mce-type="bookmark" id="mce_SELREST_start" data-mce-style="overflow:hidden;line-height:0" style="overflow:hidden;line-height:0" &amp;amp;gt;&amp;amp;lt;/span&amp;amp;gt;
*/
Use Case
Here are some examples of when comments can or should be used.
/*
        File Name.   : main.cpp
        Date Created : 13th February 2017
        Created By   : Arun Patwardhan
        Project Name : String Parser
        File Contents:
                - Command Line Option selector
                - Different entry points for the remaining code
        Contact      : arun@amaranthine.co.in
*/
This is a classic example of a multi line comment. This comment provides useful information about the name of the file, when it was created, who created it, contact information, the code that is found in this file.
/*
    Exception Possibilities while Reading/Writing from/to Database
    write_error : This is thrown when there is duplicate data that is being
                  written into the database.
    db_empty.   : This is thrown when you attempt to read from an empty data
                  base.
                  Use the func is_empty() method.
    invalid_data: This is thrown when the data to be written is not valid.
    data_missing: This is thrown when insufficient data is passed. If the write
                  operation requires mandatory data an exception is thrown
                  instead of writing default values.
*/
enum DBExceptions : Error
{
    case write_error(String)
    case db_empty(String)
    case invalid_data(String)
    case data_missing(String)
}
This example shows the necessary documentation while declaring a new type. In short its purpose and situations when different values might be used.
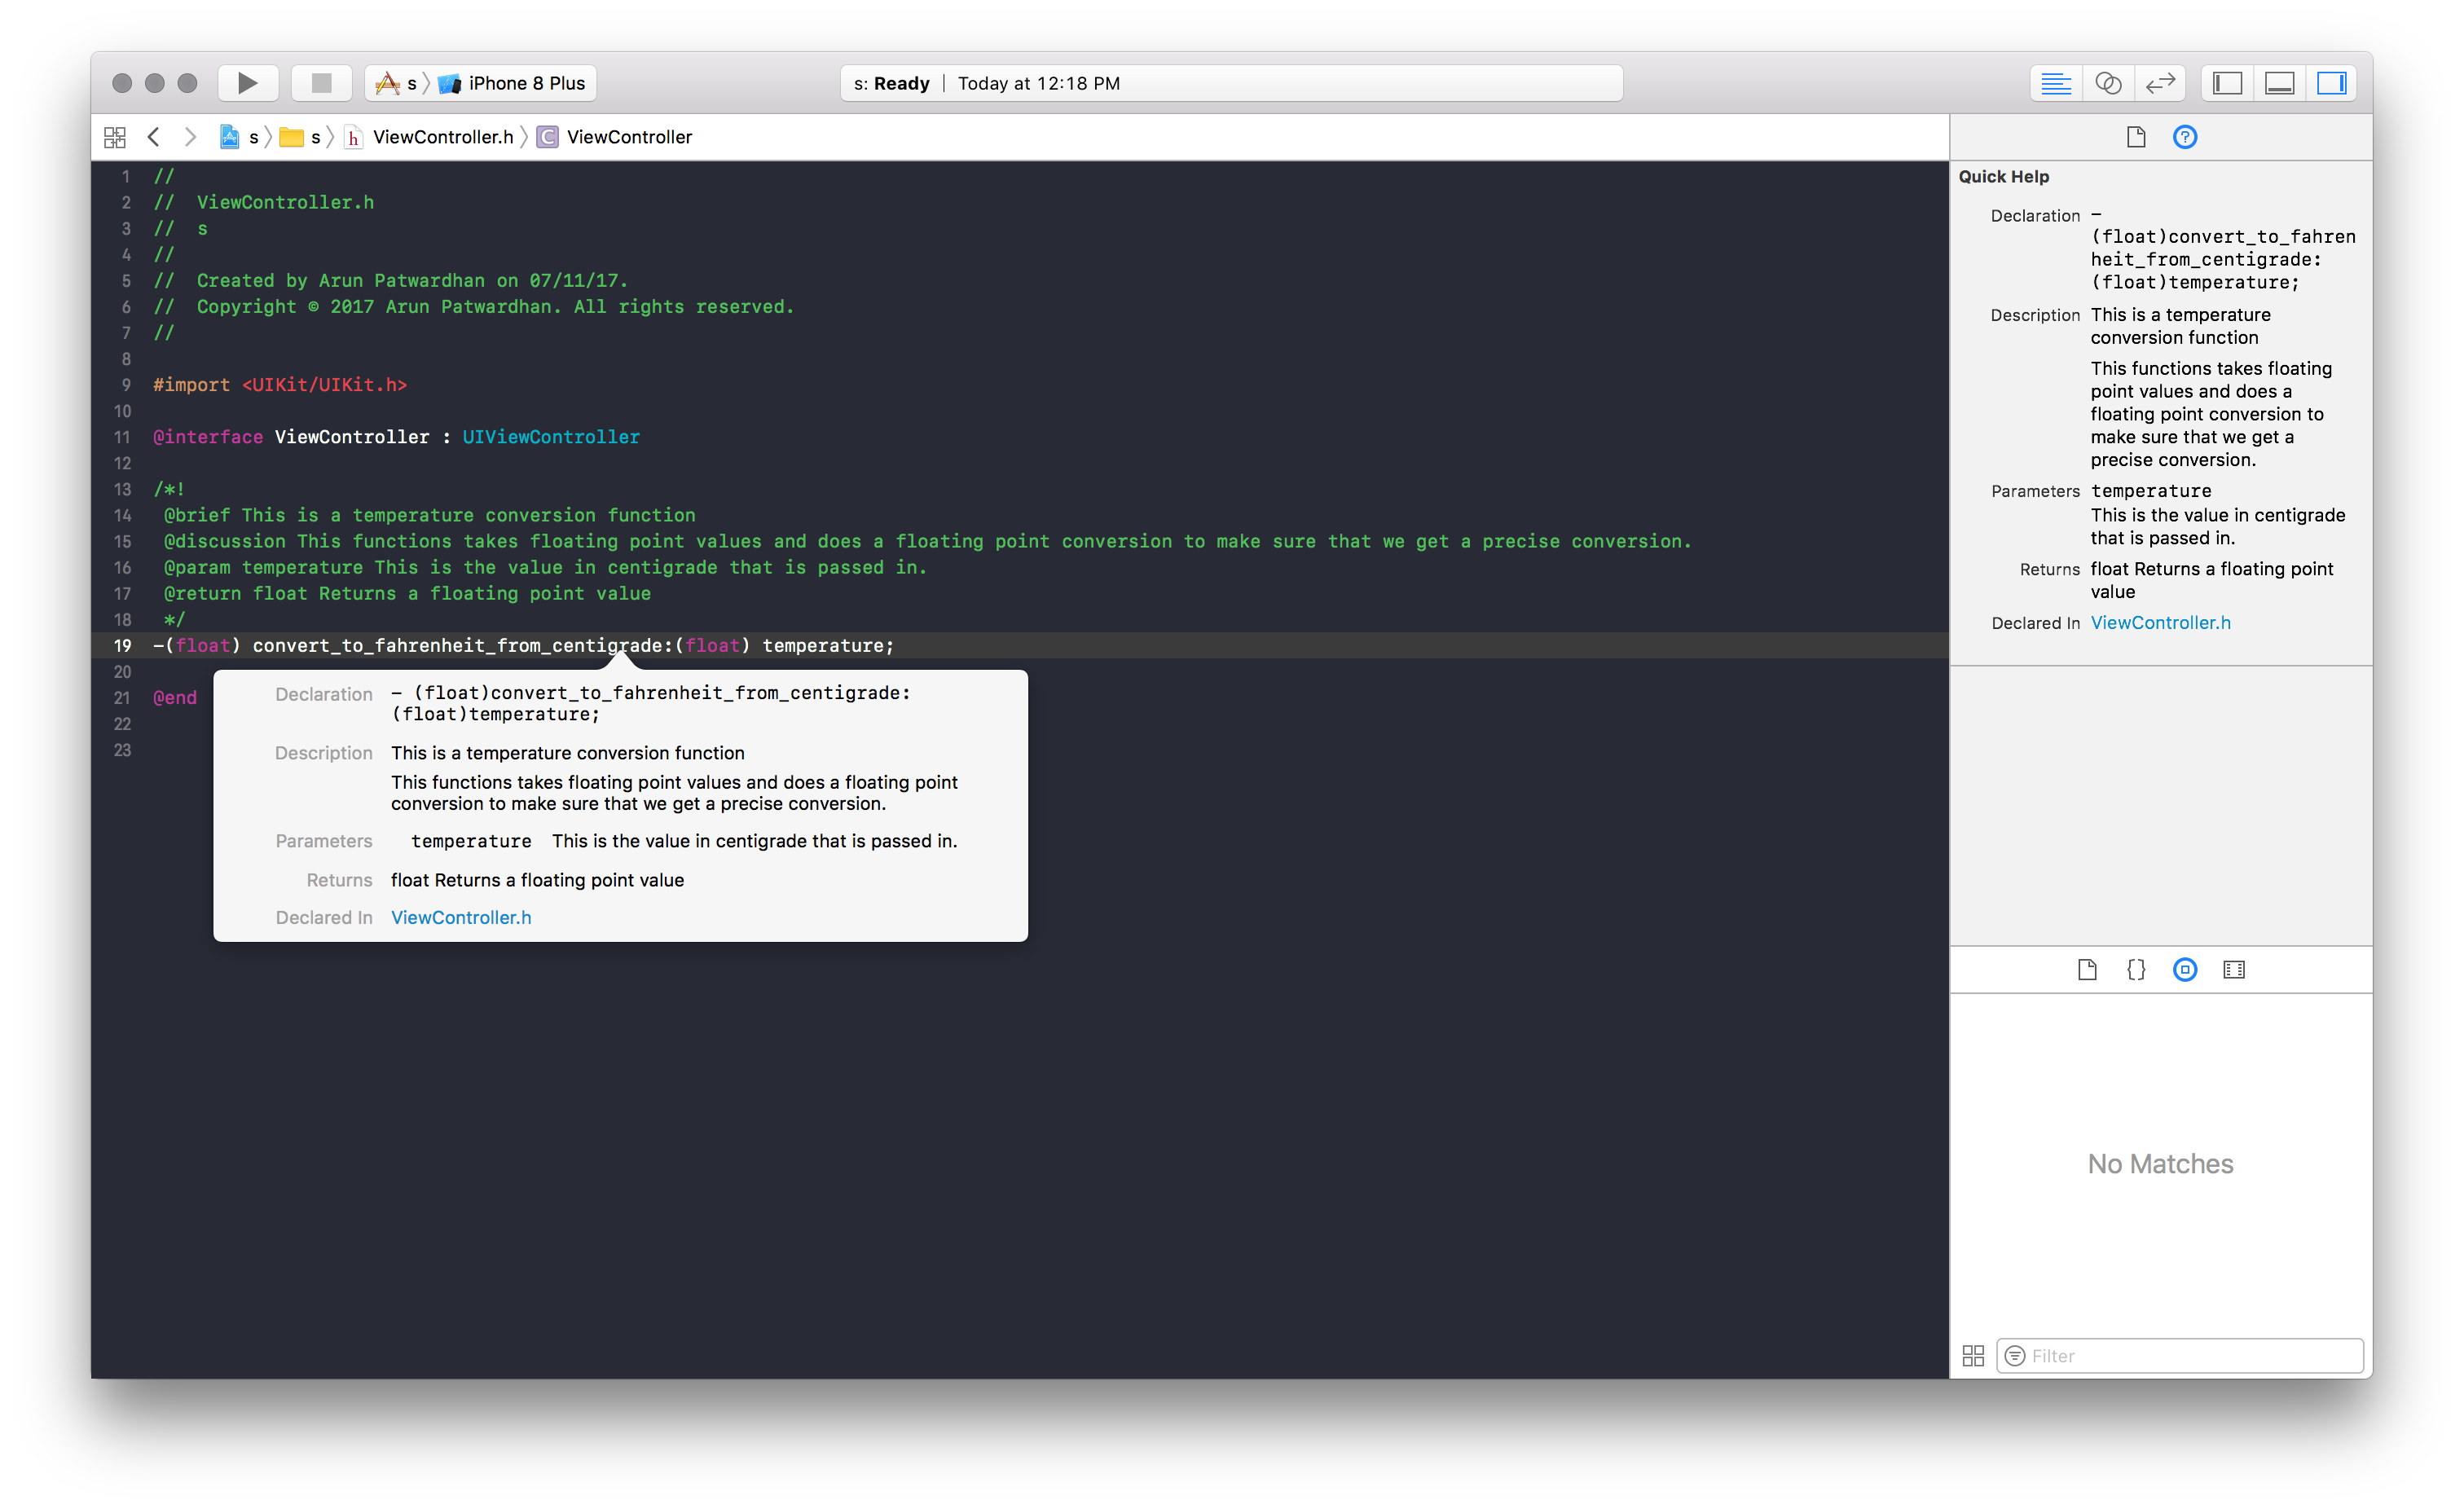
Here is an example of code for functions.
@interface Converter : NSObject
/*!
    @brief This is a temperature conversion function

    @discussion This functions takes floating point values and does a floating point conversion to make sure that we get a precise conversion.

    @param temperature This is the value in centigrade that is passed in. Note, negative values can also be passed in. Values whose results exceed the range supported by float will produce un predictable results.

    @return float Returns a floating point value
*/
-(float) convert_to_fahrenheit_from_centigrade:(float) temperature;
@end
The comment gives information about different aspects of the function. Including the rage of values supported. Note that it also uses special markup to allow for the code description to show up in the Help menu bar or when you option click the method.
This is how the comments with markup look like. They appear in the ⌥ click menu as well as the help menu on the right hand side.
Read Me Files
Another thing one can do along with comments is to create Read Me files. Read Me files are plain text files that are bundled as a part of the project. Unlike comments which give information about a specific piece of code or an entire file, Read Me files give information about the entire project as a whole. Since they are text files we actually treat them as text.
Here is some typical information that is found in a Read Me file:
Files
– makefile This is the file used to build the Application.
– main.cpp This is the entry point file. The selection of execution path on the basis of command line options is done here.
– Parser.h This file contains the declaration for the Parser class as well as its internal structure.
– Parser.cpp This file contains the implementation of the Parser class
– DataStructure.h This file contains the declaration of the internal structure of the data structure.
– DataStructure.cpp This file contains the implementation of the internal structure of the data structure.
– Validator.h This file contains the declaration of the internal structure of the data structure.
– Validator.cpp This file contains the implementation of the internal structure of the data structure.
– Test1 Runs a basic set of strings as input.
– Output1 Expected output after running Test1. Compare your results with the results of this file.
Libraries Required – Standard Template Library
The above is just a sample Read Me file. In real world implementations these can get a lot bigger with references to links and future developments. Some of the other things that can be mentioned are:
Future additions
Bugs fixed (potentially with the bug fix request ticket)
Limitations
Tools that are required to make this code
Additional tools that need to be installed
Project Status
Naming Conventions
Documentation becomes a lot easier if we follow good naming conventions. Variables, functions, types, files… which are well named in itself become self explanatory and at the very least reduce the amount of documentation required.
Additional Tools Documentation in C++, Objective-C
Formatting in Playgrounds and Xcode projects is achieved using Markups in comments. The following article describes some of the things that you can do. Note that there are many more ways of acheiving some of the effects shown here.
The idea behind markups is to make your code more readable whether you are using Playgrounds or Xcode.
If you can only see the commented code in playgrounds and not the rendered markup then click on Editor > Show Rendered Markup to view the rendering. You can use this option to toggle back and forth.
Formatting in Playgrounds
Plain Text
There are different kinds of text you can place in a Playground. Let us look at the code below to see what all is achieved.
Line 1 shows how to render a Title Text. This is achieved using the # before the text.
Line 2 shows how to get a lower sized text by using ## instead of #. We can achieve more levels if we wish.
For multi line text with bullets use the *, +, – symbols. This is seen on lines 7-13.
It is also possible to create numbered lists too. Simply type the numbered list & it renders accordingly.
It is possible to have multiple pages in Playgrounds. This way we can create a more readable experience that makes the code structured, compartmentalised and easier to understand.
To do that open a playground and then simply add a playground by clicking File > New > Playground Page.
To move from one page to the next simply write the comment.
//: [Next Topic](@next)
This will automatically place a link to jump to the next page.
Similarly you can add a link to move to the previous page.
//: [Previous](@previous)
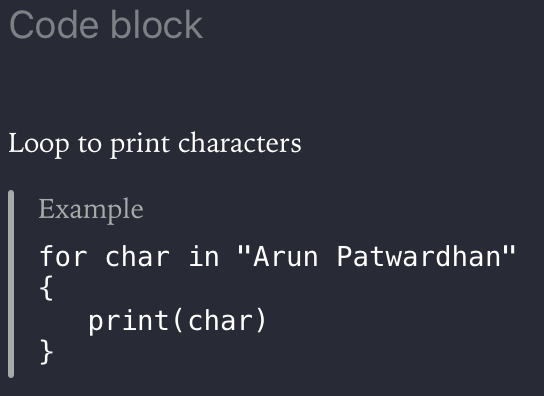
Code block
We can even show a code block in the text. It is formatted in a different manner to tell the user that it is a code block.
//: ### Code block
/*:
Loop to print characters
````
for char in "Arun Patwardhan"
{
    print(char)
}
*/
This is how it appears:
Function Help
There is also some formatting that can be done for functions, types and other pieces of code written in a playground. This also appears on the quick help of the sidebar.
We will look at how to create formatted markup for playgrounds.
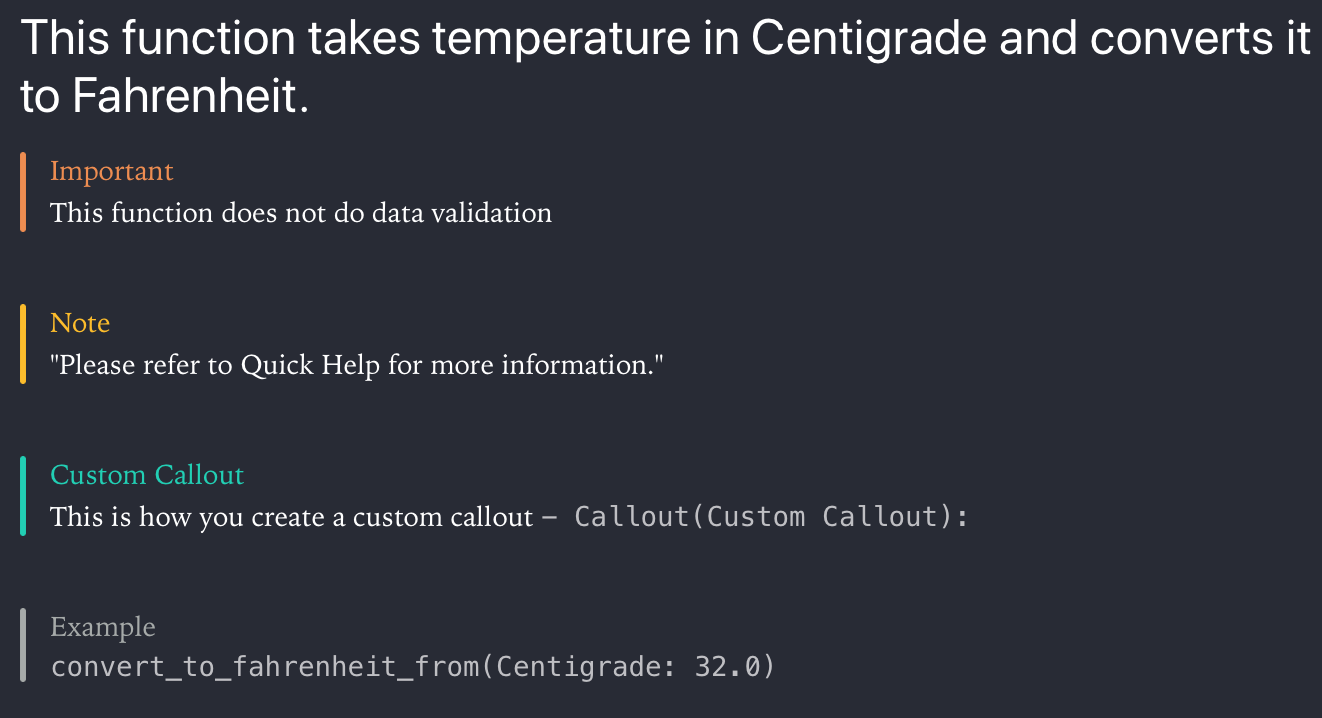
/*:
## This function takes temperature in Centigrade and converts it to Fahrenheit.
- important: This function does not do data validation
*/
/*:
- Note: "Please refer to Quick Help for more information."
*/
/*:
- Callout(Custom Callout): This is how you create a custom callout ` - Callout(Custom Callout):`
*/
/*:
- Example: `convert_to_fahrenheit_from(Centigrade: 32.0)`
*/
This renders as:
Formatted Markup for Functions.
We will look at formatting the comments to appear in Quick Help in the Formatting for Xcode section.
Inserting Links
The last bit is related to inserting links. We have already seen how to insert links for moving between Playground pages.
Redirecting to URL
/*:
For more articles on Programming, see [Programming articles @ arunpatwardhan.com](https://arunpatwardhan.com/category/programming/)
*/
This renders as:
Formatting for Xcode
Function Help
As we saw in the earlier section we can create a lot of documentation for Functions. The approach is similar to the one we used in Playgrounds. We will be using callouts to provide information. We will use some callouts for Playgrounds, however, there are many more callouts available for Xcode Symbol Documentation as compared to Playground. The main difference here is the fact that the comments begin with /** instead of /*:.
“The code shown below will work in both, regular Xcode projects as well as Playgrounds.”
/**
This function takes temperature in Centigrade and converts it to Fahrenheit.
- important: This function does not do data validation
- parameter temp: This is the temperature in Centigrade. It can be a negative value too.
- returns: This is the temperature in Fahrenheit.
- requires: `temp > -273.0 && temp < 1000.0` - Note: The requirement mentioned is not enforced. - Since: iOS 11 - author: Arun Patwardhan - copyright: Copyright (c) Amaranthine 2015 - version: 1.0 */
func convert_to_fahrenheit_from(Centigrade temp : Float) -> Float
{
    return ((temp * 9.0 / 5.0) + 32.0)
}
This renders as:
Formatted Markup for Playgrounds as well as Quick Help
Note that the quick help appears in the Right hand side sidebar. That too only after you select the function.
As we can see this makes the function a lot more readable. The real advantage of Quick Help comes in the fact that the documentation is now easily accessible no matter which file we are in within the project. The also helps the developer put in the right kind of information, required for proper usage of the function, in the help section.
Note that the rendered markup for Playgrounds will only appear in Playgrounds.
Inserting Links
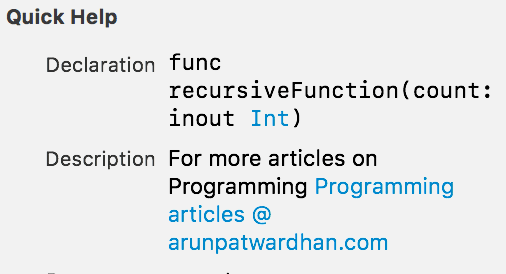
Just like in the previous section where we introduced links we can add links to the symbol documentation.
/**
   For more articles on Programming [Programming articles @ arunpatwardhan.com (https://arunpatwardhan.com/category/programming/)
*/
func recursiveFunction(count : inout Int)
{
   while 0 <= count
   {
      count -= 1
      recursiveFunction(count: &count)
   }
}
This renders in Quick Help as:
Callouts supported by Playgrounds
Custom Callout
Example
Callouts supported by Symbol Documentation
Attention
Author
Authors
Bug
Complexity
Copyright
Date
Invariant
Precondition
Postcondition
Remark
Requires
See Also
Since
Version
Warning
Callouts supported by both Playgrounds & Symbol Documentation