This is the third part in the 3 part series on Apple ID & iCloud. This part touches on enterprise specific aspects.
Here are the links to Part 1 & Part 2.
This is for Swift Version 2.2 & earlier. I will be adding the snippet of code for the changes the Swift 3.x have introduced.
The Collection Type, Sequence Type & Generator Type Protocols define rules that govern how different data structures or collections of data can be used, interacted with and operated within the Swift programming language. The CollectionType is a special case of the SequenceType.
Lets take the example of the Swift For-Loop.
var arrOfStrings : [String] = [String]()

arrOfStrings.append("Jill")
arrOfStrings.append("Jack")
arrOfStrings.append("John")
arrOfStrings.append("Jane")

for name in arrOfString
{
     print("The name is \(name)")
}
Now, if we have created our own data type. We would not be able to use the above for-loop as it would not conform to the … type protocols. The for-loop is expecting a data structure that acts and behaves in a way that is governed by the … protocols.
Just like the for-loop example above there are many other features within the Swift Programming Language that expect data structures to act and behave in a particular way. By designing our data structures to conform to these protocols we can make the easily compatible with the existing code and language features out there.
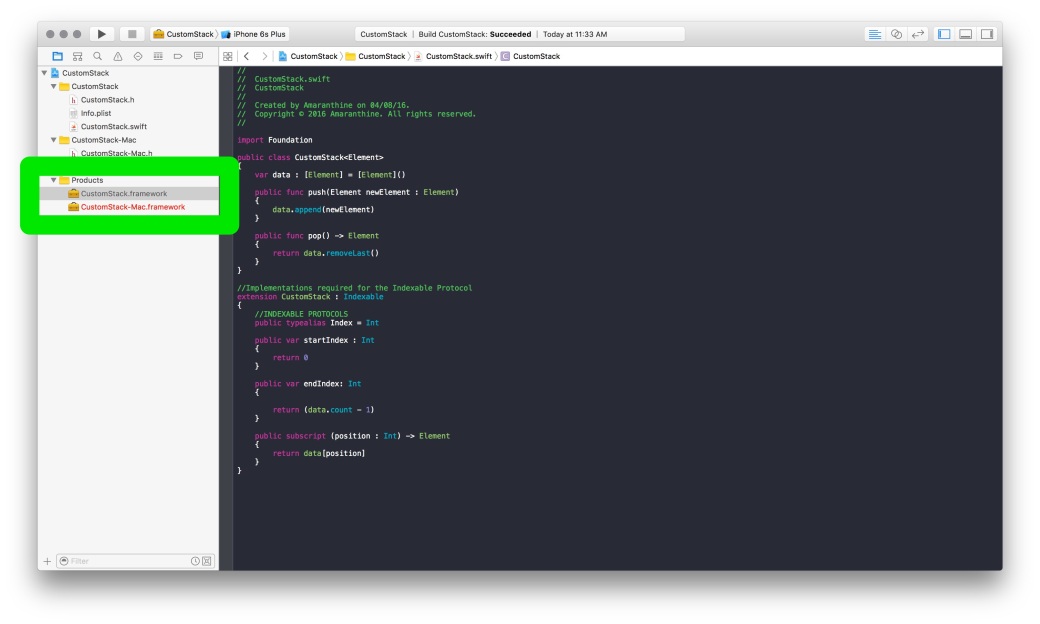
First we need to decide what kind of collection are we making. For the sake of this example I will create a Custom Stack.
class CustomStack<Element>
{
    var data : [Element] = [Element]()

    func push(Element newElement : Element)
    {
        data.append(newElement)
    }

    func pop() -> Element
    {
        return data.removeLast()
    }
}
The above code is very simple for the purpose of this exercise. Its a stack. Which is internally really an Array. It has functions to push data and pop data. We are now going to convert this type to a collection to conform to the CollectionType protocol.
As a first step we are going to make our CustomStack conform to the Indexable Protocol.
extension CustomStack : Indexable
{
    //INDEXABLE PROTOCOLS
    typealias Index = Int

    var startIndex : Int
    {
        return 0
    }

    var endIndex: Int
    {
        return (data.count - 1)
    }

    subscript (position : Int) -> Element
    {
        return data[position]
    }
}
The above change makes the data structure conform to the Indexable protocol. This is a requirement for it to be of type CollectionType. In order to conform to the Indexable protocol we need to implement a few computed properties. Let us look at the changes
typealias Index = Int
This line informs the system that the Indexing type for my data structure is an Int.
var startIndex : Int
{
    return 0
}

var endIndex: Int
{
    return (data.count - 1)
}
The next 2 are computed properties. Each provides the implementation of the startIndex and endIndex properties. Note that the type for both is Int as we have declared the Index type earlier as Int.
subscript (position : Int) -> Element
{
    return data[position]
}
The last implementation is of subscript. This provides the implementation to access an Element from the Stack using the Subscript operator.
Next we will implement the Sequence Type Protocol methods.
extension CustomStack : SequenceType
{
    typealias Generator = AnyGenerator<Element>

    func generate() -> Generator
    {
        var index = 0

        return AnyGenerator(body: {() -> Element? in
            if index < self.data.count
            {
                let res =  self.data[index]
                index += 1
                return res
            }
            return nil
        })
    }
}
Let us examine this code line by line.
typealias Generator = AnyGenerator<Element>
Objects of type Generator allow us to navigate through our collection. Quite like how iterators work in C++. This line specifies the type to be AnyGenerator for Elements.
func generate() -> Generator
Next we start the implementation of the generate function. This is required as part of the SequenceType protocol.
var index = 0
This index variable is used to track the element that is currently being accessed.
return AnyGenerator(body: {() -> Element? in
            if index < self.data.count
            {
                let res =  self.data[index]
                index += 1
                return res
            }
            return nil
        })
The return statement is the main statement. Here we are creating an object of type AnyGenerator. As an argument to the constructor call we are passing in a closure that will be used to iterate through the sequence. Note that the closure captures the index variable and holds a reference to its value even though we have left the original function.
Next we will implement the Collection Type Protocol methods. We don’t really need to implement a lot in order to conform to the CollectionType protocol. In fact, if we just conform to the CollectionType protocol and use the implementations of the previous 2 extensions we should be just fine. However, for the sake of demonstration we are implementing the subscript functionality within the CollectionType.
extension CustomStack : CollectionType
{
    typealias SubSequence = CustomStack<Element>

    subscript (bounds: Range<CustomStack.Index>) -> CustomStack.SubSequence
    {
        let newStack : CustomStack<Element> = CustomStack<Element>()

        for i in bounds.startIndex...bounds.endIndex
        {
            newStack.push(Element: data[i])
        }
        return newStack
    }
}
Let us look at the code line by line.
typealias SubSequence = CustomStack<Element>
Again, as before this line indicates that the SubSequence type is actually a CustomStack.
subscript (bounds: Range<CustomStack.Index>) -> CustomStack.SubSequence
Here we start the implementation of the subscript functionality.
let newStack : CustomStack<Element> = CustomStack<Element>()

for i in bounds.startIndex...bounds.endIndex
{
     newStack.push(Element: data[i])
}
return newStack
The rest of the code is the implementation of the subscript range behaviour. One can have different implementations to achieve the same result.
As we can see, by designing our data structure to conform to a particular set of protocols. We have made it possible for our data structure to take advantages of the different features, functionalities and even API’s available within the Swift Language and the Frameworks used as a part of iOS, macOS, watchOS & tvOS development.
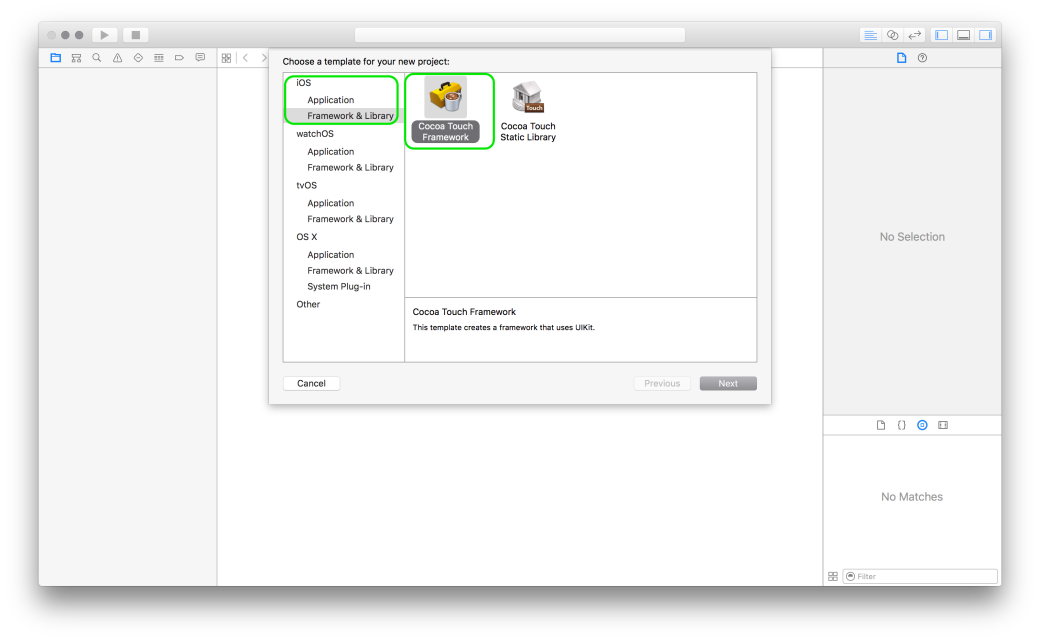
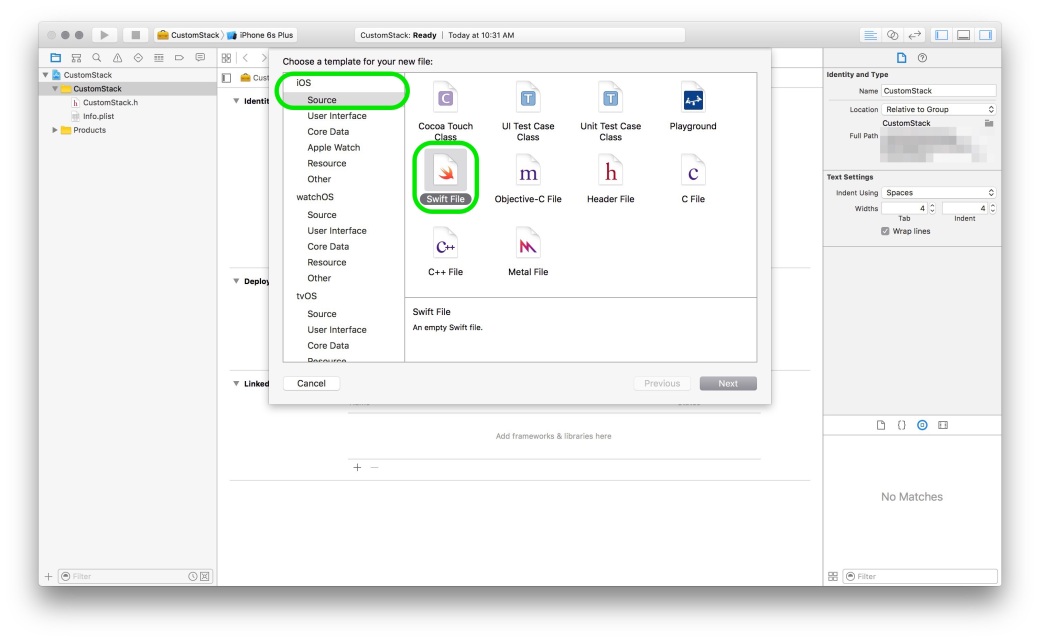
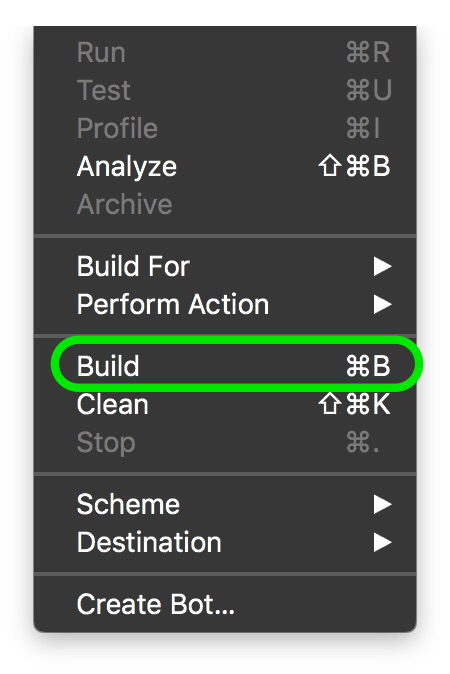
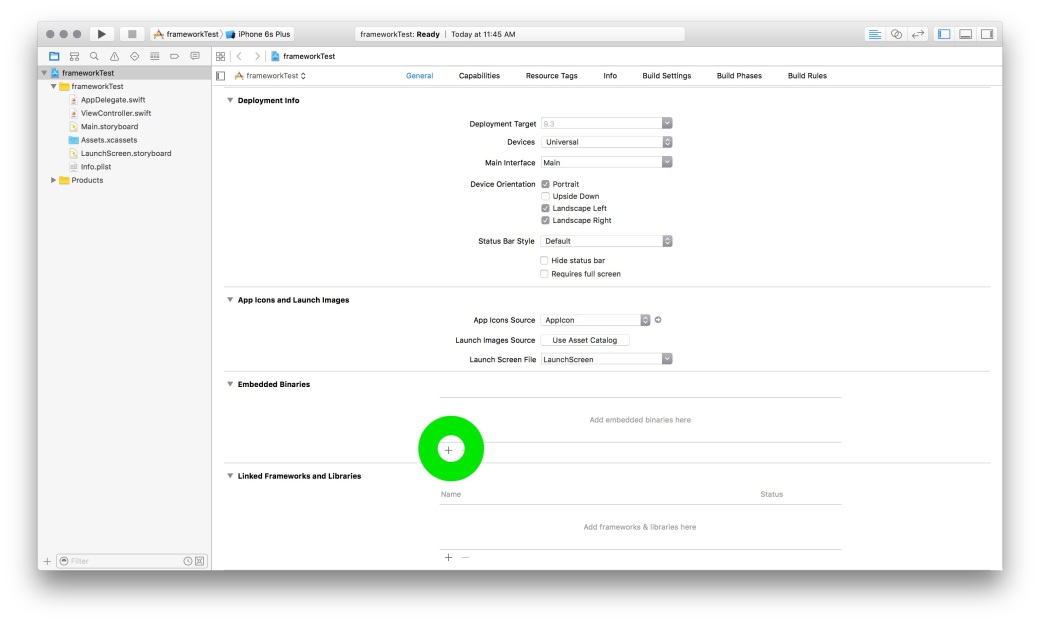
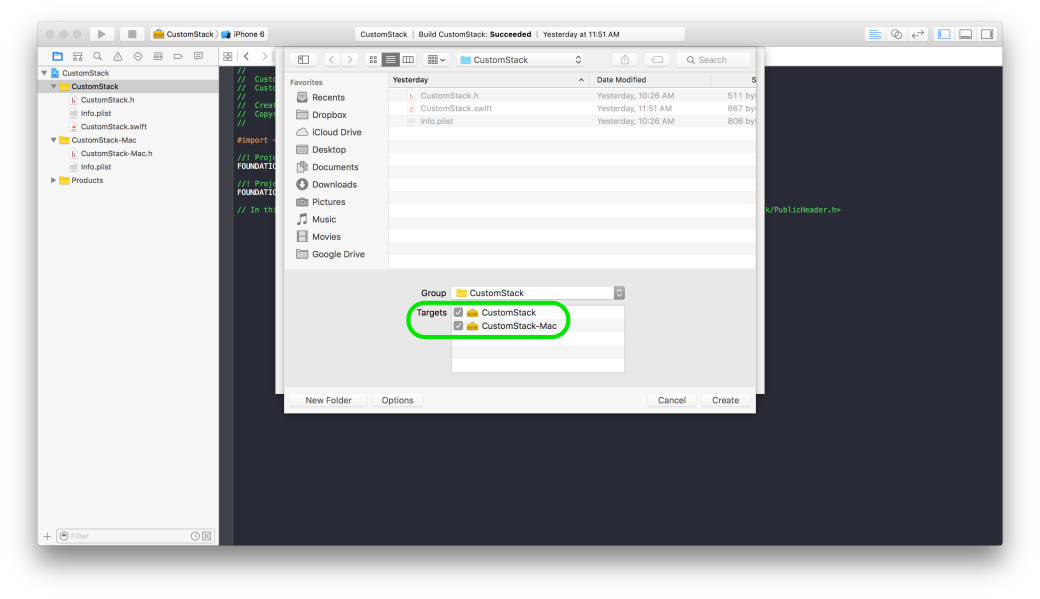
Creating Swift Frameworks is easy. The steps below walk you through creating a Swift Framework. The steps below have been performed on Xcode 7.3

Different variables/classes/functions that are declared within a module are accessible freely within the module. Swift files contain code & are themselves found within Swift modules. So a module can mean project or a framework.So, to access the variables/functions/classes from module A in module B, we have to make those elements of module A public in order to access them in module B.
For more information, do read Apple’s Swift Documentation.
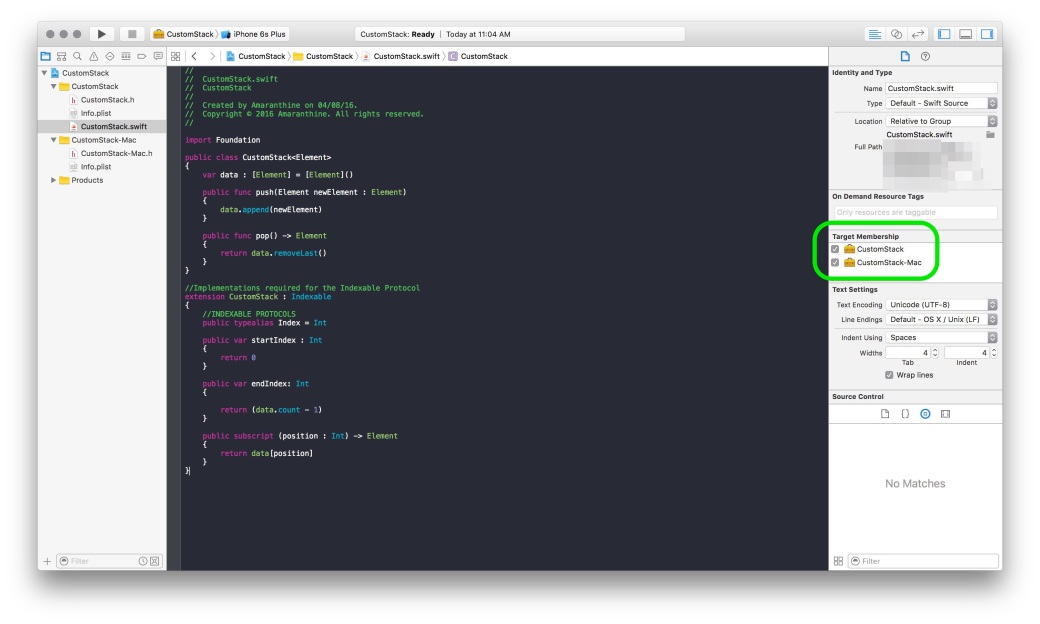
The process of creating a mixed library is straightforward. Its almost the same as above with some minor differences.
#import "<FrameworkName>/<HeaderName>.h
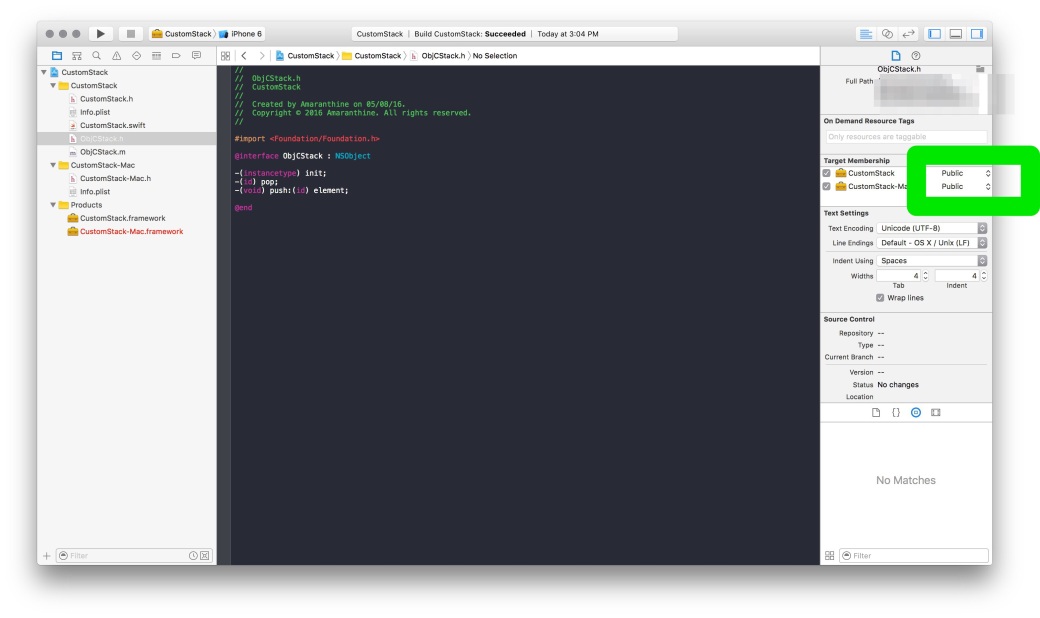
#import "<FrameworkName>/<FrameworkName>-Swift.h"
Replace the word FrameworkName with the name of your Framework.
Apple’s devices are getting more and more popular by the day. People are really excited to get hold of the newest product that comes out of its stable. This guide walks you through some of the things you need to keep in mind while buying used devices or selling your existing device. This may not apply when buying a new product from the store for the first time, however, its still good to know these things & run your device through a checklist.
Note the checklist provided below is by no means comprehensive nor is it complete. There might be other things to keep in mind before buying &/or selling used devices, depending on the geographic area, situation, and circumstances.
Before buying a used products run them through this checklist. Some items are device specific.
The list above should give you a good idea on what you need to do while planning to sell your Apple device.


Enterprises may take additional steps
These are some of the things that you can do to make the transaction easy on both the sides.
For best viewing please make sure the quality is set to 720p 60 HD.
This article covers some of the things troubleshooters would need during their everyday work. I’ve also listed links to some products and applications as an example. It is by no means an endorsement of the same.
OS X Install Disk: This is probably one of the most important tool that a troubleshooter must carry around with him/her. Ideally it would be one disk with multiple versions, each corresponding to a specific version of the OS. Exactly how many versions depends on the situation, for example one can have all instances of the present and previous 2 versions of the OS (For example OS X Mavericks 10.9, 10.9.1, 10.9.2, 10.9.3, 10.9.4, 10.9.5 OS X Yosemite 10.10, 10.10.1, 10.10.2, 10.10.3, 10.10.4, 10.10.5 OS X El Capitan 10.11, 10.11.1)
Thunderbolt & FireWire Cables: These come in handy when it comes to transferring data. These cables are necessary when you wish to perform target disk mode troubleshooting. Make sure you have the correct version of the cable.
http://www.apple.com/shop/product/MD862LL/A/apple-thunderbolt-cable-05-m
Portable Storage Device: Along with the cables mentioned earlier having a portable storage device with a large capacity is useful. Mainly when it comes to taking a back up. The user may or may not have a storage device available for this. (Ideally, taking a backup of the data should be done by the user on his/her own storage device.)
http://www.lacie.com/as/en/products/mobile-storage/rugged-thunderbolt/
http://www.promise.com/Products/Pegasus
Internet access via USB Dongle: Yet another important tool. Application & OS upgrades require internet access. This will also come in handy when you are trying to perform network troubleshooting. Make sure there is sufficient data available for upload/download. Optionally one can carry multiple Internet dongles from different vendors.
Portable Power Bank: This is more useful for portable devices. Carry one with a large capacity, enough for multiple recharges or charging multiple devices.
Display adapters: Necessary to troubleshoot when the main display isn’t working or to heck the display ports. Carry all combinations HDMI to VGA, MiniDisplay to VGA, MiniDisplay to HDMI, HDMI to HDMI and any others depending on the device to be connected to.
http://www.apple.com/shop/product/H9139VC/B/kanex-atv-pro-x-hdmi-to-vga-adapter-with-audio-support
http://www.apple.com/shop/product/MB572Z/B/mini-displayport-to-vga-adapter
Secondary Display: This might not be practical as displays tend to be very large and not necessarily portable. However, one can carry a small pocket projector. A secondary display is always handy as it reduces dependency on the user/client to provide one.
Power adapters: Not strictly required but can come in handy. Useful for checking if the user’s power cord is functioning properly. Make sure you carry all the different versions of the power cords.
Lightning & 30 pin cables: Again not strictly necessary but would be useful for checking if the user’s power cord is functioning properly. Make sure you carry all the different versions of the power cords.
MacBook Pro &/or iPad: Carrying your own Mac & iPhone/iPad is very important. Load these devices with various tools required to diagnose and/or fix issues.
https://itunes.apple.com/in/app/inettools-network-diagnose/id561659975?mt=8
https://itunes.apple.com/us/app/inet-network-scanner/id340793353?mt=8
Airport Utility: https://support.apple.com/kb/DL1664
Airport Utility: AirPort Utility by Apple
Data safety is always a must. With portable devices it gets even more important. Here are a few steps that one can take to make sure their iPhone/iPad/iPod touch is secure. While the guide says iPhone, you can apply many of these steps to other iOS devices, subject to feature availability.
This is the simplest form of security. You are prompted to setup your passcode during the initial device setup itself. While it is not necessary, it is highly recommended. Of course, you can change this at any time. The other option on the newer devices is to use the fingerprint scanner called Touch ID. This adds a convenience to the user while taking care of the security needs. The important thing is that your finger print details are left on the device. Nothing is shared over the internet. The Touch ID is limited to newer devices.


Activation lock is a feature that was first introduced in iOS 7. The idea behind Activation lock is to make sure that no one is able to use a stolen device, even if it is erased. This is activated automatically once you sign into your iCloud account. To use a device after it has been erased, the user must enter the Apple ID & password that was used to sign into iCloud on the device.
Care must also be taken when transferring devices & Activation Lock: https://support.apple.com/kb/PH13695?locale=en_US
This feature is available via the iCloud service. It allows you to locate your device & shows it up on the map itself. This feature is extremely useful if you have lost the device. Note: For this to work, the device requires an active network connection.


Once configured, you can locate the device using the web that is via http://www.icloud.com or through the “Find my iPhone” app on another iOS device.
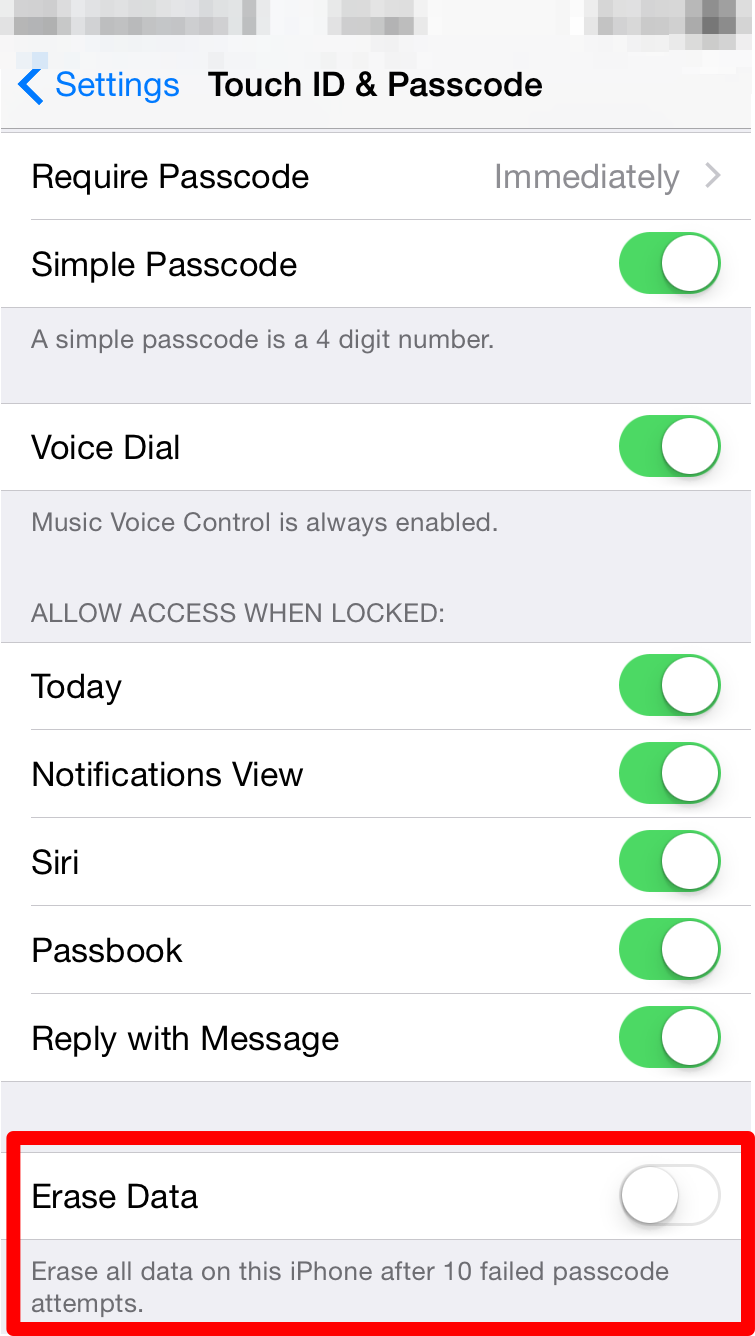
Another useful option is to automatically erase the phone, if the number of passcode attempts by a user exceeds the maximum specified limit.
This is setup in the Touch ID & Passcode section within the Settings app.
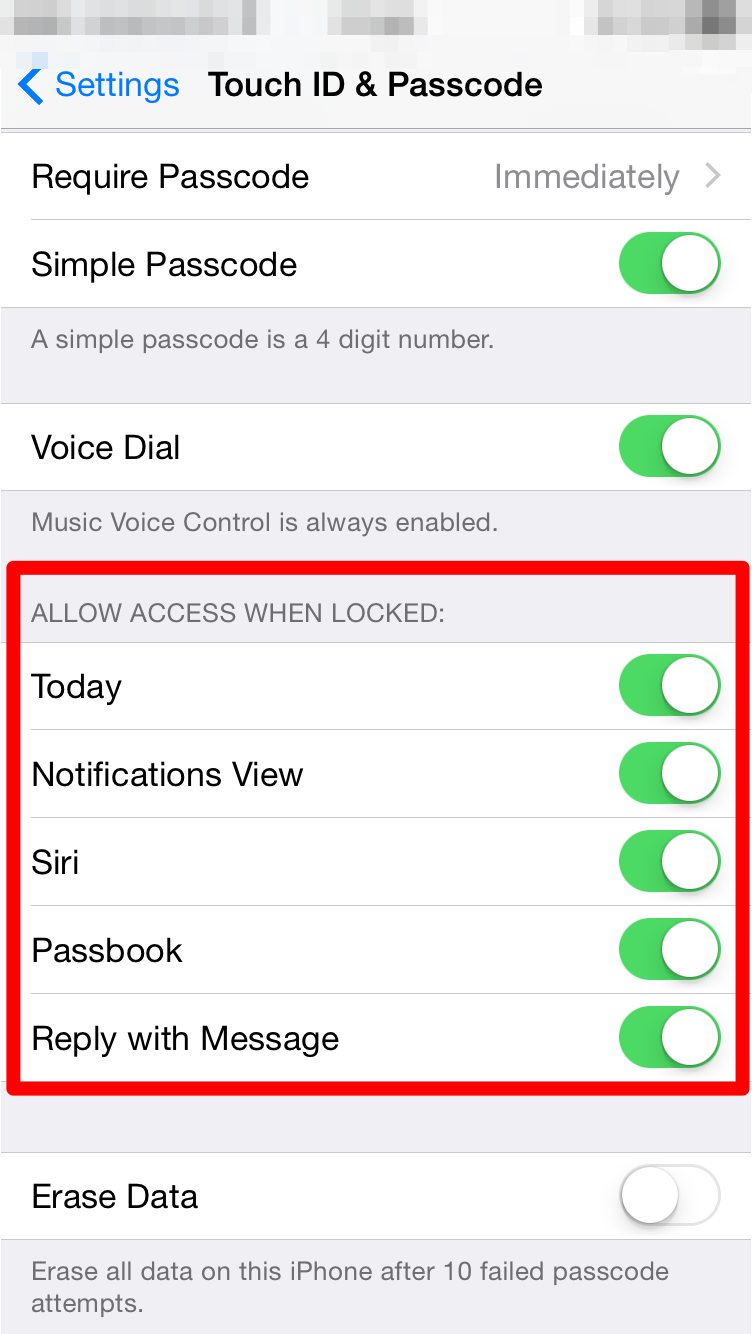
Just having a passcode or Touch ID may not be enough in all cases. Some data is also available from the lock screen. One can control the availability of data on the lock screen from the Touch ID & Passcode screen within the Settings app.
Additionally, you can also control what information from your device is being shared & which apps have access to that information. There is a lot of flexibility available when it comes to controlling the kind of information being shared.
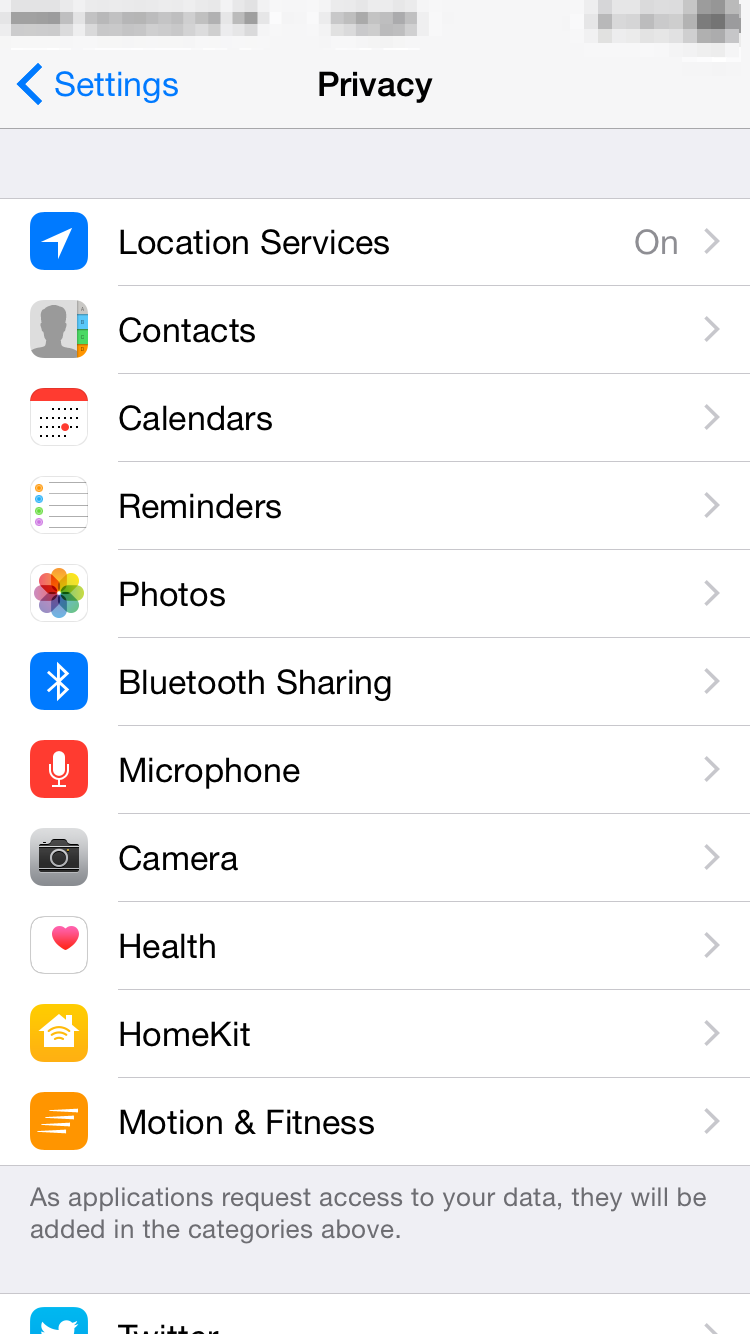
The user can specify which apps can access their contacts, calendar events, location & other data.
It’s very rare that one leaves their iPhone unattended. But in the rare cases that one is distracted from the task they are performing on the device, it would be nice to know if the device can lock itself up.
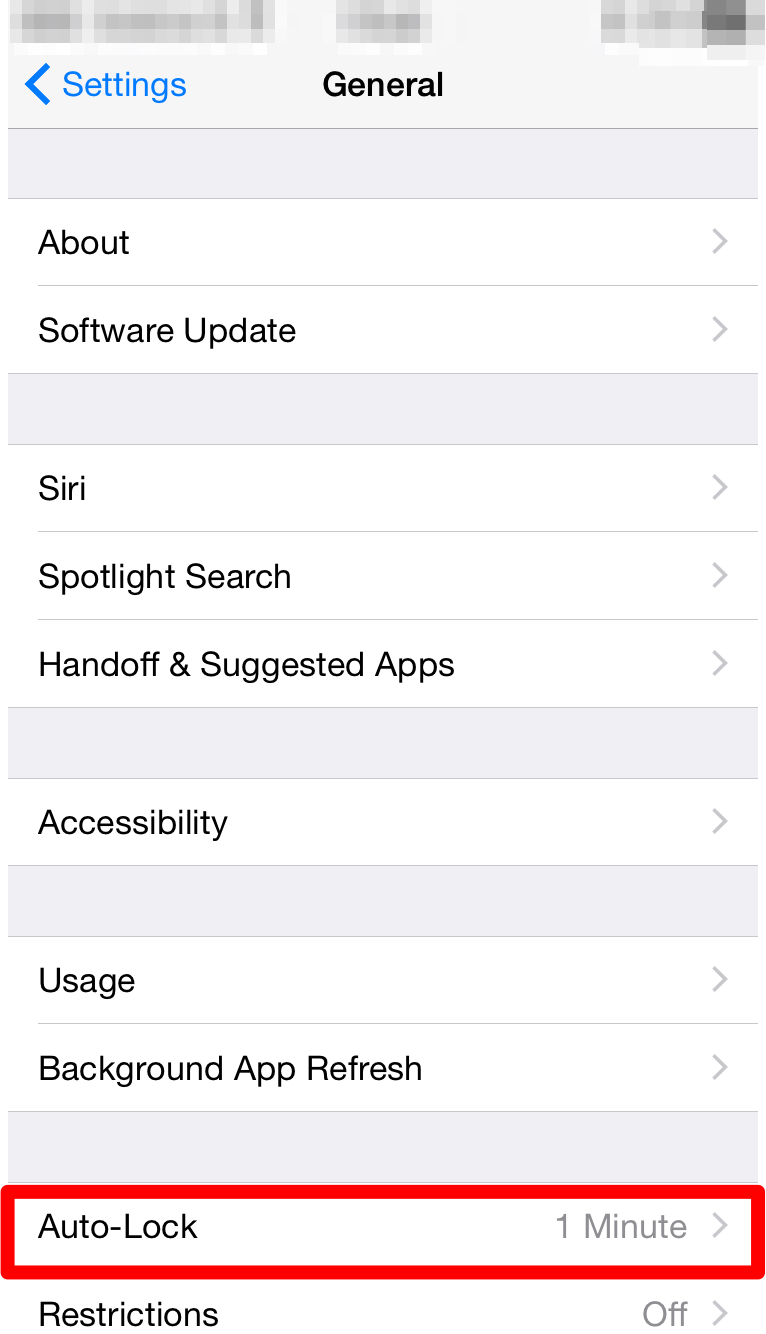
This is done through auto lock within the General settings under the settings app.
Located under the general settings within the settings app, restrictions, as the name says, allows us to disable certain applications and actions from being executed.

The passcode is required to enable/disable the feature.
In todays interconnected world managing all your data is quite important. Most of us end up having more than one smart device that we use everyday. As time goes on we will buy a newer version of the device. It is not necessary that we will get a newer version of each smart computer that we own simultaneously. This means that we have to pay special attention to making sure that our data stays up to date on all the devices & that there is no accidental loss of data.
There are various solutions available to users which easily takes care of data management problems commonly faced by multiple users. One of the most common solutions is to make sure that all your data is available on the cloud. I have given a brief overview on the different cloud services available in my previous article.
However, storing information on the cloud is not enough. Some effort still needs to be done on the users end to ensure that the data is there everywhere they want it. In this article I will be talking about managing your data, migrating your data & backing up your data on your iOS devices.
The starting point for this is the iCloud service. It is a free service provided by Apple & is a must for iPhones & iPads.
Through this article I will be referring to the iOS device as iPhone, however, the steps apply to any iOS device. A few settings & options may change depending on the version of the OS on your computer & your mobile device. The steps mentioned below would be applicable for iOS 8. They may be applicable for earlier versions, but all features may not be available.
This is a very common situation. Most people have a devices for a few years & place a lot of data on it. Once they purchase a new device getting the same data onto the new device is the challenge. This involves a few steps.
STEP 1
STEP 2:
For those who do not have a computer based backup or don’t have a computer can choose to backup their phone onto iCloud. Note that this will require sufficient free space available on the cloud. When they are prompted to restore users will have to sign in with their Apple ID & restore the backup from there.
This is for first time buyers or people switching to the iPhone. No matter which is the case there is one important thing to be done. You have to move your data onto a cloud service which is compatible with iPhone.
iCloud is available for iOS Devices, Macs & Windows. So if you are moving your data from Windows onto your iPhone you could consider running iCloud for Windows. Additionally the iCloud service is also accessible from the browser. So you can access many documents across both the platforms.
Apart from this you can also use iTunes for Windows to move your data from the computer to the iPhone.
This will mean that you will have to use a third party cloud service. Good choices for something like this would be Google Drive or Dropbox. Other services such as Evernote could also be used for the same.
Backing up data is very important. This is a step missed quite often by many users. A common mistake made is in believing that they can restore all their data from the iCloud whenever they wish. While that is true, iCloud is not meant to act as a backup. You can choose to save your backup on iCloud, but this is simply using the iCloud storage space for holding the backup & is not otherwise accessible.
There are 2 options to backing up your iPhones data. One is to back it up onto your computer using iTunes, the other is to back it up onto iCloud.
Pros
Cons
Pros
Cons
