Table of Contents
What is server side Swift?
Server side Swift is basically a server application implemented using the Swift Programming Language. These applications then talk to different clients just like other server applications.
Why would we want to develop server side applications using Swift?
That is a good question. Why would we want to develop server side applications using Swift? If you are an iOS App developer then the biggest advantage is that there is no need to learn a new language from scratch just to build your own backend.
Also the backend and frontend development can happen at the same time and they can share the same codebase.
Of course, the biggest advantage is that we get all the benefits of Swift: Fast, Expressive, Safe, Interoperable, & Adaptable.
What do we need?
The initial development is typically done on a Mac with Xcode installed. Though you can develop the server on Linux using Swift tools too.
- Mac computer running the latest macOS
- Latest version of Xcode
- Vapor tools installed on the development computer
- Server to host your web app
Basic setup and configuration
We will now configure our development computer to develop a Vapor based server. This article assumes that you have a Mac computer with Xcode installed.
- Open Terminal.
- Confirm that you have installed Xcode command line tools.
- Run the following command:
brew install Vapor
- Confirm that it installed successfully by running the following command:
vapor —help
Creating our first server side app using Swift
- Open Terminal.
- Navigate to the folder where you wish to create the project. ~/Developer is a popular location. The rest of the activities assume that the project was created in the Developer folder. However, you can create it in any other location.
- Once you are in the desired folder run the vapor tool to create the server project
vapor new <server app name> -n
- This will create the server as a Swift Package. Navigate into the project folder. The folder name will be the same as the server app name mentioned in the command above.
- Open the Package.swift file using the following command. This will open the project using Xcode.
open Package.swift
- Once Xcode opens it will immediately start downloading the package dependencies mentioned in the Package file. Wait for those to finish downloading.
- Let us confirm that everything is setup well. From the upper left hand corner of Xcode click the ‘Run’ button to start the server.
- You should see the following message printed in the console window of Xcode:
[ NOTICE ] Server started on http://127.0.0.1:8080
- Now let us confirm if we can reach this site. Open Safari or a browser of your choice.
- Type http://127.0.0.1:8080 and press return. It should load a web page with a simple message: “It works!”. You can also visit localhost:8080 and get the same results.
- Type http://127.0.0.1:8080/hello and press return. It should load a web page with a simple message: “Hello, world!”.
- This confirms that the server has been setup well and configured properly.
- Create a new file called CommunicationController.swift under the controllers folder within the project folder. This is where we will implement all the request handlers.
- Navigate to the newly created file.
- At the top add a line to import the Vapor framework.
import Vapor
- Next we will declare a struct called CommunicationController which inherits from RouteCollection. You will get an error message saying that the type does not conform to the protocol. Don’t worry we will add the necessary stubs in a minute. This controller will handle the routing of requests received by the server.
- Click on the error to apply the stubs, it will write the code for you or you can manually write the following:
func boot(routes: any Vapor.RoutesBuilder) throws {

}
- Now we will start implementing the boot. This is where we define the request types and route them to the appropriate function.
let routeGroup = routes.grouped("Source")
- Before we can describe the routes we need the functions that handle the respective messages. Implement the following functions in the same struct.
func getMessage(req : Request) throws -> String {
    return "This is a message received from the server."
}

func postMessage(req : Request) throws -> HTTPStatus {
    let value = try req.content.decode(String.self)

    print(#line, value.name)
    return HTTPStatus.ok
}
The getMessage simply returns a String. The post message prints the value sent to the server.
- Add the following two lines to the boot function, after the routeGroup declaration.
routeGroup.get("Receive", use: getMessage)

routeGroup.post("Send", use: postMessage)
- Your completed struct should look like this:
import Vapor

struct CommunicationController : RouteCollection {
    func boot(routes: any Vapor.RoutesBuilder) throws {
        let routesGroup = routes.grouped("Source")

        routesGroup.get("Receive", use: getMessage)
        routesGroup.post("Send", use: postMessage)
    }

    func getMessage(req : Request) throws -> String {
        return "This is a message received from the server."
    }

    func postMessage(req : Request) throws -> HTTPStatus {
        let value   : String    = try req.content.decode(String.self)
        print(#line, value)
        return HTTPStatus.ok
    }
}
The GET & POST methods have their own respective names “Receive” and “Send”. These will be a part of the URL endpoints which we will need when we are building the client.
- Switch to the routes file.
- Replace all the code in the routes function with the following statement:
try app.register(collection: CommunicationController())
Testing the server app
We will test our server with the help of a client app. We will quickly create a basic iOS App that can talk to the backend service. You can create any other frontend app that you might be comfortable with.
- To test the server we will make a quick iOS App. Create a new iOS App that uses the UI framework of your choice.
- Create a swift file called NetworkEngine.swift and write the following code in there:
import Foundation

final class NetworkEngine {
    //MARK: - Singleton
    private static var reference    : NetworkEngine?

    private init() { }

    static var shared : NetworkEngine {
        if reference == nil {
            reference = NetworkEngine()
        }
        return reference!
    }

    typealias NetworkResponseHandler = (Data?, URLResponse?, Error?) -> Void

    func communicateWith(Server url : URL, andHandleResponseWith completionHandler : @escaping NetworkResponseHandler) {
        let task = URLSession.shared.dataTask(with: url, completionHandler: completionHandler)
        task.resume()
    }

    func communicateWith(Request req : URLRequest, andHandleResponseWith completionHandler : @escaping NetworkResponseHandler) {
        let task = URLSession.shared.dataTask(with: req, completionHandler: completionHandler)
        task.resume()
    }
}
It is a basic wrapper for the URLSession calls.
- I am implementing the project as a SwiftUI project. So I will create the ContentViewVM.swift file.
- Declare a constant to hold the URL to the server. Since we are testing on the same computer we will use the self url.
private let targetURL : String = "http://127.0.0.1:8080"
- Implement the function to get a message as shown below:
func initiateCommunication(task : @escaping () -> Void) {
        //1) Get the URL
        let destinationURL      : URL                                   = URL(string: "\(self.targetURL)/Source/Receive")!
        var req                 : URLRequest                            = URLRequest(url: destinationURL)
        req.httpMethod                                                  = "GET"

        //2) Create the completion handler
        let completionHandler   : NetworkEngine.NetworkResponseHandler  = {(data : Data?, response : URLResponse?, err : Error?) -> Void in
            print(String(data: data!, encoding: String.Encoding.utf8)!)
        }

        //3) Start communication
        NetworkEngine.shared.communicateWith(Request: req, andHandleResponseWith: completionHandler)
    }
- Implement the function to post a message as shown below:
func sendSomeData(input : String) {
        //1) Get the URL
        let destinationURL  : URL           = URL(string: "\(self.targetURL)/Source/Send")!
        let objToSend       : String        = input
        let jsonEncoder     : JSONEncoder   = JSONEncoder()
        let body                            = try? jsonEncoder.encode(objToSend)

        var req             : URLRequest    = URLRequest(url: destinationURL)
        req.httpMethod                      = "POST"
        req.httpBody                        = body
        req.addValue("application/json", forHTTPHeaderField: "content-type")

        NetworkEngine.shared.communicateWith(Request: req, andHandleResponseWith: {(data, response, error) in
            print(response!)
        })
    }
- Switch to the ContentView.swift file.
- Implement the ContentView as shown below:
import SwiftUI

struct ContentView: View {
    var viewModel : ContentViewVM   = ContentViewVM()

    var body: some View {
        VStack {
            Button("Get") {
                self.viewModel.initiateCommunication(task: {})
            }
            .padding()

            Button("Post") {
                self.viewModel.sendSomeData(input: "Sending this message from the test app on \(Date.now)")
            }
    }
}
- Run the iOS app in the simulator.
- Tap the ‘Get’ button. See if you get the message from the server. It will be printed in the Xcode console.
- Tap the ‘Post’ button. See if you received the message on the server. It will be printed in the Xcode console for the server project.
- You have successfully configured basic communication.
Next we will implement basic authentication
- Create a new file in the controllers folder. Call it UserAuthenticationLogic.swift.
- Declare a struct that represents the user.
import Vapor

struct User : Authenticatable {
    var name : String
}
- Now we will implement the struct that handles the authentication.
struct UserAuthenticator : AsyncBasicAuthenticator {
    func authenticate(basic : BasicAuthorization, for request : Request) async throws {
        if basic.username == "test" && basic.password == "secret" {
            request.auth.login(User(name: "Test"))
        }
    }
}
It conforms to the AsyncBasicAuthenticator protocol. Using basic authorisation it checks to see if the username and password match and login the user if it does.
The user authentication logic i have implemented above is too basic and trivial. Real world deployments would need a proper identity integration logic.
- Switch to the CommunicationController.swift file.
- Replace the routes group with a group that uses the UserAuthenticator. Update the subsequent get and post statements to use the new group. Your boot function should look like this:
func boot(routes: any Vapor.RoutesBuilder) throws {
        let protectedRoutesGroup = routes.grouped(UserAuthenticator())

        protectedRoutesGroup.get("Receive", use: getMessage)
        protectedRoutesGroup.post("Send", use: postMessage)
    }
- Add the statement too require login at the start of the getMessage and postMessage functions.
_ = try req.auth.require(User.self).name
- To test this we will switch back to our iOS App.
- Update the target URL for both the initiateCommunication & sendSomeData functions. Remove the /Source from the URL.
- Add the following lines in the initiateCommunication function after the statement where we specify the httpMethod:
let body = "Basic \("test:secret".data(using: .utf8)!.base64EncodedString())"
req.setValue(body, forHTTPHeaderField: "Authorization")
- Add the following lines in the sendSomeData function right after the content type is specified for the request.
let authBody = "Basic \("test:secret".data(using: .utf8)!.base64EncodedString())"
req.setValue(authBody, forHTTPHeaderField: "Authorization")
- Run both the server as well as our iOS app.
- Test the Get and post messages just like the previous task.
- Play around by sending an incorrect username &/or password.
- The updated function should look like:
func initiateCommunication(task : @escaping () -> Void) {
    //1) Get the URL
    let destinationURL      : URL                                   = URL(string: "\(self.targetURL)/Receive")!
    var req                 : URLRequest                            = URLRequest(url: destinationURL)
    req.httpMethod                                                  = "GET"
    let body                                                        = "Basic \("test:secret".data(using: .utf8)!.base64EncodedString())"
    req.setValue(body, forHTTPHeaderField: "Authorization")

    //2) Create the completion handler
    let completionHandler   : NetworkEngine.NetworkResponseHandler  = {(data : Data?, response : URLResponse?, err : Error?) -> Void in
        print(String(data: data!, encoding: String.Encoding.utf8)!)
    }

    //3) Start communication
    NetworkEngine.shared.communicateWith(Request: req, andHandleResponseWith: completionHandler)
}

func sendSomeData(input : String) {
    //1) Get the URL
    let destinationURL  : URL           = URL(string: "\(self.targetURL)/Send")!
    let objToSend       : String        = input
    let jsonEncoder     : JSONEncoder   = JSONEncoder()
    let body                            = try? jsonEncoder.encode(objToSend)

    var req             : URLRequest    = URLRequest(url: destinationURL)
    req.httpMethod                      = "POST"
    req.httpBody                        = body
    req.addValue("application/json", forHTTPHeaderField: "content-type")
    let authBody                        = "Basic \("test:secret".data(using: .utf8)!.base64EncodedString())"
    req.setValue(authBody, forHTTPHeaderField: "Authorization")

    NetworkEngine.shared.communicateWith(Request: req, andHandleResponseWith: {(data, response, error) in
        print(response!)
    })
}
Notice that the endpoint names in the URL have changed a little bit. “Source” is no longer needed.
Hosting the server using DigitalOcean droplets
I will be hosting the server on a DigitalOcean droplet. This will be an Ubuntu server that can run our server application. You can use any other hosting medium that you wish or even use docker for this.
- Open DigitalOcean: https://www.digitalocean.com/
- Login.
- Click on Create > Droplet
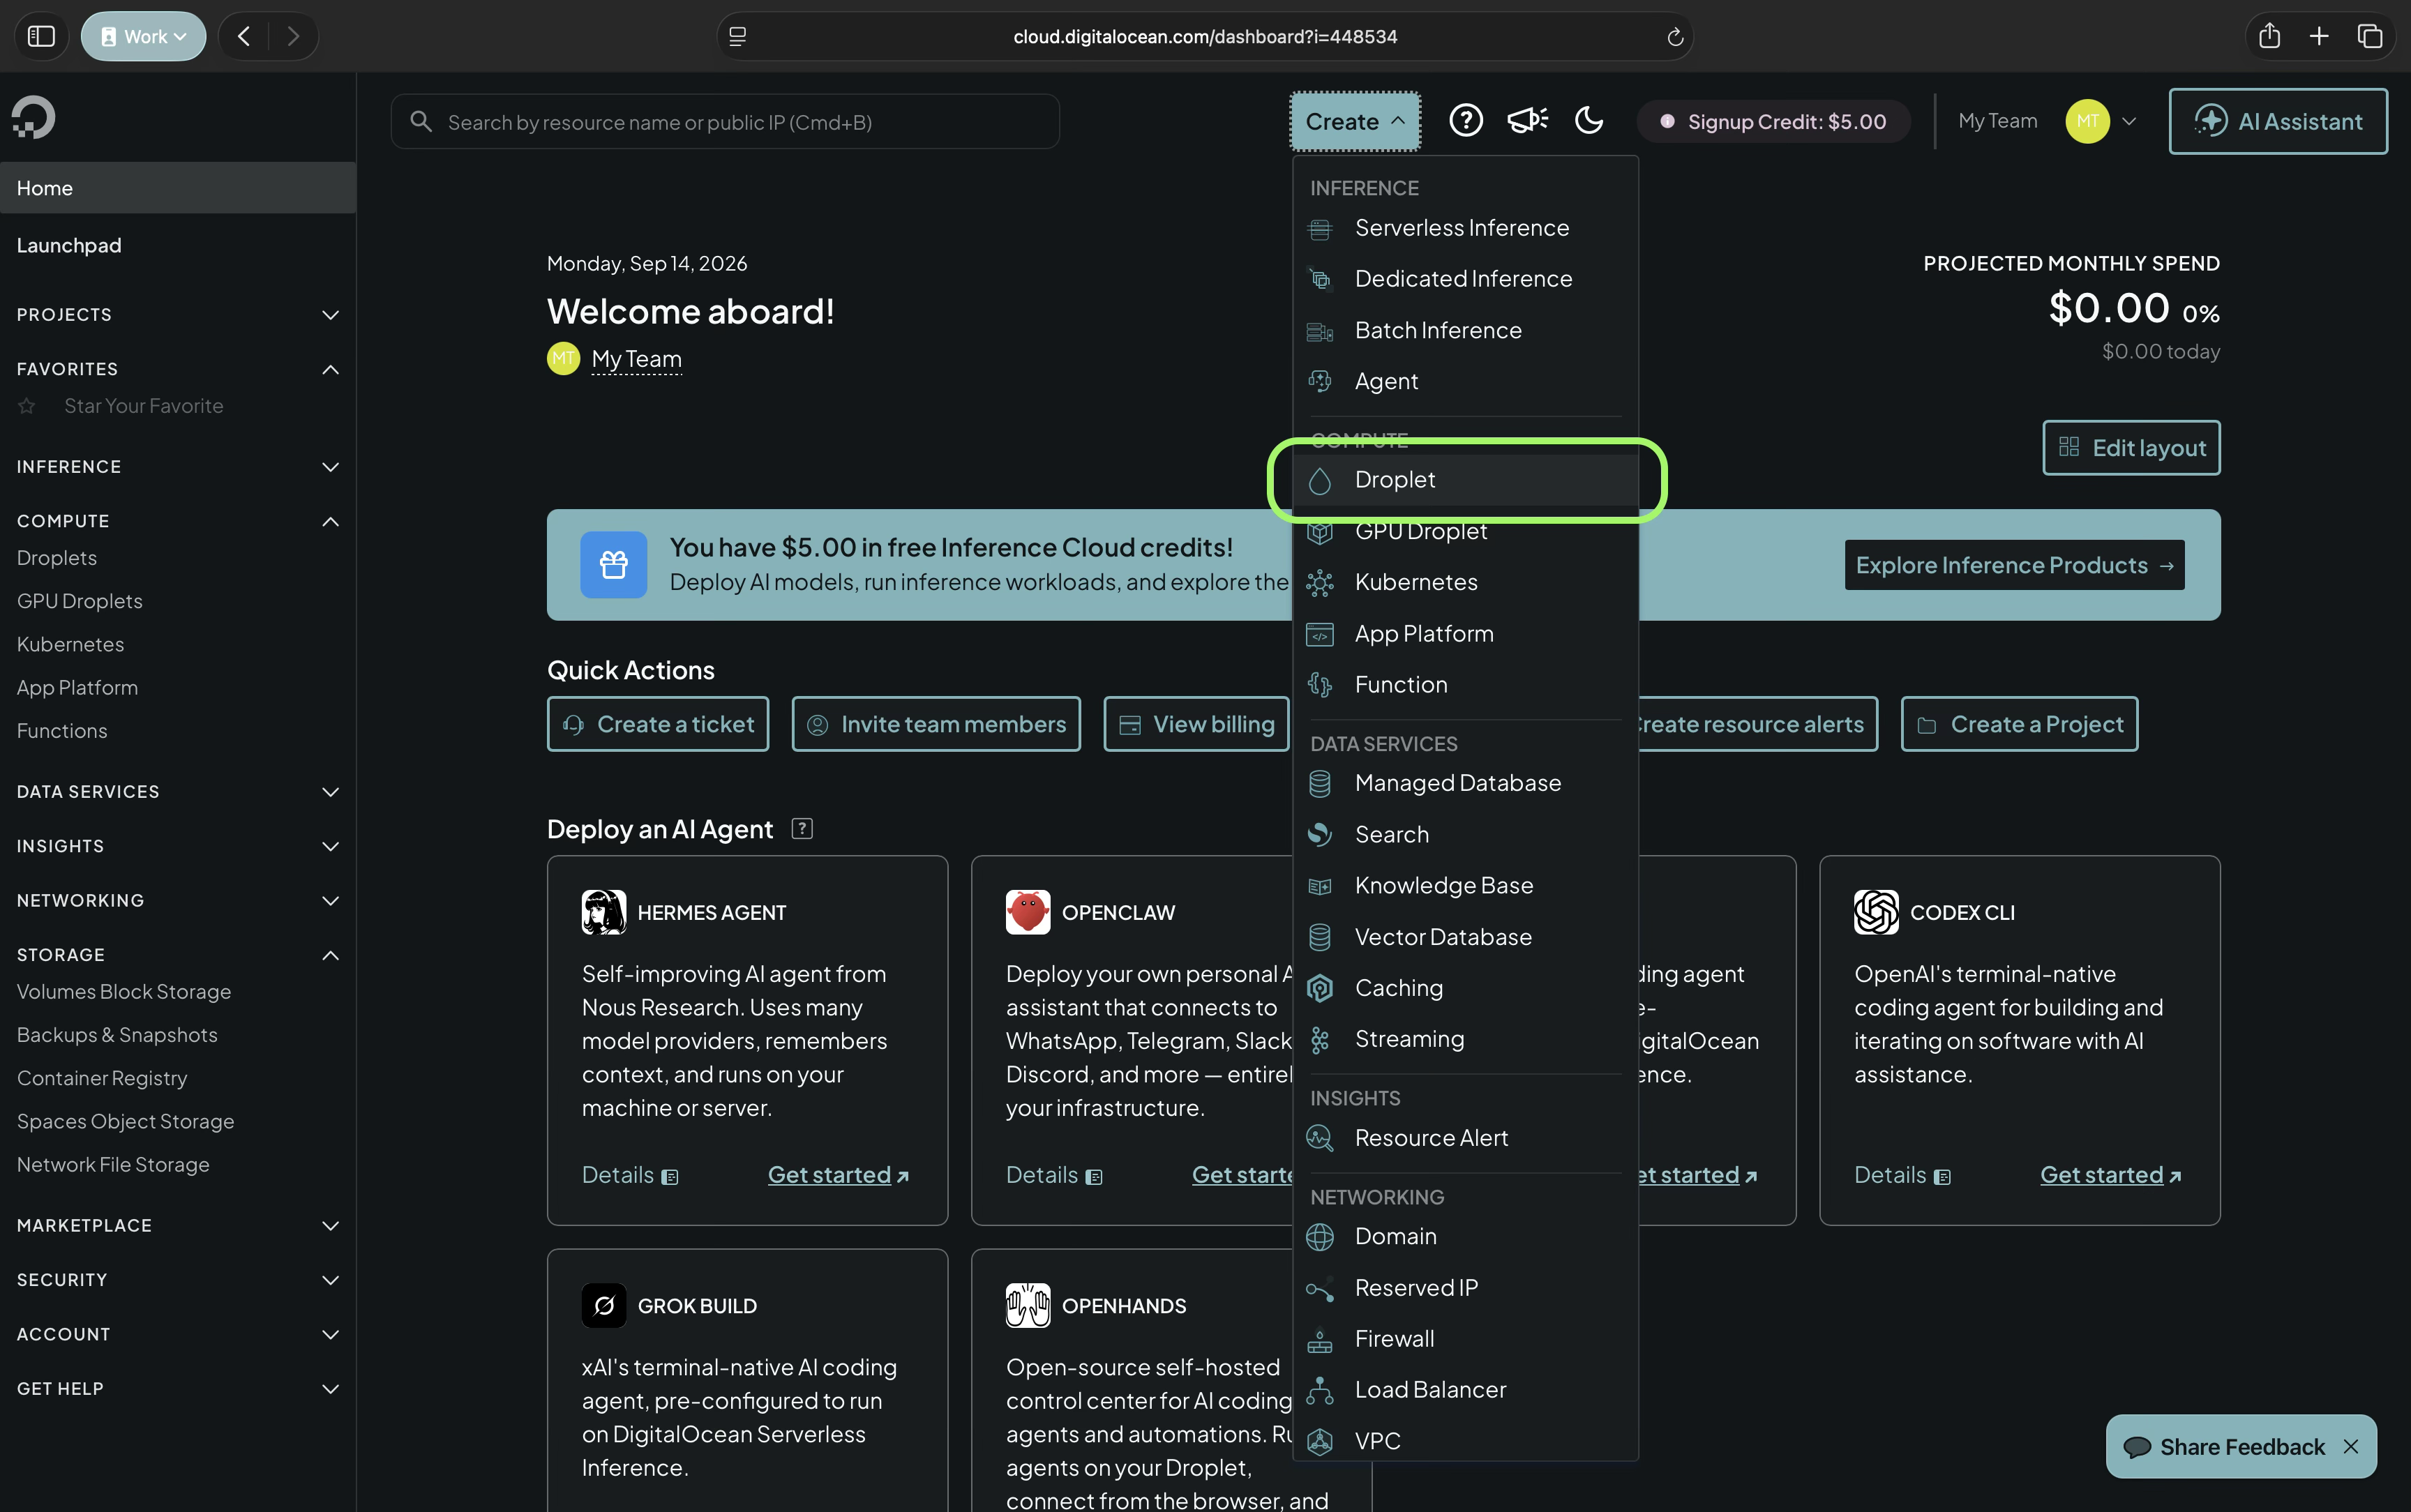
- Choose the server. This could be any one. I have chosen the one closest to my city.
- Choose Ubuntu 22.04 as version. Again, you can pick your preferred one from the choice.
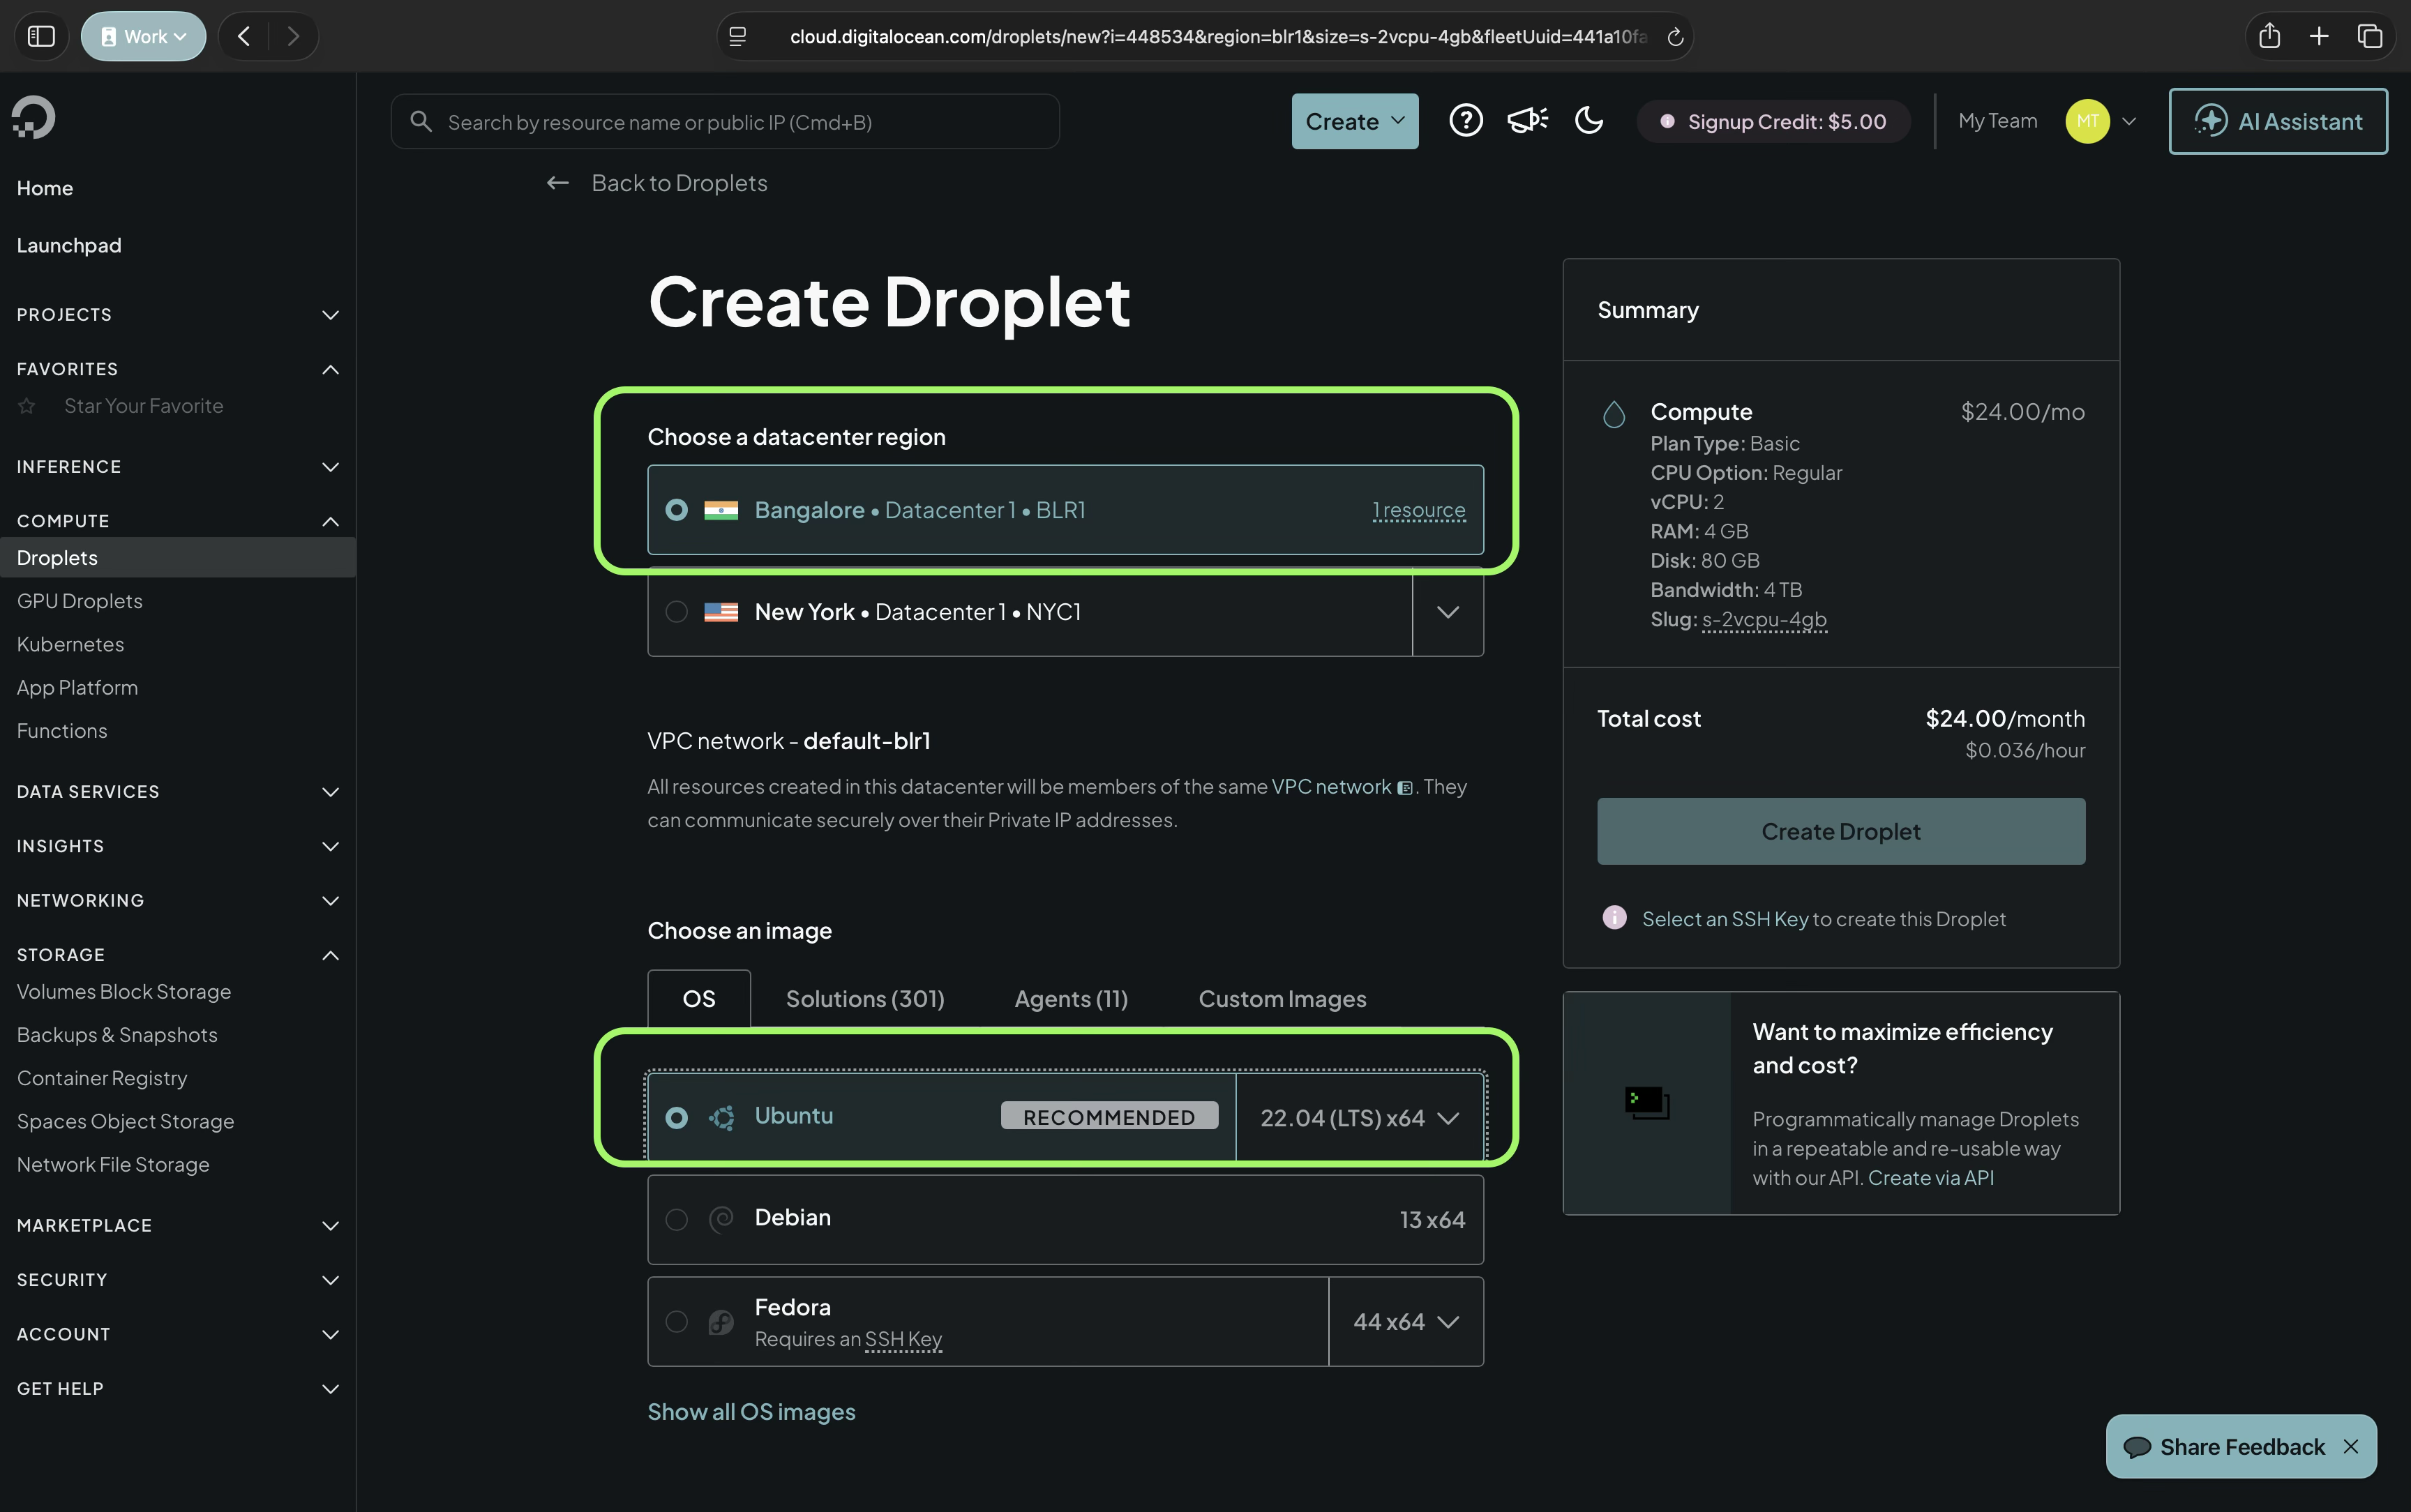
- Go fo basic configuration
- Choose basic plan. Pick this configuration carefully. It will determine the load that your service can handle.
When I was testing this I needed almost 2 CPU cores as well as 2GB of RAM just to get started. The good thing is you can increase this at a later point in time. However, that involves stopping and starting the server, so you will want to plan things out properly.
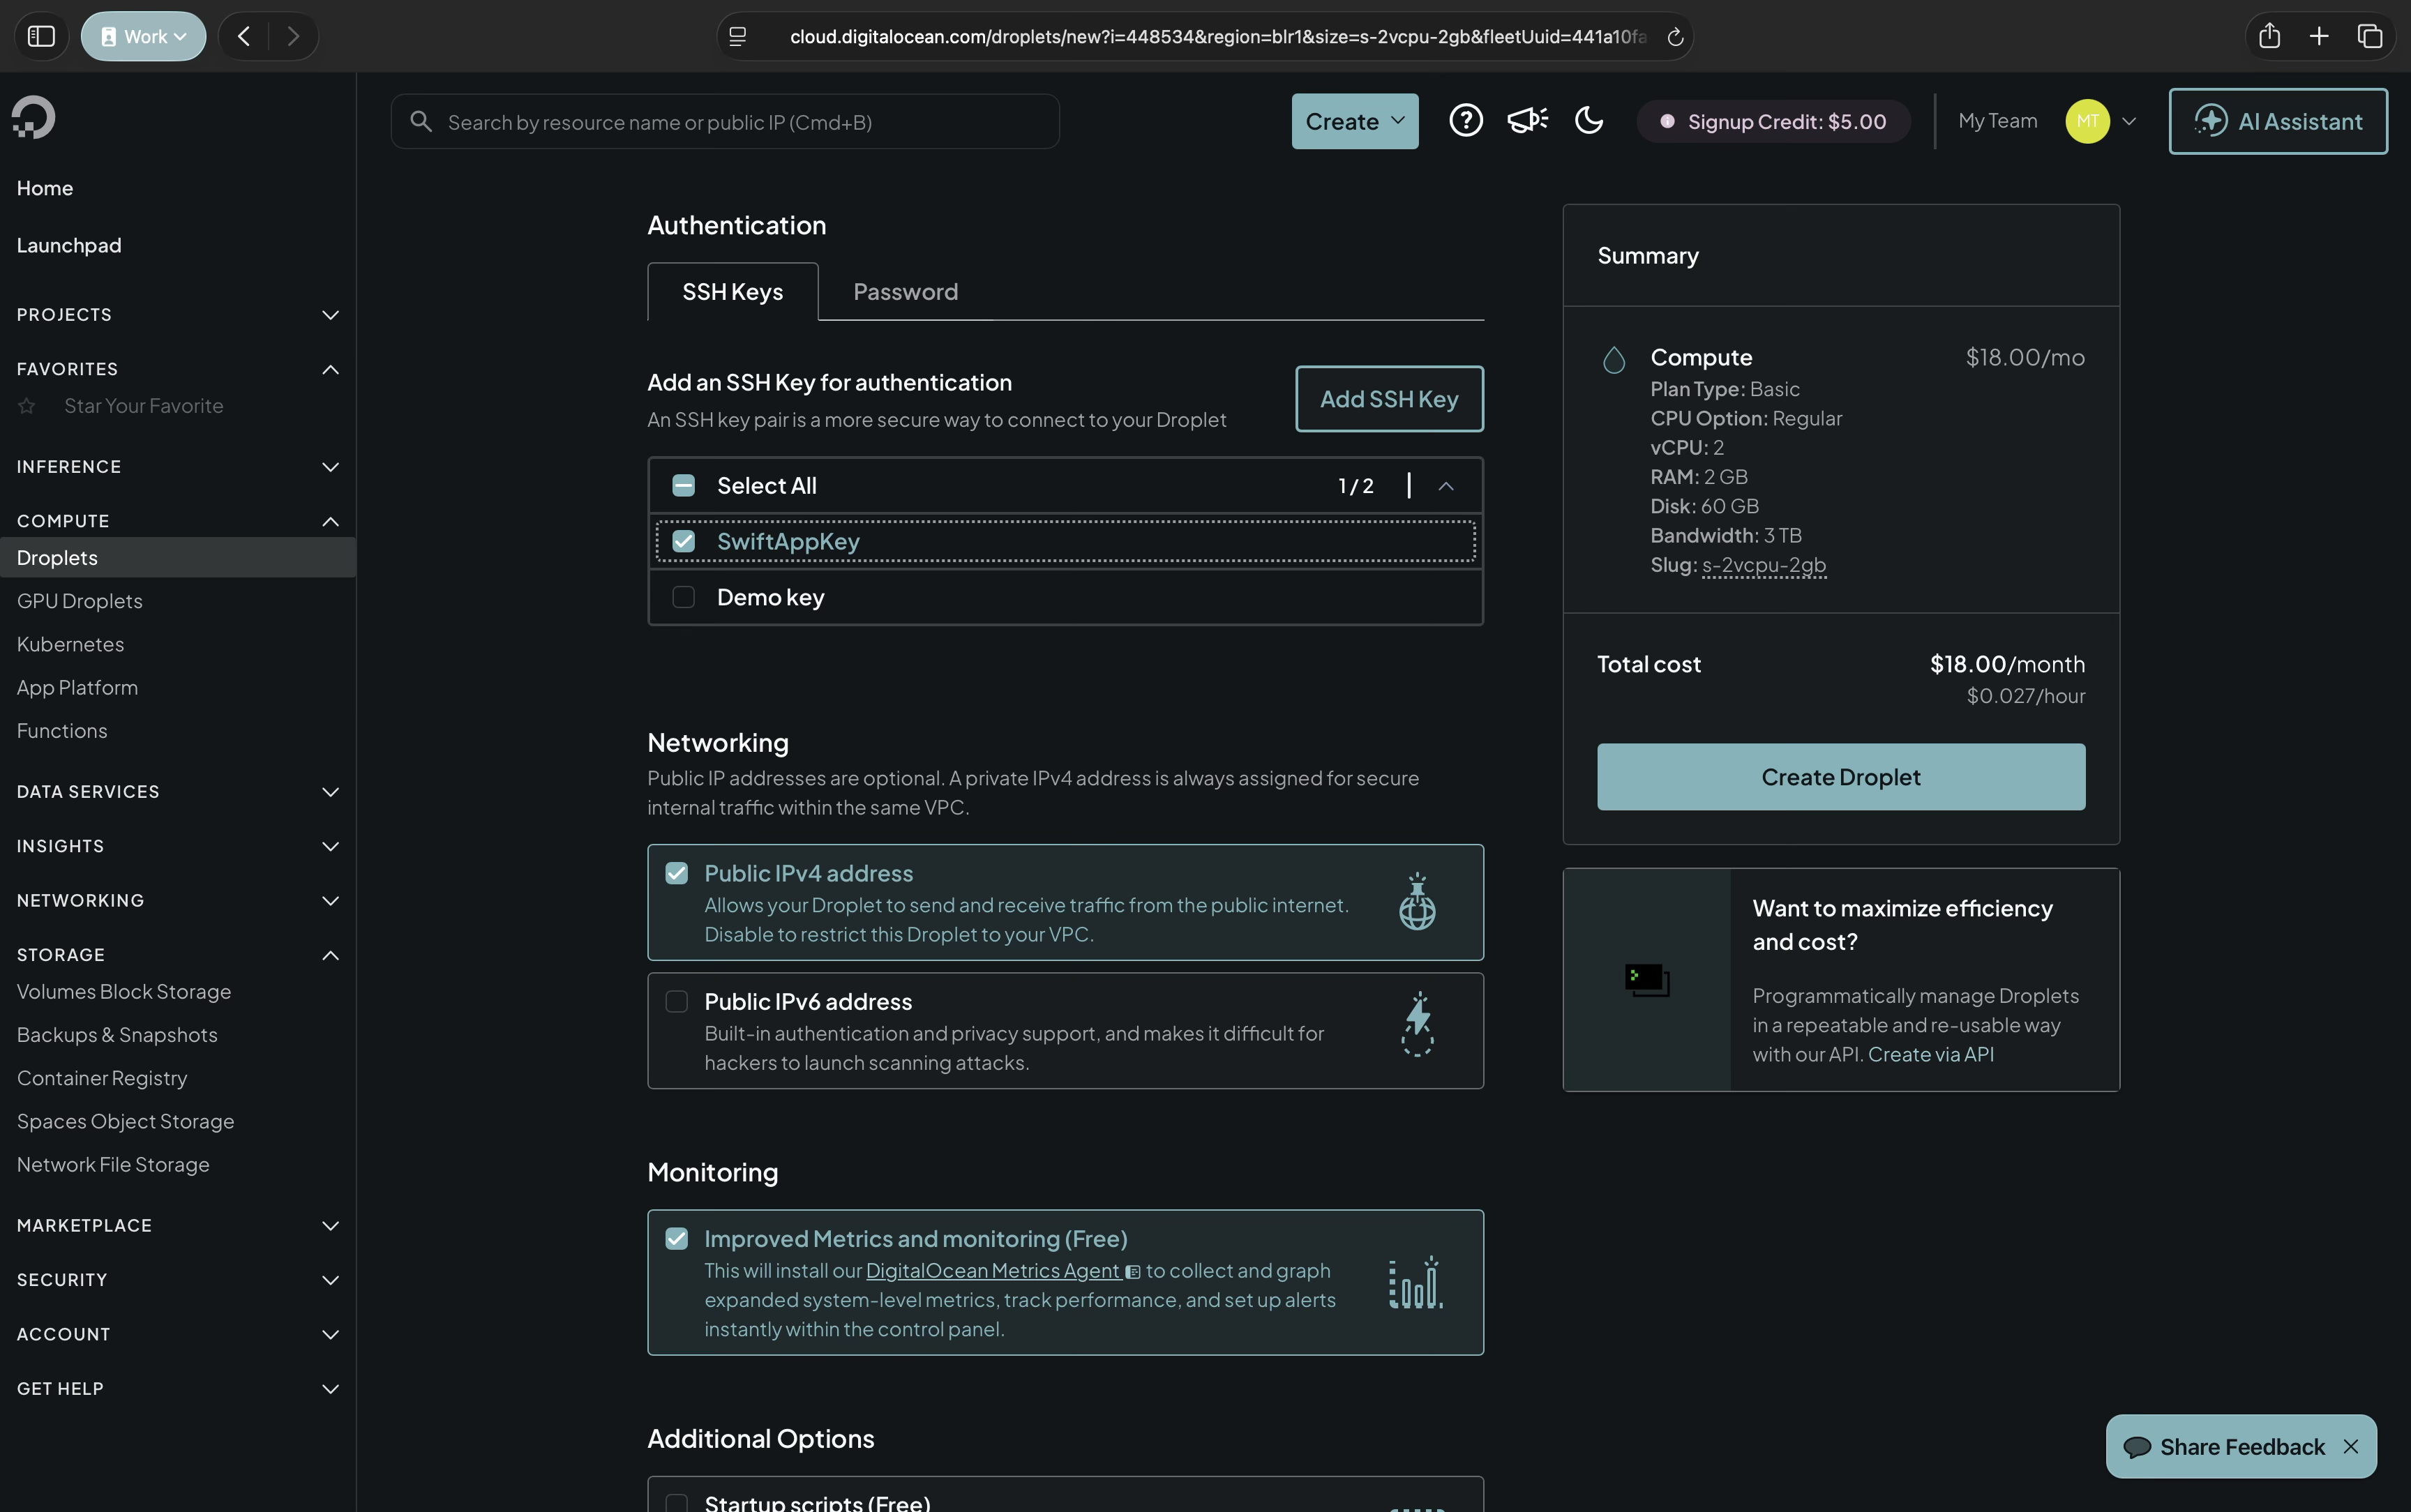
- Under authentication select add keys. You can add as many keys as you want.
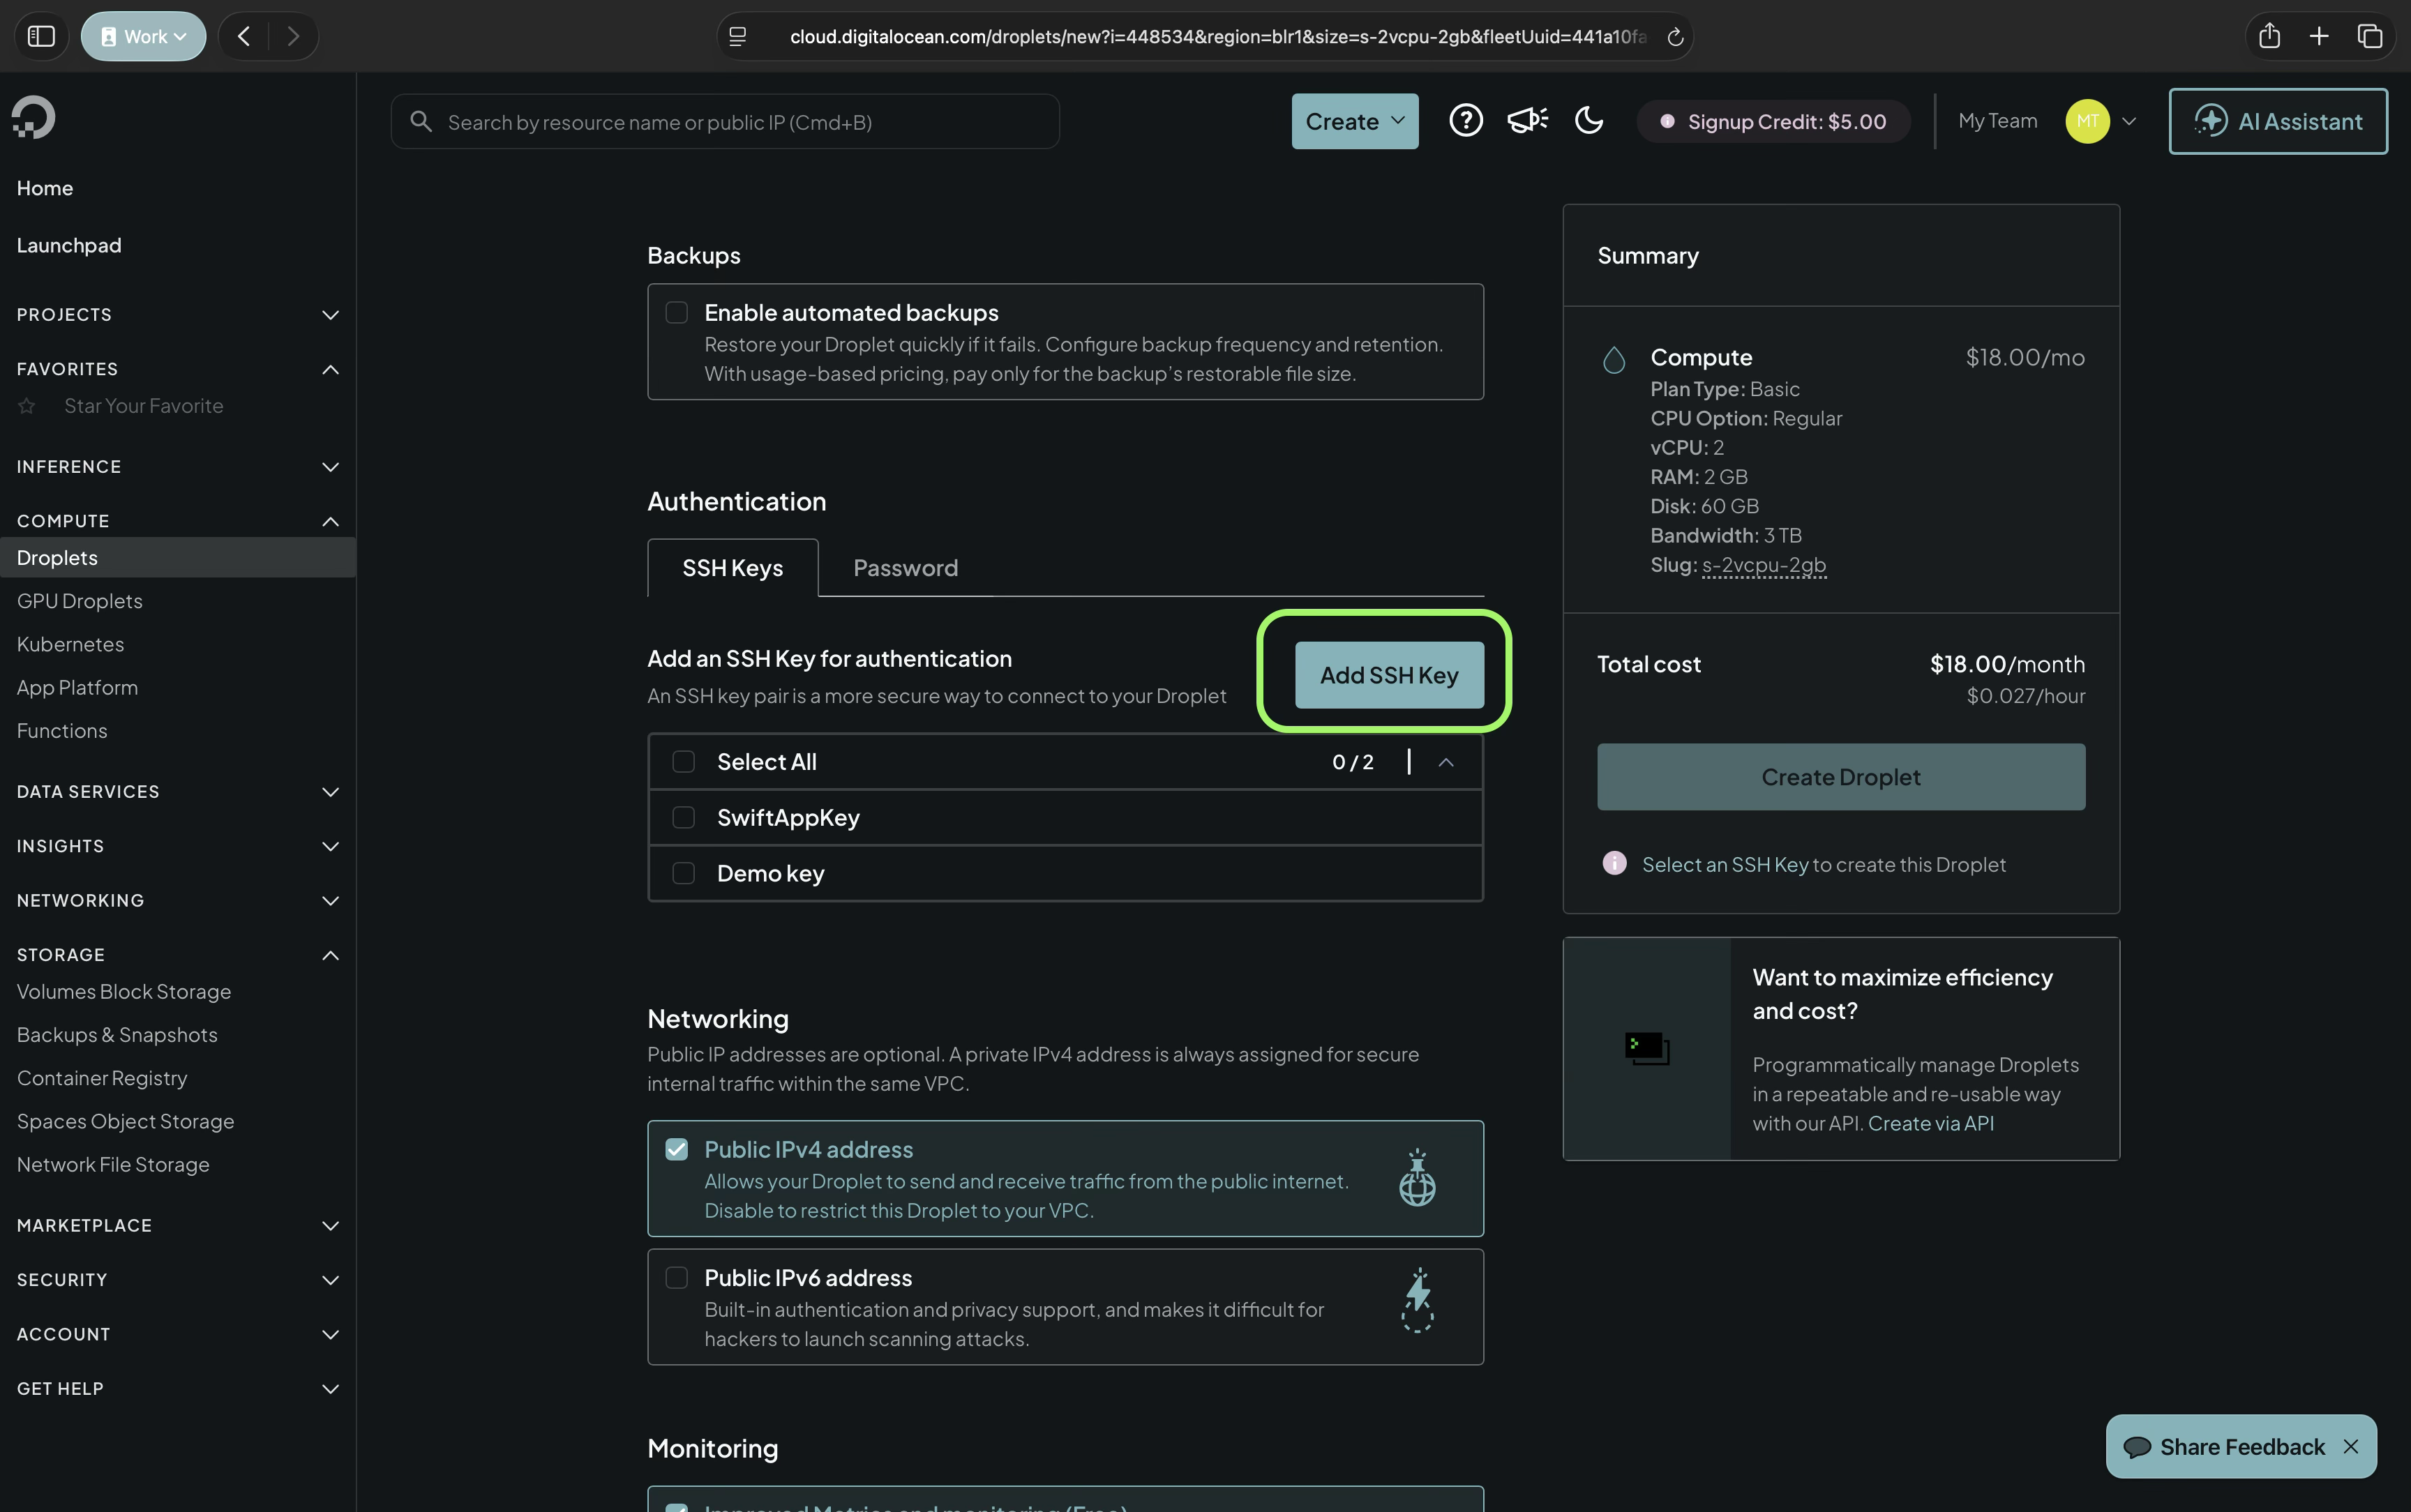
- Let us create a key. We will do this from the command line interface of macOS. Switch to terminal.
- Navigate to
~/Developer. Create it if it isn’t there already. - Create a hidden folder called
.sshusing the command
mkdir .ssh
You can do this from any folder. I will be using the Developer folder in the home folder as reference.
- Navigate inside the hidden folder.
cd .ssh
- Create a file named do_id1.txt inside the hidden folder using the command:
touch do_id2.txt
This will hold the key.
- Run the command:
ssh-keygen
- You will be prompted to enter the path of the file that will hold the key. Enter the path to the hidden folder created in step 11. This will be inside the home folder. Replace ‘demo’ with your home folder name.:
/Users/demo/Developer/.ssh/do_id2.txt
- If the file already exists you will be prompted to overwrite. Type yes and press the return key.
- You will be prompted to enter a passphrase for your file. Note down this passphrase in a safe place as we will be needing it. Enter a passphrase.
- Once done take a screenshot for reference.
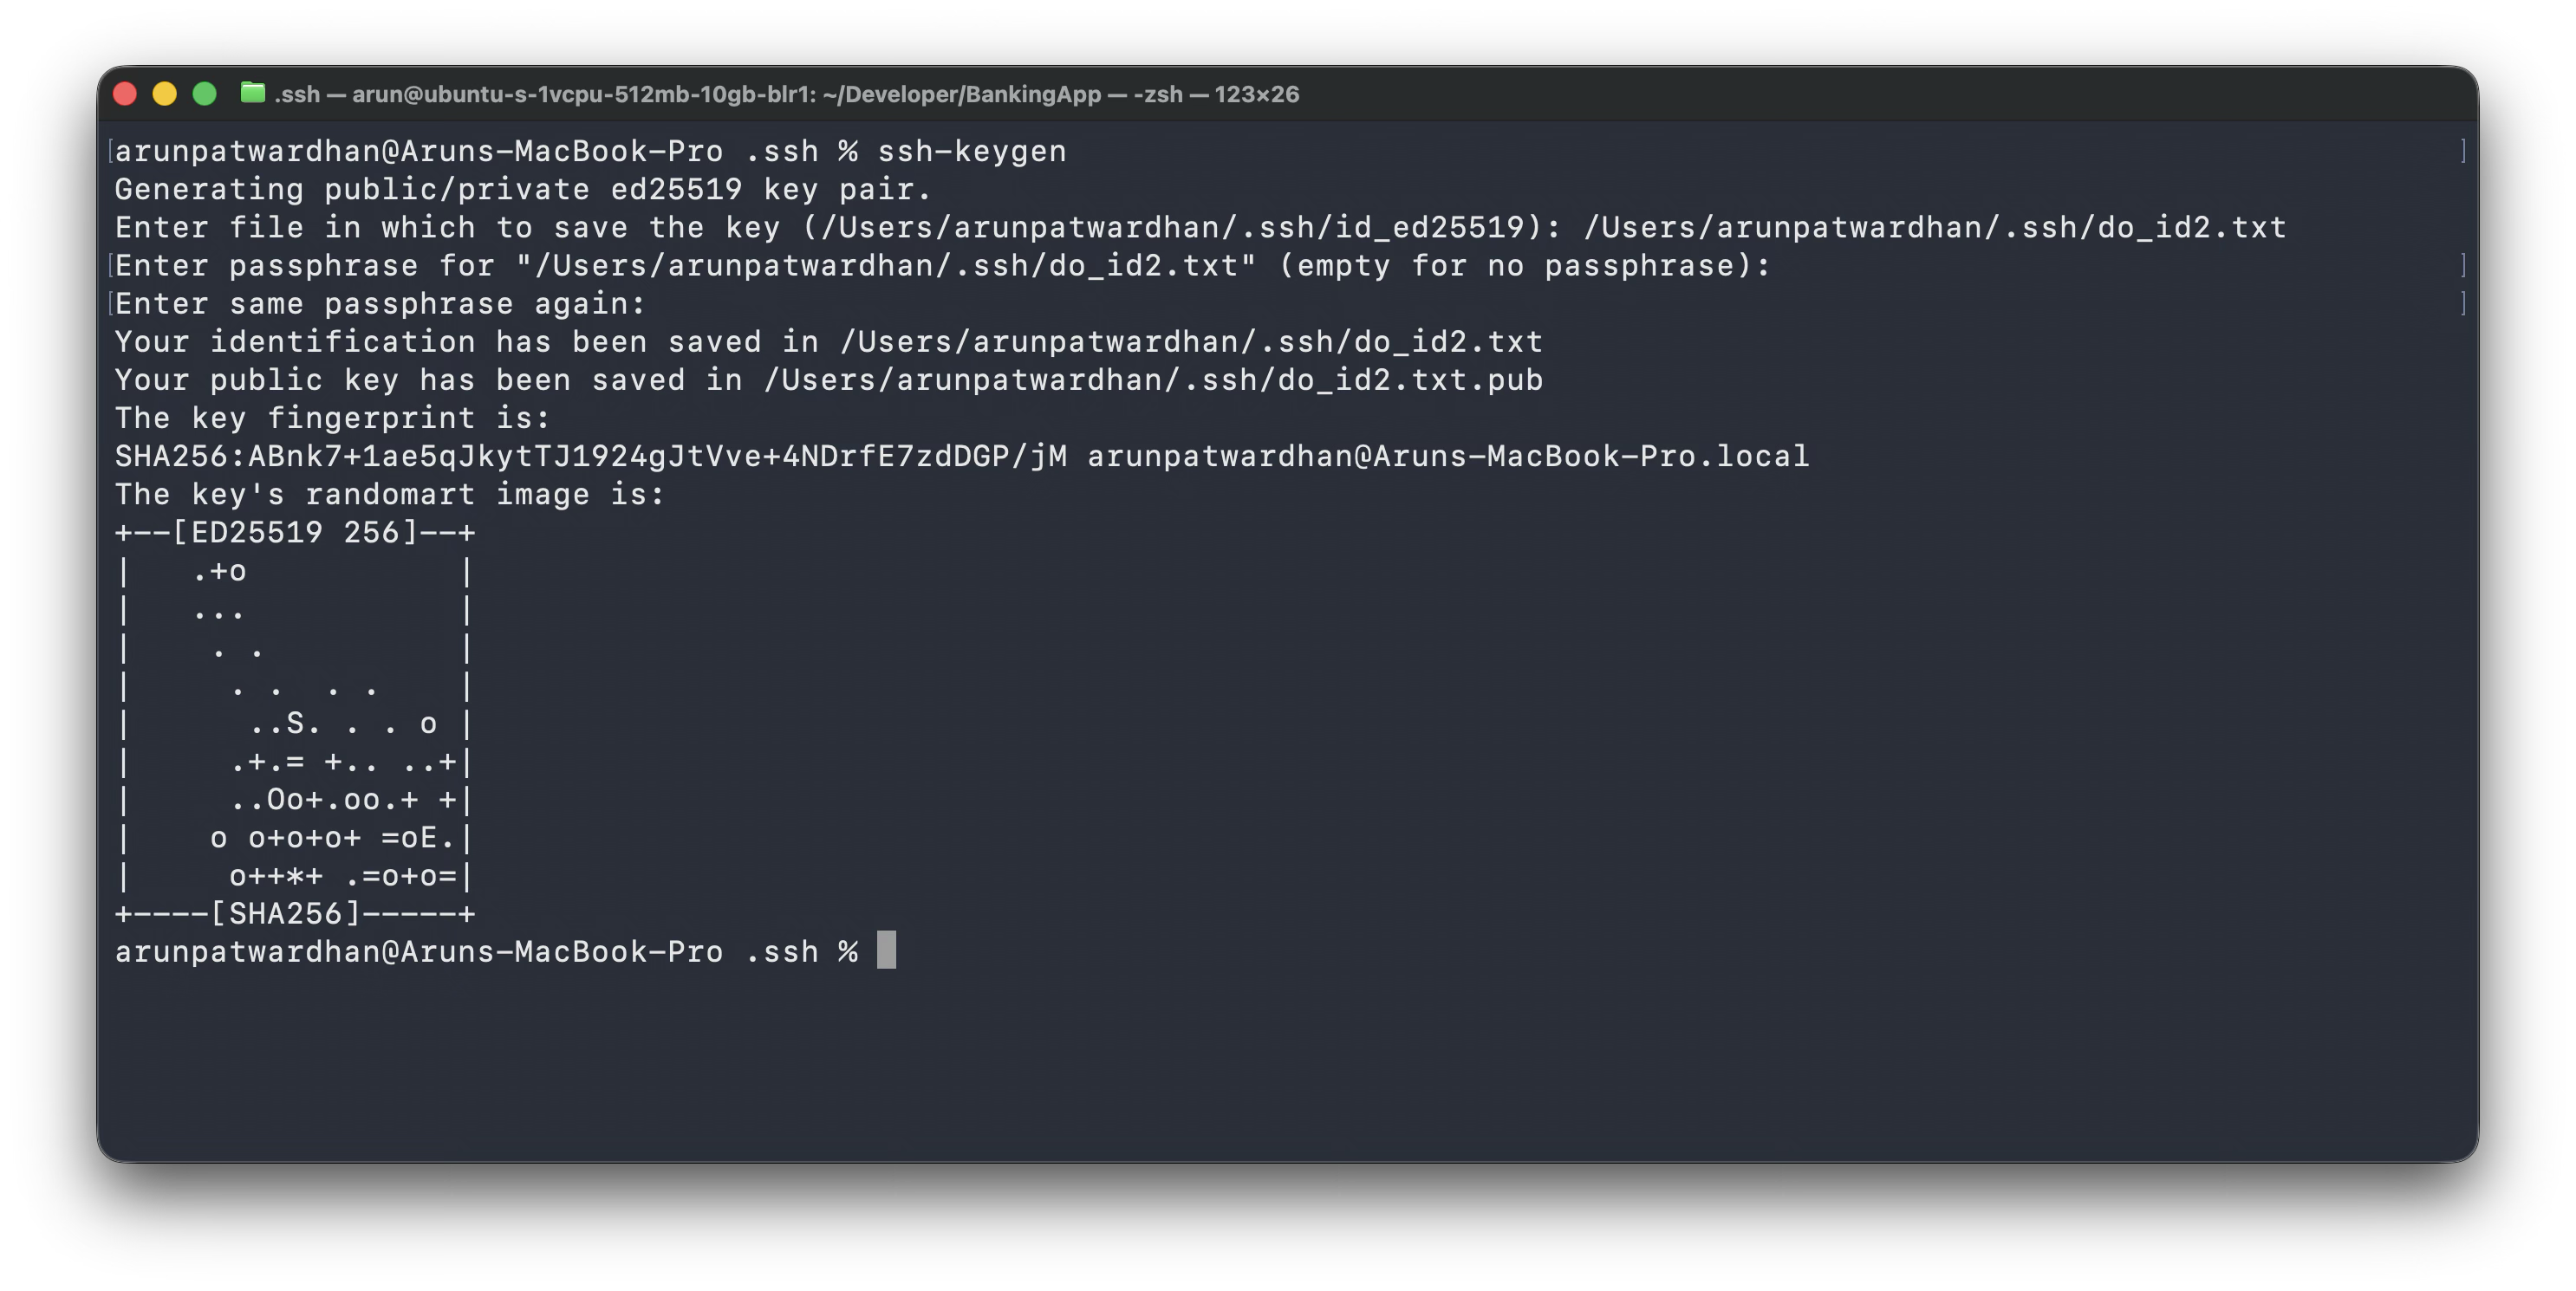
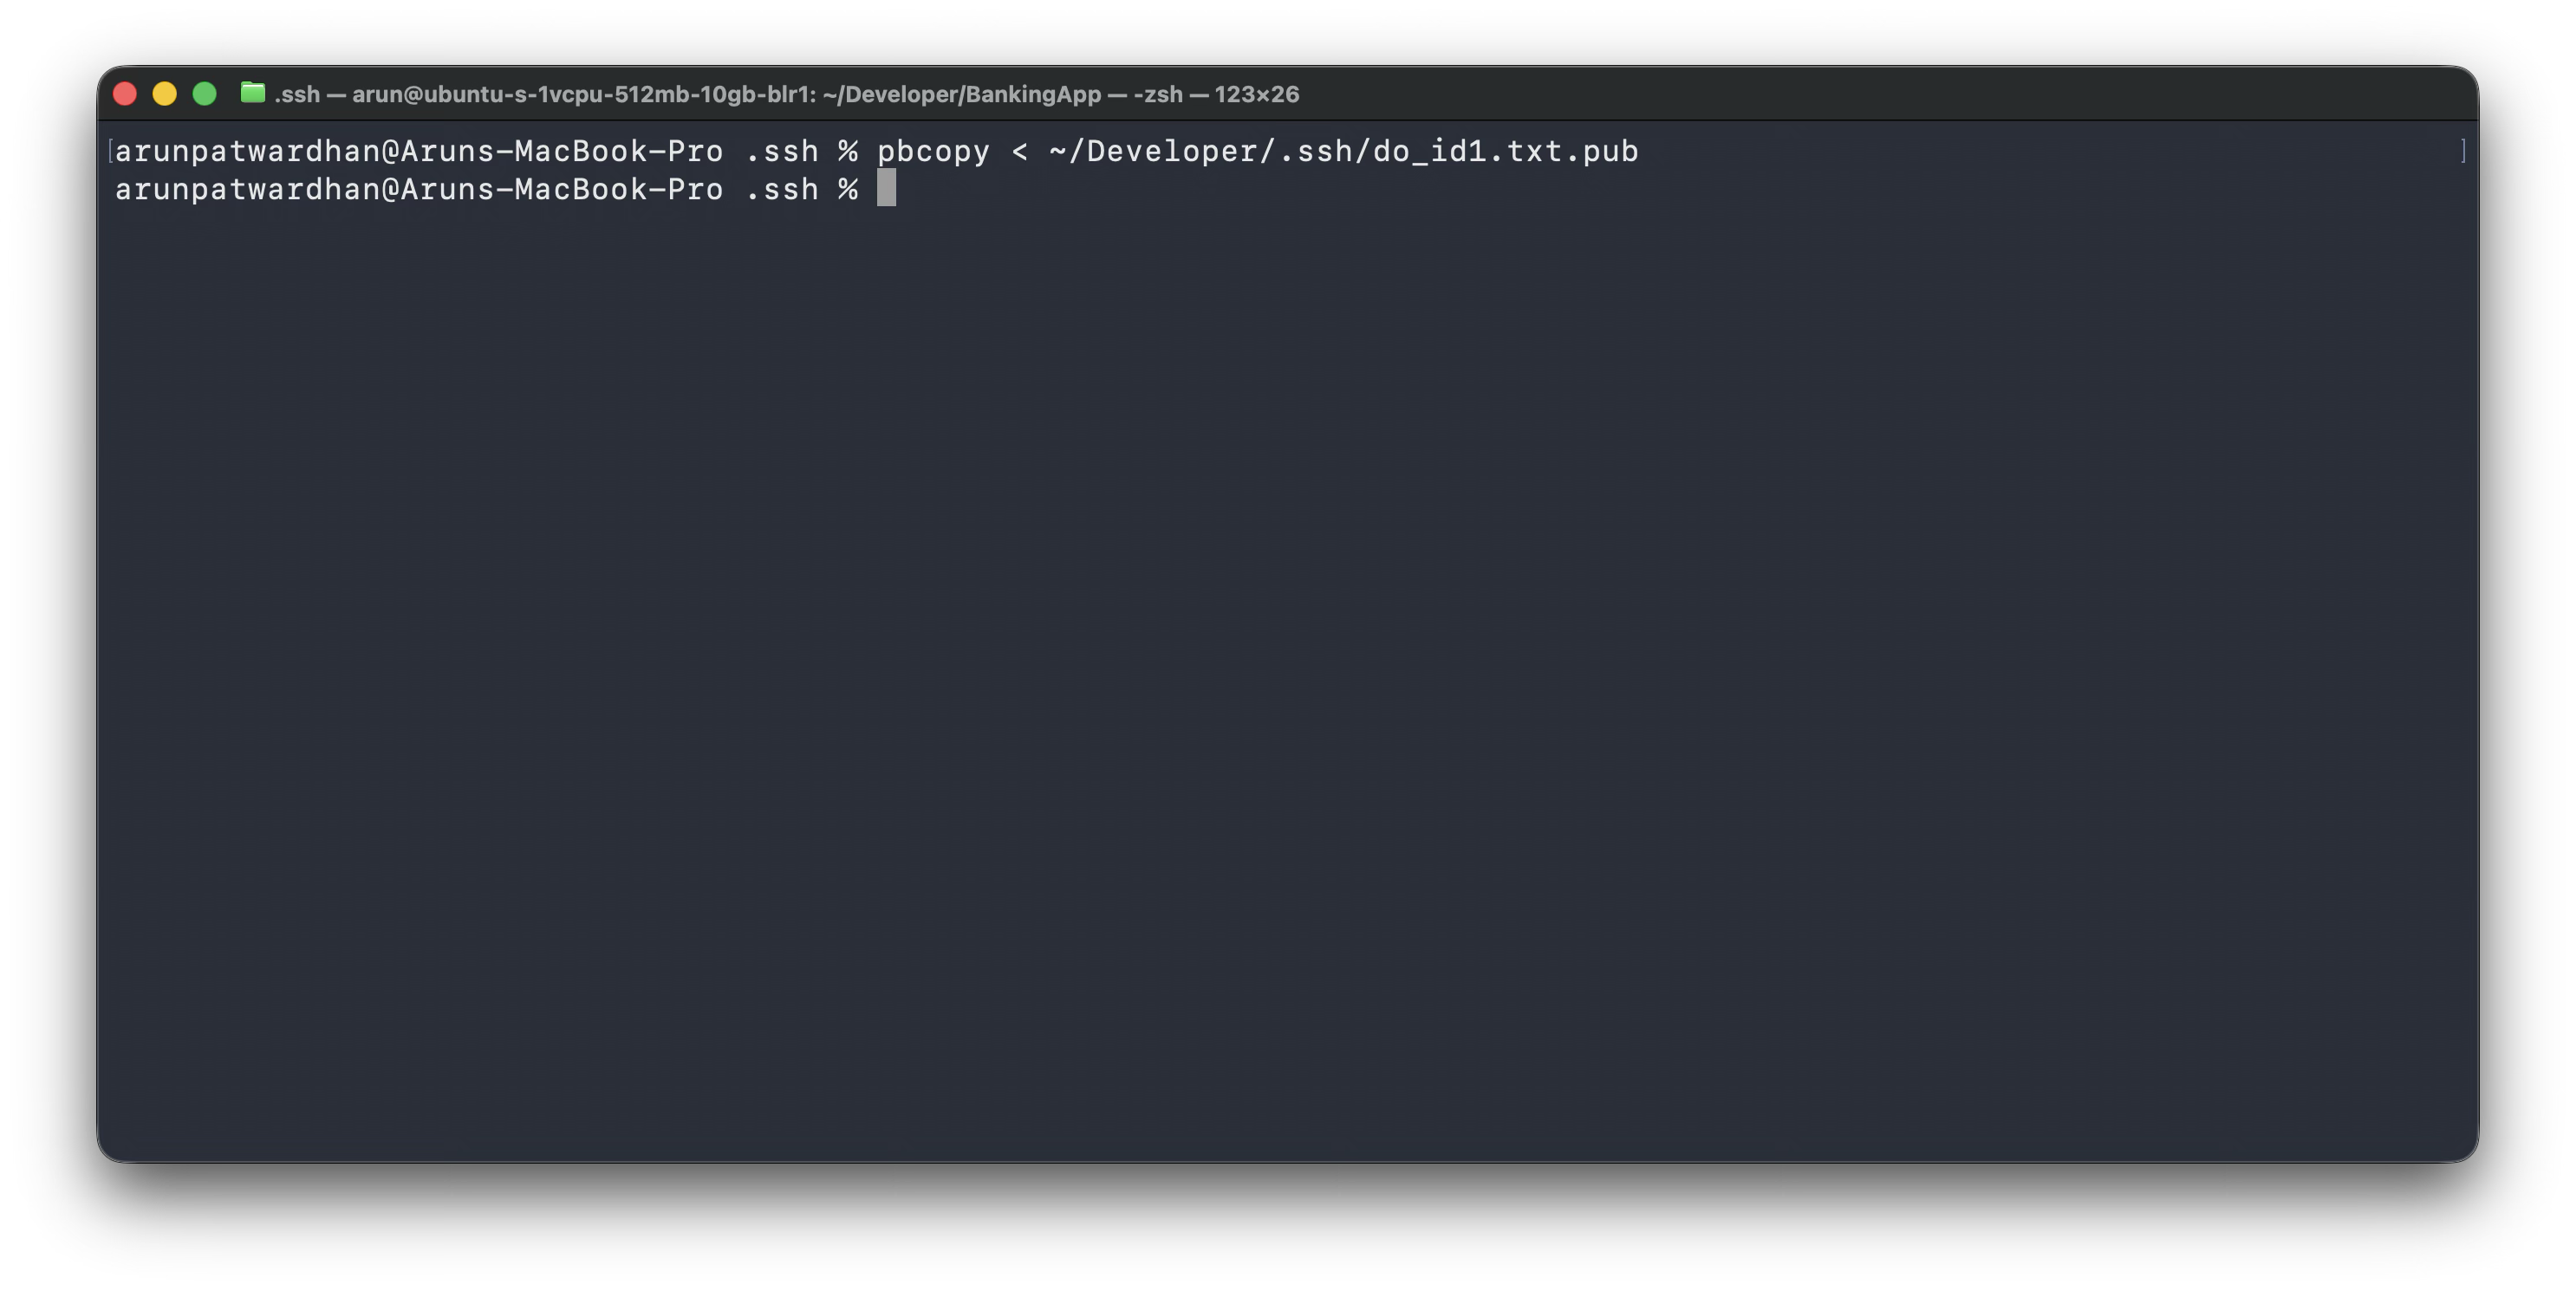
- We need to copy the public key and paste it into our DigitalOcean droplet. Run the command
to copy the public key:
pbcopy < ~/Developer/.ssh/do_id1.txt.pub
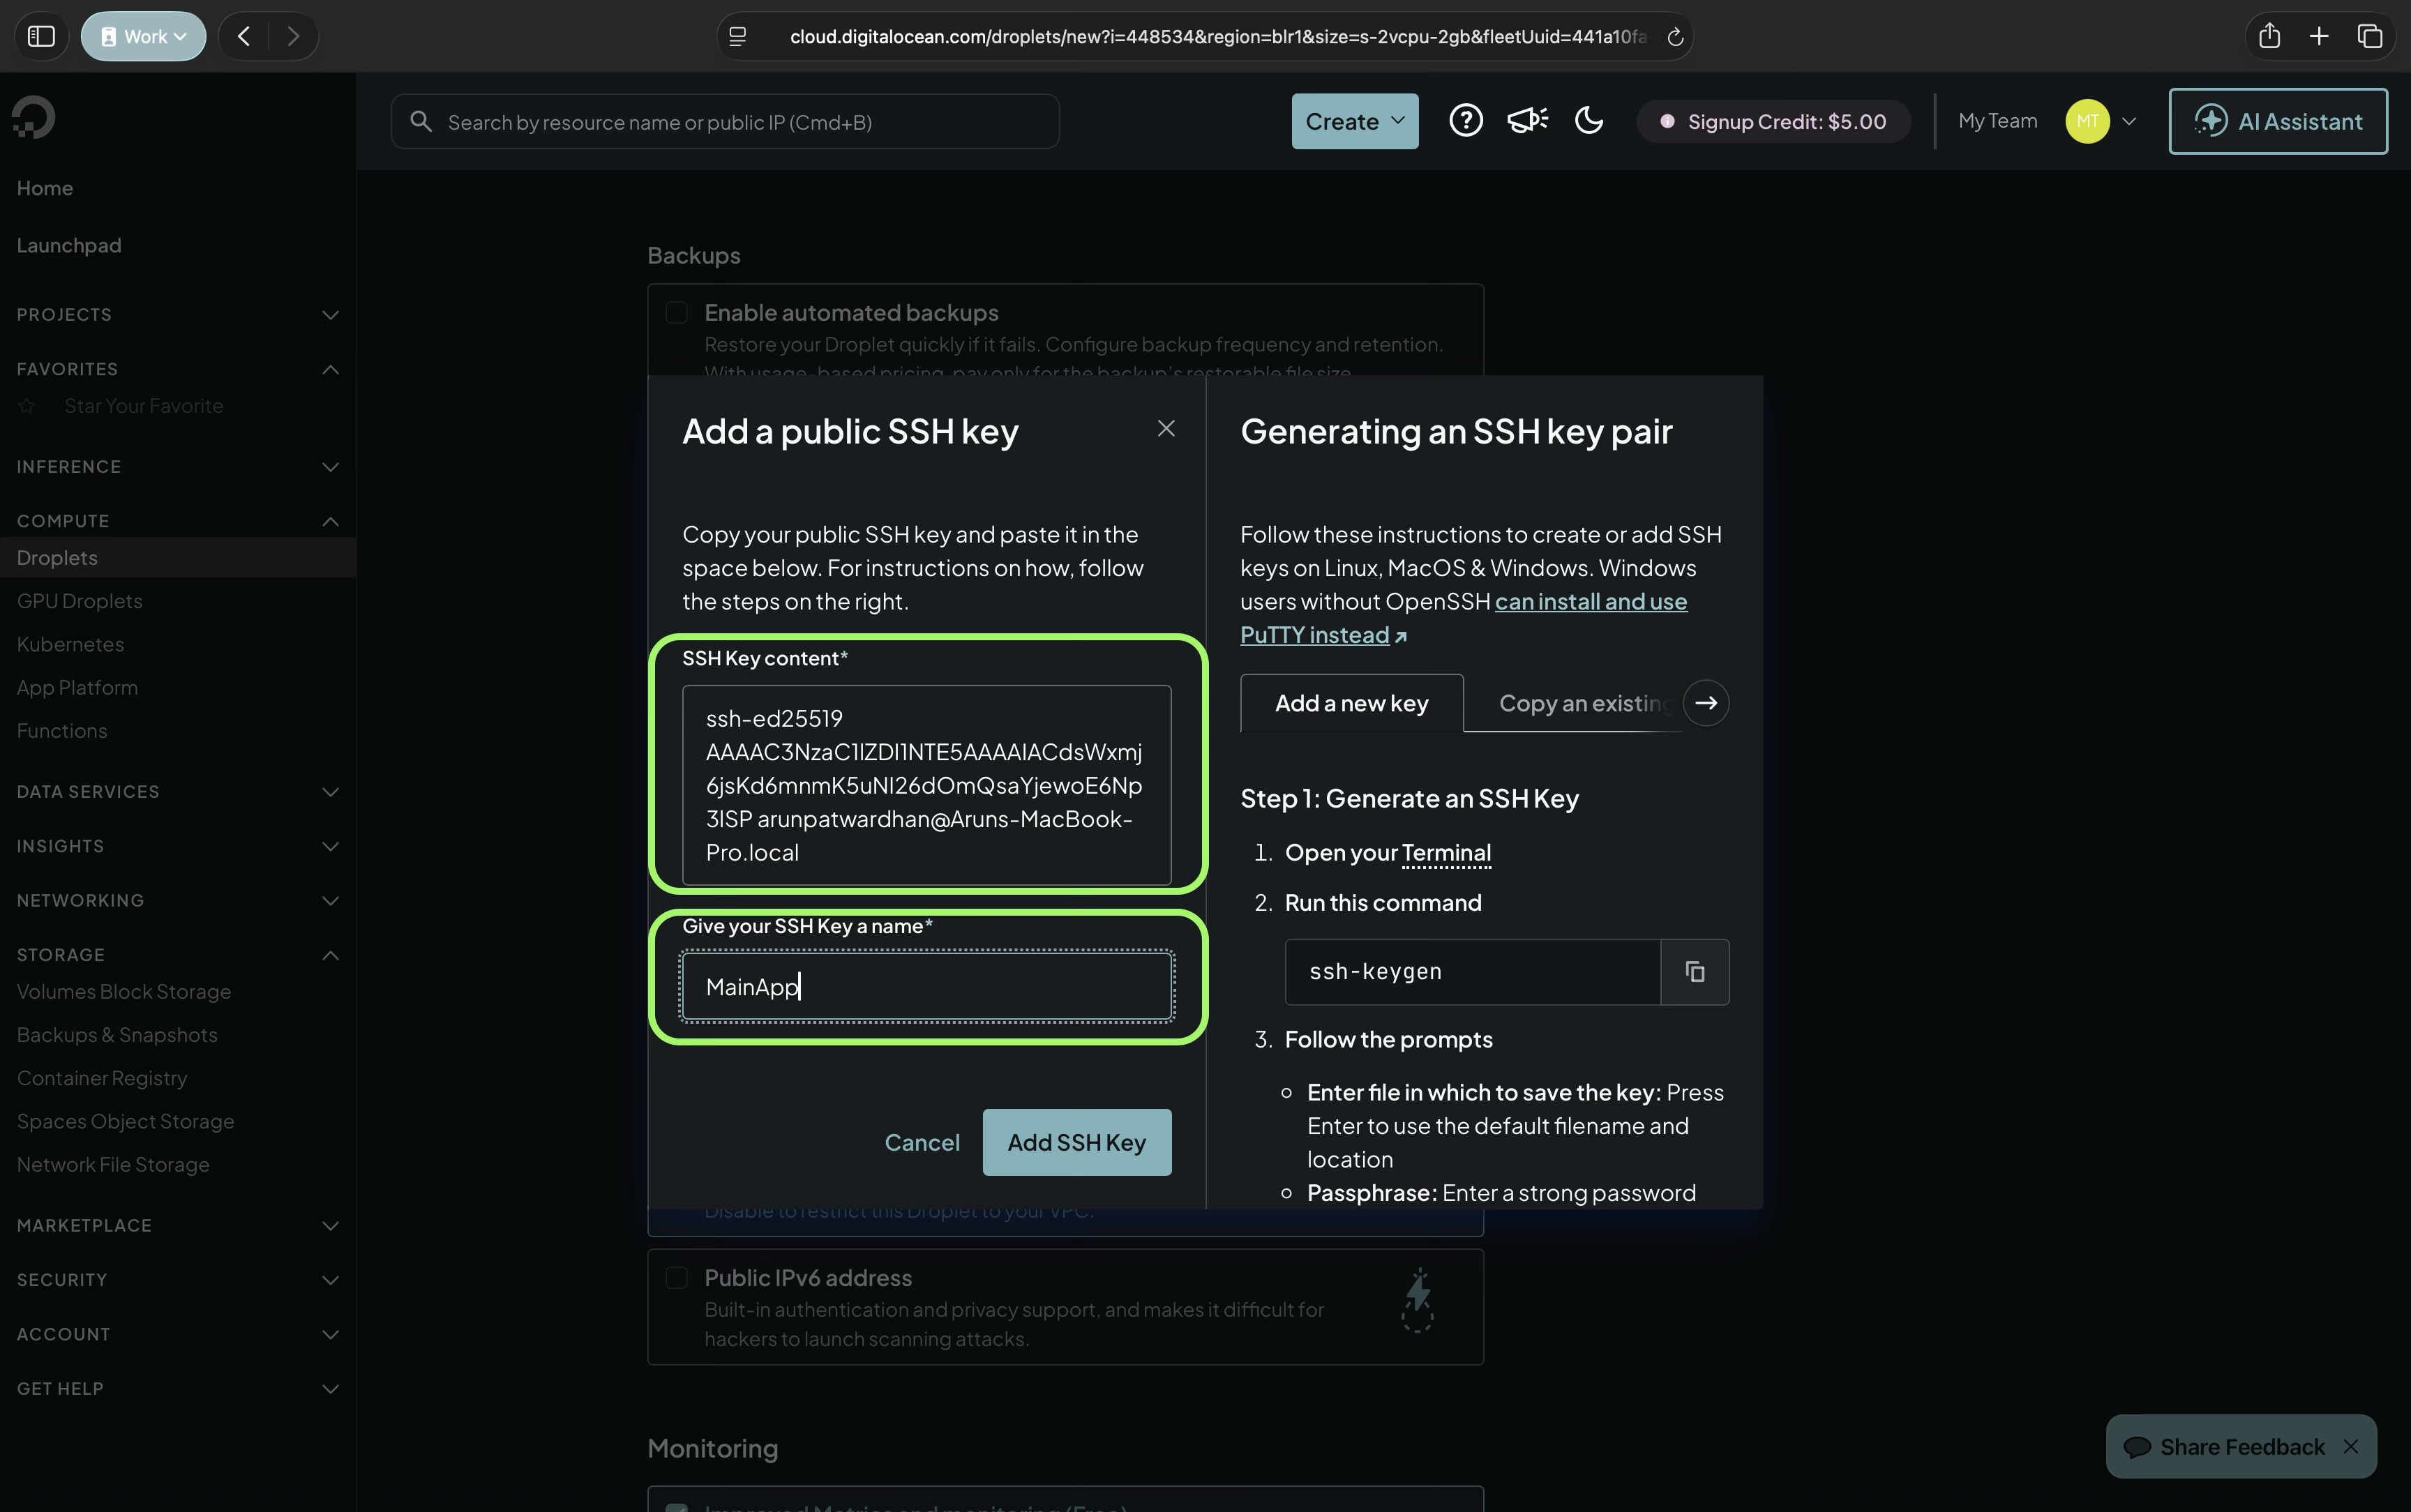
- Paste on the DigitalOcean portal.
- Give it a name.
- Finally click on ‘Add SSH key’.
- Select the key and create the droplet.
You will probably be prompted to add your credit card details.
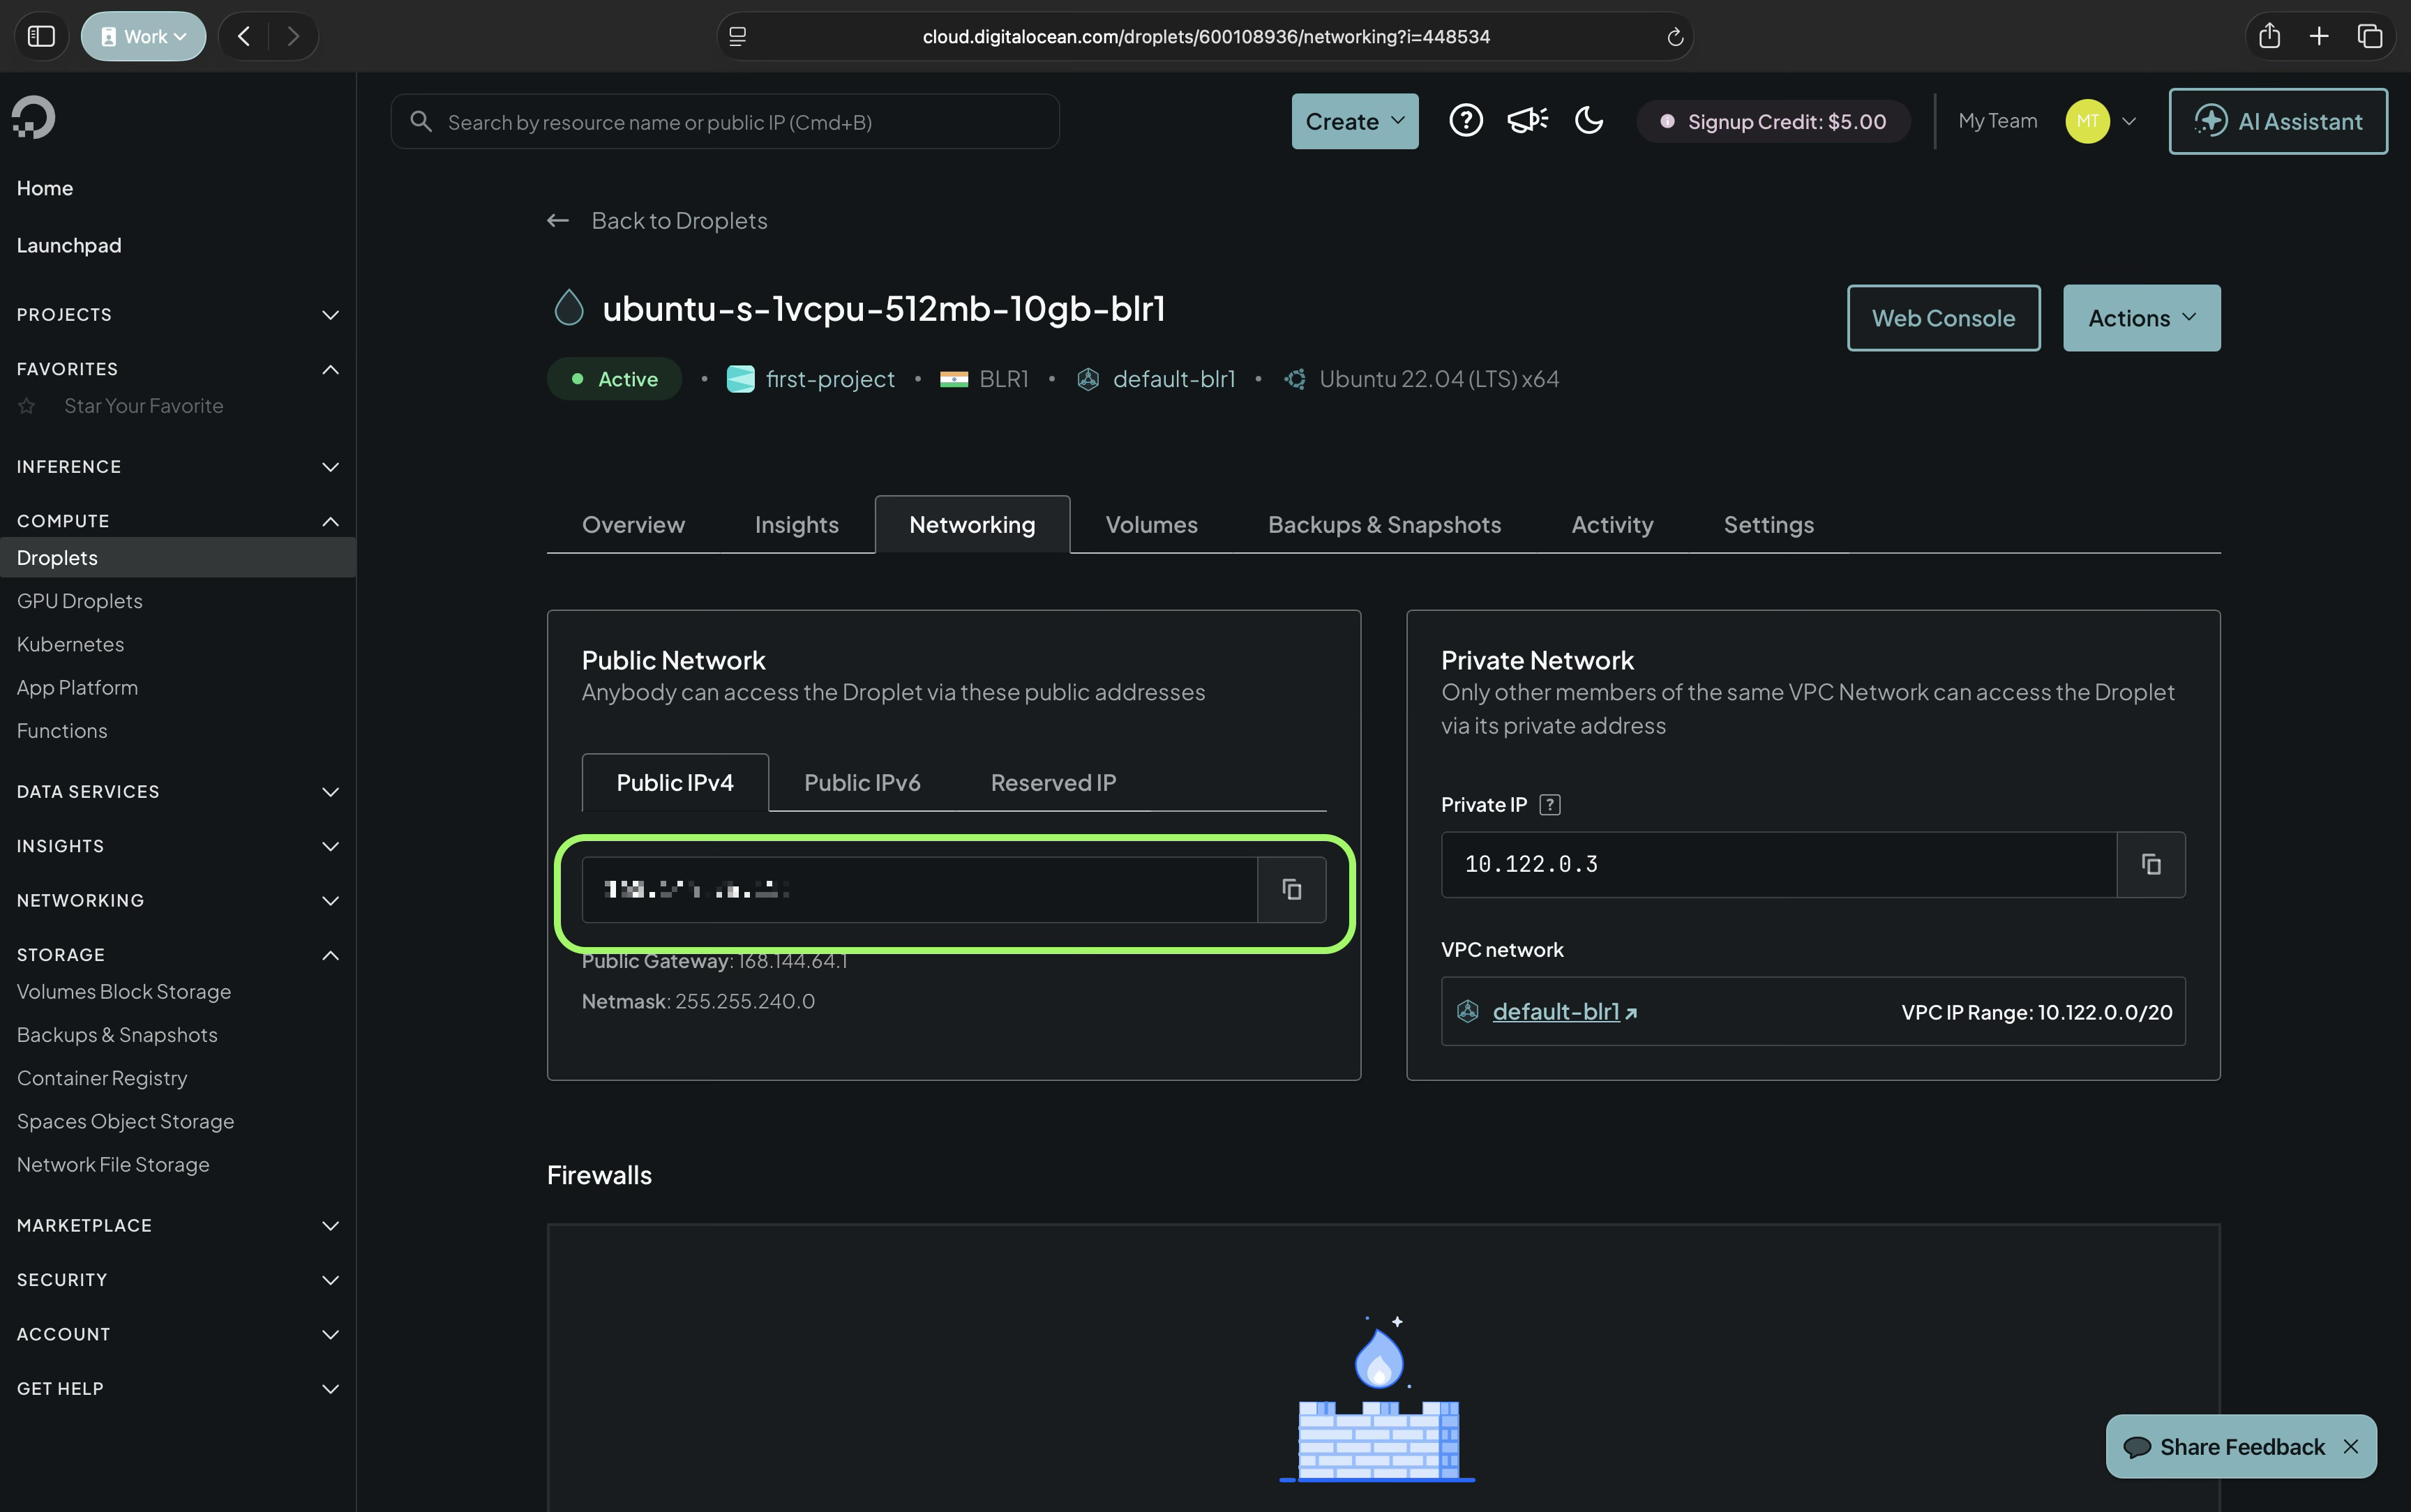
- Note down the public ip address.
- Now let us log in to our instance using SSH. Switch back to terminal.
- Change the permission on the key file to 600:
chmod 600 ~/Developer/.ssh/do_id1.txt
- Run the command to login:
ssh -i ~/Developer/.ssh/do_id1.txt root@<ip address>
- Enter the passphrase from step 17
- You should have logged in.
- Lets create a new account run the command:
adduser arun
- Answer the prompts
- Add user to sudo group:
usermod -aG sudo arun
- Allow OpenSSH through firewall:
ufw allow OpenSSH
- Enable firewall:
ufw enable
- Copy the keys from root user to our newly created user:
rsync --archive --chown=arun:arun ~/.ssh /home/arun
- Setup done.
- Now we will install Swift
- Run the command to install Swiftly:
curl -O https://download.swift.org/swiftly/linux/swiftly-$(uname -m).tar.gz && \
tar zxf swiftly-$(uname -m).tar.gz && \
./swiftly init --quiet-shell-followup && \
. "${SWIFTLY_HOME_DIR:-$HOME/.local/share/swiftly}/env.sh" && \
hash -r
You can get more information about Swiftly from https://www.swift.org/install/linux/
- Install Vapor we will do this by building from source.:
git clone https://github.com/vapor/toolbox.git
cd toolbox
git checkout 20.0.2
You can get information about building from source @ https://github.com/vapor/toolbox
Check the documentation to find out the latest version.
- Build Vapor and move the binary into your path.
make install DEST=/usr/local/bin/vapor
- Navigate to the folder where you wish to create the project. ~/Developer is a popular location. The rest of the activities assume that the project was created in the Developer folder. However, you can create it in any other location.
- Once you are in the desired folder run the vapor tool to create the server project
vapor new <server app name> -n
- This will create the server as a Swift Package. Navigate into the project folder. The folder name will be the same as the server app name mentioned in the command above.
- Open port 8080 or 443 depending on what you are configuring:
sudo ufw allow 8080
- Run the server using the command:
swift run App serve --hostname 0.0.0.0 --port 8080
Our server is ready to host.
Transfering files to our Droplet
In most situations we wll have developed our server on a Mac. We will wish to transfer these files to the Droplet. Let us look at the steps involved in this.
- Download and install FileZilla on the computer from where you want to transfer the files. https://filezilla-project.org/download.php?platform=macos-arm64
- Open FileZilla
- Go to Settings > Connection > SFTP and upload the key txt file.
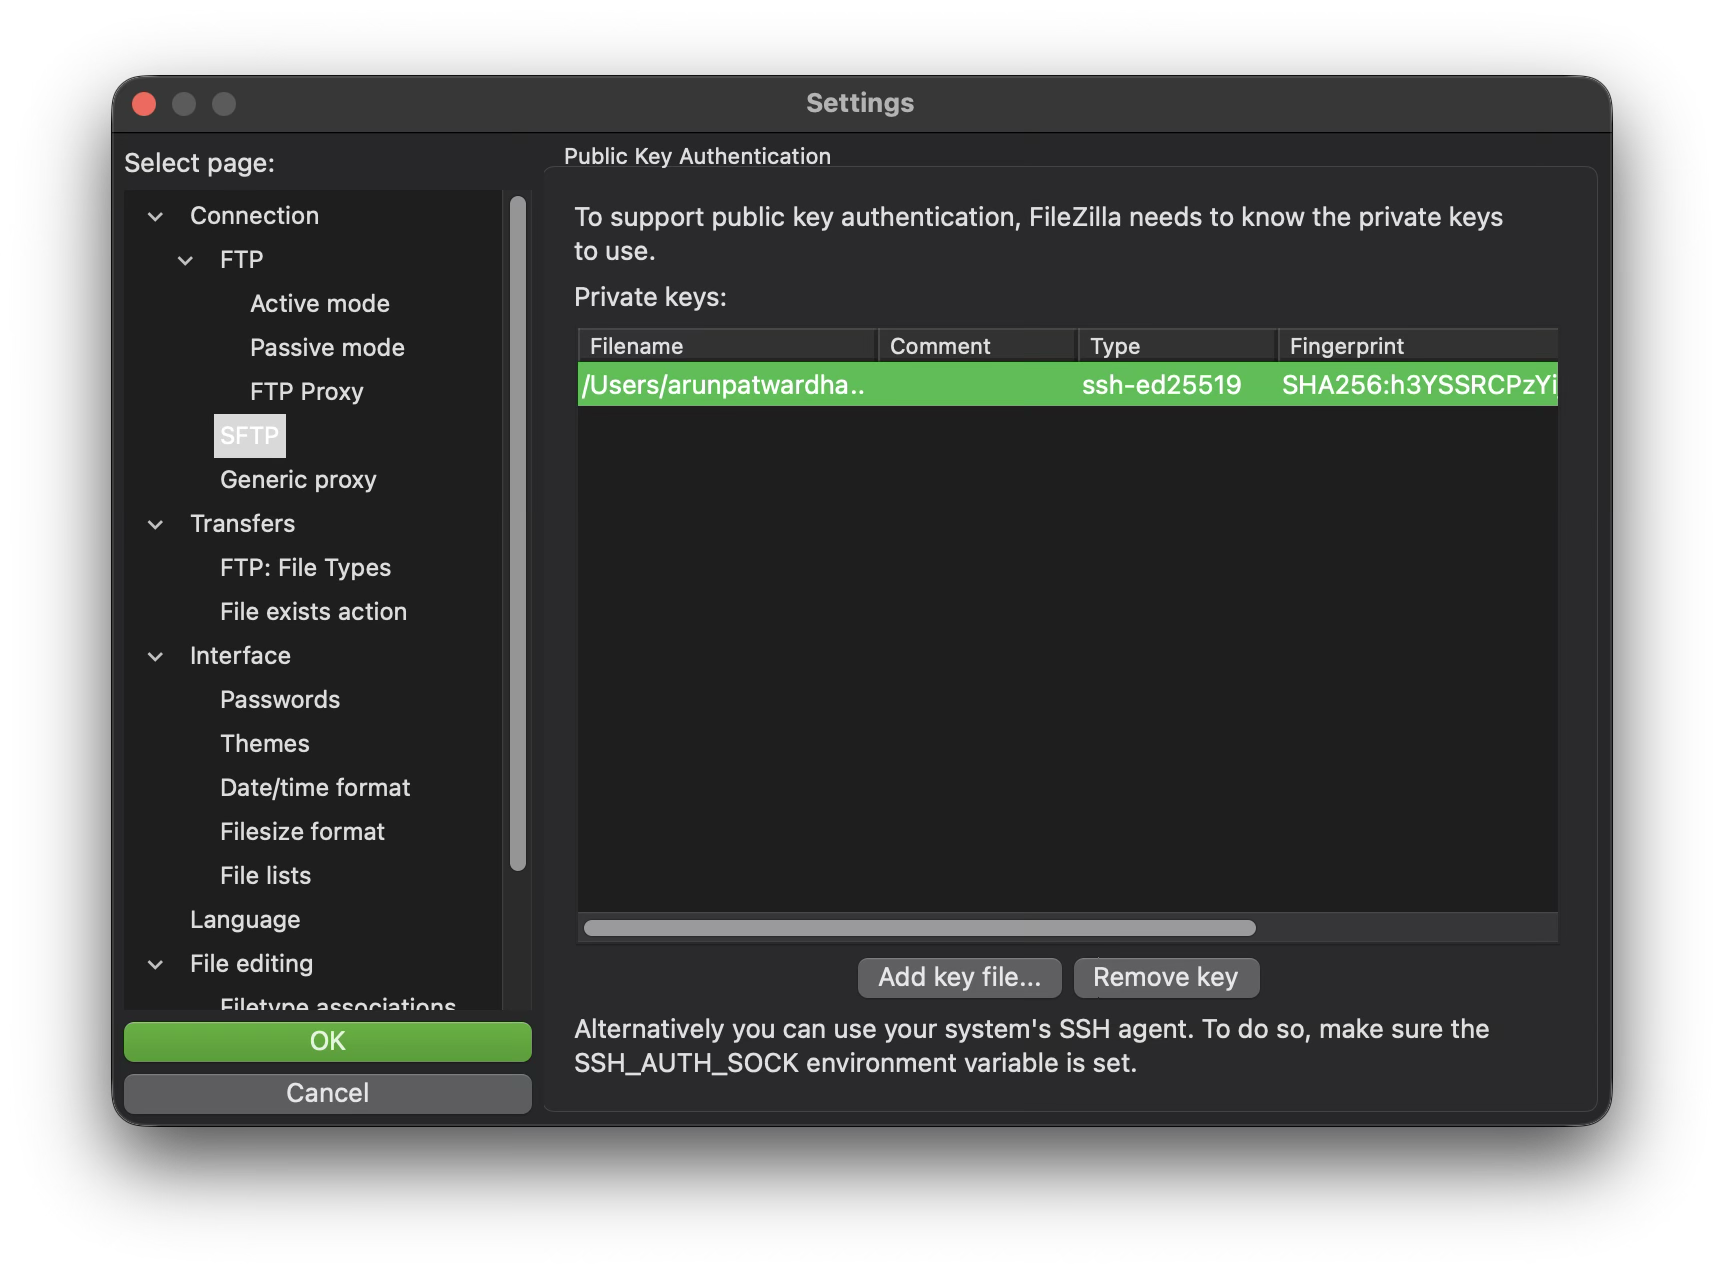
- Click ok.
- Open Site manager.
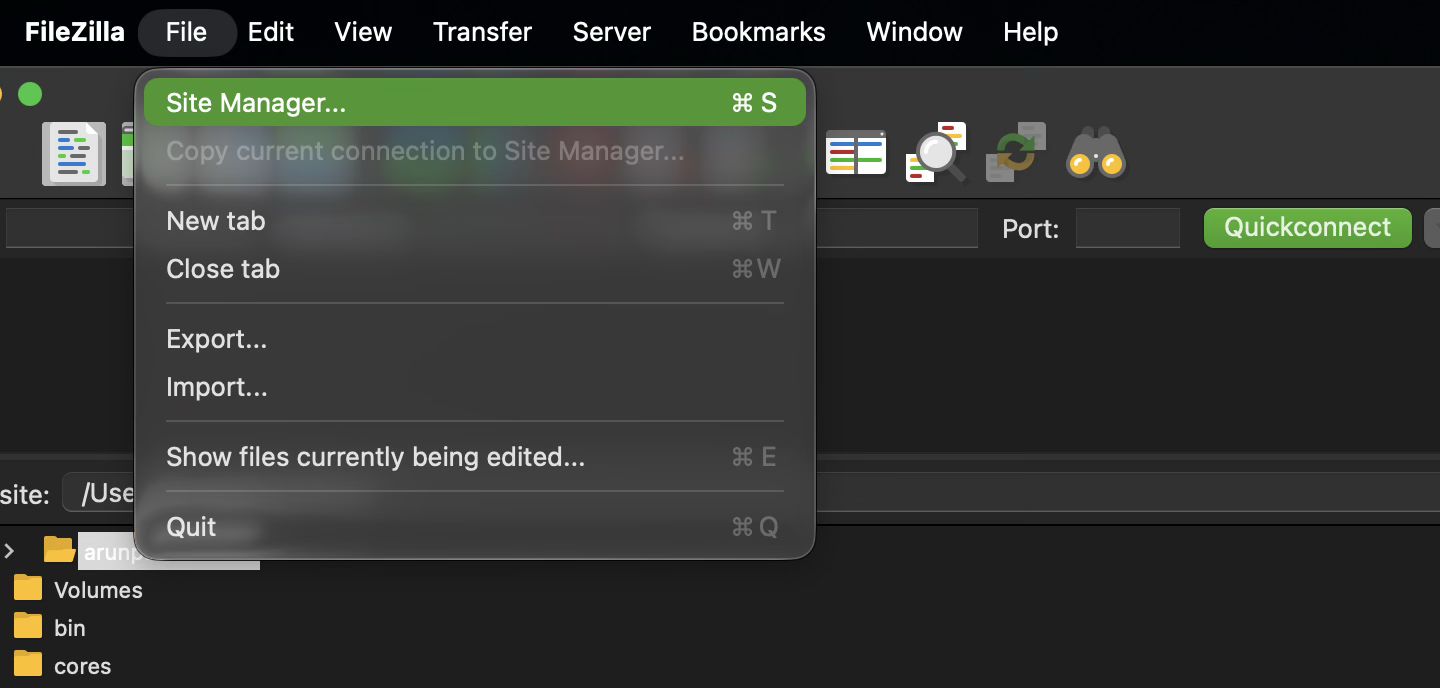
- Click on New Site.
- Name it droplet
- Set the protocol, host name, port, user name and login type, and key file.
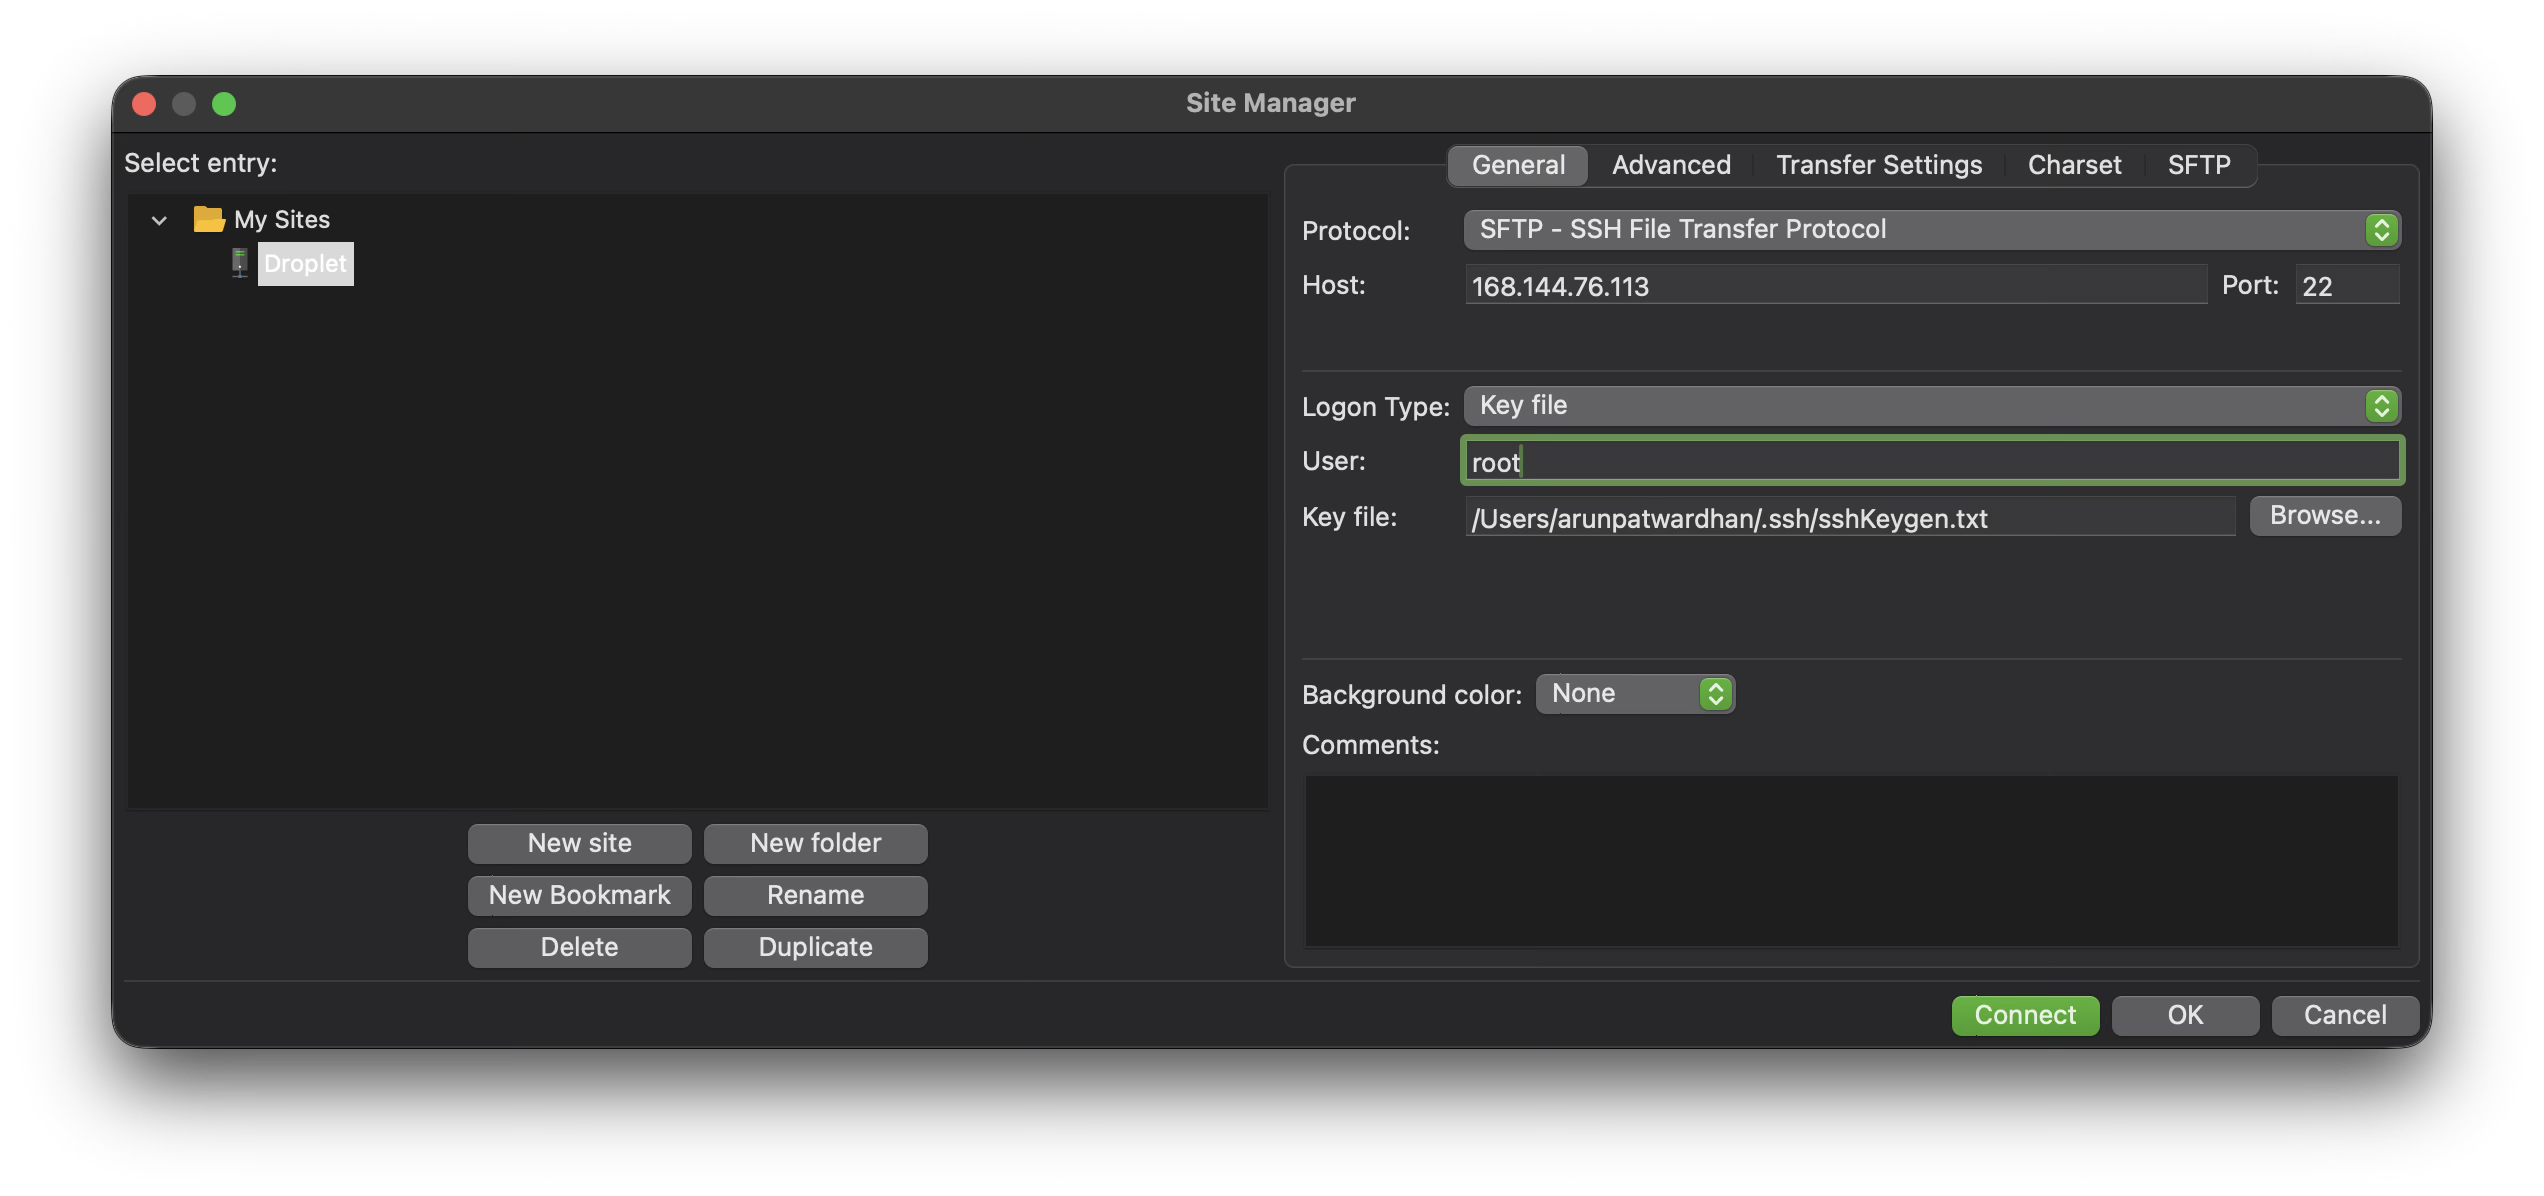
- Click on Connect.
- If prompted to save passwords select “Do not Save”.
- If you get an unknown host key simply click ok.
- Enter the passphrase which you entered when you created the keys.
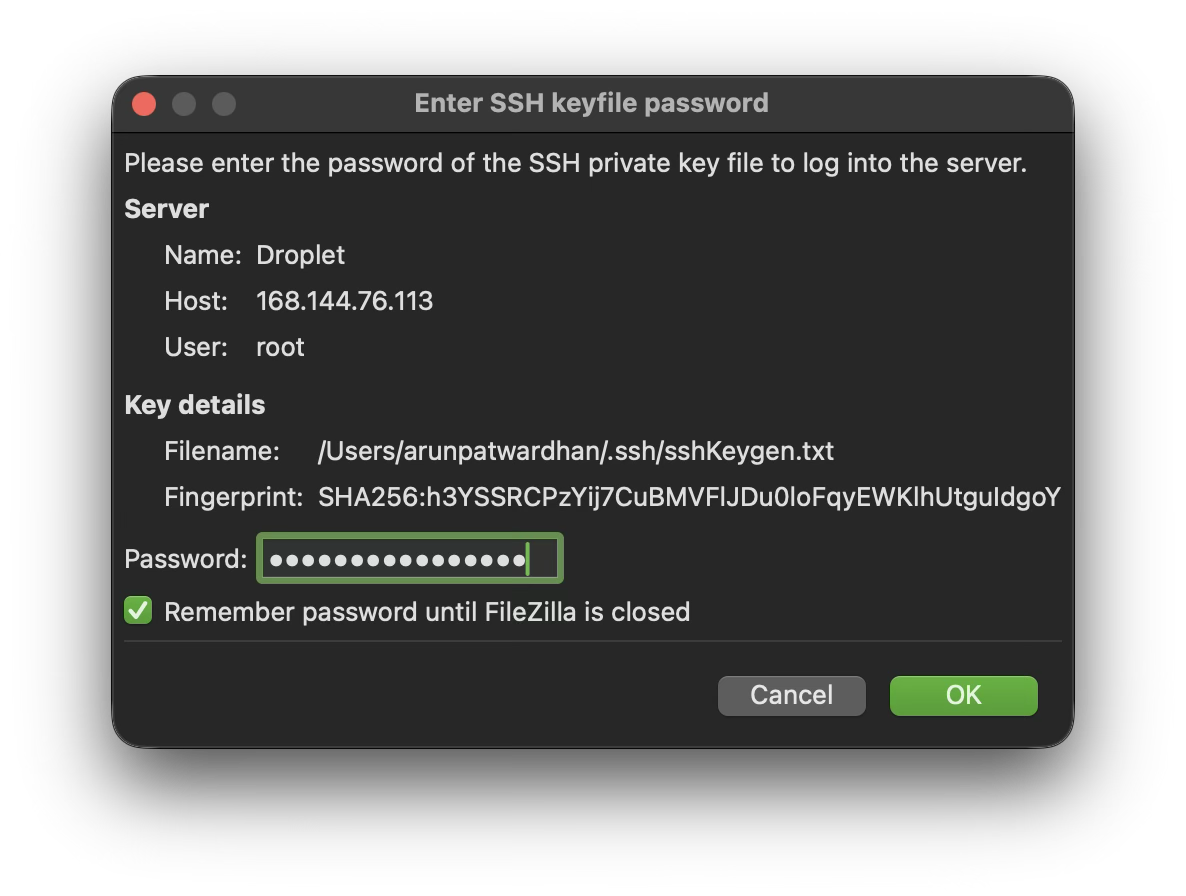
- Click ok.
- You are connected and should see the folders on the right hand side.
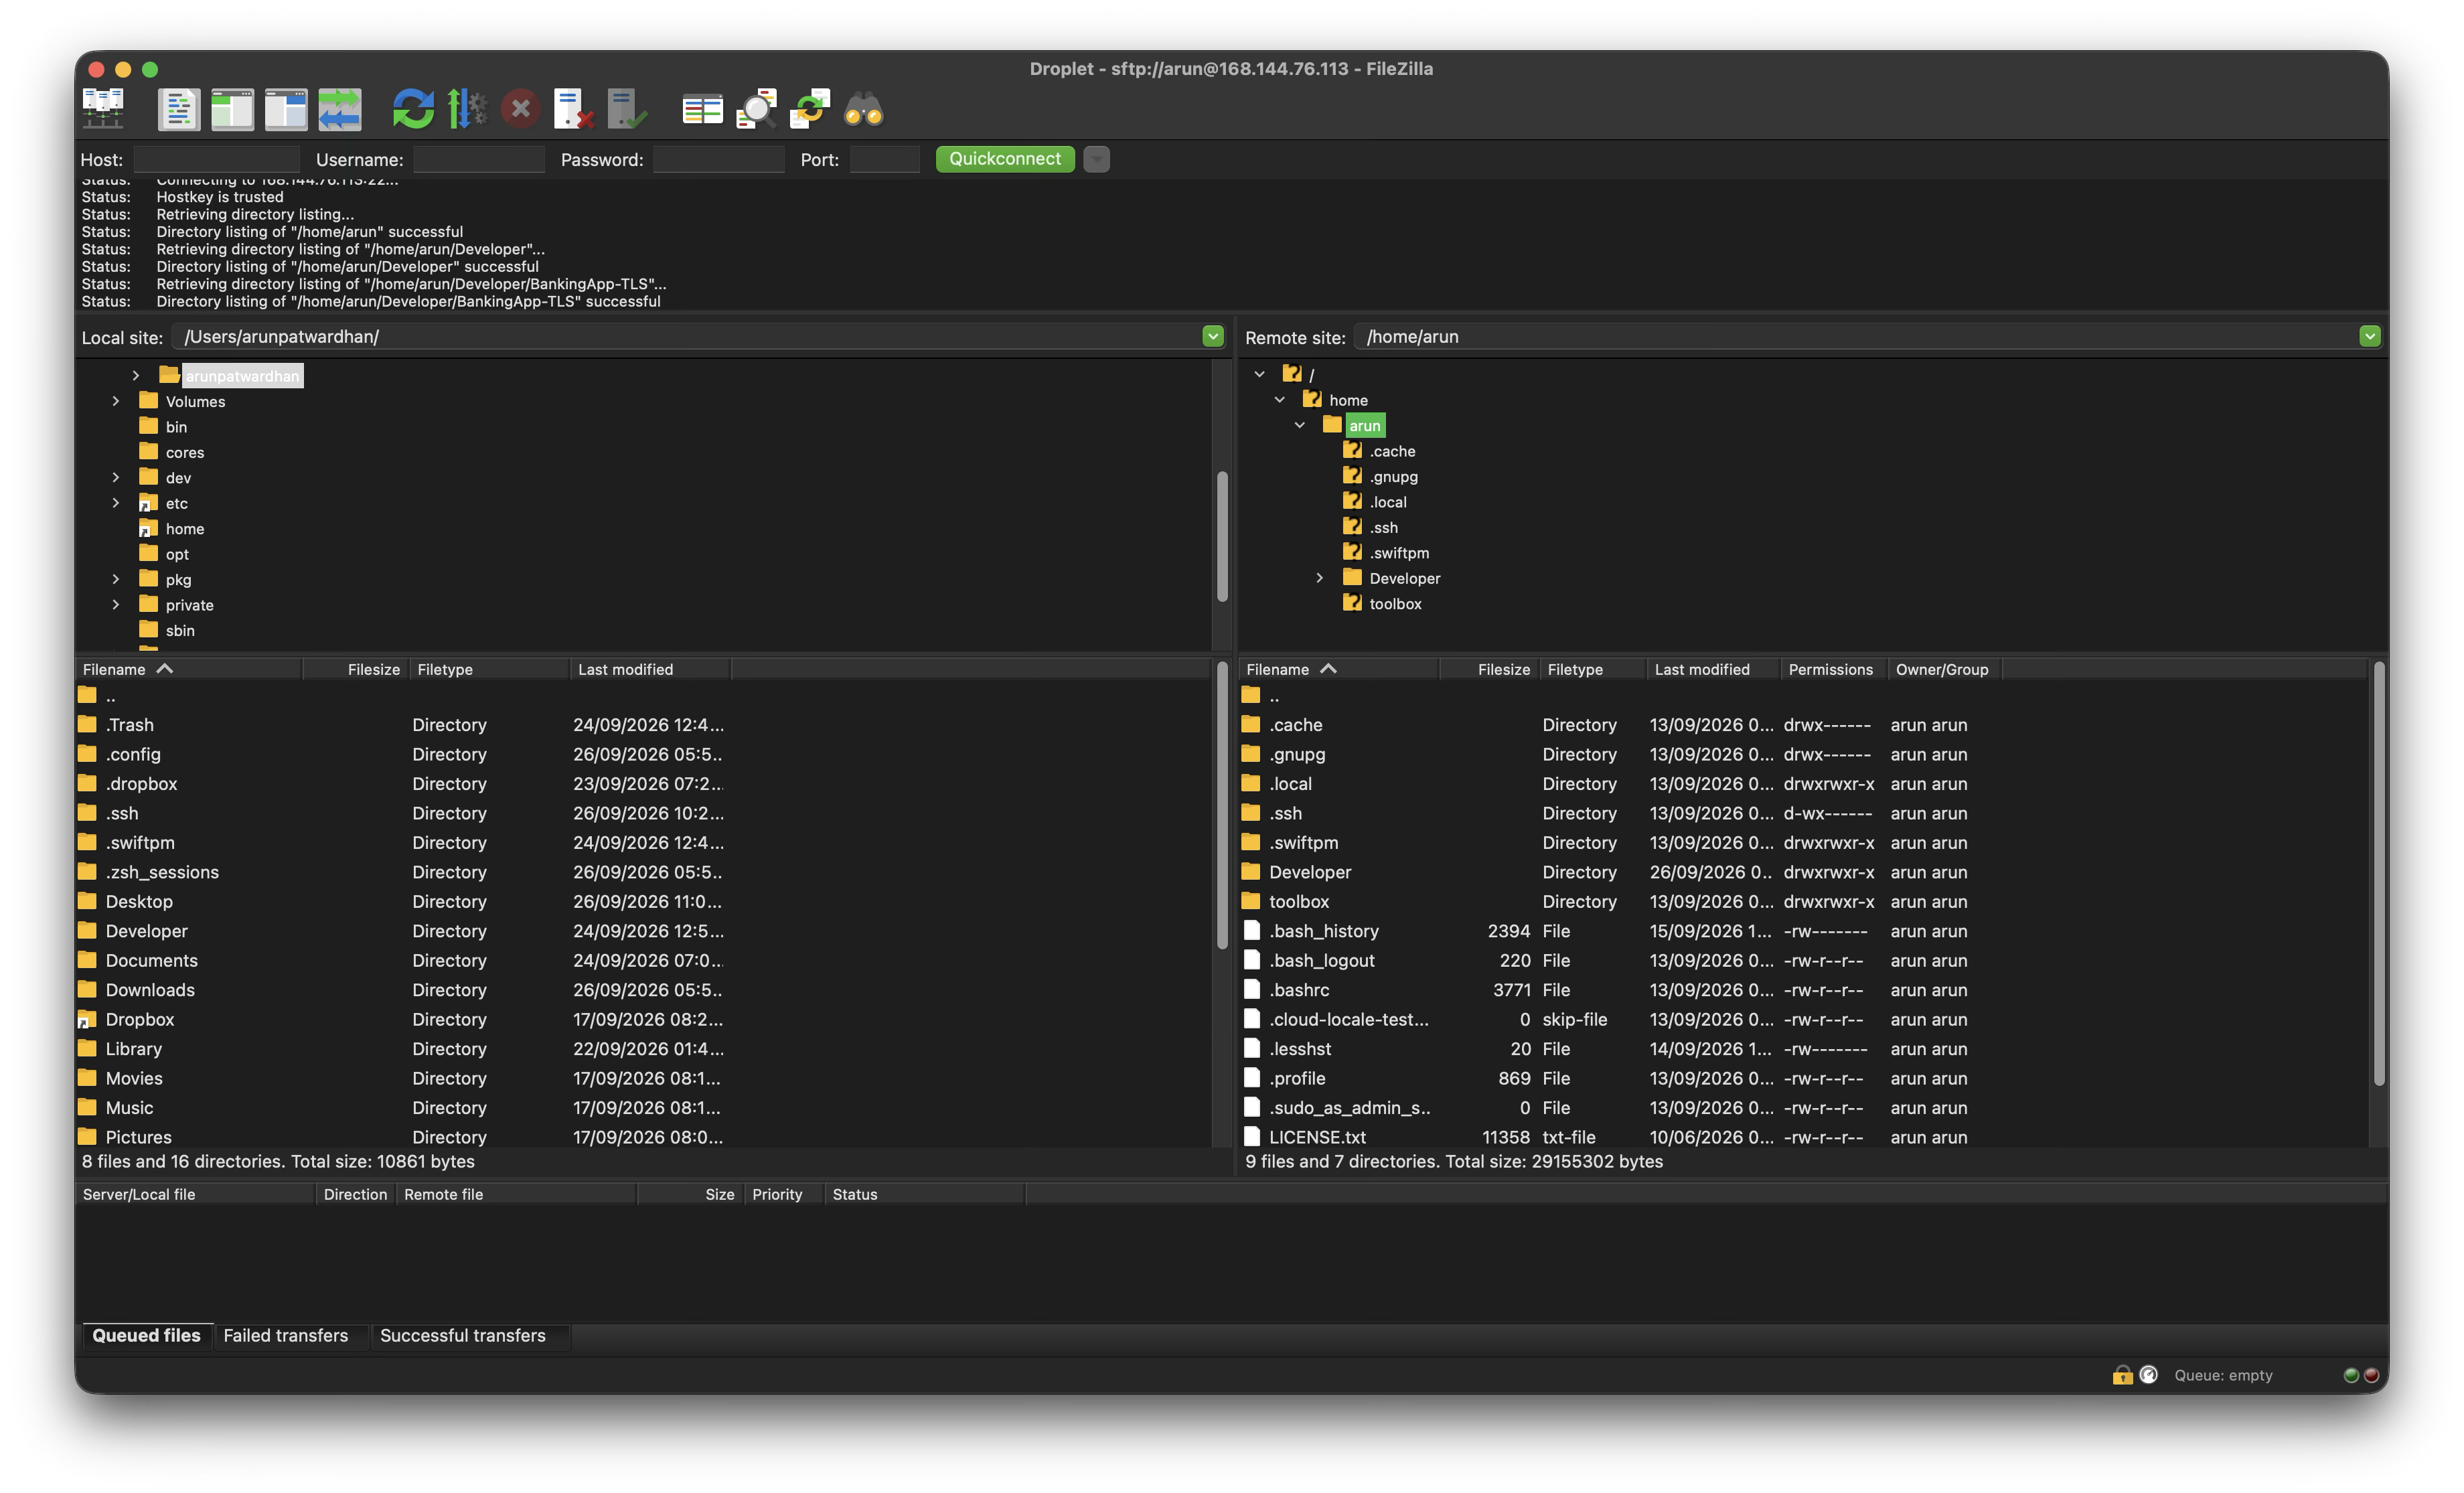
- Simply drag the files from the right hand side to the left hand side.
- To test the app start the server as show in step 45 on hosting a droplet. Then use the iOS App created earlier. The URL will have to be updated to match the Droplet’s URL. If everything is onfigured well then you should have an app that connects to the server properly.
Useful Links
Vapor Documentation
DigitalOcean droplets
Installing Swift on Linux
You can download the completed projects from the links below.
Sample Vapor server project
Sample client app
https://github.com/AmaranthineTech/CommunicationServerClient

