In an earlier article we discussed how to create documentation for Swift projects and frameworks. In this article we will look at how to use DocC to generate documentation for shell scripts.
DocC is a documentation rendering tool built into Xcode that allows developers to easily build documentation for their code. Traditionally, developers would create documentation for their code via comments and then separately create documentation files for reference for other developers. DocC combines the 2 steps into a single step, making it easy for developers to write documentation and for others to read that documentation.
With a little modification we will be able to do the same for our shell scripts.
NOTE: We will be making use of concepts covered in an earlier article. Please make sure you go through that before going through the steps.
Adding DocC documentation for shell scripts
DocC is designed to help app developers easily create documentation for their code. So as such it is geared towards creating documentation for that. However, we can tweak things a little bit and use this process for our scripts.
We will be creating a macOS App project.This will act as a starting point. Don’t worry! We won’t be writing any code. You do not need to learn any programming language for this. So lets begin.
Open Xcode
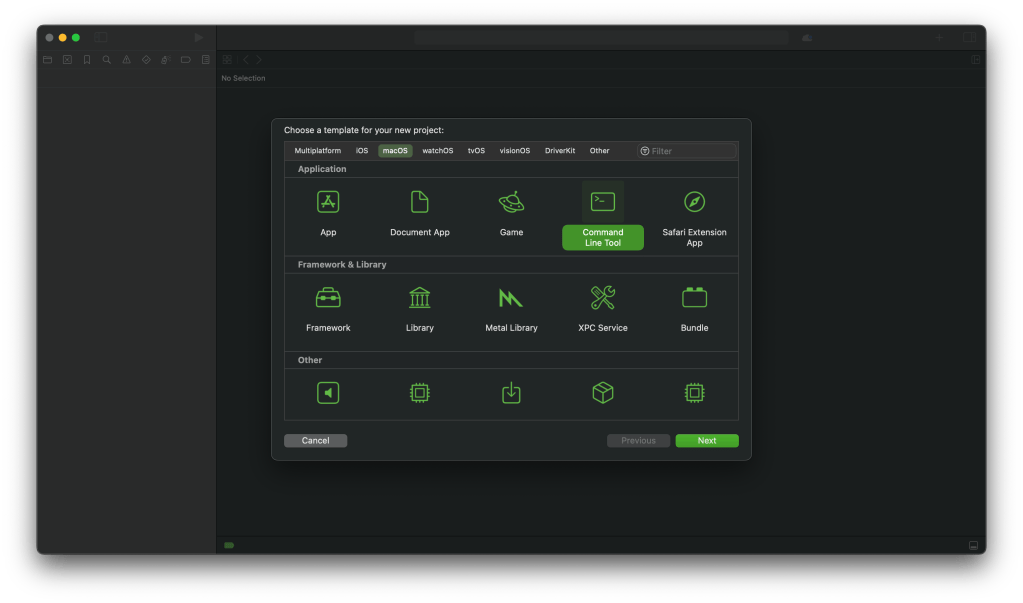
Create a new macOS app project. Select File > New > Project from the menu bar.
Choose “Command line” from the template wizard.
Call it “FolderCreator” as thats the script we are using in this demo.
Provide your company’s url in reverse format as the Organisation identifier. For example, com.companyname, org.organisationname, and so on.
Choose the language as Swift. Save it on the desktop.
Add the script file to your project. We will be using the script from our scripting series. You can find the script here.
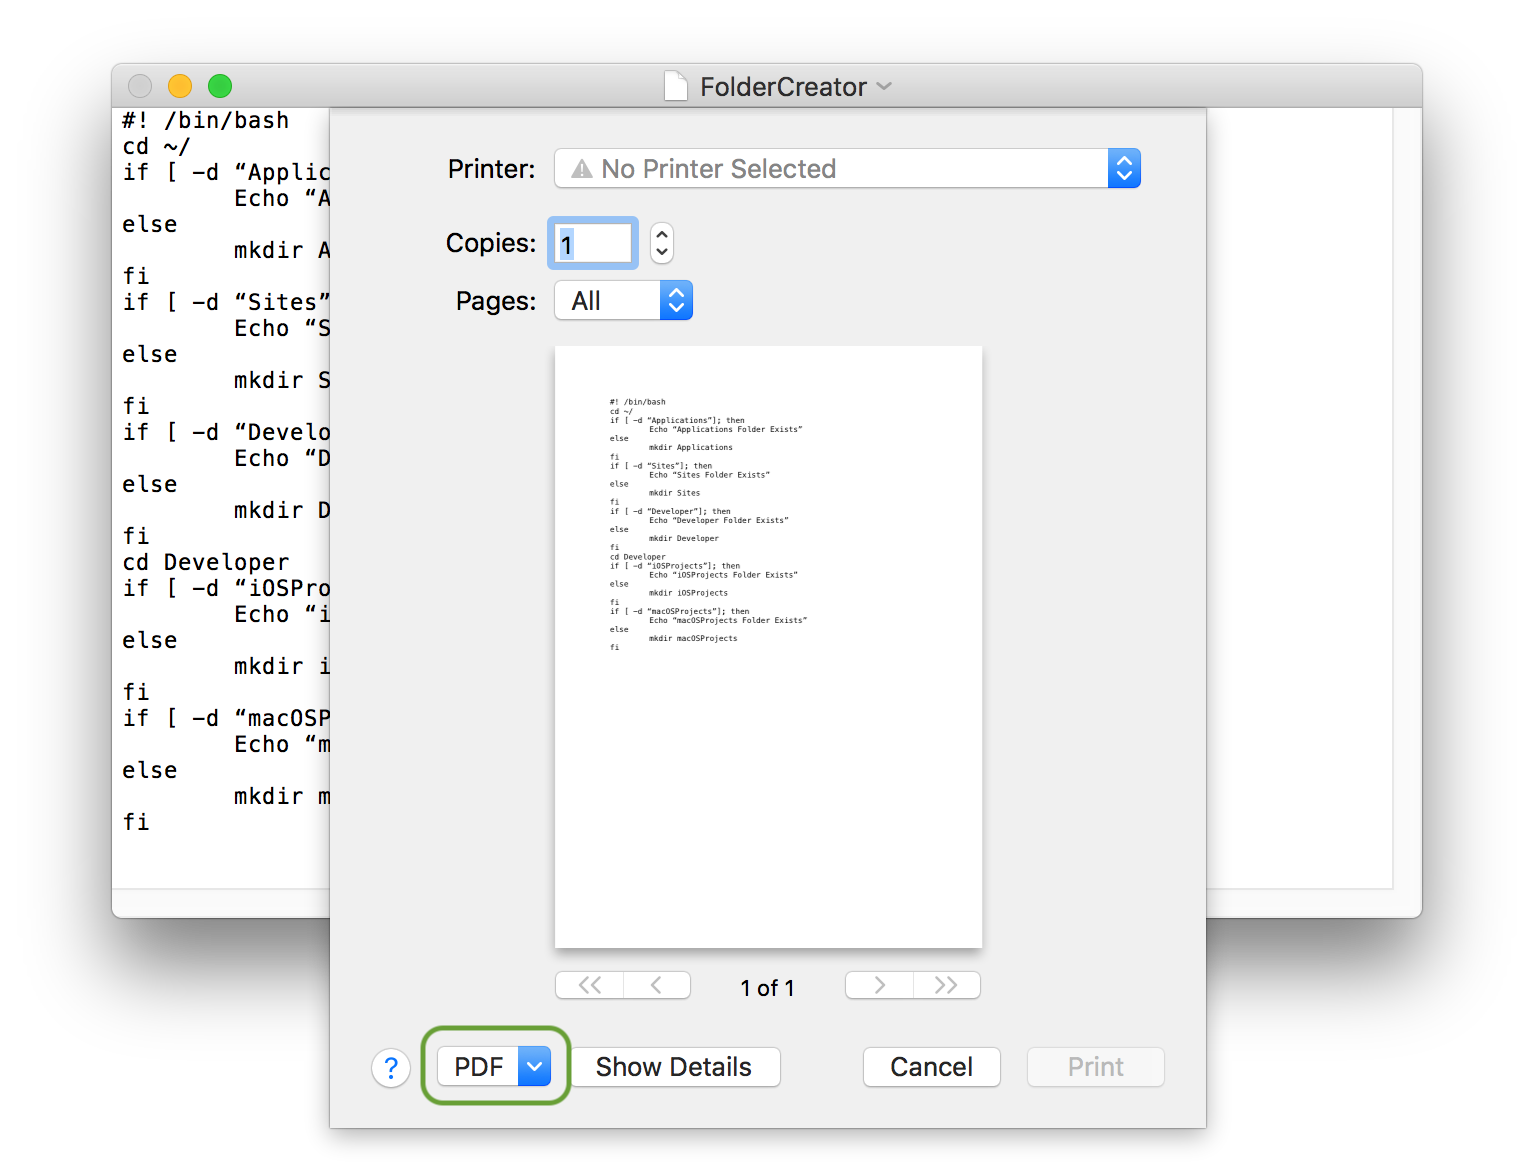
If we go ahead and build the documentation then we won’t find anything helpful. That’s because the documentation compiler is designed to read code and not our script. So it doesn’t contain anything useful. We will have to build the documentation for our script manually. Lets start by adding the documentation catalog. Select File > New > File, under the documentation heading select documentation catalog.
We will add metadata that specifies that this is the documentation for a script. The formatting style is similar to that of markdown documents. Much like the readme files you find in github.
We will add a description, a table listing out the different articles and a topics section that references articles.
Finally we will add a tab navigator to reference external links and resources.
Your completed file should look like:
# ``FolderCreator``

@Metadata {
   @TitleHeading("Shell Script")
}

This script is used to create folders.

## Overview

This script is used to create upto 3 folders on the computer.

| Topic        | Description  | Link |
| ---------    | --------------------------------------- | ---------- |
| License      | License information | <doc:LicenseInformation> |
| History      | Version history | <doc:History> |
| Usage        | How to use the script | <doc:Usage> |
| Requirements | Prerequisites for running the script | <doc:Requirements> |
| Installation | How to install the script | <doc:Installation> |
| Help | Getting help | <doc:Help> |
| Script | Script file for reference | <doc:ScriptFile> |
| Man page | Man page file for reference | <doc:ManPage> |
| Download files | Download the different script versions | <doc:DownloadFiles> |
| Learn scripting | Blog article on learning how to write scripts | <doc:LearnScripting> |

## Topics

### Articles
- <doc:Help>

### Downloads
- <doc:DownloadFiles>

### Tutorials
- <doc:LearnScripting>

@TabNavigator {
   @Tab("Github page") {
       [https://github.com/AmaranthineTech](https://github.com/AmaranthineTech)
   }


   @Tab("Blog") {
       [https://arunpatwardhan.com](https://arunpatwardhan.com)
   }


   @Tab("Youtube") {
       [Amaranthine YouTube Channel](https://www.youtube.com/@amaranthine5616)
   }
}
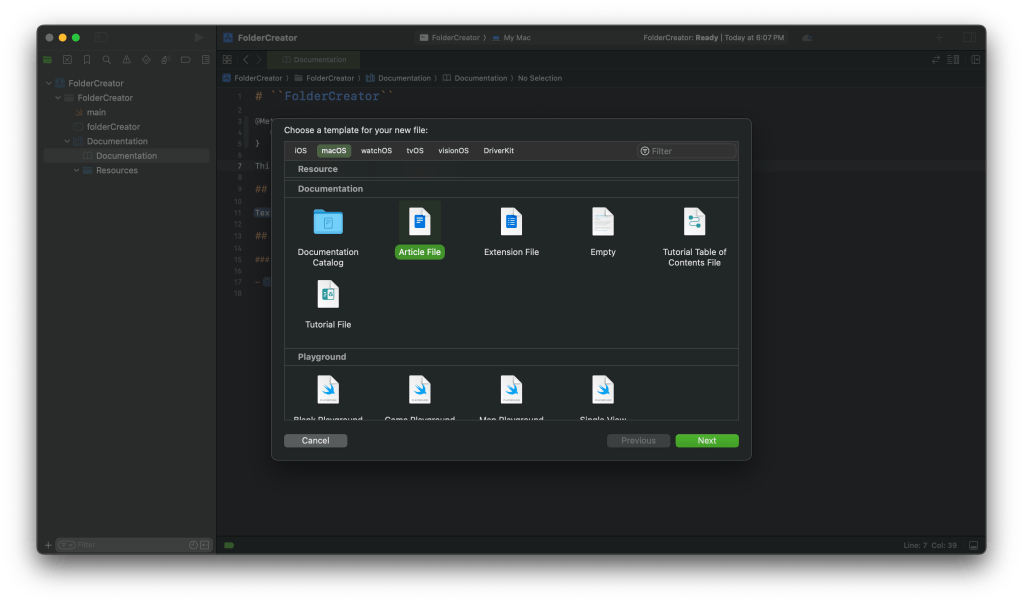
Let us add and article. We will add an article for usage. Click on File > New > File. Select Article from the template wizard.
In the overview add the information about using our script.
Your completed file should look like this:
# Usage

How to run the script

## Overview

 - To create folders with default names run the command:
```shell
folderCreator
```
 - To define your own folder names:
```shell
folderCreator <folder1> <folder2> <folder3>
```

 - Available options  : Only the help option is available
 - Getting help       : Use the -h or the -help options to get more information. Or you can use the man command to view the man page. Provided the man page was installed along with the command.
```shell
folderCreator -h
folderCreator -help
man folderCreator
```
> Important: It is assumed that the man page for the script has been deployed before use. For more information on how to deploy the man page visit [Shell scripting in macOS – Part 10: Distribution](https://arunpatwardhan.com/2023/02/02/shell-scripting-in-macos-part-10-distribution/). You can also view the <doc:Installation> article.
Similarly add articles for Help, History, License information, Requirements, Learn scripting, Installation, and Download files. You can look at the comments from the script to build the information.
Add an article that will show the raw manpage file.
Copy and paste the entire manpage in that file as an “md syntax.
Your completed page should look like:
# ManPage
@Metadata {
    @PageKind(sampleCode)
    @CallToAction(url: "https://github.com/AmaranthineTech/ShellScripts/blob/main/folderCreator.1", purpose: link)
}
Man page file
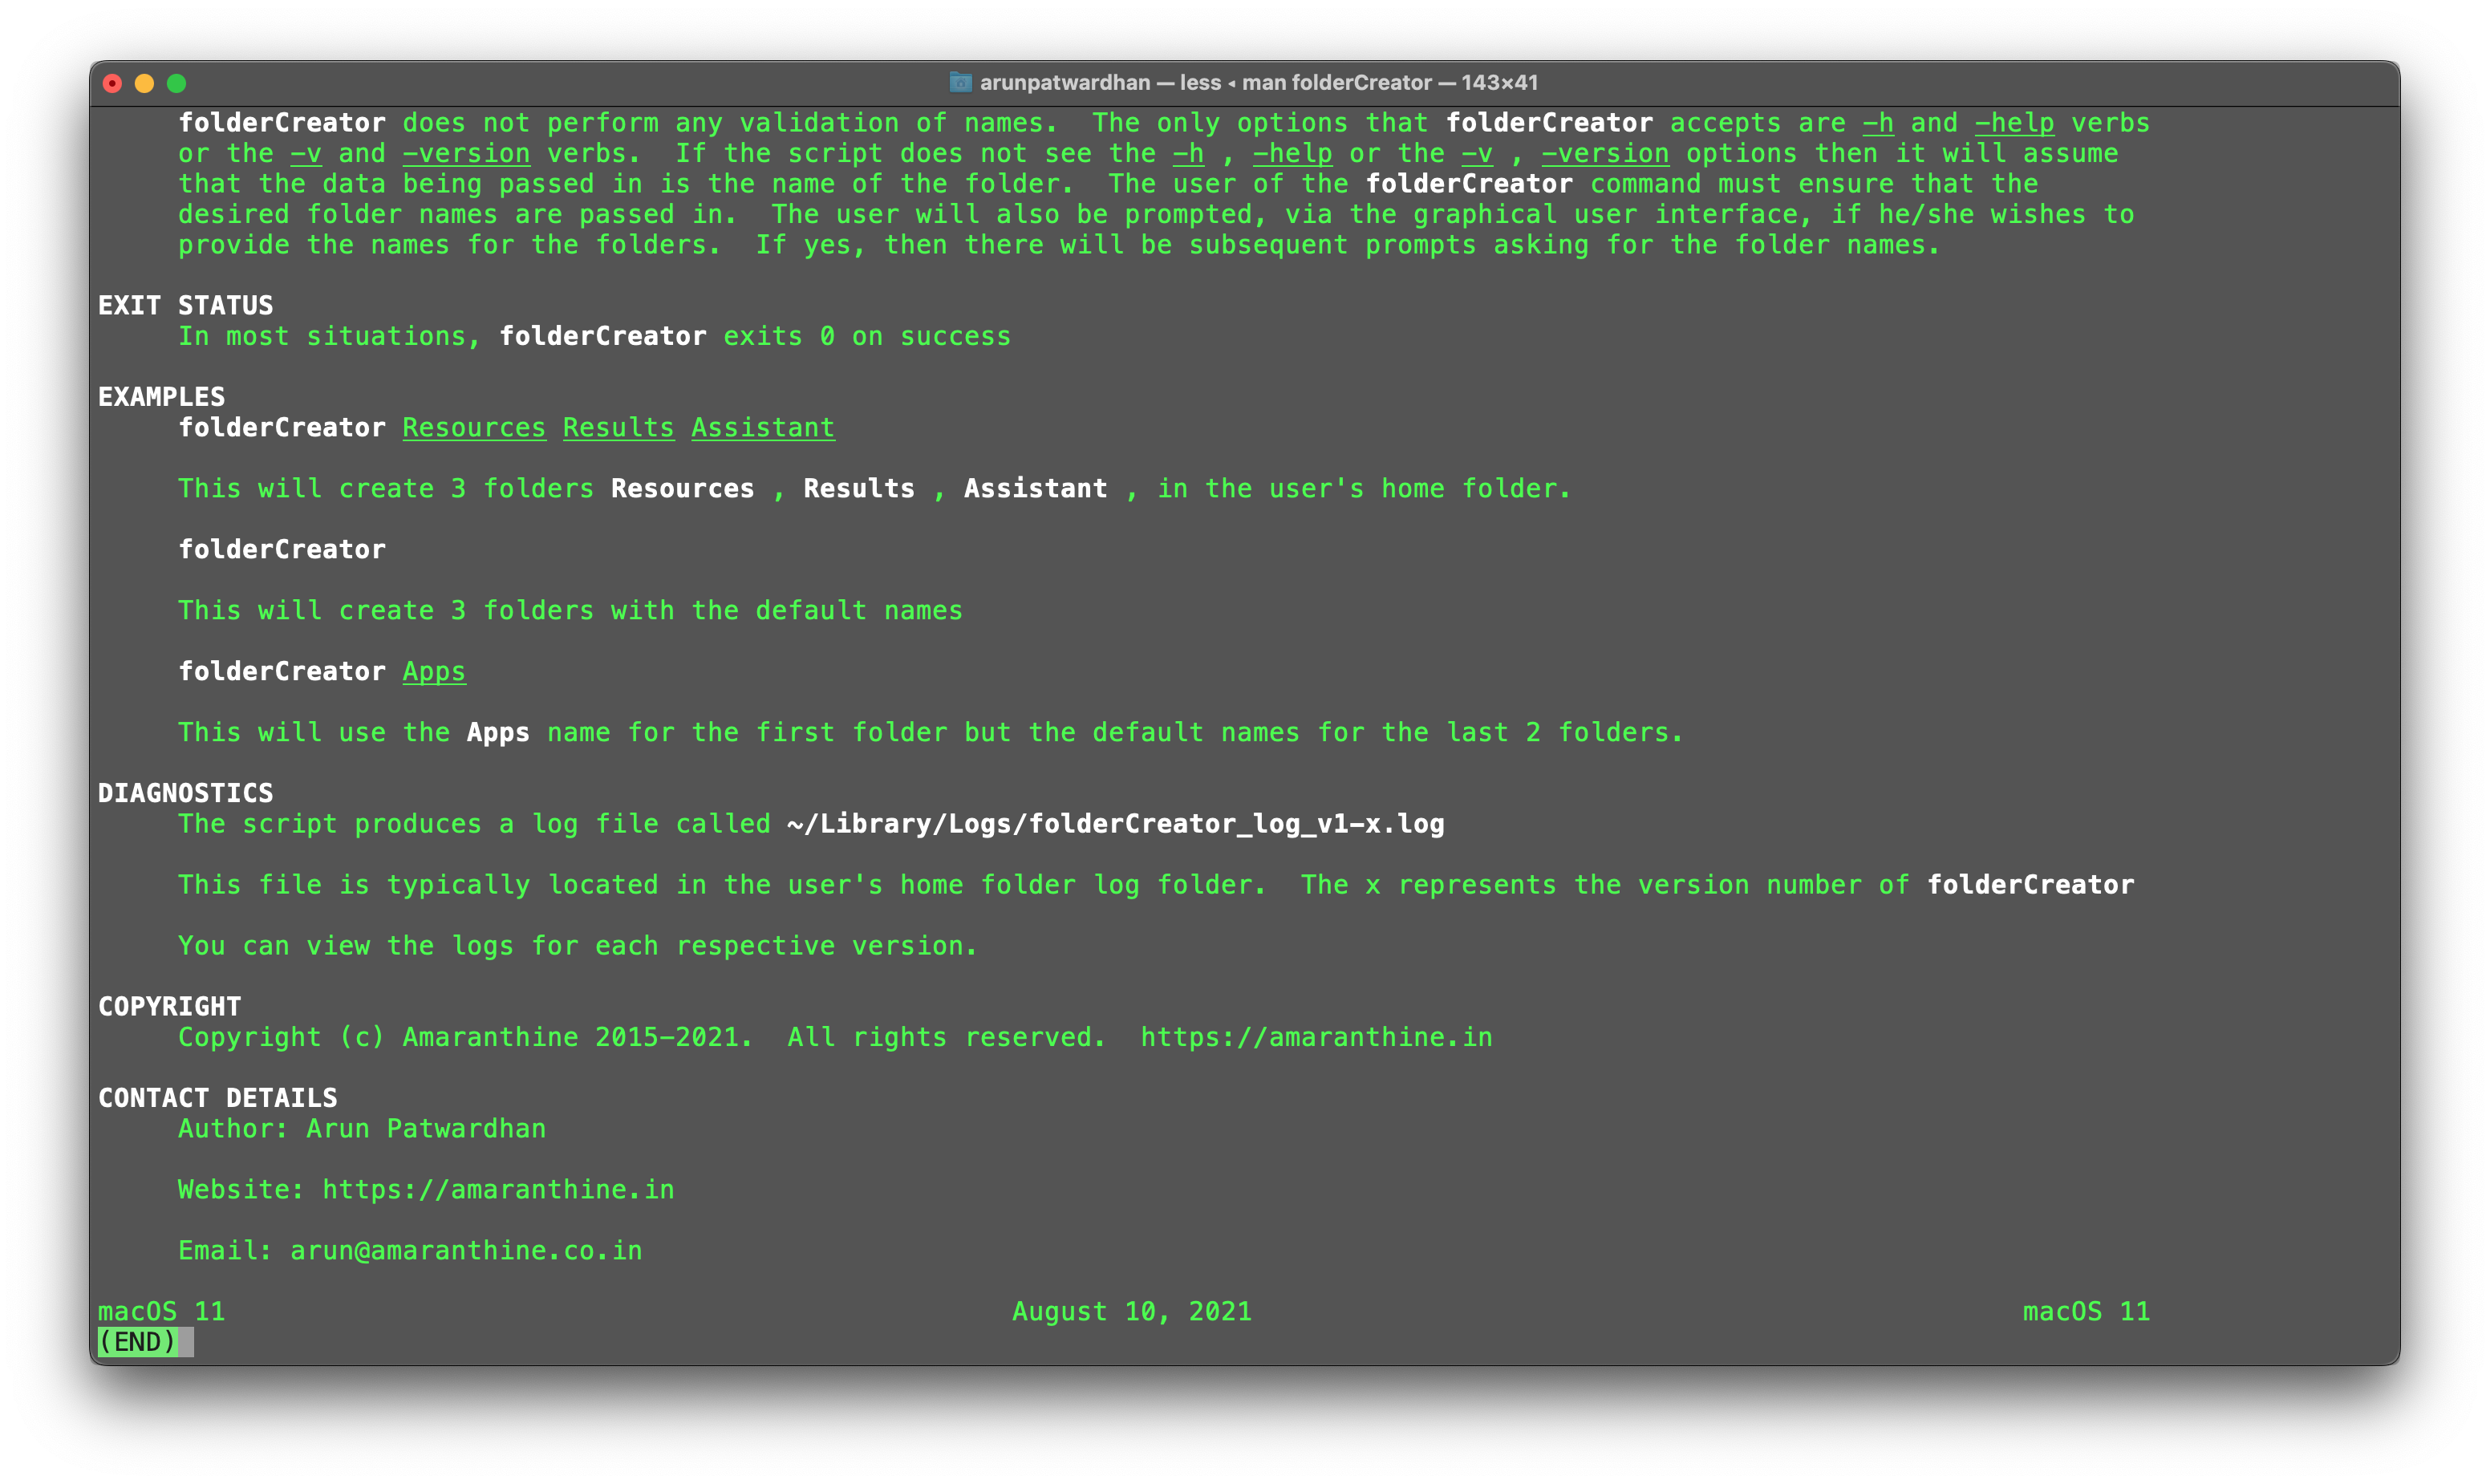
## folderCreator man page
```md
.\"Copyright (c) 2015-2022 Amaranthine. All Rights Reserved.
.\"
.\"
.Dd August 10, 2021
.Dt FOLDERCREATOR 1
.Os macOS 11
.Sh NAME
.Nm folderCreator
.Nd Folder creation utility
.\"
.\" ============================================================================
.\" ========================== BEGIN SYNOPSIS SECTION ==========================
.Sh SYNOPSIS
.Nm
.Ar "folder names"
.Op verbs
.\" =========================== END SYNOPSIS SECTION ===========================
.\" ============================================================================
.\"
.\" ============================================================================
.\" ======================== BEGIN DESCRIPTION SECTION =========================
.Sh DESCRIPTION
.Nm
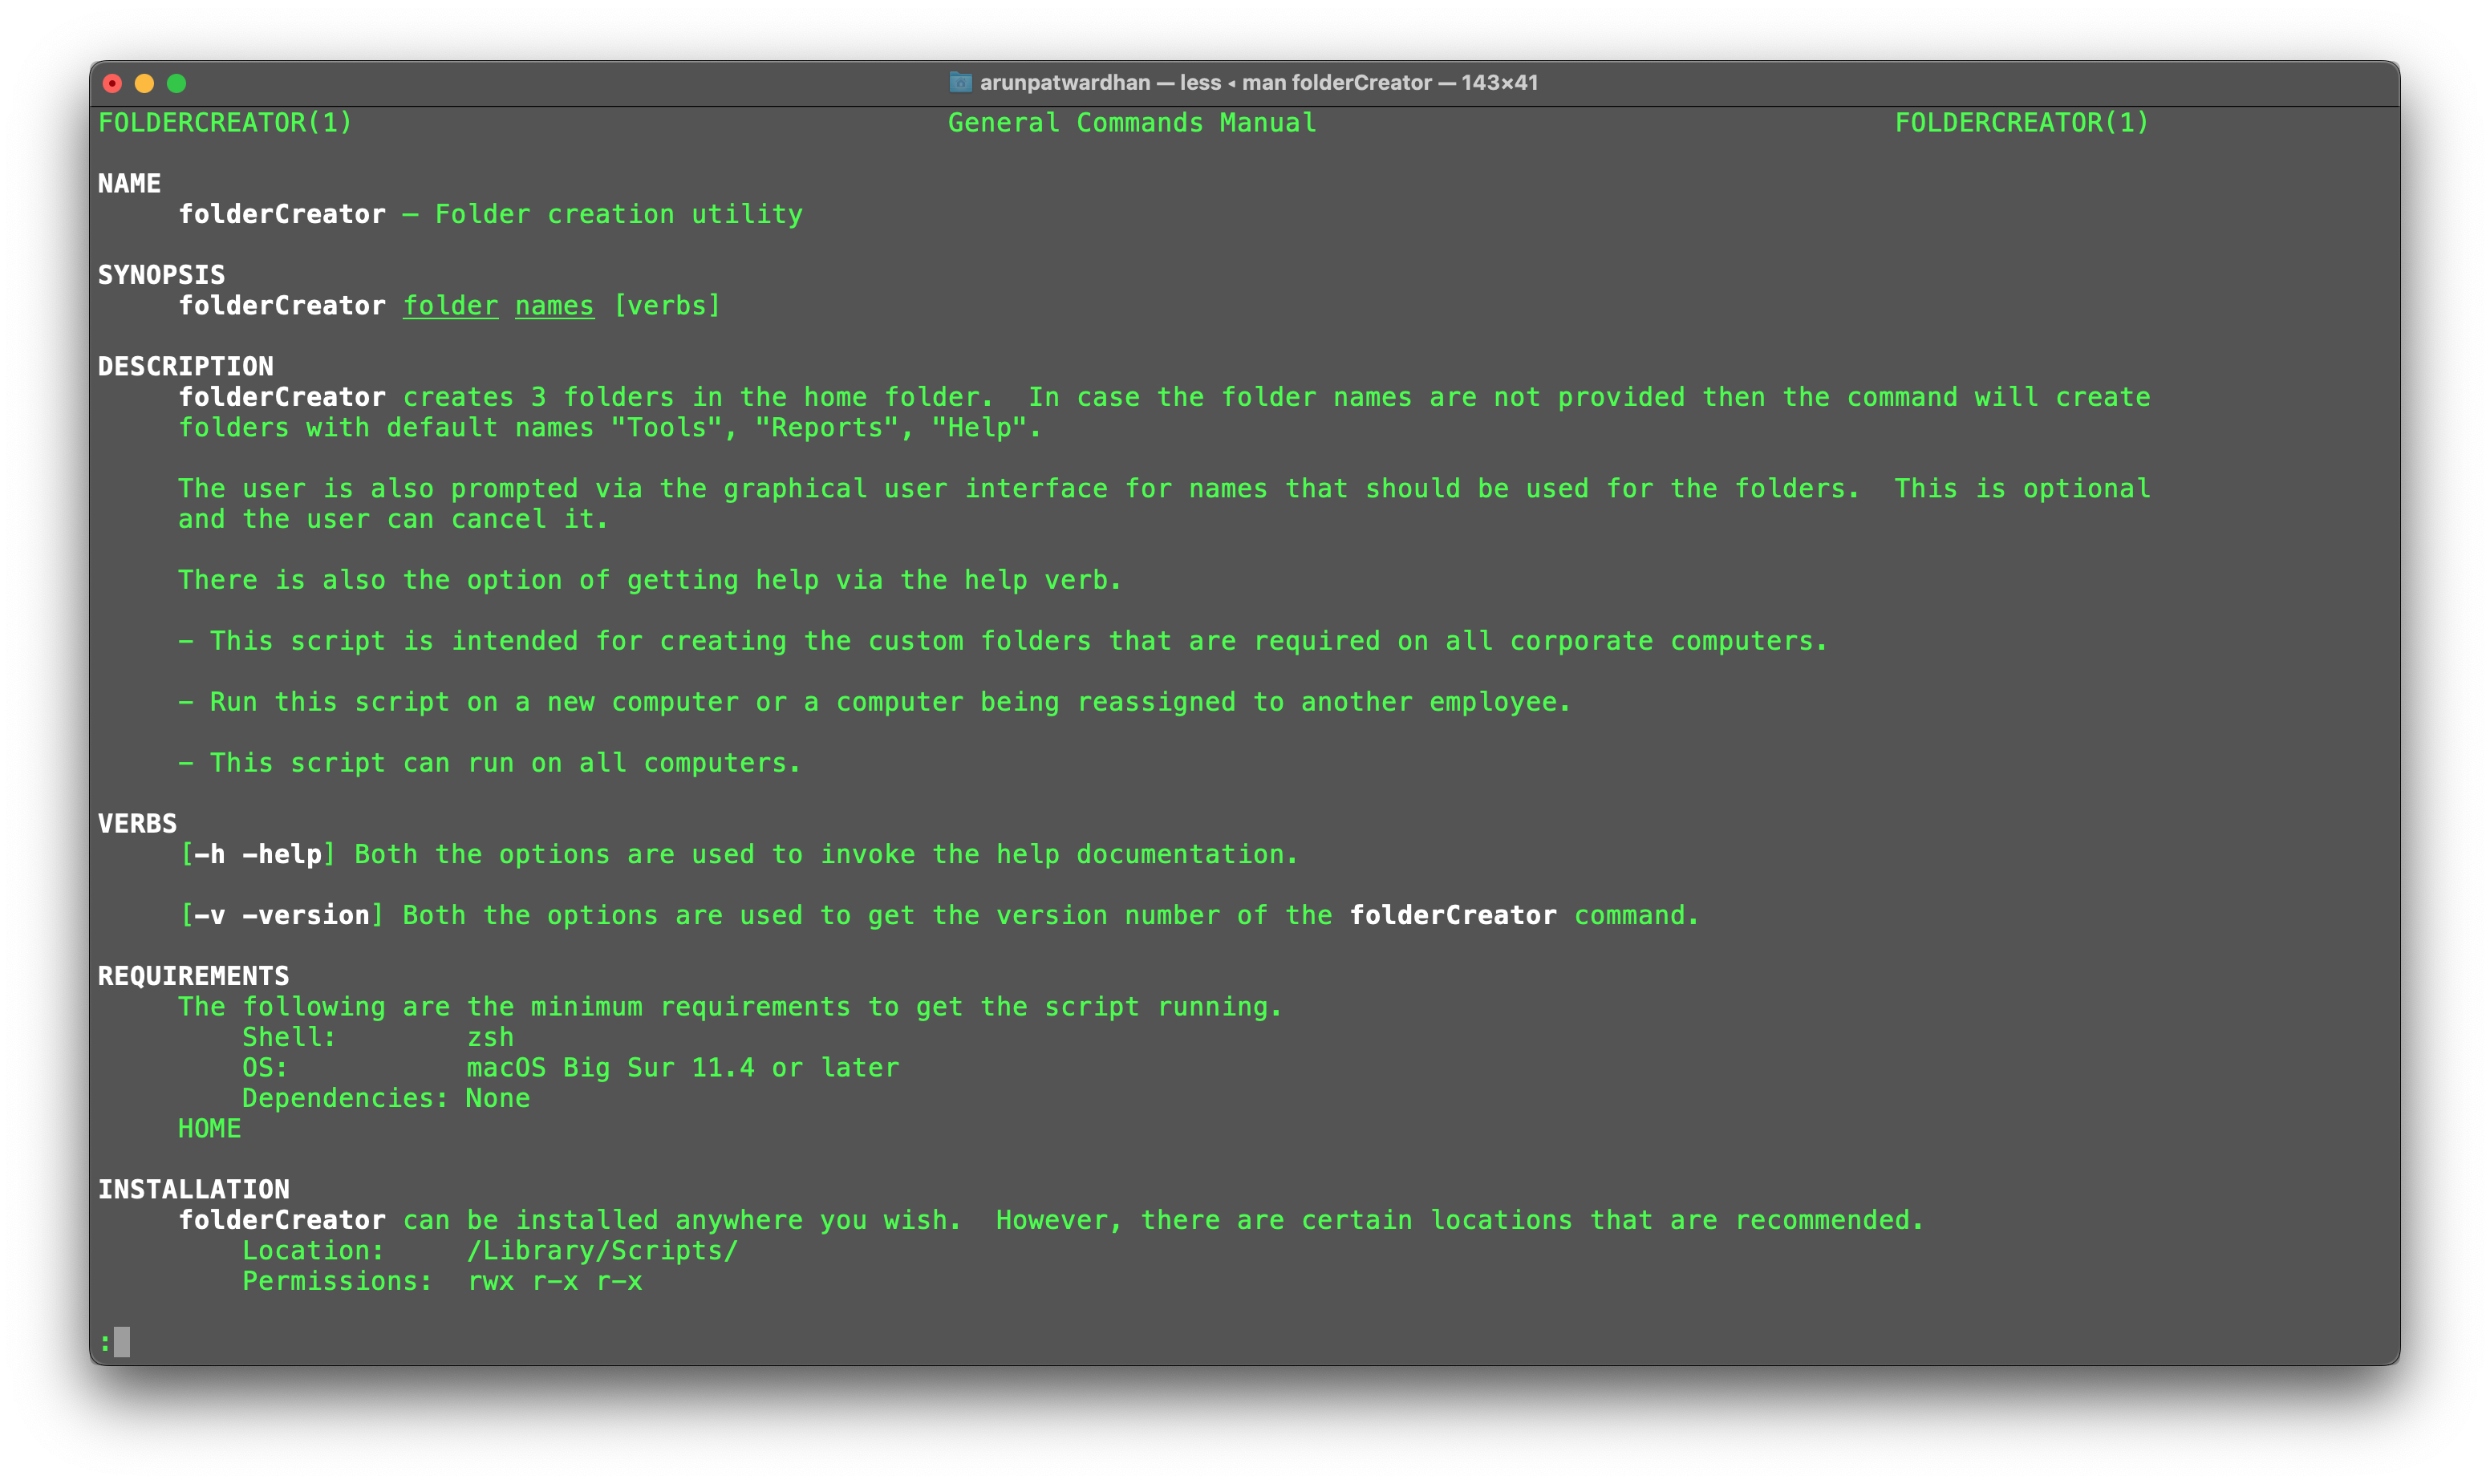
creates 3 folders in the home folder.
In case the folder names are not provided then the command
will create folders with default names "Tools", "Reports", "Help".
.Pp
The user is also prompted via the graphical user interface for names that should be used for the folders.
This is optional and the user can cancel it.
.Pp
There is also the option of getting help via the help verb.
.Pp
- This script is intended for creating the custom folders that are required on all corporate computers.
.Pp
- Run this script on a new computer or a computer being reassigned to another employee.
.Pp
- This script can run on all computers.
.\" ----------------------------------------------------------------------------
.\" ------------------------- BEGIN TERMINOLOGY LIST ---------------------------
.Sh VERBS
.Bl -hang
.It Op Fl h help
Both the options are used to invoke the help documentation.
.It Op Fl v version
Both the options are used to get the version number of the
.Nm
command.
.El
.\" --------------------------- END TERMINOLOGY LIST ---------------------------
.\" ----------------------------------------------------------------------------
.\" ============================================================================
.\" ======================== BEGIN REQUIREMENTS SECTION ========================
.Sh REQUIREMENTS
The following are the minimum requirements to get the script running.
.Bl -hang -offset 4n -width "xxxxxxxxxxxx" -compact
.It Shell:
zsh
.It OS:
macOS Big Sur 11.4 or later
.It Dependencies:
None
.El
.Ev HOME
.\" ============================================================================
.\" ======================== BEGIN INSTALLATION SECTION ========================
.Sh INSTALLATION
.Nm
can be installed anywhere you wish.
However, there are certain locations that are recommended.
.Bl -hang -offset 4n -width "xxxxxxxxxxxx" -compact
.It Location:
/Library/Scripts/
.It Permissions:
rwx r-x r-x
.El
.\" ============================================================================
.\" ======================== BEGIN USAGE SECTION ========================
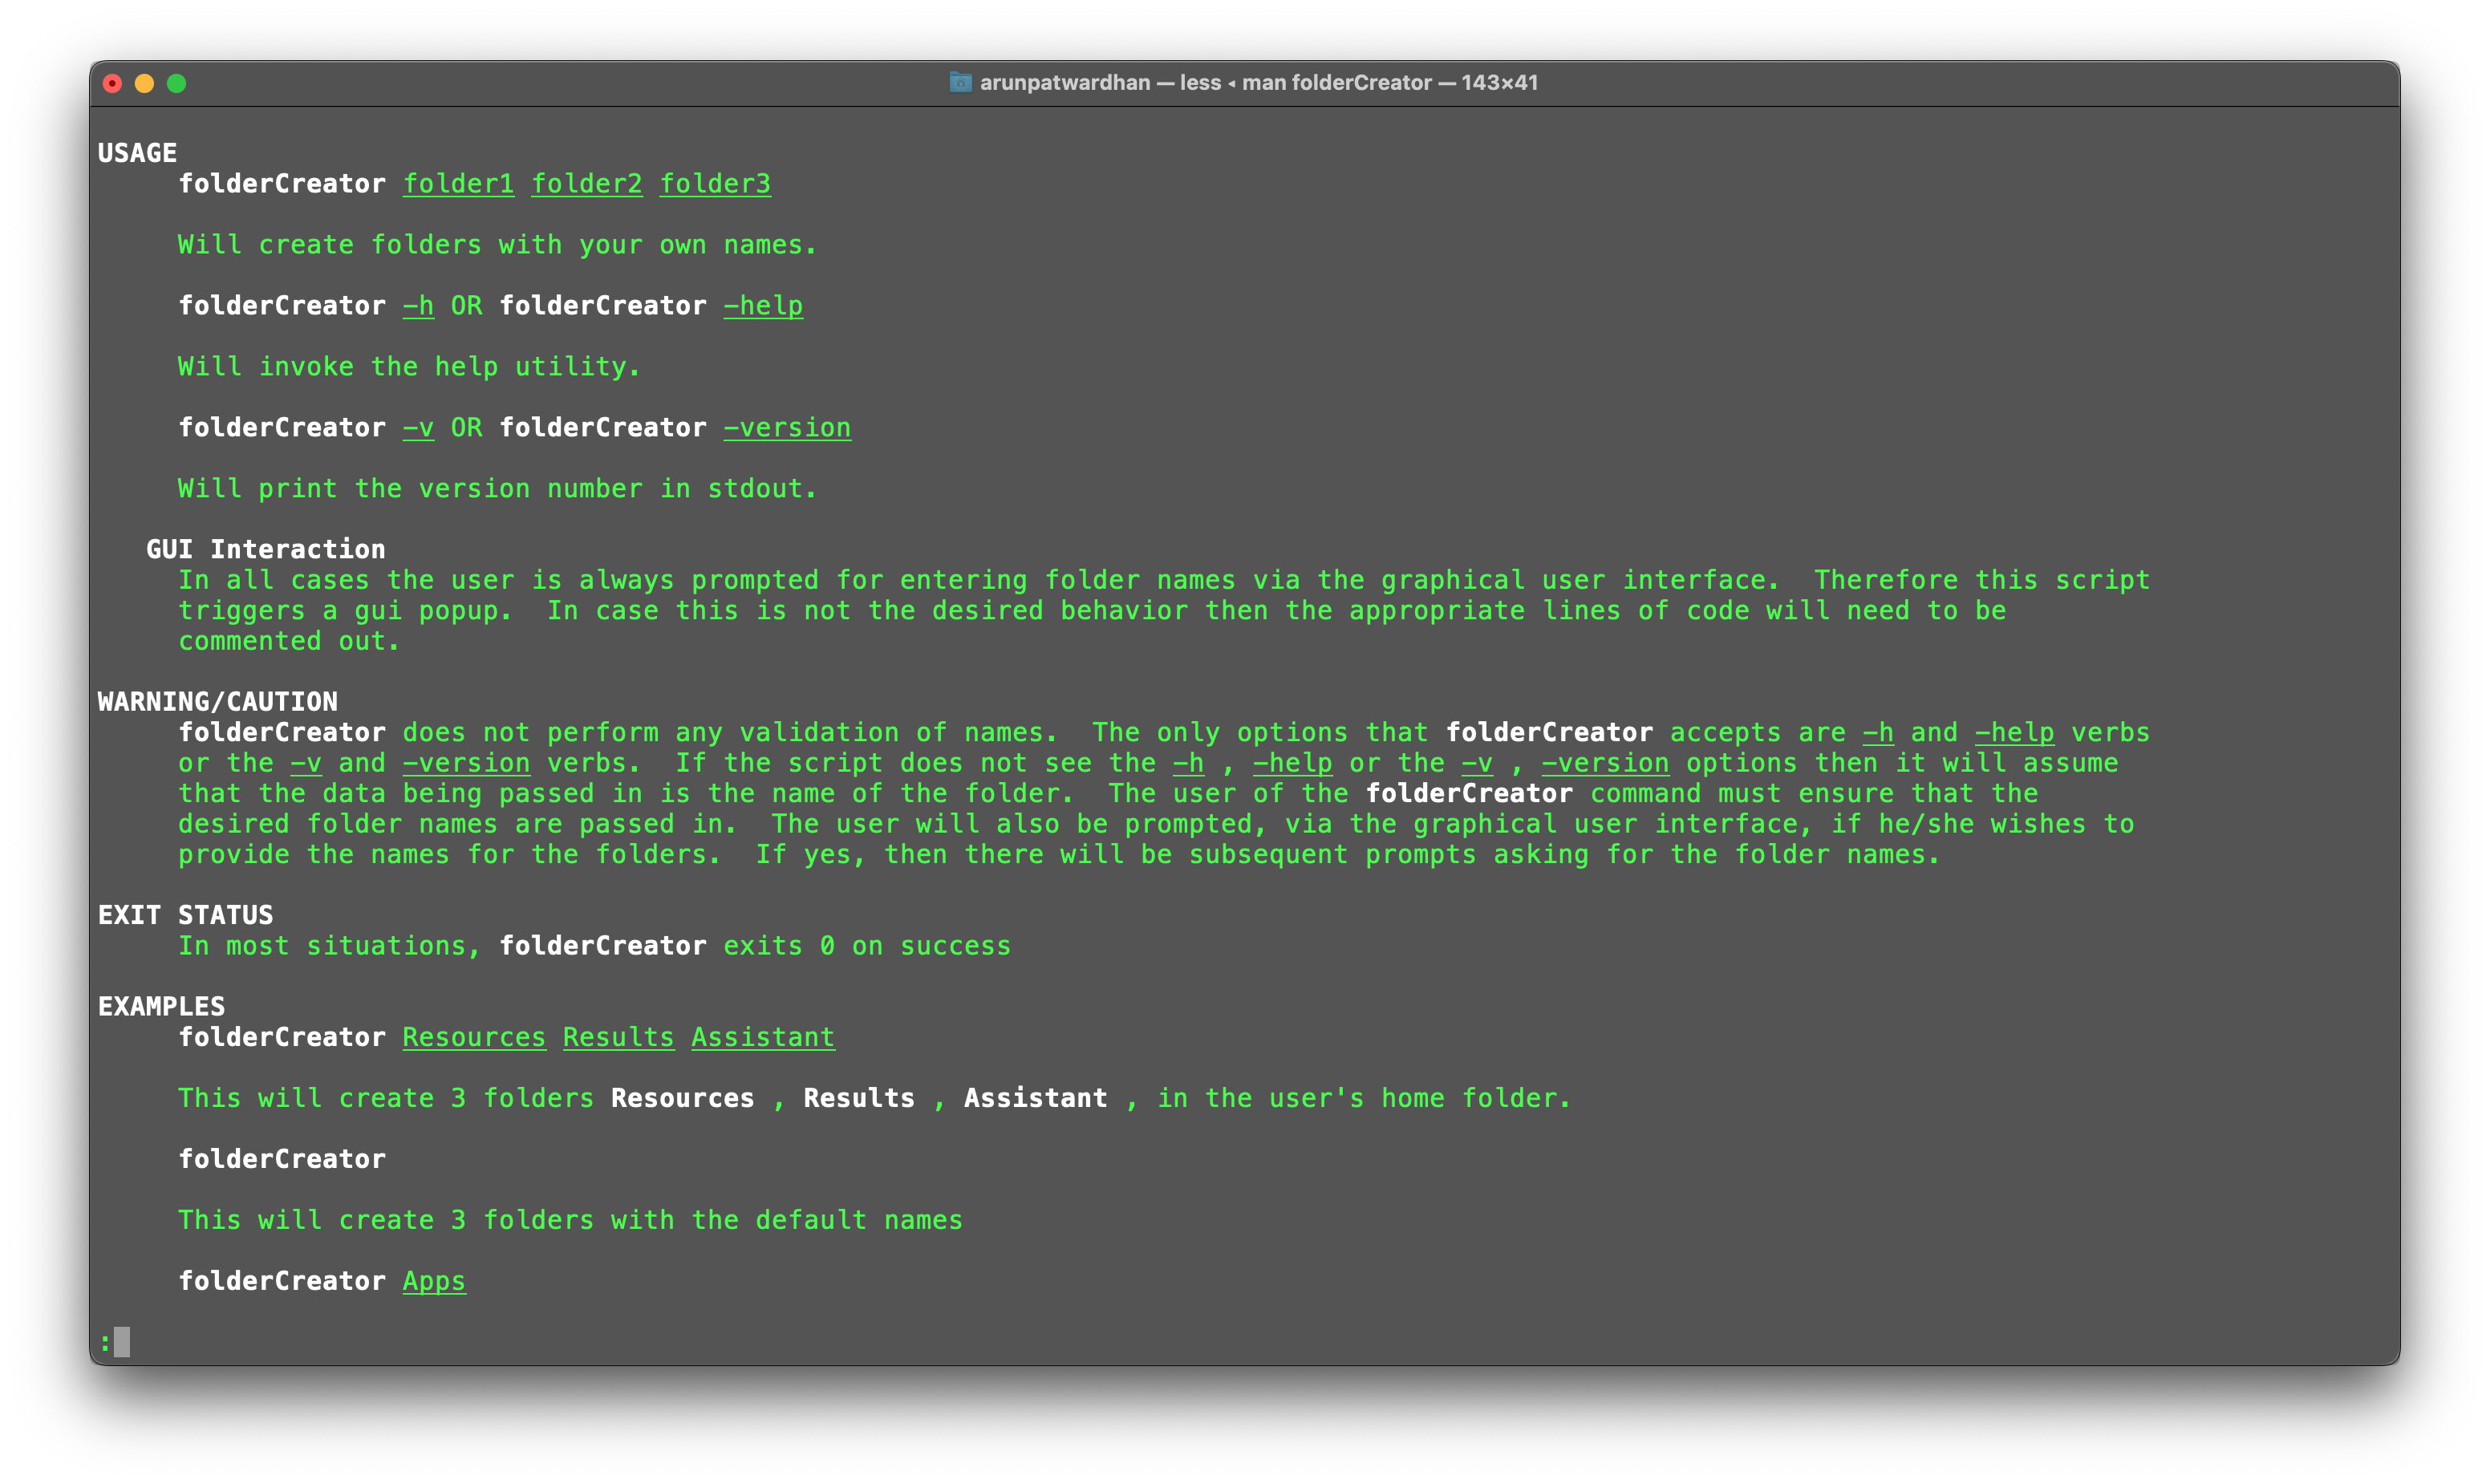
.Sh USAGE
.Nm
.Ar folder1
.Ar folder2
.Ar folder3
.Pp
Will create folders with your own names.
.Pp
.Nm
.Ar -h
OR
.Nm
.Ar -help
.Pp
Will invoke the help utility.
.Pp
.Nm
.Ar -v
OR
.Nm
.Ar -version
.Pp
Will print the version number in stdout.
.Ss GUI Interaction
In all cases the user is always prompted for entering folder names via the graphical user interface.
Therefore this script triggers a gui popup.
In case this is not the desired behavior then the appropriate lines of code will need to be commented out.
.\" ============================================================================
.\" ======================== BEGIN WARNING/CAUTION SECTION ========================
.Sh WARNING/CAUTION
.Nm
does not perform any validation of names.
The only options that
.Nm
accepts are
.Ar -h
and
.Ar -help
verbs or the
.Ar -v
and
.Ar -version
verbs.
If the script does not see the
.Ar -h
,
.Ar -help
or the
.Ar -v
,
.Ar -version
options then it will assume that the data being passed in is the name of the folder.
The user of the
.Nm
command must ensure that the desired folder names are passed in.
The user will also be prompted, via the graphical user interface, if he/she wishes to provide the names for the folders.
If yes, then there will be subsequent
prompts asking for the folder names.
.\" ============================================================================
.\" ======================== BEGIN EXIT STATUS SECTION =========================
.Sh EXIT STATUS
In most situations,
.Nm
exits 0 on success
.\" ============================================================================
.\" ======================== BEGIN EXAMPLES SECTION ========================
.Sh EXAMPLES
.Nm
.Ar Resources
.Ar Results
.Ar Assistant
.Pp
This will create 3 folders
.Sy Resources
,
.Sy Results
,
.Sy Assistant
,
in the user's home folder.
.Pp
.Nm
.Pp
This will create 3 folders with the default names
.Pp
.Nm
.Ar Apps
.Pp
This will use the
.Sy Apps
name for the first folder but the default names for the last 2 folders.
.\" ============================================================================
.\" ======================== BEGIN DIAGNOSTICS SECTION ========================
.Sh DIAGNOSTICS
The script produces a log file called
.Sy ~/Library/Logs/folderCreator_log_v1-x.log
.Pp
This file is typically located in the user's home folder log folder.
The x represents the version number of
.Nm
.Pp
You can view the logs for each respective version.
.\" ============================================================================
.\" ======================== BEGIN COPYRIGHT SECTION ========================
.Sh COPYRIGHT
Copyright (c) Amaranthine 2015-2021.
All rights reserved.
https://amaranthine.in
.\" ============================================================================
.\" ======================== BEGIN CONTACT SECTION ========================
.Sh CONTACT DETAILS
.An Author: Arun Patwardhan
.Pp
Website: https://amaranthine.in
.Pp
Email: arun@amaranthine.co.in
```
Also create a page to show the actual script. This is useful. Anyone reading our documentation will also quickly be able to see our script.
And thats it. We have all the necessary information in there. You can download my completed project from the section below. Use it to compare the documentation that you wrote.
Distributing the documentation
There are several ways to distribute the documentation. I have covered those in the previous article. The best option is to host it on a website and make it available to anyone who wishes to use it. That is what I have done. You can view the website here: https://amaranthinescript.github.io/documentation/foldercreator
Use with other scripts
The good thing about the how we created our documentation is that those steps apply to all other kinds of scripts. Instead of our shell script you can add any other script such as AppleScript in there and create documentation for the same.
Yes the process is a bit manual but it does allow script writers to quickly create highly readable documentation.
This is the last article in the series of scripts. We will take the script from Part 8 and continue with it. We will be taking our folderCreator script and using it in our distribution process.
Distribution is the process of placing the script along with any supporting resources on a destination computer making it easily available for use. There are many aspects to this process, but we are going to look at a few of them:
Where should our script be installed?
How will the end user be invoking the script?
Does the script have its own man page?
Creating our own commands from other shell scripts
You may have noticed that whenever we use commands like defaults, echo, ls, cd, … we do not have to specify the path to the command. There is a reason for that. When we run our script the shell interpreter ‘knows’ where to go and look for these commands. There are some predefined locations available. We can get these predefined locations from the environment.
printenv PATH
This gives us an output that looks like:
/usr/local/bin:/usr/bin:/bin:/usr/sbin:/sbin
The output you see will vary from computer to computer. As we can see it is a list of folders separated by a ‘:’. These are the folders the interpreter will go through to locate the commands we use.
While we do not specify the path to a command in our script it is actually considered good practice. In fact, we will be making the same change to our script.
So if we want our own commands to be located easily it should be placed in one of these folders.
Installing commands
While installing commands there is one feature of macOS that we need to keep in mind: SIP (System Integrity Protection). Introduced in OS X 10.11 El Capitan, SIP prevents the modification of certain system files or folders even if you have root privileges. So this means that we do not have a lot of choice when it comes to installing our command. We will place it in /usr/local/bin folder.
Here is the final version of the folderCreator script. I have added paths to some commands and have kept the file name as folderCreator. The version number has been removed from the file name.
#!/bin/zsh

#-------------------------------------------------------------------------------------------------
#NAME:		Folder creator
#AUTHOR:	Arun Patwardhan
#CONTACT:	arun@amaranthine.co.in
#DATE:		15th September 2022
#WEBSITE:	https://github.com/AmaranthineTech/ShellScripts
#-------------------------------------------------------------------------------------------------

#LEGAL DISCLAIMER --------------------------------------------------------------------------------
#THE SOFTWARE IS PROVIDED "AS IS", WITHOUT WARRANTY OF ANY KIND, EXPRESS OR
#IMPLIED, INCLUDING BUT NOT LIMITED TO THE WARRANTIES OF MERCHANTABILITY,
#FITNESS FOR A PARTICULAR PURPOSE AND NONINFRINGEMENT. IN NO EVENT SHALL THE
#AUTHORS OR COPYRIGHT HOLDERS BE LIABLE FOR ANY CLAIM, DAMAGES OR OTHER
#LIABILITY, WHETHER IN AN ACTION OF CONTRACT, TORT OR OTHERWISE, ARISING FROM,
#OUT OF OR IN CONNECTION WITH THE SOFTWARE OR THE USE OR OTHER DEALINGS IN THE
#SOFTWARE.
#-------------------------------------------------------------------------------------------------

#LICENSE/TERMS AND CONDITIONS --------------------------------------------------------------------
#MIT License

#Copyright (c) Amaranthine 2021.

#Permission is hereby granted, free of charge, to any person obtaining a copy
#of this software and associated documentation files (the "Software"), to deal
#in the Software without restriction, including without limitation the rights
#to use, copy, modify, merge, publish, distribute, sublicense, and/or sell
#copies of the Software, and to permit persons to whom the Software is
#furnished to do so, subject to the following conditions:

#The above copyright notice and this permission notice shall be included in all
#copies or substantial portions of the Software.
#-------------------------------------------------------------------------------------------------

#ABOUT -------------------------------------------------------------------------------------------
# fileCreator.zsh
# 1.8
#-------------------------------------------------------------------------------------------------

#DESCRIPTION -------------------------------------------------------------------------------------
# - THis script is intended for creating the custom folders that are required on all corporate computers.
# - Run this script on a new computer or a computer being reassigned to another employee.
# - This script can run on all computers.
#-------------------------------------------------------------------------------------------------

#USAGE -------------------------------------------------------------------------------------------
# - To create folders with default names run the command: ./folderCreator.zsh
# - To define your own folder names: ./folderCreator.zsh <folder1> <folder2> <folder3>
# - Available options  : Only the help option is available
# - Getting help       : Use the -h or the -help options to get more information. Or you can use the man command to view the man page.
#-------------------------------------------------------------------------------------------------

#WARNING/CAUTION ---------------------------------------------------------------------------------
#******************************************************************************************************************
#******************************************************************************************************************
#******************************************************************************************************************
#******************************************************************************************************************
# This script doesn't perform any validation of the folder names being passed in by the user.
# If the script does not see the -h or the -help options then it will assume that the data being passed in is the name of the folder.
# The user of the script must ensure that the desired folder names are passed in.
#******************************************************************************************************************
#******************************************************************************************************************
#******************************************************************************************************************
#******************************************************************************************************************
#-------------------------------------------------------------------------------------------------

#INSTALLATION ------------------------------------------------------------------------------------
# Instructions for placing the script in the correct place are listed here.
# Location:		/Library/Scripts/
# Permissions:	rwx r-x r-x
#-------------------------------------------------------------------------------------------------

#REQUIREMENTS ------------------------------------------------------------------------------------
# Shell:		/bin/zsh
# OS:			macOS Big Sur 11.4 or later
# Dependencies:	None
#-------------------------------------------------------------------------------------------------

#HELP/SUPPORT ------------------------------------------------------------------------------------
# You can get help by running the following commands.
# ./folderCreator.zsh -h
# ./folderCreator.zsh -help
# OR
# man folderCreator.zsh
# You can also view the log file for the same at: ~/Library/Logs/folderCreator_log_v1-8.log
#-------------------------------------------------------------------------------------------------

#HISTORY -----------------------------------------------------------------------------------------
# ------------------------------------------------------------------------------------------------
# Version 1.0: Basic script which creates the folders
# Version 1.1: Gives user the ability to specify the folder names at run time.
# Version 1.2: Adds safety checks to the scripts
# Version 1.3: Includes documentation as well as ability to get help.
# Version 1.4: Includes optimisation using for loop
# Version 1.5: Prompts the user in the GUI for names for the different folders.
# Version 1.6: Updated the log mechanism with the help of a function and here document.
# Version 1.7: Replaced the folder variables with an array
# Version 1.8: Added absolute path for commands. Final version ready for deployment.
#-------------------------------------------------------------------------------------------------

#-------------------------------------------------------------------------------------------------
# ------------------------------ SCRIPT STARTS HERE ----------------------------------------------
#-------------------------------------------------------------------------------------------------
#-------------------------------------------------------------------------------------------------
#-------------------------------------------------------------------------------------------------

#These are the default values used for the folder names incase the user doesn't provide any.
FOLDERS=("Tools" "Reports" "Help")

#Script version number
VERSION_NUMBER="1.8"

#Command name
COMMAND_NAME="folderCreator.zsh"

#1. Check to see if the user is asking for help. In which case we will have to provide information about the command.
if [[ $1 == "-h" ]] || [[ $1 == "-help" ]]; then
	echo "ABOUT
-----
fileCreator.zsh
Version $VERSION_NUMBER

NAME
----
$COMMAND_NAME — Folder creation utility SYNOPSIS
$COMMAND_NAME folder names [ verbs ]

DESCRIPTION
-----------
$COMMAND_NAME creates 3 folders in the home folder. In case the folder names are not provided then the command will create folders with default names 'Tools', 'Reports', \"Help\".

There is also the option of getting help via the help verb.
- This script is intended for creating the custom folders that are required on all corporate computers.
- Run this script on a new computer or a computer being reassigned to another employee.
- This script can run on all computers.

VERBS
-----
[ −h −help] Both the options are used to invoke the help documentation.
[ −v −version] Both the options are used to get the version number of the folderCreator command.

REQUIREMENTS
------------
The following are the minimum requirements to get the script running.
Shell:			zsh
OS:				macOS Big Sur 11.4 or later
Dependencies:	None

INSTALLATION
------------
$COMMAND_NAME can be installed anywhere you wish. However, there are certain locations that are recommended.
Location:		/Library/Scripts/
Permissions:		rwxr-xr-x

USAGE
-----
$COMMAND_NAME folder1 folder2 folder3
Will create folders with your own names.

$COMMAND_NAME -h OR $COMMAND_NAME -help
Will invoke the help utility.

$COMMAND_NAME -v OR $COMMAND_NAME -version
will print the version number in stdout.

WARNING/CAUTION
---------------
$COMMAND_NAME does not perform any validation of names. The only options that folderCreator accepts are -h and -help verbs or the -v and
-version verbs. If the script does not see the -h , -help or the -v , -version options then it will assume that the data being passed in is
the name of the folder. The user of the folderCreator command must ensure that the desired folder names are passed in. The user will also be
prompted, via the graphical user interface, if he/she wishes to provide the names for the folders. If yes, then there will be subsequent
prompts asking for the folder names.

EXAMPLES
--------
$COMMAND_NAME Resources Results Assistant
This will create 3 folders Resources , Results , Assistant , in the user’s home folder.

$COMMAND_NAME
This will create 3 folders with the default names

$COMMAND_NAME Apps
This will use the Apps name for the first folder but the default names for the last 2 folders.

NOTE
----
The user will be asked if he/she wishes to provide custom names in all the examples mentioned above. The user's value will always override
whatever is being provided to the script or defaults.

DIAGNOSTICS
-----------
The script produces a log file called ~/Library/Logs/folderCreator_log_v1-x.log
This file is typically located in the user’s home folder log folder. The x represents the version number of $COMMAND_NAME
You can view the logs for each respective version.

COPYRIGHT
---------
Copyright (c) Amaranthine 2015-2021. All rights reserved. https://amaranthine.in

EXIT STATUS
-----------
In most situations, $COMMAND_NAME exits 0 on success"
	exit 0
fi

PATH_TO_LOG="$HOME/Library/Logs/folderCreator_log_v1-8.log"

# Function to log activity
function recordActivity() {
	/bin/cat << EOF >> $PATH_TO_LOG
[$(date)] $1
EOF
}


echo "$(date) Running script $0 to create folders."
echo ""

TODAY=$(date)

recordActivity "Starting"

#2. Check to see if the version number is
if [[ $1 == "-version" ]] || [[ $1 == "-v" ]]; then
	echo "Version: $VERSION_NUMBER"
	exit 0
fi

#3. The following if statements check to see if the script is receiving any arguments. It then picks those arguments and assigns them to the respective variables for use in the script.
if [[ $1 != "" ]]; then
	FOLDERS[0]=$1
fi

if [[ $2 != "" ]]; then
	FOLDERS[1]=$2
fi

if [[ $3 != "" ]]; then
	FOLDERS[2]=$3
fi

#4. We can prompt the user to see if they wish to provide folder names themselves. This will override any values provided as arguments.
userClicked=$(/usr/bin/osascript -e 'button returned of (display dialog "Would you like to provide names for the folders or use the defaults instead?" buttons {"Custom", "Default"} default button 2 with icon POSIX file "/System/Library/CoreServices/HelpViewer.app/Contents/Resources/AppIcon.icns")')

# if the user decides to provide custom names then go ahead and ask the user via GUI prompts. Otherwise use the values sent as arguments or defaults.
if [[ $userClicked == "Custom" ]]; then
	recordActivity "The user decided to provide custom names."

	FOLDERS[0]=$(/usr/bin/osascript -e 'text returned of (display dialog "Enter the name of folder 1" default answer "Utilities" buttons {"OK"} default button 1 with title "Folder that will hold the utilities" with icon POSIX file "/Users/Shared/Finder.icns")')

	FOLDERS[1]=$(/usr/bin/osascript -e 'text returned of (display dialog "Enter the name of folder 2" default answer "Tools" buttons {"OK"} default button 1 with title "Folder that will hold the tools" with icon POSIX file "/Users/Shared/Finder.icns")')

	FOLDERS[2]=$(/usr/bin/osascript -e 'text returned of (display dialog "Enter the name of folder 3" default answer "Help" buttons {"OK"} default button 1 with title "Folder that will hold the support documents" with icon POSIX file "/Users/Shared/Finder.icns")')

	recordActivity "User provided: ${FOLDER[@]}"
else
	recordActivity "User decided to use default values: ${FOLDER[@]}"
fi

#5. Go to the home folder.
cd $HOME

#6. Check to see if each of the folders exists. If it exists then do not create it. Else create the folder.
recordActivity "Creating folders: ${FOLDER[@]}"

for item in ${FOLDER[@]}; do
	if [[ -d $item ]]; then
		recordActivity "Not creating $item as it already exists."
	else
		recordActivity "Creating $item"
		/bin/mkdir $item
	fi

	#7. Create the task completion file inside each folder.
	recordActivity "Creating hidden file for $item folder."
	cd $item
	#8. Generate the file names based on the folder names.
	/usr/bin/touch ".$item-FolderCreated"
	cd ..
done

echo "$(date) Task completed. Have a nice day!"

#-------------------------------------------------------------------------------------------------
#-------------------------------------------------------------------------------------------------
#-------------------------------------------------------------------------------------------------
# ------------------------------ END OF SCRIPT ---------------------------------------------------
In order to run this command we will have to give it execute capabilities.
chmod 755 folderCreator
This should change the icon of the script to that of an executable. If it doesn’t then go ahead and remove the extension from the file.
Copy the file to the /usr/local/bin folder. You will need to authenticate as admin to do this. There may be other executables in this folder.
Using commands
Now let us test to see if this has worked. Run the command:
folderCreator -h
We can use the which command to confirm that the correct binary is being used.
which folderCreator
Adding path to the environment
Now, it is not necessary that the executables we create should be placed in one of the standard PATH folders. We could place it anywhere else. All we would have to do is to export this new folder path to the PATH environment variable. There are a few ways of doing this.
Use the export command
Source another script file into your script
Automatically configure bash/zsh to source the export command
Using the export command
The export command temporarily adds a value to the PATH environment variable. We could do this at the start of the script. Let us look at this as an example.
Create a script, message.bash and save it in the /Users/Shared/Scripts/.
#!/bin/bash

echo "$(date) This is a random script $RANDOM"
Create another script called test.bash and save it where ever you want.
#!/bin/bash

export DEVELOPER_PATH=/Users/Shared/Scripts/
export PATH=$DEVELOPER_PATH:$PATH

bash welcome.bash

which welcome.bash
Run the script with the command: bash test.bash. Don’t forget to put the path when using the script.
The 2 export commands are setting the value of the PATH environment variable to the new path. Note that while doing that we still keep the existing PATH value. So the environment will contain all the existing PATHS as well as the new path.
We can immediately see the benefit of adding another folder to our PATH component. The commands on line 6 and 8 do not require the path to the welcome.bash script to be explicitly mentioned. Even though they are not in the standard search paths. In fact, any script/executable that is placed in that folder will now be directly accessible without having to specify the absolute path. Having said that it is still a good idea to put the absolute path to a command.
An important thing to keep in mind is that this change only applies to the script that we are running. This will not impact other shells or other scripts running in the same shell. The next 2 options will show us how we could possibly do that.
Source the export commands from another script
If the export commands are needed in more than one script then it might be a good idea to source them instead of rewriting them over and over again.
Start off by creating a new file called newPath.bash. It should only have the 2 export commands in them.
Now we will modify our test.bash script from the previous example as shown below.
#!/bin/bash
#Using source

source /Users/Shared/newPath.bash

bash welcome.bash

which welcome.bash
You can see that we simply source the original script in here. This is extremely useful if there are multiple paths that need to be added to multiple scripts. Any change in the path only has to be made in one place making this approach far more convenient and scalable. There is still the same catch. Any change to the path is only applicable to the scope of the script. Other scripts and the shell environment itself does not get affected.
Configure bash/zsh to source our export commands.
While the pervious 2 approaches are good, they have the limitation that the changes are only applicable to the script where the sourcing is done. All the other scripts and the shell itself are not affected by it. Now this maybe a desired outcome. There are situations where you would want this to be applicable globally to all the scripts and the shell itself without having to change the PATH value manually by ourselves. This can be done by changing the scripts that are invoked when the shell is loaded.
The file that is to be invoked is located in the /etc folder. It is called zshrc. If you want to make a change to bash shell then you need to modify bashrc. Copy this file to your desktop. Change it as shown below.
# System-wide profile for interactive zsh(1) shells.

# Setup user specific overrides for this in ~/.zshrc. See zshbuiltins(1)
# and zshoptions(1) for more details.

# Correctly display UTF-8 with combining characters.
if [[ "$(locale LC_CTYPE)" == "UTF-8" ]]; then
    setopt COMBINING_CHARS
fi

# Disable the log builtin, so we don't conflict with /usr/bin/log
disable log

# Save command history
HISTFILE=${ZDOTDIR:-$HOME}/.zsh_history
HISTSIZE=2000
SAVEHIST=1000

# Beep on error
setopt BEEP

# Use keycodes (generated via zkbd) if present, otherwise fallback on
# values from terminfo
if [[ -r ${ZDOTDIR:-$HOME}/.zkbd/${TERM}-${VENDOR} ]] ; then
    source ${ZDOTDIR:-$HOME}/.zkbd/${TERM}-${VENDOR}
else
    typeset -g -A key

    [[ -n "$terminfo[kf1]" ]] && key[F1]=$terminfo[kf1]
    [[ -n "$terminfo[kf2]" ]] && key[F2]=$terminfo[kf2]
    [[ -n "$terminfo[kf3]" ]] && key[F3]=$terminfo[kf3]
    [[ -n "$terminfo[kf4]" ]] && key[F4]=$terminfo[kf4]
    [[ -n "$terminfo[kf5]" ]] && key[F5]=$terminfo[kf5]
    [[ -n "$terminfo[kf6]" ]] && key[F6]=$terminfo[kf6]
    [[ -n "$terminfo[kf7]" ]] && key[F7]=$terminfo[kf7]
    [[ -n "$terminfo[kf8]" ]] && key[F8]=$terminfo[kf8]
    [[ -n "$terminfo[kf9]" ]] && key[F9]=$terminfo[kf9]
    [[ -n "$terminfo[kf10]" ]] && key[F10]=$terminfo[kf10]
    [[ -n "$terminfo[kf11]" ]] && key[F11]=$terminfo[kf11]
    [[ -n "$terminfo[kf12]" ]] && key[F12]=$terminfo[kf12]
    [[ -n "$terminfo[kf13]" ]] && key[F13]=$terminfo[kf13]
    [[ -n "$terminfo[kf14]" ]] && key[F14]=$terminfo[kf14]
    [[ -n "$terminfo[kf15]" ]] && key[F15]=$terminfo[kf15]
    [[ -n "$terminfo[kf16]" ]] && key[F16]=$terminfo[kf16]
    [[ -n "$terminfo[kf17]" ]] && key[F17]=$terminfo[kf17]
    [[ -n "$terminfo[kf18]" ]] && key[F18]=$terminfo[kf18]
    [[ -n "$terminfo[kf19]" ]] && key[F19]=$terminfo[kf19]
    [[ -n "$terminfo[kf20]" ]] && key[F20]=$terminfo[kf20]
    [[ -n "$terminfo[kbs]" ]] && key[Backspace]=$terminfo[kbs]
    [[ -n "$terminfo[kich1]" ]] && key[Insert]=$terminfo[kich1]
    [[ -n "$terminfo[kdch1]" ]] && key[Delete]=$terminfo[kdch1]
    [[ -n "$terminfo[khome]" ]] && key[Home]=$terminfo[khome]
    [[ -n "$terminfo[kend]" ]] && key[End]=$terminfo[kend]
    [[ -n "$terminfo[kpp]" ]] && key[PageUp]=$terminfo[kpp]
    [[ -n "$terminfo[knp]" ]] && key[PageDown]=$terminfo[knp]
    [[ -n "$terminfo[kcuu1]" ]] && key[Up]=$terminfo[kcuu1]
    [[ -n "$terminfo[kcub1]" ]] && key[Left]=$terminfo[kcub1]
    [[ -n "$terminfo[kcud1]" ]] && key[Down]=$terminfo[kcud1]
    [[ -n "$terminfo[kcuf1]" ]] && key[Right]=$terminfo[kcuf1]
fi

# Default key bindings
[[ -n ${key[Delete]} ]] && bindkey "${key[Delete]}" delete-char
[[ -n ${key[Home]} ]] && bindkey "${key[Home]}" beginning-of-line
[[ -n ${key[End]} ]] && bindkey "${key[End]}" end-of-line
[[ -n ${key[Up]} ]] && bindkey "${key[Up]}" up-line-or-search
[[ -n ${key[Down]} ]] && bindkey "${key[Down]}" down-line-or-search

# Default prompt
PS1="%n@%m %1~ %# "

# Useful support for interacting with Terminal.app or other terminal programs
[ -r "/etc/zshrc_$TERM_PROGRAM" ] && . "/etc/zshrc_$TERM_PROGRAM"

if [[ -f /Users/Shared/newPath.bash ]]; then
    source /Users/Shared/newPath.bash
fi
Save this file back to the etc folder. It might be a good idea to take a backup of the original file in case we need to restore it back to undo any errors we might introduce.
Open the terminal app. Run the welcome.bash script without providing the path. See if it works.
Run the command to print the path variable:
printenv PATH
As we can see, there is no need to run the export command repeatedly. There is no need to source the file that contains those commands either.
Standard location or custom path
This approach does give us a lot of flexibility. However, we can see that there are several things we need to do before we can get everything working well. It might be better for us to place our commands in the standard /usr/local folder. That would make the deployment a lot easier.
Man pages
What are man pages?
If you have used the command line interface on macOS/Unix/Linux then you would be familiar with the man command. In case you aren’t then the man command is the command that loads the manual for the binary specified. It is a quick easy way to access the documentation and help for the command. However, man pages aren’t restricted to only binaries. They could be applied on normal files too.
There is one thing to keep in mind. It is not necessary that a man page exists for a given command. Try running the command man folderCreator. What do you get?
No manual entry for folderCreator
We get a message saying that there is no manual entry for our binary. So we need to go ahead and create one.
Before I talk about how to create them I will first address the question of whether we need to create one in the first place. Especially since we are already providing help view the -h -help options. Actually we don’t have to. However, keep in mind that most users are already familiar with the man command and their instinctive reaction is to look for the man page of your command. It would be very nice to offer them that ability.
How do we create them?
In order to create our man page we need to use certain macros that render the document for us. More information can be available via the mandoc, groff, mdoc, and man commands. I would highly recommend going through the man pages of these commands.
man pages are simple files that contain information which is formatted with the help of different macros. A typical man page contains the following sections in the specified sequence:
NAME
SYNOPSIS
DESCRIPTION
VERBS
REQUIREMENTS
INSTALLATION
USAGE
WARNINGS
EXIT STATUS
EXAMPLES
DIAGNOSTICS
COPYRIGHT
CONTACT DETAILS
There are other sections available too: the man page for groff command contains excellent information about that. Armed with the information about which sections are there within the man page we need to start gathering all our details together.
One piece that we need is the manual section.If we run the man command on man:
man man
It gives us some information about the manual sections. The sections describe the kinds of commands and potentially the actions they perform. Our command would fall under the user commands section or section 1.
Where are they located?
These files are located in the /usr/local/share/man/man1 folder. Where man1 represents the section number.
Let us try to create the file. Before that we will look at some macros that we would need.
Macro
Description
.Dd
This is used to specify the date when the man page was created/published.
.Dt
This is used to specify the title for the man page. Its value should always be in all caps.
.Os
The name of the operating system.
.Sh
Section header name,
.Nm
The name of the command. This is the name that will be used throughout the document.
.Nd
The description of the command.
.Ar
Arguments being passed to a command
.Op
Options being passed to a command
.Pp
New paragraph
.Bl
Start a list
.El
End the list
.Ev
For environment variables
.It
Italics
.Ss
Subsection
.An
Name of the author
.Sy
Symbolic font mode
.\"
Comment
Macros used to create the man page file
You can get more details and information about these macros by running the following command:
man mdoc
We will now use these macros to render our man page. The easiest way to do this would be to use an existing man page file as a template. The idea is to use the macros to do the rendering for us. Copy paste the contents of any existing man page into your file and start replacing the content with your own content. You can always test your page by using the man command directly on your file.
man /path/to/your/manpage/file.1
A good thing to do would be to add 1 item at a time and run the above command repeatedly till you get comfortable with how everything fits together.
If you need help correcting the formatting of the file run the following command:
mandoc -T lint folderCreator.1
This is how the man page file looks. Name it folderCreator.1 where the ‘1’ indicates the section number.
This file contains hidden or bidirectional Unicode text that may be interpreted or compiled differently than what appears below. To review, open the file in an editor that reveals hidden Unicode characters.
Learn more about bidirectional Unicode characters
Our script has evolved quite a bit from the first blog. We started off with a very simple script and have ended with a larger script. It still does the same thing it did originally but is now a lot better. Here are some of the key points:
Writing event updates to log files
User interaction
Flexibility in terms of folder names via user interaction from the GUI as well as the command line arguments
Easy to maintain thanks to functions
Arrays make it scalable
Loops help make the script compact
Variables enhance scalability
Periodic checks ensure the script is safe and stable
User can get help using
the -h or the -help options
From the comments in the script
by viewing the man page for the script
Of course, there is room for improvement. Some of you might come up with ways of achieving this solution differently. Which is perfectly fine. There is no such thing as a universally perfect script. The point behind the script above was to illustrate how the different features could work together.
Final thoughts
Scripting is a continuous learning process. There are so many things in it. Over time you will find that you are faced with similar challenges. One thing that a lot of script writers and programmers do is to refer to perviously written scripts to get a head start. Every time you write a script it would be a good idea to archive it and keep a copy elsewhere. This will come in handy.
This article is a continuation of the previous article. We will be taking the previous script and using it to build on the concepts we will learning in this article.
Why would we need to do this?
So far our scripts have run without any communication between the script and any user. In many situations this might be enough. Often times we would need to ask the user for some information before proceeding. This could be for confirmation before performing a certain task, or to customise the script actions as they are being performed.
Ways of interacting with the user
We have a few options to do this.
read utility
GUI pop via AppleScript
Let us look at the read utility first.
Reading from stdin
The read commands captures data entered via stdin. This is typically the terminal prompt from where the user enters the data. This captured value is read into a variable.
#!/bin/bash

read -p " What is your name?": NAME

echo $NAME
This is a simple example. The user is prompted (on stdout) to enter their name. The user types the name and it is stored in a variable. The contents of the variable are then echoed out to stdout again.
Of course, this assumes the user is manually running the script. Later in this article we will go over how we can automate such scripts with the help of ‘expect’ utility.
Reading from a file
Reading from a file is possible thanks to the read command as well as the loop operations we learnt earlier.
Asking question via GUI
The easiest thing to do would be to prompt the user for information via a GUI popup. This makes the experience a lot better. However, we will need something else for that. We will leverage AppleScript (which is a macOS specific scripting language) to show the popup. This will be invoked from the shell script using osascript.
I will be covering the basics of AppleScript in a later article.
First we will look at how to get the dialog to appear using AppleScript. This requires the use of AppleScript display dialog command.
This file contains hidden or bidirectional Unicode text that may be interpreted or compiled differently than what appears below. To review, open the file in an editor that reveals hidden Unicode characters.
Learn more about bidirectional Unicode characters
This will simply show a popup to the user with a message and 2 buttons. We can customise it further:
This file contains hidden or bidirectional Unicode text that may be interpreted or compiled differently than what appears below. To review, open the file in an editor that reveals hidden Unicode characters.
Learn more about bidirectional Unicode characters
display dialog "Would you like to provide names for the folders or use the defaults instead?" buttons {"Custom", "Default"} default button 2 with icon POSIX file "/System/Library/CoreServices/HelpViewer.app/Contents/Resources/AppIcon.icns"
This adds a custom icon. If we run this script the user would see something like:
Make sure that the path to the custom icon is what you would want it to be.
If we wanted to find out which button the user has selected then:
This file contains hidden or bidirectional Unicode text that may be interpreted or compiled differently than what appears below. To review, open the file in an editor that reveals hidden Unicode characters.
Learn more about bidirectional Unicode characters
button returned of (display dialog "Would you like to provide names for the folders or use the defaults instead?" buttons {"Custom", "Default"} default button 2 with icon POSIX file "/System/Library/CoreServices/HelpViewer.app/Contents/Resources/AppIcon.icns")
The button returned of tells us which button was clicked. It also adds a nice title for the popup.
The really nice thing to do would be to somehow run this from terminal. To do that we will use the osascript command. This command needs the AppleScript command to be passed is as a statement.
osascript -e '<AppleScript statement>'
Let us add our command here.
osascript -e 'button returned of (display dialog "Would you like to provide names for the folders or use the defaults instead?" buttons {"Custom", "Default"} default button 2 with icon POSIX file "/System/Library/CoreServices/HelpViewer.app/Contents/Resources/AppIcon.icns")'
Finally to get this value into a script variable we will use command substitution.
userClicked=$(/usr/bin/osascript -e 'button returned of (display dialog "Would you like to provide names for the folders or use the defaults instead?" buttons {"Custom", "Default"} default button 2 with icon POSIX file "/System/Library/CoreServices/HelpViewer.app/Contents/Resources/AppIcon.icns")')
We can now echo the variable or use it in a condition check.
Example
Let us update our code to ask the user for names they would like to give for their folder.
Just after the line where we finish checking the 3 positional parameters, add this line.
#4. We can prompt the user to see if they wish to provide folder names themselves. This will override any values provided as arguments.
userClicked=$(/usr/bin/osascript -e 'button returned of (display dialog "Would you like to provide names for the folders or use the defaults instead?" buttons {"Custom", "Default"} default button 2 with icon POSIX file "/System/Library/CoreServices/HelpViewer.app/Contents/Resources/AppIcon.icns")')
This will first ask the user if they wish to provide the folder names or use the defaults. The response is captured in the shell variable userClicked.
Below that we will put an if check to see what the user has selected.
# if the user decides to provide custom names then go ahead and ask the user via GUI prompts. Otherwise use the values sent as arguments or defaults.
if [[ $userClicked == "Custom" ]]; then

else

fi
If the condition is true we have to show dialog prompts to ask the user for the name. This is going to be similar to our first check. However, this one will also have the ability for the user to enter a value. Add 3 prompts, one for each folder. Also add an echo statement to write to the log file. The if should now look like:
if [[ $userClicked == "Custom" ]]; then
	echo "$(date) The user decided to provide custom names." >> $PATH_TO_LOG

	TOOLS_FOLDER=$(/usr/bin/osascript -e 'text returned of (display dialog "Enter the name of folder 1" default answer "Utilities" buttons {"OK"} default button 1 with title "Folder that will hold the utilities" with icon POSIX file "/Users/Shared/Finder.icns")')

	REPORTS_FOLDER=$(/usr/bin/osascript -e 'text returned of (display dialog "Enter the name of folder 2" default answer "Tools" buttons {"OK"} default button 1 with title "Folder that will hold the tools" with icon POSIX file "/Users/Shared/Finder.icns")')

	HELP_FOLDER=$(/usr/bin/osascript -e 'text returned of (display dialog "Enter the name of folder 3" default answer "Help" buttons {"OK"} default button 1 with title "Folder that will hold the support documents" with icon POSIX file "/Users/Shared/Finder.icns")')

	echo "$(date) User provided: $TOOLS_FOLDER $REPORTS_FOLDER $HELP_FOLDER" >> $PATH_TO_LOG
else
	echo "$(date) User decided to use default values: $TOOLS_FOLDER $REPORTS_FOLDER $HELP_FOLDER" >> $PATH_TO_LOG
fi
The script is now ready to accept user input. The completed script should look like:
#!/bin/zsh

#-------------------------------------------------------------------------------------------------
#NAME:		Folder creator
#AUTHOR:	Arun Patwardhan
#CONTACT:	arun@amaranthine.co.in
#DATE:		10th August 2021
#WEBSITE:	https://github.com/AmaranthineTech/ShellScripts
#-------------------------------------------------------------------------------------------------

#LEGAL DISCLAIMER --------------------------------------------------------------------------------
#THE SOFTWARE IS PROVIDED "AS IS", WITHOUT WARRANTY OF ANY KIND, EXPRESS OR
#IMPLIED, INCLUDING BUT NOT LIMITED TO THE WARRANTIES OF MERCHANTABILITY,
#FITNESS FOR A PARTICULAR PURPOSE AND NONINFRINGEMENT. IN NO EVENT SHALL THE
#AUTHORS OR COPYRIGHT HOLDERS BE LIABLE FOR ANY CLAIM, DAMAGES OR OTHER
#LIABILITY, WHETHER IN AN ACTION OF CONTRACT, TORT OR OTHERWISE, ARISING FROM,
#OUT OF OR IN CONNECTION WITH THE SOFTWARE OR THE USE OR OTHER DEALINGS IN THE
#SOFTWARE.
#-------------------------------------------------------------------------------------------------

#LICENSE/TERMS AND CONDITIONS --------------------------------------------------------------------
#MIT License

#Copyright (c) Amaranthine 2021.

#Permission is hereby granted, free of charge, to any person obtaining a copy
#of this software and associated documentation files (the "Software"), to deal
#in the Software without restriction, including without limitation the rights
#to use, copy, modify, merge, publish, distribute, sublicense, and/or sell
#copies of the Software, and to permit persons to whom the Software is
#furnished to do so, subject to the following conditions:

#The above copyright notice and this permission notice shall be included in all
#copies or substantial portions of the Software.
#-------------------------------------------------------------------------------------------------

#ABOUT -------------------------------------------------------------------------------------------
# fileCreator.zsh
# 1.5
#-------------------------------------------------------------------------------------------------

#DESCRIPTION -------------------------------------------------------------------------------------
# - THis script is intended for creating the custom folders that are required on all corporate computers.
# - Run this script on a new computer or a computer being reassigned to another employee.
# - This script can run on all computers.
#-------------------------------------------------------------------------------------------------

#USAGE -------------------------------------------------------------------------------------------
# - To create folders with default names run the command: ./folderCreator.zsh
# - To define your own folder names: ./folderCreator.zsh <folder1> <folder2> <folder3>
# - Available options  : Only the help option is available
# - Getting help       : Use the -h or the -help options to get more information. Or you can use the man command to view the man page.
#-------------------------------------------------------------------------------------------------

#WARNING/CAUTION ---------------------------------------------------------------------------------
#******************************************************************************************************************
#******************************************************************************************************************
#******************************************************************************************************************
#******************************************************************************************************************
# This script doesn't perform any validation of the folder names being passed in by the user.
# If the script does not see the -h or the -help options then it will assume that the data being passed in is the name of the folder.
# The user of the script must ensure that the desired folder names are passed in.
#******************************************************************************************************************
#******************************************************************************************************************
#******************************************************************************************************************
#******************************************************************************************************************
#-------------------------------------------------------------------------------------------------

#INSTALLATION ------------------------------------------------------------------------------------
# Instructions for placing the script in the correct place are listed here.
# Location:		/Library/Scripts/
# Permissions:	rwx r-x r-x
#-------------------------------------------------------------------------------------------------

#REQUIREMENTS ------------------------------------------------------------------------------------
# Shell:		/bin/zsh
# OS:			macOS Big Sur 11.4 or later
# Dependencies:	None
#-------------------------------------------------------------------------------------------------

#HELP/SUPPORT ------------------------------------------------------------------------------------
# You can get help by running the following commands.
# ./folderCreator.zsh -h
# ./folderCreator.zsh -help
# OR
# man folderCreator.zsh
# You can also view the log file for the same at: ~/Library/Logs/folderCreator_log_v1-5.log
#-------------------------------------------------------------------------------------------------

#HISTORY -----------------------------------------------------------------------------------------
# ------------------------------------------------------------------------------------------------
# Version 1.0: Basic script which creates the folders
# Version 1.1: Gives user the ability to specify the folder names at run time.
# Version 1.2: Adds safety checks to the scripts
# Version 1.3: Includes documentation as well as ability to get help.
# Version 1.4: Includes optimisation using for loop
# Version 1.5: Prompts the user in the GUI for names for the different folders.
#-------------------------------------------------------------------------------------------------

#-------------------------------------------------------------------------------------------------
# ------------------------------ SCRIPT STARTS HERE ----------------------------------------------
#-------------------------------------------------------------------------------------------------
#-------------------------------------------------------------------------------------------------
#-------------------------------------------------------------------------------------------------

#These are the default values used for the folder names incase the user doesn't provide any.
TOOLS_FOLDER="Tools"
REPORTS_FOLDER="Reports"
HELP_FOLDER="Help"

#Script version number
VERSION_NUMBER="1.5"

#Command name
COMMAND_NAME="folderCreator.zsh"

#1. Check to see if the user is asking for help. In which case we will have to provide information about the command.
if [[ $1 == "-h" ]] || [[ $1 == "-help" ]]; then
	echo "ABOUT
-----
fileCreator_v1-5.zsh
Version $VERSION_NUMBER

NAME
----
$COMMAND_NAME — Folder creation utility SYNOPSIS
$COMMAND_NAME folder names [ verbs ]

DESCRIPTION
-----------
$COMMAND_NAME creates 3 folders in the home folder. In case the folder names are not provided then the command will create folders with default names 'Tools', 'Reports', \"Help\".

There is also the option of getting help via the help verb.
- This script is intended for creating the custom folders that are required on all corporate computers.
- Run this script on a new computer or a computer being reassigned to another employee.
- This script can run on all computers.

VERBS
-----
[ −h −help] Both the options are used to invoke the help documentation.
[ −v −version] Both the options are used to get the version number of the folderCreator command.

REQUIREMENTS
------------
The following are the minimum requirements to get the script running.
Shell:\t\t zsh
OS:\t\t macOS Big Sur 11.4 or later
Dependencies:\t None

INSTALLATION
------------
$COMMAND_NAME can be installed anywhere you wish. However, there are certain locations that are recommended.
Location:\t /Library/Scripts/
Permissions: \t rwxr-xr-x

USAGE
-----
$COMMAND_NAME folder1 folder2 folder3
Will create folders with your own names.

$COMMAND_NAME -h OR $COMMAND_NAME -help
Will invoke the help utility.

$COMMAND_NAME -v OR $COMMAND_NAME -version
will print the version number in stdout.

WARNING/CAUTION
---------------
$COMMAND_NAME does not perform any validation of names. The only options that folderCreator accepts are -h and -help verbs or the -v and
-version verbs. If the script does not see the -h , -help or the -v , -version options then it will assume that the data being passed in is
the name of the folder. The user of the folderCreator command must ensure that the desired folder names are passed in. The user will also be
prompted, via the graphical user interface, if he/she wishes to provide the names for the folders. If yes, then there will be subsequent
prompts asking for the folder names.

EXAMPLES
--------
$COMMAND_NAME Resources Results Assistant
This will create 3 folders Resources , Results , Assistant , in the user’s home folder.

$COMMAND_NAME
This will create 3 folders with the default names

$COMMAND_NAME Apps
This will use the Apps name for the first folder but the default names for the last 2 folders.

NOTE
----
The user will be asked if he/she wishes to provide custom names in all the examples mentioned above. The user's value will always override
whatever is being provided to the script or defaults.

DIAGNOSTICS
-----------
The script produces a log file called ~/Library/Logs/folderCreator_log_v1-x.log
This file is typically located in the user’s home folder log folder. The x represents the version number of $COMMAND_NAME
You can view the logs for each respective version.

COPYRIGHT
---------
Copyright (c) Amaranthine 2015-2021. All rights reserved. https://amaranthine.in

EXIT STATUS
-----------
In most situations, $COMMAND_NAME exits 0 on success"
	exit 0
fi

echo "$(date) Running script $0 to create folders."
echo ""

TODAY=$(date)
PATH_TO_LOG="$HOME/Library/Logs/folderCreator_log_v1-5.log"

echo "$(date) Starting" >> $PATH_TO_LOG

#2. Check to see if the version number is
if [[ $1 == "-version" ]] || [[ $1 == "-v" ]]; then
	echo "Version: $VERSION_NUMBER"
	exit 0
fi

#3. The following if statements check to see if the script is receiving any arguments. It then picks those arguments and assigns them to the respective variables for use in the script.
if [[ $1 != "" ]]; then
	TOOLS_FOLDER=$1
fi

if [[ $2 != "" ]]; then
	REPORTS_FOLDER=$2
fi

if [[ $3 != "" ]]; then
	HELP_FOLDER=$3
fi

#4. We can prompt the user to see if they wish to provide folder names themselves. This will override any values provided as arguments.
userClicked=$(/usr/bin/osascript -e 'button returned of (display dialog "Would you like to provide names for the folders or use the defaults instead?" buttons {"Custom", "Default"} default button 2 with icon POSIX file "/System/Library/CoreServices/HelpViewer.app/Contents/Resources/AppIcon.icns")')

# if the user decides to provide custom names then go ahead and ask the user via GUI prompts. Otherwise use the values sent as arguments or defaults.
if [[ $userClicked == "Custom" ]]; then
	echo "$(date) The user decided to provide custom names." >> $PATH_TO_LOG

	TOOLS_FOLDER=$(/usr/bin/osascript -e 'text returned of (display dialog "Enter the name of folder 1" default answer "Utilities" buttons {"OK"} default button 1 with title "Folder that will hold the utilities" with icon POSIX file "/Users/Shared/Finder.icns")')

	REPORTS_FOLDER=$(/usr/bin/osascript -e 'text returned of (display dialog "Enter the name of folder 2" default answer "Tools" buttons {"OK"} default button 1 with title "Folder that will hold the tools" with icon POSIX file "/Users/Shared/Finder.icns")')

	HELP_FOLDER=$(/usr/bin/osascript -e 'text returned of (display dialog "Enter the name of folder 3" default answer "Help" buttons {"OK"} default button 1 with title "Folder that will hold the support documents" with icon POSIX file "/Users/Shared/Finder.icns")')

	echo "$(date) User provided: $TOOLS_FOLDER $REPORTS_FOLDER $HELP_FOLDER" >> $PATH_TO_LOG
else
	echo "$(date) User decided to use default values: $TOOLS_FOLDER $REPORTS_FOLDER $HELP_FOLDER" >> $PATH_TO_LOG
fi

#5. Go to the home folder.
cd $HOME

#6. Check to see if each of the folders exists. If it exists then do not create it. Else create the folder.
echo "$(date) Creating folders: $TOOLS_FOLDER, $REPORTS_FOLDER, $HELP_FOLDER" >> $PATH_TO_LOG

for item in $TOOLS_FOLDER $REPORTS_FOLDER $HELP_FOLDER; do
	if [[ -d $item ]]; then
		echo "$(date) Not creating $item as it already exists." >> $PATH_TO_LOG
	else
		echo "$(date) Creating $item" >> $PATH_TO_LOG
		mkdir $item
	fi

	#7. Create the task completion file inside each folder.
	echo "$(date) Creating hidden file for $item folder." >> $PATH_TO_LOG
	cd $item
	#8. Generate the file names based on the folder names.
	touch ".$item-FolderCreated"
	cd ..
done

echo "$(date) Task completed. Have a nice day!"

#-------------------------------------------------------------------------------------------------
#-------------------------------------------------------------------------------------------------
#-------------------------------------------------------------------------------------------------
# ------------------------------ END OF SCRIPT ---------------------------------------------------
I have also performed some additional cleanup. That has been highlighted. The comments and the help have also been updated to reflect the new changes. I have also moved a couple of the echo statements further up the script. These have also been highlighted.
This article is a continuation of the previous article. We will be taking the previous script and using it to build on the concepts we will learning in this article.
Loops
Often times we will come across a situation where we want to perform a task repeatedly with different pieces of data.
For example, here is a snippet of our shell script:
if [[ -d $TOOLS_FOLDER ]]; then
	echo "$(date) Not creating $TOOLS_FOLDER as it already exists." >> $PATH_TO_LOG
else
	echo "$(date) Creating $TOOLS_FOLDER" >> $PATH_TO_LOG
	mkdir $TOOLS_FOLDER
fi

if [[ -d $REPORTS_FOLDER ]]; then
	echo "$(date) Not creating $REPORTS_FOLDER as it already exists." >> $PATH_TO_LOG
else
	echo "$(date) Creating $REPORTS_FOLDER" >> $PATH_TO_LOG
	mkdir $REPORTS_FOLDER
fi

if [[ -d $HELP_FOLDER ]]; then
	echo "$(date) Not creating $HELP_FOLDER as it already exists." >> $PATH_TO_LOG
else
	echo "$(date) Creating $HELP_FOLDER" >> $PATH_TO_LOG
	mkdir $HELP_FOLDER
fi
You can see that we are performing the same task repeatedly. Only the name of the folder is changing. This is the kind of situation that we will commonly encounter. Loops can help us make the script a little more efficient.
Handling loops
We are going to look at 2 solutions for handling loops:
For loop
While loop
For loops
A for loop works on a collection of data. It steps through the collection in the sequence in which it is present and picks one item from it at a time. The loop then performs the tasks specified in it using the item collected. Once finished it proceeds to pick up the next item. This is done till all the items in the collection are used.
Here is an example of a simple for loop. It contains 4 pieces of data in its collection: “Applications”, “Documents”, “Downloads”, & “Library”.
#!/bin/bash

for folder in Applications Documents Downloads Library
do
	echo "The folder is $folder"
done
The output would be:
The folder is Applications
The folder is Documents
The folder is Downloads
The folder is Library
The collection could be data coming from somewhere else; such as the output of a command.
#!/bin/bash

for details in $(ls)
do
	echo "-> $details"
done
The output would be:
-> Desktop
-> Documents
-> Downloads
-> Library
-> Movies
-> Music
-> Pictures
-> Public
While loops
A while loop also performs tasks repeatedly. However it does this till a certain condition is satisfied. So we could use the test operations we learnt in an earlier article to achieve the check.
#!/bin/bash

while [[ ! -f /Users/Shared/exit.txt ]]; do
	echo "File not found"
done

echo "Found"
The script is checking to see if the file at the given path exists. If the file doesn’t exist then it prints out a message and performs the check again.
This will be done till the file is found.
NOTE: If you are testing the above code then you will need to create the file manually. You can do that by executing the following command in terminal:
touch /Users/Shared/exit.txt
Example
Let us go ahead and update our script.
First we will remove the variables that store the names for the hidden files.
Next we will remove the code for creating the folders. This will be replaced by a single block of code inside a for loop. Just remove the code for the reports folder and the help folder. We will use the code for the tools folder inside the for loop.
Right below the line where we echo out the statement that we are creating the folder, add the code for the for loop. Move the remaining folder creation logic inside it and rename the variable.
for item in $TOOLS_FOLDER $REPORTS_FOLDER $HELP_FOLDER; do
	if [[ -d $item ]]; then
		echo "$(date) Not creating $item as it already exists." >> $PATH_TO_LOG
	else
		echo "$(date) Creating $item" >> $PATH_TO_LOG
		mkdir $item
	fi

done
Next, remove the code to create the hidden file. As before, only remove the code for creating the hidden file for the reports and help folders.
Copy the remaining lines of code into the for loop. Place it right after the fi statement.
for item in $TOOLS_FOLDER $REPORTS_FOLDER $HELP_FOLDER; do
	if [[ -d $item ]]; then
		echo "$(date) Not creating $item as it already exists." >> $PATH_TO_LOG
	else
		echo "$(date) Creating $item" >> $PATH_TO_LOG
		mkdir $item
	fi

	#6. Create the task completion file inside each folder.
	echo "$(date) Creating hidden file for $item folder." >> $PATH_TO_LOG
	cd $item
	#7. Generate the file names based on the folder names.
	touch ".$item-FolderCreated"
	cd ..
done
Your final script should look like this:
#!/bin/zsh

#-------------------------------------------------------------------------------------------------
#NAME:		Folder creator
#AUTHOR:	Arun Patwardhan
#CONTACT:	arun@amaranthine.co.in
#DATE:		10th August 2021
#WEBSITE:	https://github.com/AmaranthineTech/ShellScripts
#-------------------------------------------------------------------------------------------------

#LEGAL DISCLAIMER --------------------------------------------------------------------------------
#THE SOFTWARE IS PROVIDED "AS IS", WITHOUT WARRANTY OF ANY KIND, EXPRESS OR
#IMPLIED, INCLUDING BUT NOT LIMITED TO THE WARRANTIES OF MERCHANTABILITY,
#FITNESS FOR A PARTICULAR PURPOSE AND NONINFRINGEMENT. IN NO EVENT SHALL THE
#AUTHORS OR COPYRIGHT HOLDERS BE LIABLE FOR ANY CLAIM, DAMAGES OR OTHER
#LIABILITY, WHETHER IN AN ACTION OF CONTRACT, TORT OR OTHERWISE, ARISING FROM,
#OUT OF OR IN CONNECTION WITH THE SOFTWARE OR THE USE OR OTHER DEALINGS IN THE
#SOFTWARE.
#-------------------------------------------------------------------------------------------------

#LICENSE/TERMS AND CONDITIONS --------------------------------------------------------------------
#MIT License

#Copyright (c) Amaranthine 2021.

#Permission is hereby granted, free of charge, to any person obtaining a copy
#of this software and associated documentation files (the "Software"), to deal
#in the Software without restriction, including without limitation the rights
#to use, copy, modify, merge, publish, distribute, sublicense, and/or sell
#copies of the Software, and to permit persons to whom the Software is
#furnished to do so, subject to the following conditions:

#The above copyright notice and this permission notice shall be included in all
#copies or substantial portions of the Software.
#-------------------------------------------------------------------------------------------------

#ABOUT -------------------------------------------------------------------------------------------
# fileCreator.zsh
# 1.4
#-------------------------------------------------------------------------------------------------

#DESCRIPTION -------------------------------------------------------------------------------------
# - THis script is intended for creating the custom folders that are required on all corporate computers.
# - Run this script on a new computer or a computer being reassigned to another employee.
# - This script can run on all computers.
#-------------------------------------------------------------------------------------------------

#USAGE -------------------------------------------------------------------------------------------
# - To create folders with default names run the command: ./folderCreator.zsh
# - To define your own folder names: ./folderCreator.zsh <folder1> <folder2> <folder3>
# - Available options  : Only the help option is available
# - Getting help       : Use the -h or the -help options to get more information. Or you can use the man command to view the man page.
#-------------------------------------------------------------------------------------------------

#WARNING/CAUTION ---------------------------------------------------------------------------------
#******************************************************************************************************************
#******************************************************************************************************************
#******************************************************************************************************************
#******************************************************************************************************************
# This script doesn't perform any validation of the folder names being passed in by the user.
# If the script does not see the -h or the -help options then it will assume that the data being passed in is the name of the folder.
# The user of the script must ensure that the desired folder names are passed in.
#******************************************************************************************************************
#******************************************************************************************************************
#******************************************************************************************************************
#******************************************************************************************************************
#-------------------------------------------------------------------------------------------------

#INSTALLATION ------------------------------------------------------------------------------------
# Instructions for placing the script in the correct place are listed here.
# Location:		/Library/Scripts/
# Permissions:	rwx r-x r-x
#-------------------------------------------------------------------------------------------------

#REQUIREMENTS ------------------------------------------------------------------------------------
# Shell:		/bin/zsh
# OS:			macOS Big Sur 11.4 or later
# Dependencies:	None
#-------------------------------------------------------------------------------------------------

#HELP/SUPPORT ------------------------------------------------------------------------------------
# You can get help by running the following commands.
# ./folderCreator.zsh -h
# ./folderCreator.zsh -help
# OR
# man folderCreator.zsh
# You can also view the log file for the same at: ~/Library/Logs/folderCreator_log_v1-4.log
#-------------------------------------------------------------------------------------------------

#HISTORY -----------------------------------------------------------------------------------------
# ------------------------------------------------------------------------------------------------
# Version 1.0: Basic script which creates the folders
# Version 1.1: Gives user the ability to specify the folder names at run time.
# Version 1.2: Adds safety checks to the scripts
# Version 1.3: Includes documentation as well as ability to get help.
# Version 1.4: Includes optimisation using for loop
#-------------------------------------------------------------------------------------------------

#-------------------------------------------------------------------------------------------------
# ------------------------------ SCRIPT STARTS HERE ----------------------------------------------
#-------------------------------------------------------------------------------------------------
#-------------------------------------------------------------------------------------------------
#-------------------------------------------------------------------------------------------------

#These are the default values used for the folder names incase the user doesn't provide any.
TOOLS_FOLDER="Tools"
REPORTS_FOLDER="Reports"
HELP_FOLDER="Help"

#Script version number
VERSION_NUMBER="1.4"

#Command name
COMMAND_NAME="folderCreator.zsh"

#1. Check to see if the user is asking for help. In which case we will have to provide information about the command.
if [[ $1 == "-h" ]] || [[ $1 == "-help" ]]; then
	echo "ABOUT
-----
fileCreator_v1-4.zsh
Version $VERSION_NUMBER

NAME
----
$COMMAND_NAME — Folder creation utility SYNOPSIS
$COMMAND_NAME folder names [ verbs ]

DESCRIPTION
-----------
$COMMAND_NAME creates 3 folders in the home folder. In case the folder names are not provided then the command will create folders with default names 'Tools', 'Reports', \"Help\".

There is also the option of getting help via the help verb.
- This script is intended for creating the custom folders that are required on all corporate computers.
- Run this script on a new computer or a computer being reassigned to another employee.
- This script can run on all computers.

VERBS
-----
[ −h −help] Both the options are used to invoke the help documentation.
[ −v −version] Both the options are used to get the version number of the folderCreator command.

REQUIREMENTS
------------
The following are the minimum requirements to get the script running.
Shell:\t\t zsh
OS:\t\t macOS Big Sur 11.4 or later
Dependencies:\t None

INSTALLATION
------------
$COMMAND_NAME can be installed anywhere you wish. However, there are certain locations that are recommended.
Location:\t /Library/Scripts/
Permissions: \t rwxr-xr-x

USAGE
-----
$COMMAND_NAME folder1 folder2 folder3
Will create folders with your own names.

$COMMAND_NAME -h OR $COMMAND_NAME -help
Will invoke the help utility.

$COMMAND_NAME -v OR $COMMAND_NAME -version
will print the version number in stdout.

WARNING/CAUTION
---------------
$COMMAND_NAME does not perform any validation of names. The only options that folderCreator accepts are -h and -help verbs or the -v and -version verbs. If the script does not see the -h , -help or the -v , -version options then it will assume that the data being passed in is the name of the folder. The user of the folderCreator command must ensure that the desired folder names are passed in.

EXAMPLES
--------
$COMMAND_NAME Resources Results Assistant
This will create 3 folders Resources , Results , Assistant , in the user’s home folder.

$COMMAND_NAME
This will create 3 folders with the default names

$COMMAND_NAME Apps
This will use the Apps name for the first folder but the default names for the last 2 folders.

DIAGNOSTICS
-----------
The script produces a log file called ~/Library/Logs/folderCreator_log_v1-x.log
This file is typically located in the user’s home folder log folder. The x represents the version number of $COMMAND_NAME
You can view the logs for each respective version.

COPYRIGHT
---------
Copyright (c) Amaranthine 2015-2021. All rights reserved. https://amaranthine.in

EXIT STATUS
-----------
In most situations, $COMMAND_NAME exits 0 on success"
	exit 0
fi

echo "$(date) Running script $0 to create folders."
echo ""

#2. Check to see if the version number is
if [[ $1 == "-version" ]] || [[ $1 == "-v" ]]; then
	echo "Version: $VERSION_NUMBER"
	exit 0
fi

#3. The following if statements check to see if the script is receiving any arguments. It then picks those arguments and assigns them to the respective variables for use in the script.
if [[ $1 != "" ]]; then
	TOOLS_FOLDER=$1
fi

if [[ $2 != "" ]]; then
	REPORTS_FOLDER=$2
fi

if [[ $3 != "" ]]; then
	HELP_FOLDER=$3
fi

TODAY=$(date)
PATH_TO_LOG="$HOME/Library/Logs/folderCreator_log_v1-4.log"

echo "$(date) Starting" >> $PATH_TO_LOG

#4. Go to the home folder.
cd $HOME

#5. Check to see if each of the folders exists. If it exists then do not create it. Else create the folder.
echo "$(date) Creating folders: $TOOLS_FOLDER, $REPORTS_FOLDER, $HELP_FOLDER" >> $PATH_TO_LOG

for item in $TOOLS_FOLDER $REPORTS_FOLDER $HELP_FOLDER; do
	if [[ -d $item ]]; then
		echo "$(date) Not creating $item as it already exists." >> $PATH_TO_LOG
	else
		echo "$(date) Creating $item" >> $PATH_TO_LOG
		mkdir $item
	fi

	#6. Create the task completion file inside each folder.
	echo "$(date) Creating hidden file for $item folder." >> $PATH_TO_LOG
	cd $item
	#7. Generate the file names based on the folder names.
	touch ".$item-FolderCreated"
	cd ..
done

echo "$(date) Task completed. Have a nice day!"

#-------------------------------------------------------------------------------------------------
#-------------------------------------------------------------------------------------------------
#-------------------------------------------------------------------------------------------------
# ------------------------------ END OF SCRIPT --------------------------------------------------
This article is a continuation of the previous article. We will be taking the previous script and using it to build on the concepts we will learning in this article.
Performing tasks conditionally
So far our script has been performing tasks uninterrupted one after the other. But often times you will come across a situation where you need to perform some checks before going ahead.
The main reason why we would want to perform checks is to make sure that certain criteria are met or if certain resources are present.
Only if these conditions are satisfied will we proceed ahead. Or take an alternative course of action incase the condition isn’t met.
We can find all these checks in the man page for the test command.
Let us look at some of those checks.
Test operations
You can run the following command to view all the operations possible.
man test
There are different comparison operations possible.
The – followed by a letter and then the file name allows us to check for different aspects of a file. Such as if it exists, whether it is a directory and more…
We can even compare files with each other.
We can compare strings.
And we can compare numbers.
Conditional code
Now that we have seen the different kinds of condition checks available. Let us explore how we can use the condition checks.
If statement
The if statement has various forms. We will look at the simplest one first.
if [[ -d "$HOME/Applications" ]]; then
	echo "The applications folder exists in the home folder."
fi
If else statement
If-elif-else statement
Switch on case statement
Modify our code
We will be adding checks to make sure that the arguments passed in contain values. We will also check to see if the folders exist before trying to create them.
#!/bin/zsh

echo "$(date) Running script $0 to create folders."

TOOLS_FOLDER="Tools"
REPORTS_FOLDER="Reports"
HELP_FOLDER="Help"

if [[ $1 != "" ]]; then
	TOOLS_FOLDER=$1
fi

if [[ $2 != "" ]]; then
	REPORTS_FOLDER=$2
fi

if [[ $3 != "" ]]; then
	HELP_FOLDER=$3
fi

TOOLS_FOLDER_CREATED=".$TOOLS_FOLDER-FolderCreated"
REPORTS_FOLDER_CREATED=".$REPORTS_FOLDER-FolderCreated"
HELP_FOLDER_CREATED=".$HELP_FOLDER-FolderCreated"

TODAY=$(date)
PATH_TO_LOG="$HOME/Library/Logs/folderCreator_log_v1-1.log"

echo "$(date) Starting" >> $PATH_TO_LOG

cd $HOME

echo "$(date) Creating folders: $TOOLS_FOLDER, $REPORTS_FOLDER, $HELP_FOLDER" >> $PATH_TO_LOG
if [[ -d $TOOLS_FOLDER ]]; then
	echo "$(date) Not creating $TOOLS_FOLDER as it already exists." >> $PATH_TO_LOG
else
	echo "$(date) Creating $TOOLS_FOLDER" >> $PATH_TO_LOG
	mkdir $TOOLS_FOLDER
fi

if [[ -d $REPORTS_FOLDER ]]; then
	echo "$(date) Not creating $REPORTS_FOLDER as it already exists." >> $PATH_TO_LOG
else
	echo "$(date) Creating $REPORTS_FOLDER" >> $PATH_TO_LOG
	mkdir $REPORTS_FOLDER
fi

if [[ -d $HELP_FOLDER ]]; then
	echo "$(date) Not creating $HELP_FOLDER as it already exists." >> $PATH_TO_LOG
else
	echo "$(date) Creating $HELP_FOLDER" >> $PATH_TO_LOG
	mkdir $HELP_FOLDER
fi

echo "$(date) Creating hidden file for $TOOLS_FOLDER folder." >> $PATH_TO_LOG
cd $TOOLS_FOLDER
touch $TOOLS_FOLDER_CREATED
cd ..

echo "$(date) Creating hidden file for $REPORTS_FOLDER folder." >> $PATH_TO_LOG
cd $REPORTS_FOLDER
touch $REPORTS_FOLDER_CREATED
cd ..

echo "$(date) Creating hidden file for $HELP_FOLDER folder." >> $PATH_TO_LOG
cd $HELP_FOLDER
touch $HELP_FOLDER_CREATED
cd ..

echo "$(date) Task completed. Have a nice day!"
Your completed code should look like.
This file contains hidden or bidirectional Unicode text that may be interpreted or compiled differently than what appears below. To review, open the file in an editor that reveals hidden Unicode characters.
Learn more about bidirectional Unicode characters
This article is a continuation of the previous article. We will be taking the previous script and using it to build on the concepts we will learning in this article.
Documentation in scripts
As you must have observed, our script has already grown to a fairly large one. It still performs the same task we intended it to perform, but there are many more features and capabilities in it. As our script grows it becomes more and more difficult for us to understand what is happening and why. Of course, since we have written the script it is a lot easier for us to understand. But let’s suppose there is a colleague of yours that is reading this script. He/she might have a more difficult time trying to understand the purpose of the script. In fact, even if you attempted to read your own script, say after a break of 6 months, you will take some time understanding why exactly you wrote a piece of code.
A good way to address these issues is to document our code. Documentation gives the creator/editor of the script a chance to explain in simple terms what he/she intendeds to do and potentially why they did a particular thing.
What should be documented?
This is how the documentation template looks.
This file contains hidden or bidirectional Unicode text that may be interpreted or compiled differently than what appears below. To review, open the file in an editor that reveals hidden Unicode characters.
Learn more about bidirectional Unicode characters
# This is a good place to give version history. This helps the user of the script or any future modifiers of the script understand how the script evolved.
Let us look at some of the things that can be offered.
Item
Description
Ownership
This is where we provide details about the person who originally created the script. There might be more than one author involved. Also, it would be nice to maintain a history of people who have modified the script in any way.
Legal disclaimers and License terms
This is where you specify any disclaimers or warning that you wish to provide to anyone who wishes to use the script. You may also include license terms incase you wish to share the script with a wider audience.
Description
Of all the pieces this is one of the most important components. This section actually describes the scope and purpose of the script. Anyone who is using the script will probable be looking at this section first.
Usage
Use this section to provide information about how this script should be used. You could also provide information about the location of the script.
Warning
The idea behind this section is to provide the user information about possible issues with the script. Some examples of this would include: bugs, edge cases, expected supporting assets. Anything that is necessary for the script to run without issues.
Installation
This is where information for placing the script in the correct place with the correct permissions are provided.
Requirements
Any assets, resources or other items that may be required to run the script.
Help and Support
Information about where the user of the script can get more help or how they can get more help is provided here.
History
This section gives information about who modified the script, when they did it, along with the version number. This information may also be available via a version control tool such as Git. However, it may not be the case with every user of the script. In any case it is a good idea to also keep the history in the script.
Offering help
In most situations documentation is enough. But in some situations it may not be possible to read the script. This could be because the user may not have permissions to read the script. Another good way to provide information would be by providing a mechanism to get help for this command.
This is most commonly achieved by providing an option to out script either as -h or -help.
The script has now been modified to support this. It essentially prints a message on the screen if it sees the -h or the -help option.
This is how your final code should look.
This file contains hidden or bidirectional Unicode text that may be interpreted or compiled differently than what appears below. To review, open the file in an editor that reveals hidden Unicode characters.
Learn more about bidirectional Unicode characters
#These are the default values used for the folder names incase the user doesn't provide any.
TOOLS_FOLDER="Tools"
REPORTS_FOLDER="Reports"
HELP_FOLDER="Help"
#Script version number
VERSION_NUMBER="1.3"
#Command name
COMMAND_NAME="folderCreator.zsh"
#1. Check to see if the user is asking for help. In which case we will have to provide information about the command.
if [[ $1 == "-h" ]] || [[ $1 == "-help" ]]; then
echo "ABOUT
-----
fileCreator_v1-3.zsh
Version $VERSION_NUMBER
NAME
----
$COMMAND_NAME — Folder creation utility SYNOPSIS
$COMMAND_NAME folder names [ verbs ]
DESCRIPTION
-----------
$COMMAND_NAME creates 3 folders in the home folder. In case the folder names are not provided then the command will create folders with default names 'Tools', 'Reports', \"Help\".
There is also the option of getting help via the help verb.
- This script is intended for creating the custom folders that are required on all corporate computers.
- Run this script on a new computer or a computer being reassigned to another employee.
- This script can run on all computers.
VERBS
-----
[ −h −help] Both the options are used to invoke the help documentation.
[ −v −version] Both the options are used to get the version number of the folderCreator command.
REQUIREMENTS
------------
The following are the minimum requirements to get the script running.
Shell:\t\t zsh
OS:\t\t macOS Big Sur 11.4 or later
Dependencies:\t None
INSTALLATION
------------
$COMMAND_NAME can be installed anywhere you wish. However, there are certain locations that are recommended.
Location:\t /Library/Scripts/
Permissions: \t rwxr-xr-x
USAGE
-----
$COMMAND_NAME folder1 folder2 folder3
Will create folders with your own names.
$COMMAND_NAME -h OR $COMMAND_NAME -help
Will invoke the help utility.
$COMMAND_NAME -v OR $COMMAND_NAME -version
will print the version number in stdout.
WARNING/CAUTION
---------------
$COMMAND_NAME does not perform any validation of names. The only options that folderCreator accepts are -h and -help verbs or the -v and -version verbs. If the script does not see the -h , -help or the -v , -version options then it will assume that the data being passed in is the name of the folder. The user of the folderCreator command must ensure that the desired folder names are passed in.
EXAMPLES
--------
$COMMAND_NAME Resources Results Assistant
This will create 3 folders Resources , Results , Assistant , in the user’s home folder.
$COMMAND_NAME
This will create 3 folders with the default names
$COMMAND_NAME Apps
This will use the Apps name for the first folder but the default names for the last 2 folders.
DIAGNOSTICS
-----------
The script produces a log file called ~/Library/Logs/folderCreator_log_v1-x.log
This file is typically located in the user’s home folder log folder. The x represents the version number of $COMMAND_NAME
You can view the logs for each respective version.
In most situations, $COMMAND_NAME exits 0 on success"
exit 0
fi
echo "$(date) Running script $0 to create folders."
echo ""
#2. Check to see if the version number is
if [[ $1 == "-version" ]] || [[ $1 == "-v" ]]; then
echo "Version: $VERSION_NUMBER"
exit 0
fi
#3. The following if statements check to see if the script is receiving any arguments. It then picks those arguments and assigns them to the respective variables for use in the script.
if [[ $1 != "" ]]; then
TOOLS_FOLDER=$1
fi
if [[ $2 != "" ]]; then
REPORTS_FOLDER=$2
fi
if [[ $3 != "" ]]; then
HELP_FOLDER=$3
fi
#4. Generate the file names based on the folder names.
This article is a continuation of the previous article. We will be taking the previous script and using it to build on the concepts we will learning in this article.
Using Variables to store information
First up we will look at variable. Variables are containers that can hold information. The biggest advantage of this is the fact that we can use information in our tasks simply by reusing the variable it is stored in. This means if there is any change at a later date, then we only have to change the value in the variable.
So, in the future, if there is a need to modify the information, we only have a single point of change to make. This greatly aids in the ease of maintenance of the code.
It also makes the script more readable.
NOTE: The value of a variable can be changed at a later point of time within the script.
Creating variables is very easy. You simply declare a name and assign it a value using the = operator. For example, if we are going to be using the path to the logs folder then storing it in a variable called PATH_TO_LOGS makes sense. We would then follow it up with the = sign and follow that up with the path in quotes.
PATH_TO_LOGS=“/Library/Logs/“
To use this variable in a command we would simple callout the name with the $ symbol prefixed before it.
echo $PATH_TO_LOGS
The $ symbol is necessary to access the value being held by the container.
While declaring variables try to use names which explain the purpose of the variable.
Built in variables
We can see that it is very easy to define our own variables. However, we are not restricted to creating our own variables. The system provides us with predefined variables. These give us access to useful information such as:
Path to the current user’s home folder.
The shell interpreter being used.
The currently logged in user name.
We can get the complete list of commands with the help of the printenv command.
printenv
How about using these variables? Well, we will use it the same way we would use our own variables. Just prefix the $ symbol before the variable name.
echo "The path to the home folder is $HOME"
Let us update the script from the previous article.
#!/bin/zsh

echo "Running script to create folders."

TOOLS_FOLDER="Tools"
REPORTS_FOLDER="Reports"
HELP_FOLDER="Help"

TOOLS_FOLDER_CREATED=".$TOOLS_FOLDER-FolderCreated"
REPORTS_FOLDER_CREATED=".$REPORTS_FOLDER-FolderCreated"
HELP_FOLDER_CREATED=".$HELP_FOLDER-FolderCreated"

cd $HOME

echo "Creating folders: $TOOLS_FOLDER, $REPORTS_FOLDER, $HELP_FOLDER"
mkdir $TOOLS_FOLDER
mkdir $REPORTS_FOLDER
mkdir $HELP_FOLDER

echo "Creating hidden file for $TOOLS_FOLDER folder."
cd $TOOLS_FOLDER
touch $TOOLS_FOLDER_CREATED
cd ..

echo "Creating hidden file for $REPORTS_FOLDER folder."
cd $REPORTS_FOLDER
touch $REPORTS_FOLDER_CREATED
cd ..

echo "Creating hidden file for $HELP_FOLDER folder."
cd $HELP_FOLDER
touch $HELP_FOLDER_CREATED
cd ..

echo "Task completed. Have a nice day!"
Capturing command output
Now that we have seen how variables can be created and used, then next logical step is to use them to store the outcome of a command. Why would we need to do this? Let us suppose that a command returns the path to a folder and we would like to perform multiple tasks on this folder. We can simply save the path in a variable and then use the variable across the script.
If storing the result of the command in a variable wasn’t possible then we would have to execute the command over and over again every time we needed the result.
But before we store the outcome of the command we first need to understand how we can capture the output of a command itself. This is done with the help of command substitution. The command to be executed is placed within the $ symbol followed by parentheses.
So to store it in a variable we would just place the command we would just place this on he right hand side of the = sign. For example, if we wanted to store today’s date we would use the date command placed within the $() on the right hand side of the = sign. On the left hand side of the = sign would be the name of our variable.
TODAY=$(date)
There is an older way of doing the same thing, instead of using the $() the command would be placed within 2 back ticks.
TODAY=`date`
Writing to files
While it is useful to store information within variables there are some limitation with this. Sometimes we would like to store our data outside the script for example on some other file. The advantage with this approach is that it allows us to access the information across multiple invocations of the script.
The way we write to a file is by redirecting the output of the command from standard output to a file. There are 2 operators that help us with this.
The redirect operator with a single angle bracket will write the contents to a file. This will replace the existing content fo the file.
echo "Hello, World!" > /Users/Shared/message.txt
The redirect operator with 2 angle brackets will also write contents to a file. But this will append or add the existing content.
echo "Hello, World!" >> /Users/Shared/message.txt
Depending on what you want you can use one of the 2 approaches.
Logging events taking place in the script
A log file is used to note done certain events being performed by an app, script, process, or any task. It is a very useful troubleshooting tool. This would be a nice feature to add to our script. We can log the different events that are taking place. To do this we will use the same redirect operator to write to a file.
Log files are typically stored in one of two locations in macOS:
~/Library/Logs/
/Library/Logs
For our demo we will store it in the ~/Library/Logs/ folder. This makes sense because our script will be making changes to a user’s home folder. So ideally, the log file should also stay in the user’s home folder.
The way we will generate our log file is by redirecting the output of the echo command to our file.
So all the echo statements we have will be modified to redirect to the log. Additionally, we will use command substitution to include the date and time in out message. Let us modify the script above to reflect these new changes.
#!/bin/zsh

echo "$(date) Running script to create folders."

TOOLS_FOLDER="Tools"
REPORTS_FOLDER="Reports"
HELP_FOLDER="Help"

TOOLS_FOLDER_CREATED=".$TOOLS_FOLDER-FolderCreated"
REPORTS_FOLDER_CREATED=".$REPORTS_FOLDER-FolderCreated"
HELP_FOLDER_CREATED=".$HELP_FOLDER-FolderCreated"

TODAY=$(date)
PATH_TO_LOG="$HOME/Library/Logs/folderCreator_log_v1-1.log"

echo "$(date) Starting" >> $PATH_TO_LOG

cd $HOME

echo "$(date) Creating folders: $TOOLS_FOLDER, $REPORTS_FOLDER, $HELP_FOLDER" >> $PATH_TO_LOG
mkdir $TOOLS_FOLDER
mkdir $REPORTS_FOLDER
mkdir $HELP_FOLDER

echo "$(date) Creating hidden file for $TOOLS_FOLDER folder." >> $PATH_TO_LOG
cd $TOOLS_FOLDER
touch $TOOLS_FOLDER_CREATED
cd ..

echo "$(date) Creating hidden file for $REPORTS_FOLDER folder." >> $PATH_TO_LOG
cd $REPORTS_FOLDER
touch $REPORTS_FOLDER_CREATED
cd ..

echo "$(date) Creating hidden file for $HELP_FOLDER folder." >> $PATH_TO_LOG
cd $HELP_FOLDER
touch $HELP_FOLDER_CREATED
cd ..

echo "$(date) Task completed. Have a nice day!"
Passing information to a script
While storing information and capturing information within a script is useful. It is also useful to have the ability to give information to a script at the time of running the script. This allows the user of the script to have greater control over the end result or outcome.
The information that is passed into the script is store in predefined variables known as positional variables. They are named $0, $1, $2 and onwards. Let us modify the script to use these variables.
#!/bin/zsh

echo "$(date) Running script $0 to create folders."

TOOLS_FOLDER=$1
REPORTS_FOLDER=$2
HELP_FOLDER=$3

TOOLS_FOLDER_CREATED=".$TOOLS_FOLDER-FolderCreated"
REPORTS_FOLDER_CREATED=".$REPORTS_FOLDER-FolderCreated"
HELP_FOLDER_CREATED=".$HELP_FOLDER-FolderCreated"

TODAY=$(date)
PATH_TO_LOG="$HOME/Library/Logs/folderCreator_log_v1-1.log"

echo "$(date) Starting" >> $PATH_TO_LOG

cd $HOME

echo "$(date) Creating folders: $TOOLS_FOLDER, $REPORTS_FOLDER, $HELP_FOLDER" >> $PATH_TO_LOG
mkdir $TOOLS_FOLDER
mkdir $REPORTS_FOLDER
mkdir $HELP_FOLDER

echo "$(date) Creating hidden file for $TOOLS_FOLDER folder." >> $PATH_TO_LOG
cd $TOOLS_FOLDER
touch $TOOLS_FOLDER_CREATED
cd ..

echo "$(date) Creating hidden file for $REPORTS_FOLDER folder." >> $PATH_TO_LOG
cd $REPORTS_FOLDER
touch $REPORTS_FOLDER_CREATED
cd ..

echo "$(date) Creating hidden file for $HELP_FOLDER folder." >> $PATH_TO_LOG
cd $HELP_FOLDER
touch $HELP_FOLDER_CREATED
cd ..

echo "$(date) Task completed. Have a nice day!"
The final script should look like:
This file contains hidden or bidirectional Unicode text that may be interpreted or compiled differently than what appears below. To review, open the file in an editor that reveals hidden Unicode characters.
Learn more about bidirectional Unicode characters
One last thing to talk about now is script locations. So far we have been placing our scripts where ever we wish and running them from there. But it may be a good idea to use a consistent location for the same. There are several candidates for this:
~/Library/Scripts/
/Library/Scripts/
These are the more standard locations.
The only decision that needs to be made is whether it is the Library folder in the user’s home folder or the library folder located at root. This affects if the script is available only for a specific user or for all users on a computer.
There are other locations possible too. Developers often have a folder in the home folder called “Developer”. This needs to be manually created, but once created the system recognises it as the folder where files related to development are kept. You can create a scripts folder and place it in there.
Another popular location is the Application Support folder within the library folder. You can create a folder that represents items related to your scripts and then place the script in that folder. Note that these folders will have to be created by manually.
~/Developer/Scripts/
~/Library/Application Support/<your folder>/
These 2 locations would need to be created.
Scripts are not typically exposed to the end user. There is typically some kind of scheduling mechanism that triggers them. However, if a script is designed to be used by the end user you could even place them in:
/Applications/Scripts/
~/Applications/Scripts/
Like the developer folder the applications folder in the home folder needs to be created. But once created the system recognises what it is intended for and gives it special privileges. The scripts folder within it will have to be created manually.
While this may not seem like a big deal. Placing your scripts in the correct location can lead to more consistent experiences, make troubleshooting easy, and also hide potential complexity.
Conclusion
The ability to store data within a script, pass data to a script or store data on an external file from within a script has several advantages. This makes the script more power and compact at the same time. It also makes the script less susceptible to errors and mistakes.
Video
Download
You can download the script from the same git repository as the previous one. The script is named folderCreator_v1-1.zsh.
One of the advantages with scripts is the fact that you can easily automate many tasks. Here is an article that walks you through that process.
If you come across a situation where you want to perform a set of tasks on multiple computers then scripts come in very handy.
I will be providing the Shell Script version of the task. Feel free to make changes to the scripts as required. I will try to provide an AppleScript version of the tasks a little later.
This is not the only way to implement the scripts. There may be multiple approaches towards achieving the same result. You will have to explore and examine the correct approach.
This is not a comprehensive list. The scripts should give you some ideas and act as a useful reference when you are creating your own scripts.
I have tested these scripts on macOS Catalina 10.15
The Software Is Provided “As Is”, Without Warranty Of Any Kind, Express Or Implied, Including But Not Limited To The Warranties Of Merchantability, Fitness For A Particular Purpose And Noninfringement. In No Event Shall The Authors Or Copyright Holders Be Liable For Any Claim, Damages Or Other Liability, Whether In An Action Of Contract, Tort Or Otherwise, Arising From, Out Of Or In Connection With The Software Or The Use Or Other Dealings In The Software.
WARNING
Please try these scripts on a test computer. Some of the scripts do make changes to the system. Always test before using these scripts.
Automating tasks on the Mac is very useful for a wide variety of reasons. In this article we are going to look at the different technologies available for automating tasks.
TOOLS
Automator
The simplest way of achieving automation. Automator which is a built in application allows you to create task workflows by simply dragging in a set of predefined routines into a specified sequence. Let us explore how it works by creating a watermarking print plugin
Let us look at how we can create a print plugin that automatically adds a watermark to the pdf file.
First get hold of an image that you will use as a watermark.
Open Automator.
Click on “New Document”
Choose Print Plugin as the type of task to create
From the left hand side drag the “Watermark PDF Documents” option. You will be able to locate this from the PDF library on the extreme right.
Add the image that will be used as a watermark. Customise the settings to your desired level. You may have to use trial and error till you get the desired output.
Similarly drag the Move finder Items to the right. You will be able to locate this from the Files & Folders library.
Save the task as WatermarkCreator.
Open a text file.
Select File > Print
Click on the PDF drop down in the print dialog.
Select the newly created task.
You have now successfully setup your own watermark creator.
Shell Scripting
For those coming from a Linux/Unix background this might be a familiar option. Very often users need to run a series of terminal commands repeatedly. While it is not difficult to do this, wouldn’t it be nice if we could write all the commands in a single file? Shell Scripts help users do just that.
To create a shell script:
Open TextEdit
Write the following code in there (We will write code to create a series of files and folders in our home folder for a user called admin):
#! /bin/sh
cd /Users/admin/
if [ -d "/Users/admin/Applications/" ]; then
echo "Applications Folder Exists"
else
mkdir Applications
fi
if [ -d "/Users/admin/Sites/" ]; then
echo "Sites Folder Exists"
else
mkdir Sites
fi
if [ -d "/Users/admin/Developer/" ]; then
echo "Developer Folder Exists"
else
mkdir Developer
fi
cd Developer
if [ -d "/Users/admin/Developer/iOSProjects/" ]; then
echo "iOSProjects Folder Exists"
else
mkdir iOSProjects
fi
if [ -d "/Users/admin/Developer/macOSProjects/" ]; then
echo "macOSProjects Folder Exists"
else
mkdir macOSProjects
fi
Save the file with the name FolderCreator on the Desktop.
Open the Terminal Application
Let us make the script executable. To do that, run the commands:
AppleScript is Apple’s proprietary scripting technology. It comes bundled as a part of macOS. To create AppleScript tasks we need to use the built in AppleScript editor.
Here is an example of a small AppleScript
tell application “Finder” to set the view for all Finder Windows as column view
tell application “Finder” to close every Finder Window
tell application “Safari”
open location “<a href="http://www.arunpatwardhan.com">http://www.arunpatwardhan.com</a>
open location “<a href="http://www.amaranthine.in/feedback">http://www.amaranthine.in/feedback</a>
open location “<a href="http://www.amaranthine.in/gallery">http://www.amaranthine.in/gallery</a>
end tell
Copy that block of commands in your AppleScript editor and see what comes up.
There are many more things that can be done with AppleScript. You can have popup windows asking users for commands, turn off the computer. Change the settings for different parts of the OS and for different applications. All this with commands written in a single file. All the user has to do is double click the file.
For more information about AppleScript visit Apple’s Developer site.
Launch Agents, Launch Daemons
NOTE: Scheduling Launch Agents/Launch Daemons improperly may leave your computer in an unusable state. Always test this on a computer that does not contain important data. If you are unsure, please consult someone with knowledge of the same before proceeding ahead.
Launch Agents/Launch Daemons allow you to schedule tasks which are to be performed at intervals. You can also use them to ensure that tasks are kept running and that the user does not have the possibility to quit them. To setup a launch daemon:
First create a Plist file that looks like the one below. I have created a script called echoer and placed it in the /Users/admin/Applications folder where admin is the user.
Place the file in the ~/Library/LaunchAgents folder. Name it in.amaranthine.demod.plist
Run the command in terminal to load the Launch Agent.
An easy way to automatically load, Applications/Files/Folder, as soon as well login is to use Login Items. This is very easy to do.
Open System Preferences > Users & Groups
Switch to the Login Items tab.
Click on the ‘+’ sign at the bottom to add new Applications. Let’s add Maps so that it launches as soon as we login. You should see it appear in the list.
That’s it. You have setup login items. You can repeat this process for as many applications as you wish.
Others
PHP, Perl, Python, Javascript, Swift allow you to create custom automated tasks and routines. These require knowledge of programming.
Choosing the right approach
Which one to choose depends on a lot of factors but we can break it down to 2:
You are a technically qualified person and understand things like programming, scripting and command line
You are an end user working either at home or in office.
End User
If you are an End user then you should really stick to Automator and Login Items. These are the ones that are the easiest to implement and least likely to cause any issues. You could venture and explore other options if you have a good understanding of them. Or you can ask the IT or Tech Support teams to help you with scripting and other technologies.
Tech Support or IT Person
Any of the tools mentioned above can be used by you. Make sure that you have a good command over the tools and are able to troubleshoot issues arising out of their usage.
Note: The programs/applications/tools and languages mentioned in this article may not cover all the available options. Also, anyone who uses or implements the items mentioned in the article does so at their own risk. The author does not take responsibility for any loss or damage that may arise from the use of the programs/applications/tools and languages mentioned above.
This post follows up on the previous 2 posts. Here we will look at some advanced commands. Note that this is by no means a comprehensive list. You can visit the online version of the man pages: Apple Man Pages
The commands are explained with some common tasks in mind. Some of the steps are there to illustrate the usage of the commands. To find out other tasks that can be performed using these commands simply refer to the man pages.
FILE SYSTEM
diskutil
The diskutil command is a handy tool to run disk utility via the terminal. A full list of tasks that can be executed are available via the man command.
Example:
There could be situations where you have encrypted your USB drive & have forgotten the password for the same. While there is no way to retrieve the data, it is still possible for you to use the USB disk. Let’s use the diskutil command to do this.
– Launch terminal
– Make sure that the USB is properly connected
– Run the command diskutil cs list
– This lists all the core-storages that are connected to your system.
– Next to the Logical Volume Group select the alphanumeric id & copy it (make sure you select the correct logical volume group).
– Type the command diskutil cs delete <id>
– Replace the id with the alphanumerics id you copied earlier.
– This will completely remove the encrypted partition. As mentioned earlier you will loose all the data that is already there on the partition.
The mount command is used to mount a volume via the terminal. A volume can be mounted as a Read-Write or a read only. For full details on the functionality run the man mount command
Used to get system related information. it can generate a small or a detailed report depending on what option is used. For full information access the man pages for the command.
Displays information about the various processes running within the system including the usage 7 state. To get more information about the full functionality visit the man pages.
This command is used to access the information that is found within the System Preferences > Network Preferences pane.
You can use this command to do some quick command line configuration of the network settings.
A good example is to manually configure the settings while booted in the OS X Recovery partition. Here is an Apple Support Document which talks about the same.