OS X and iOS troubleshooters toolkit

This article covers some of the things troubleshooters would need during their everyday work. I’ve also listed links to some products and applications as an example. It is by no means an endorsement of the same.

OS X Install Disk: This is probably one of the most important tool that a troubleshooter must carry around with him/her. Ideally it would be one disk with multiple versions, each corresponding to a specific version of the OS. Exactly how many versions depends on the situation, for example one can have all instances of the present and previous 2 versions of the OS (For example OS X Mavericks 10.9, 10.9.1, 10.9.2, 10.9.3, 10.9.4, 10.9.5 OS X Yosemite 10.10, 10.10.1, 10.10.2, 10.10.3, 10.10.4, 10.10.5 OS X El Capitan 10.11, 10.11.1)

Thunderbolt & FireWire Cables: These come in handy when it comes to transferring data. These cables  are necessary when you wish to  perform target disk mode troubleshooting. Make sure you have the correct version of the cable.

http://www.apple.com/shop/product/MD862LL/A/apple-thunderbolt-cable-05-m

Portable Storage Device: Along with the cables mentioned earlier having a portable storage device with a large capacity is useful. Mainly when it comes to taking a back up. The user may or may not have a storage device available for this. (Ideally, taking a backup of the data should be done by the user on his/her own storage device.)

http://www.lacie.com/as/en/products/mobile-storage/rugged-thunderbolt/

http://www.apple.com/shop/product/HE154VC/A/promise-pegasus2-r8-24tb-8-by-3tb-thunderbolt-2-raid-system

http://www.promise.com/Products/Pegasus

Internet access via USB Dongle: Yet another important tool. Application & OS upgrades require internet access. This will also come in handy when you are trying to perform network troubleshooting. Make sure there is sufficient data available for upload/download. Optionally one can carry multiple Internet dongles from different vendors.

Portable Power Bank: This is more useful for portable devices. Carry one with a large capacity, enough for multiple recharges or charging multiple devices.

Display adapters: Necessary to troubleshoot when the main display isn’t working or to heck the display ports. Carry all combinations HDMI to VGA, MiniDisplay to VGA, MiniDisplay to HDMI, HDMI to HDMI and any others depending on the device to be connected to.

http://www.apple.com/shop/product/H9139VC/B/kanex-atv-pro-x-hdmi-to-vga-adapter-with-audio-support

http://www.apple.com/shop/product/MB572Z/B/mini-displayport-to-vga-adapter

Secondary Display: This might not be practical as displays tend to be very large and not necessarily portable. However, one can carry a small pocket projector. A secondary display is always handy as it reduces dependency on the user/client to provide one.

Power adapters: Not strictly required but can come in handy. Useful for checking if the user’s power cord is functioning properly. Make sure you carry all the different versions of the power cords.

Lightning & 30 pin cables: Again not strictly necessary but would be useful for checking if the user’s power cord is functioning properly. Make sure you carry all the different versions of the power cords.

MacBook Pro &/or iPad: Carrying your own Mac & iPhone/iPad is very important. Load these devices with various tools required to diagnose and/or fix issues.

https://itunes.apple.com/in/app/inettools-network-diagnose/id561659975?mt=8

https://itunes.apple.com/us/app/inet-network-scanner/id340793353?mt=8

Disk Drill: http://data-recovery-software-review.toptenreviews.com/mac-recovery-software/mobile/disk-drill-pro-review.html

Airport Utility: https://support.apple.com/kb/DL1664

Airport Utility: AirPort Utility by Apple

https://appsto.re/in/YJ7Dz.i

Simple steps for securing your Mac

Continuing on from the previous post, where we learnt to secure our iOS devices, we will now apply similar steps on the Mac.

The security of a computer is easy to maintain if physical access to the device is restricted to yourself as far as possible. If any unauthorised person has physical access to your computer then all bets on security are off. While it’s easy for us to say that no one else is going to use the computer, one must always take some precautions. The following are just some of the steps one could take to secure their Mac.

User Accounts

This is the simplest way of ensuring very basic security. If more than one person is using a Mac one can have different accounts for each user. The account type that can be used for other users are:

  • Standard Users: This is a basic account that is used everyday. This accounts limits the user to his own files & folders only. The user has the option to install applications too.
  • Managed Users: They are standard users with restrictions. An administrator can specify what the user can or cannot do. This includes time limits, restrictions on applications & websites.
  • Guest User: This is the simplest of the lot. Good for people who wish to access their emails & leave no data behind.

User Account Password

This is the simplest form of security. It is the password that you use to login to the computer. Having a strong password goes a long way in securing your Mac.

Setting a password

A password to your account will very likely be set when it was first created.

Changing the password

This can be changed at any point in time.

  1. Open System Preferences
  2. Click on Users & Groups
  3. If necessary unlock the padlock icon and authenticate as the administrator on your Mac.
  4. Select your user account
  5. On the right hand side click on change password

The other approach towards changing the password is:

  1. Open System Preferences
  2. Click on Security & Privacy
  3. Click on the General tab
  4. Click on the “Change Password” button next to the sentence: “A login password has been set for this user”

Note: for both the approaches you must know your existing password.

To create a strong password use the built in Password Assistant 

Encrypted Disk Images

This offers a convenient approach towards storing your files securely. Disk Images are created using Disk Utility. To create encrypted disk images:

  1. Open Disk Utility. It’s located in the Applications > Utilities  folder.
  2. Click File > New > Blank Disk Image.step2
  3. Don’t select the ‘Disk Image from Folder ‘ option.
  4. Specify the size of the image.
  5. In the Image Format select ‘Read/Write’
  6. Under security select the level of encryption desired.
  7. Provide a name and click create.Screen Shot 2015-08-15 at 11.44.19 am
  8. Choose where you wish to save the disk image, provide an appropriate password.Screen Shot 2015-08-15 at 11.45.22 am
  9. Once the image is created, open the image.
  10. It mounts as a virtual disk, you will be prompted to enter the password you set earlier.
  11. Now you can add files you wish to secure.
  12. Once you are done simply eject the volume.
  13. The next time you wish to access the files simply open the image and authenticate with the password.

This ensures that your information is completely safe.

Firewall

Firewall Options
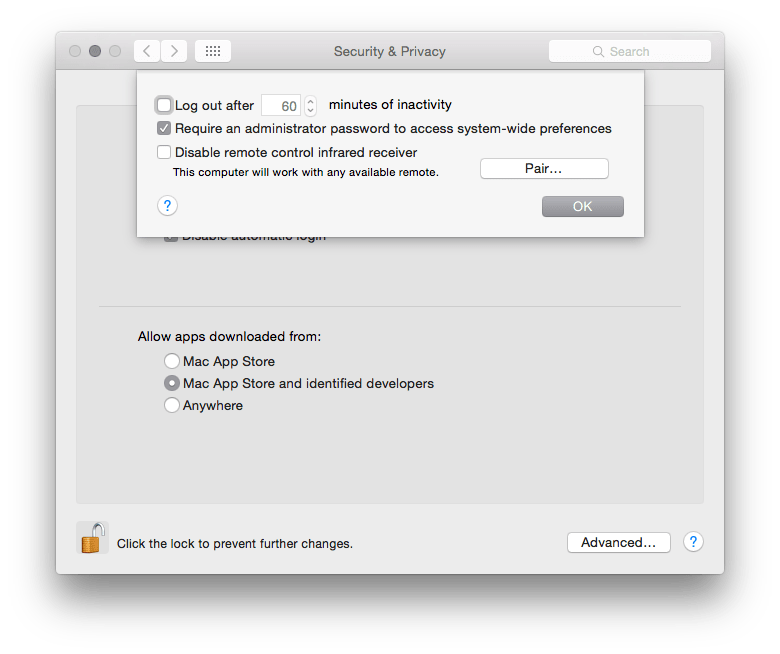
The firewall option is nice if you want to secure your communications over the network. From here you can control which applications can communicate over the internet or receive communications over the network. Simply turn on the Firewall & control access to the computer.

To customise the access to a network:

  1. Click on Firewall Options
  2. You can then click on the +/- buttons to add or remove applications from your firewall list. You can also modify whether a particular application is blocked.Screen Shot 2015-09-18 at 11.13.50 am

FileVault

Disk images provide the option of securing some of your files. But what if there is a lot of secure information that you have? Disk images maybe used but it can become tedious if there are too many files. In such situations using FileVault to secure your files is preferable.

FileVault encrypts your main partition, that is, the partition from where you boot your OS from. Most users would have a single partition on their disk, for them it would mean that FileVault encrypts the whole hard disk. So anything you create on the encrypted partition is automatically secured.

To turn on FileVault:

  1. Open System Preferences > Security & Privacy > FileVault Tab.
  2. Click ‘Turn on FileVault’.Screen Shot 2015-08-15 at 12.10.02 pm
  3. Authenticate as the administrator if necessary.
  4. You will be asked where you wish to save the ‘Recovery Key’? This key is important because you would need the recovery key to reset your account password if all administrator users forget their password.Screen Shot 2015-08-15 at 12.10.09 pm
  5. You can choose to save it to your iCloud Account
  6. Click continue.
  7. Choose the users who will have the privilege of decrypting the system for daily use.Screen Shot 2015-08-15 at 12.10.16 pm
  8. Click Continue.
  9. Click Restart to start the Encryption process.Screen Shot 2015-08-15 at 12.10.24 pm

Logout & Sleep

If you are leaving the computer idle or unattended for a period of time, then it is a good idea to make sure that the computer itself is locked automatically. These settings can easily be set from System Preferences:

  1. Open System Preferences > Security & Privacy
  2. Click on the General Tab.Screen Shot 2015-09-18 at 11.20.10 am
  3. Check the box for “Require password after sleep or screen saver begins“. This way the user will have to enter his/her password to start using the computer again. Specify the time duration after which this can happen.
  4. Click on “Advanced
  5. Select the check box to log out after a certain period of inactivity. Specify the time duration.Screen Shot 2015-09-18 at 11.20.15 am

Find My Mac

This feature has more to do with locating a device that is missing. While it is called Find My Mac, one can locate both OS X as well as iOS devices. There are a few things to keep in mind:

  • All the devices to be tracked should be signed in with the same Apple ID.
  • The device must be connected to the Internet.

Setting up Find My Mac is easy:

  1. Open System Preferences > iCloud.
  2. Make sure you are signed in.
  3. On the service list, located on the right hand side, scroll down to the checkbox for Find My Mac.
  4. Select the checkbox for Find My Mac if it is not already selected.
  5. You may need to grant access to location services.

Locating a device using Find My Mac:

  1. On any computer visit www.icloud.comicloud1
  2. Sign in with the same Apple ID/iCloud ID you had signed in with on your Mac.
  3. Once you log in click on the Find My iPhone app. Remember, even if it is called Find my iPhone, you can search for any iOS or OS X device.icloud2
  4. The page should now load with a map of all your devices which are currently online.
  5. You can select a specific device & perform various actions such as: Play Sound, Lock Device, Erase Device. Select the activity appropriate for your needs.icloud4

Privacy

it is possible to restrict access to a particular set of data on your Mac. Through the privacy tab within System Preferences > Security & Privacy.

From here once can give access to your data at an application level. The kind of data that can be moderated are:

  • Contacts
  • Calendar events
  • Location
  • Reminders
  • Facebook/Twitter credentials

Certain resources such as Location & Diagnostics are controlled by the administrator.

Firmware Password

A Firmware Password is a Logic Board level password. The main purpose of a Firmware Password is to prevent unauthorised modification of the startup process of a Mac. It doesn’t secure your data. But it makes sure that no one can gain access to your computer by changing the boot sequence. It becomes difficult for people to boot your Mac off a network or an external disk.

The process of setting up a Firmware Password is a bit technical. Please consult with a member from the IT Department of your company or contact an Apple Certified Support Professional. You can also approach an Apple Authorised Service Centre for the same. If you have forgotten one, then you will have to approach an Apple Authorised Service Centre for the same. Here are the steps.

Simple steps towards securing your iPhone

Data safety is always a must. With portable devices it gets even more important. Here are a few steps that one can take to make sure their iPhone/iPad/iPod touch is secure. While the guide says iPhone, you can apply many of these steps to other iOS devices, subject to feature availability.

PASSCODE & TOUCH ID UNLOCK

This is the simplest form of security. You are prompted to setup your passcode during the initial device setup itself. While it is not necessary, it is highly recommended. Of course, you can change this at any time. The other option on the newer devices is to use the fingerprint scanner called Touch ID. This adds a convenience to the user while taking care of the security needs. The important thing is that your finger print details are left on the device. Nothing is shared over the internet. The Touch ID is limited to newer devices.

IMG_0076

IMG_0077

IMG_0078


ACTIVATION LOCK

Activation lock is a feature that was first introduced in iOS 7. The idea behind Activation lock is to make sure that no one is able to use a stolen device, even if it is erased. This is activated automatically once you sign into your iCloud account. To use a device after it has been erased, the user must enter the Apple ID & password that was used to sign into iCloud on the device.

Care must also be taken when transferring devices & Activation Lock: https://support.apple.com/kb/PH13695?locale=en_US

FIND MY IPHONE

This feature is available via the iCloud service. It allows you to locate your device & shows it up on the map itself. This feature is extremely useful if you have lost the device. Note: For this to work, the device requires an active network connection.


IMG_0519

IMG_0439 IMG_0440


Once configured, you can locate the device using the web that is via http://www.icloud.com or through the “Find my iPhone” app on another iOS device.

ERASE PHONE

Another useful option is to automatically erase the phone, if the number of passcode attempts by a user exceeds the maximum specified limit.

This is setup in the Touch ID  & Passcode section within the Settings app.

IMG_0076

IMG_0516

ALLOW ACCESS FOR SERVICES WHEN DEVICE IS LOCKED

Just having a passcode or Touch ID may not be enough in all cases. Some data is also available from the lock screen. One can control the availability of data on the lock screen from the Touch ID & Passcode screen within the Settings app.

IMG_0076IMG_0518

PRIVACY

Additionally, you can also control what information from your device is being shared & which apps have access to that information. There is a lot of flexibility available when it comes to controlling the kind of information being shared.

IMG_0438

The user can specify which apps can access their contacts, calendar events, location & other data.

AUTO LOCK

It’s very rare that one leaves their iPhone unattended. But in the rare cases that one is distracted from the task they are performing on the device, it would be nice to know if the device can lock itself up.

IMG_0441

This is done through auto lock within the General settings under the settings app.


RESTRICTIONS

Located under the general settings within the settings app, restrictions, as the name says, allows us to disable certain applications and actions from being executed.

IMG_0523IMG_0521

The passcode is required to enable/disable the feature.


Managing all your data on iOS devices

In todays interconnected world managing all your data is quite important. Most of us end up having more than one smart device that we use everyday. As time goes on we will buy a newer version of the device. It is not necessary that we will get a newer version of each smart computer that we own simultaneously. This means that we have to pay special attention to making sure that our data stays up to date on all the devices & that there is no accidental loss of data.

There are various solutions available to users which easily takes care of data management problems commonly faced by multiple users. One of the most common solutions is to make sure that all your data is available on the cloud. I have given a brief overview on the different cloud services available in my previous article.

However, storing information on the cloud is not enough. Some effort still needs to be done on the users end to ensure that the data is there everywhere they want it. In this article I will be talking about managing your data, migrating your data & backing up your data on your iOS devices.

The starting point for this is the iCloud service. It is a free service provided by Apple & is a must for iPhones & iPads.

Through this article I will be referring to the iOS device as iPhone, however, the steps apply to any iOS device. A few settings & options may change depending on the version of the OS on your computer & your mobile device. The steps mentioned below would be applicable for iOS 8. They may be applicable for earlier versions, but all features may not be available.


Moving your data (migrating) from your old iPhone to your new iPhone

This is a very common situation. Most people have a devices for a few years & place a lot of data on it. Once they purchase a new device getting the same data onto the new device is the challenge. This involves a few steps.

STEP 1

  1. Make sure your iCloud service is turned on. By default iCloud provides sync capabilities for the information enumerated below. Note that not all services needn’t be on. But its a good idea to make sure that it is on at the very least for migration purposes.
    1. Contacts
    2. Calendar Events
    3. Reminders
    4. Photos
    5. Notes
    6. Documents for Keynote/Numbers/Pages
    7. Any documents you might have placed in the iCloud Drive (iOS 8 & later).
    8. Passbook
  2. Data provided by other services such as Google, Microsoft & any other provider will be taken care of by their respective accounts.
  3. Prepare a list of apps that don’t take advantage of the iCloud service or any other cloud based service. Note: Some apps do take advantage of iCloud but need the feature to be turned on explicitly. You may have to back this data up manually. If there are online accounts associated with the app, then make sure you are signed in & that the account offers data retrieval at a later point in time.
  4. Take a backup of your phone on your computer using iTunes.

STEP 2:

  1. Turn on your new iPhone & follow the screen steps.
  2. When asked “if you would like to setup the iPhone as a new phone or not” choose the option to restore from backup (do this only if you plan to restore from a backup taken via iTunes or from iCloud).
  3. This will prompt you to connect your iPhone to the computer where you last backed up your old iPhone.
  4. Once the restore is complete simply sign in with your Apple ID & start using your new iPhone from where you had left off.
  5. All the Apps, songs, movies, books purchased using your Apple ID will be available on your new iPhone. Apps will be available subject to OS Version compatibility.

For those who do not have a computer based backup or don’t have a computer can choose to backup their phone onto iCloud. Note that this will require sufficient free space available on the cloud. When they are prompted to restore users will have to sign in with their Apple ID & restore the backup from there.


Moving data from your computer to your new iPhone or Moving from another smartphone to iPhone

This is for first time buyers or people switching to the iPhone. No matter which is the case there is one important thing to be done. You have to move your data onto a cloud service which is compatible with iPhone.

From a computer

iCloud is available for iOS Devices, Macs & Windows. So if you are moving your data from Windows onto your iPhone you could consider running iCloud for Windows. Additionally the iCloud service is also accessible from the browser. So you can access many documents across both the platforms.

Apart from this you can also use iTunes for Windows to move your data from the computer to the iPhone.

From another smartphone

This will mean that you will have to use a third party cloud service. Good choices for something like this would be Google Drive or Dropbox. Other services such as Evernote could also be used for the same.

  1. On your current device transfer as much content as you can to the cloud service. Note that apps & media purchased on the smartphone may not necessarily be available due to compatibility reasons.
  2. On your new iPhone sign in with the same cloud service & pull in all your data.

Backing up your iPhone/iPad

Backing up data is very important. This is a step missed quite often by many users. A common mistake made is in believing that they can restore all their data from the iCloud whenever they wish. While that is true, iCloud is not meant to act as a backup. You can choose to save your backup on iCloud, but this is simply using the iCloud storage space for holding the backup & is not otherwise accessible.

There are 2 options to backing up your iPhones data. One is to back it up onto your computer using iTunes, the other is to back it up onto iCloud.

Backing up onto iCloud

Pros

  • Your backup is immediately available.
  • No need to have a separate computer just for this.
  • Backup can be restored from any location as long as internet connection is available.

Cons

  • A very good internet connection would be required.
  • The backup is restricted by the amount of space available on the cloud.
Backing up using iTunes

Pros

  • There is no storage limit. Your backup can be very large.
  • You can have multiple large backups.
  • Optional encryption capability.
  • With WiFi, based syncing the backups happen automatically.

Cons

  • You have to be physically connected to the computer using cable or WiFi to perform the backup.
  • You have to be physically connected to the computer using cable or WiFi to restore the backup.

Backing up your WhatsApp messages using iCloud

Its a safe assumption that most of us use WhatsApp for our everyday communication. In fact, it is one of the most widely used methods of communication.

People use it for all kinds of things: Staying in touch with friends, family. Collaborating with people on an office project, conducting team meetings, communicating with a client. This means that our conversations are of utmost importance to us. So one should take care & back these messages up on a regular basis. The big advantage with backup is that one can even restore past conversations from the backup when the user switches from one iOS device to the other.

Use the following steps to backup your messages to iCloud

  1. First make sure you have turned on iCloud.

  2. Open Settings > iCloud

  3. Sign in with your Apple ID

  4. Switch to Whatsapp

  5. Click on Settings

  6. Click on Chat SettingsIMG_0063

  7. Click on Chat BackupIMG_0064

  8. Here you can set the auto backup feature or manually take a backup.IMG_0071

  9. Thats it, your Whatsapp messages are now being backed up.

While restoring the process is straightforward.

  1. Make sure you are signed into iCloud.

  2. Install Whatsapp.

  3. Enter your Phone number to verify.

  4. Enter the Code sent via SMS to your phone.

  5. You will be asked whether you want to restore your previous chats from iCloud.IMG_0067

  6. Just click restore.IMG_0068 IMG_0069 IMG_0070

  7. All your previous conversations should come up now.

File types in OS X

This Article is for those new to the Mac or for those who have questions about the different file types in OS X. The lists below aren’t complete and in many cases may require the user to install additional Apple software or third party tools.

File Extensions

The table below lists some of the commonly encountered file types. Note that in certain situations, like creating & extracting from zip files, the related application is not directly invoked.

Common extensions in OS X

Common extensions in OS X


The table below shows some of the popular third party file types that once can access on OS X. Note many of them may require users to install 3rd party applications to open/edit the files. Do note that the list below is not a complete list.

Popular file types

Popular file types


Showing File Extensions

Here are the steps to show file extensions.

1) Look at the Application running. Make sure the Finder Application is running by viewing the upper left hand corner of the screen.

1

2) Click on Finder

2

3) Click on Preferences

4) Click on the ‘Advanced’ Tab. Look at the selection for File Extensions.

4

5) Make sure the checkbox to show file extensions is selected.

5

Managing all your data on your Mac

One of the single most important aspects of using a computer is Data Management. In this article I will be going over the various features available & steps that you can take to manage your data in a safe, secure & efficient way.

TimeMachineBACKUP

It happens ever so often that we are faced with a situation where we need a file to which we no longer have any access to. The reasons may be varied: lost computer, damaged or lost hard drive, accidental deletion. While there are applications that do retrieve lost files, they only work if the storage media is available & do not guarantee 100% recovery. The best solution to this is to backup your data.

The most common approach used is to manually copy the file onto an external storage. While this is easy, it can be tedious for the user & is error prone.

One of the easiest solutions is to use a backup tool called Time Machine. This is built right into OS X. You don’t need to install anything new. Just connect the hard drive where you would want to store all your backups. The OS will periodically backup all your data every hour as long as your backup drive is connected to the Mac. Many a times you are prompted to choose an external drive for backup, but that pops up only when you connect a new hard drive or a hard drive which isn’t used for backup.Once you have this activated you can then navigate back in time (just as you would expect from a time machine) and look for a file that you have lost.

Steps to Backup using Time Machine:

1) Connect the Hard drive you want to use as a backup destination.

2) Click on System Preferences > Time Machine to customise your backup.
TimeMachine

3) Click on Options to select the folders to exclude from Time Machine Backups.

TimeMachineOptionsThere are other third party tools which you could use if you wish. Retrospect and Carbon Copy Cloner are 2 of the many 3rd party tools available for this.

icloudDriveSYNCHRONISATION

In todays world most of us are using more than one device for our daily activities. This means that we would like to have most of the information on all the devices. This can be achieved through various applications that are available to manage our portables such as smart phones & tablets. But by far the easiest approach is to take advantage of Cloud Services.

If you have an iPhone &/or an iPad which you use along with your Mac then the best service for this is iCloud. However if you use a mix of platforms such as Android or Windows for your smart phones & tablets then using any third party service such as Google Drive, Drop Box, OneDrive will help you ensure that your information is available via the cloud across all devices.

Steps to turn on iCloud Services on your Mac:

1) Click on System Preferences > iCloud.

2) Sign in with your iCloud ID & password.

3) You should come to the iCloud panel where you can configure different iCloud Services.

iCLoud

4) Select the different content you want managed under iCloud.

SECURITY

This is one area which is increasingly gaining more importance. An important aspect of data management is keeping your data secure. While there is no such thing as a completely secure computer, one can definitely take steps to make sure that one’s information is kept as secure as possible.

ACCOUNT PASSWORDS: This is probably your first line of defence. Having a good strong password goes a long way in securing your data. There is a nice built in tool that evaluates & rates the passwords that you create, called as password assistant.

Password Assistant can be found on any screen within the Mac that prompts for a Password. Like the screen shot below when we are creating a new user for the Mac.

The key icon is to be clicked to launch Password Assistant.

The key icon is to be clicked to launch Password Assistant.

The Password Assistant itself gives you a lot of options when it comes to choosing your password type.

Use the drop down to select the password type.

Use the drop down to select the password type.


KEYCHAIN ACCESS NOTES: Keychain access is a builtin application that manages your secrets such as passwords, keys & certificates. There is also an option to save a note. Information within the note is saved in an encrypted way thereby securing it.

ENCRYPTION: This is the most secure way of saving information. There is a builtin encryption feature called FileVault which encrypts all the data on your system. There are 3rd party tools that can do this for you too: GPGAES Crypt, PGP to name a few.

Once can use a combination of the 3 or all 3 depending on the level of security required. It is also a good idea to keep your backup secure. Securing your computer but not the backup is a bad idea.

STORAGE

Yet another common issue that a lot of us face. Most computers that have come in over the past few years offer very large built in storage space & in most cases it is sufficient. But with the growing number of photographs, movies & songs we often find that space on our computers isn’t sufficient. This is not an easy problem to solve.

A simple approach is to keep only those things we require on the Mac. Also using cloud services to store information that we don’t need to access frequently is a good idea. Compressing data using zip files is also a good approach. But a better option, especially for large amounts of data, is to compress them into ReadWrite disk images. External storage can also be considered for placing extra data.

One area where storage management is not looked at but is equally important is related to the backup drive. Overtime as your backup drive fills up it starts removing older backs (in case of Time Machine). To ensure you have as long a history of backups, make sure that you only backup those things that you need. For example there isn’t a pressing need to backup all the OS files & applications, one can reduce the backup size by eliminating unnecessary items from the backup.

iOS Device guide for App Developers

Developers making iOS Apps regularly come across situations where they need to find out the dimensions of the screen or the icons. This guide should give a better idea about the same.

iphones

iPhone 5S/SE iPhone 6/6S/7/8 iPhone 6+/6S+/7+/8+ iPhone X
Display Points

320×568

375×667

414×736

375×812

Pixels

640×1136

750×1334

1242×2208

1125×2436

Display Points to Pixels Ratio

1:2

1:2

1:3

1:3

Pixel Density

326 ppi

326 ppi

401 ppi

458ppi

App Icon Size in pixels

120×120

120×120

180×180

180×180

Aspect Ratio

16:9

16:9

16:9

19.5:9

ipads

  iPad Mini 2,3,4 iPad Air/iPad Air 2/iPad Pro 9.7” iPad Pro 10.5 iPad Pro 12.9”
Display Points

1024×768

1024×768

1112×834

1366×1024

Pixels

2048×1536

2048×1536

2224×1668

2732×2048

Display Points to Pixels Ratio

1:2

1:2

1:2

1:2

Pixel Density

326 ppi

264ppi

264ppi

264ppi

App Icon Size in pixels

152×152

152×152

167×167

167×167

Aspect Ratio

4:3

4:3

16:9

16:9


Cloud Services Demystified

A lot of us use cloud services. Here we will talk about some of the popular services & how to use them to maximise your advantage.

What is Cloud?

Cloud Service is a technology that makes your data available across multiple devices. Depending on service provider this may even be cross platform. This is great as in todays day & age most of us make use of at least 2 smart devices. A common confusion amongst a lot of users is that cloud is a backup technology. This is not strictly true. As I mentioned earlier, when you enable cloud services they ensure that your data across all devices is the same. So if for example, you delete a file on one device, it is deleted across all the devices. It is not possible to go & retrieve the file back from the cloud. To protect yourself from such problems you should look into a cloud based backup technology.

What are the advantages?

There are numerous advantages with cloud based solutions.

  1. Firstly, your data is immediately accessible across multiple devices without your manual intervention.
  2. Storage management especially handling portable storage drives is no longer required.
  3. It is highly cost effective. In most cases the data that we consume is fairly small. The free version for most of the services does provide at least 2Gb of data. In most cases there is the option of purchasing additional storage space if needed.
  4. Its easy to use, with no major technical requirements.
  5. Most of the providers support multiple platforms & devices.

Common Cloud Service Providers & services offered

googleDrive

Google Drive: The google drive is a free account that every user gets along with their gmail account. With unto 15GB free storage this is an ideal option for those who want to store large amounts of data. It is also an ideal option for those who wish to share files & collaborate with other users. Works best when used within the Google ecosystem.

WebLink: drive.google.com


onedrive

Similar to google drive. Microsofts OneDrive allows you to store files on the cloud. This comes free with your existing hotmail.com or outlook.com accounts.  Works best when used within the Microsoft Ecosystem.

WebLink: https://onedrive.live.com/about/en-us/


dropbox

Yet another popular cloud storage & sharing service. While it has limited capacity of 2Gb it has the advantage of being accessible across multiple platforms. The storage capacity does increase for shared collaborative accounts.

WebLink: http://www.dropbox.com


evernote

Evernote is a popular app for storing information on the cloud. Apart from just offering cloud services for documents it also has a lot of other built in features such as card reader, calendar, notes that makes it a very popular app. The fact that it runs on almost all the most commonly used platforms only adds to its value. There are paid options available but they are for additional features rather than more storage explicitly.

WebLink: https://evernote.com


icloudDrive

This is Apple’s cloud solution primarily for OS X & iOS devices. Just like Google drive it ensures that the data across your OS X & iOS devices is the same. The fact that it is accessible via the web make it useful. This service is not available on all the platforms barring the desktop version of Windows for which a free download is available. Works best when used within the Apple ecosystem.

WebLink: http://www.icloud.com


Owncloud

Unlike the other services available this one is OpenSource. It has numerous advantages that make it a very attractive option, especially for businesses thinking of providing cloud services to their employees.

The main advantage is the fact that you can configure & host your own cloud services (as the name says). This means that you have control over the amount of space allocated for users & importantly security.

Apart from that there are native apps available along with a web portal to access all your data from almost all devices anywhere. This means that it is very easy to deploy without the headache of compatibility issues.


The following table gives a basic comparison on what all is offered, note that there maybe more services provided which I may have skipped, the table only highlights the most important points.

Cloud Services Comparison

Cloud Services Comparison

Clarifying Swift & Objective-C

swiftApple made a surprising announcement at the recent WWDC held between June 2-6 2014. While everyone was looking forward to the launch  of the new OS for both the Mobile as well as Mac platforms, Apple also announced a new programming language for developers. SWIFT.

It was described as Objective-C without C. Over the past few months I have gone over the features of the language & even converted many of the apps into Objective-C. While the initial learning curve is there, it is a fairly easy language to pick up. I will be going over a few interesting features of the language in this article. But what I will also be touching upon is the future & relevance of Objective-C.

Reduction in Lines of code: One of the first things that you will notice once you start programming in Swift is the reduction in the number of lines of code. Swift does away with the long syntax which you find in Objective-C. This makes the code look a lot more compact & less intimidating.

Lets take the example of creating an object in Swift & compare the syntax with that of Objective-C

Objective – C version: NSString *myString = [[NSString alloc] initWithString:@”This is a string”];

Swift version: var myString : String = String(“This is a string”)

As we can see, there is a great deal of simplicity that comes along. Reduction in the number of lines of code is of great importance to software developers. This means more compact code & improves readability. However, this comes at a price. While Objective-C code was more elaborate & did use many more lines of code it was far easier to understand by simply reading through it. In case of Swift the code will have to be complemented with details comments about what it does.

Single File: Another new feature there in Swift is the lack of header files. People coming from a Java background would find this familiar. The declaration of classes & implementation of its functions is done in .swift file now. This removes the necessity of having to import various header files. In case, certain frameworks need to be used all that needs to be done is to import that framework at the top of the file.

import framework

Replace the keyword framework with the name of the framework you wish to include.

Mixed Language Programming: Unlike Objective-C, Swift does not work well with other languages. In fact, Swift only works with Objective-C. So if you have any API’s or pieces of code that you have written in C or C++, you will have to create Objective-C wrapper classes for that C/C++ code so that you can incorporate it into your project.

This means that Objective-C is not going to be deprecated any time soon. Also, it will be equally important to learn Objective-C & can’t be ignored by people.

COMMON QUESTIONS:

– I already know Objective-C should I also learn Swift?
There is no pressing need to immediately learn Swift, though it would be a good idea to learn it anyways. None of the apps you have already made will stop working. However, you may come across code written in Swift or would need to incorporate programs written in Swift, so having knowledge of the same would be a good idea.

– I don’t know Swift or Objective-C which should I learn?
Again, as in the previous question knowing both is a really good idea. If you are confident that you will be making apps using Swift only, then you can learn just that for starters. If you feel that there is a good chance of having to read/modify or write Objective-C code then learning Objective-C before Swift makes more sense.

CONCLUSION: Swift is a very easy to use language & will sit nicely on familiar eyes. A lot of the code that will be written in the coming apps will definitely use Swift. However, this does not mean the end of the road for Objective-C. Nor does it mean that Objective-C will become redundant or obsolete. A developer can choose to use any of the languages to make the app. It will be nice for a new developer to first learn Objective-C & then move on to Swift as it will give the user a more all round understanding of the entire development framework .