Creating Frameworks for iOS/OS X App Development

Creating Swift Frameworks

Creating Swift Frameworks is easy. The steps below walk you through creating a Swift Framework. The steps below have been performed on Xcode 7.3

  1. Launch Xcode.
  2. Select Create New Project. Or from the menu bar select File > New > Project
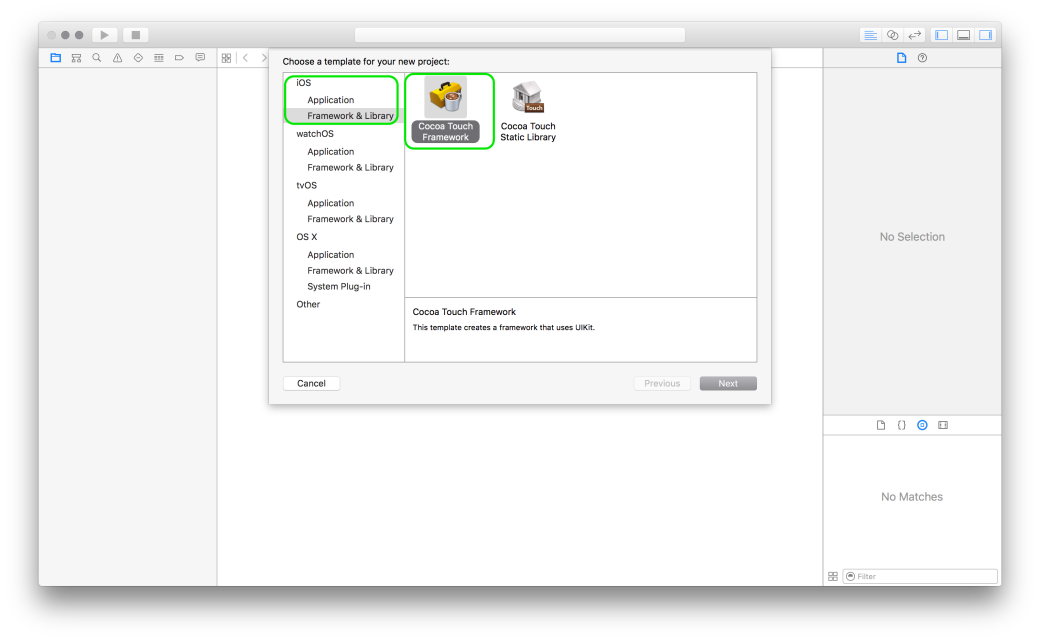
  3. From the Template chooser select the Framework & Library  Option under iOS
  4. Select Cocoa Touch Framework1
  5. Give your project a name.
  6. Make sure the language selected is Swift.
  7. Feel free to enter values of your choice for organisation name and organisation identifier.
  8. Save your project. Optionally, if you have a version control repository like Git you may save it there.
  9. In left hand side bar make sure you have selected the Project Navigator.
  10. Within the Project Navigator make sure you have selected the folder named after your project.
  11. Click on File > New > File.
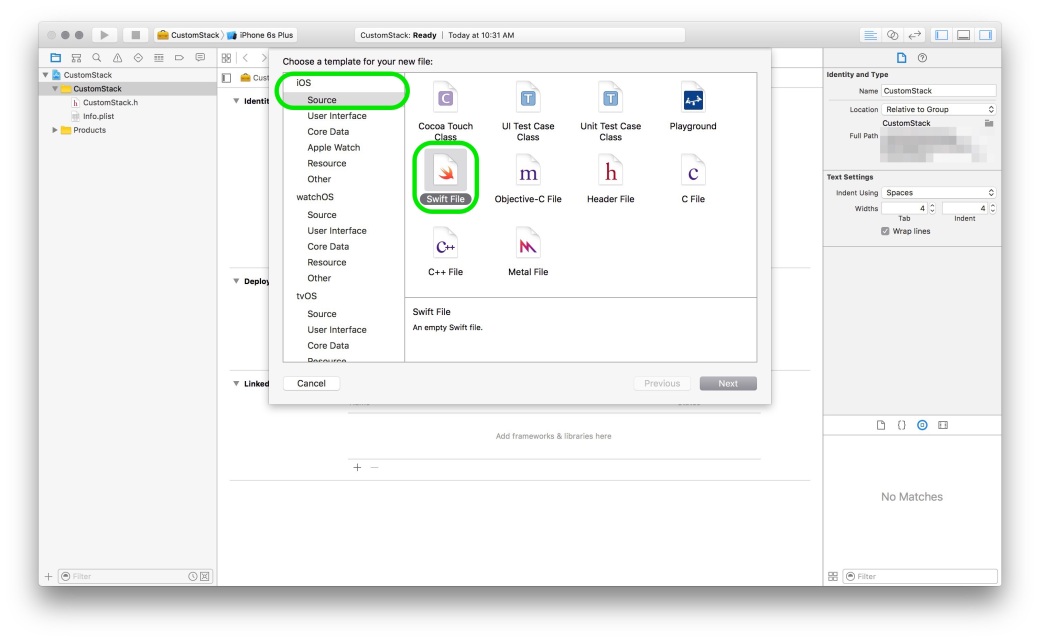
  12. Make sure iOS Source is selected on the left hand side.
  13. Select the file type as Swift.IMG_3525
  14. Write down the code that you want to make available through a framework.
  15. Now this is the key point. Place the keyword public before all the elements that you want to make publicly accessible.Why do we need to do this? To understand this we need to understand the scope of different elements within a typical Swift project. IMG_3521

    Different variables/classes/functions that are declared within a module are accessible freely within the module. Swift files contain code & are themselves found within Swift modules. So a module can mean project or a framework.So, to access the variables/functions/classes from module A in module B, we have to make those elements of module A public in order to access them in module B.

    For more information, do read Apple’s Swift Documentation.

  16. The next steps depend on what your ultimate objective is. If you wish to build a framework for distribution then you need to follow a process that is similar to distributing an app. You need to get the code signing done & prepare the project for distribution.
  17. If however, you plan to release it internally, or even just test it. Then you can follow the steps below.
  18. Firstly, our objective is to make this framework run on both OS X(macOS) as well as iOS.
  19. To do that we will be adding a new target. Click on File > New > Target.
  20. Select OS X & the Frameworks & Libraries from the sidebar.
  21. Select Cocoa Touch Framework
  22. Give your framework a unique name. Something that indicates this framework is for OS X(macOS).
  23. Now, we don’t need to rewrite the code for the Mac. We can simply make the file we have written a member for the OS X Framework Target.
  24. To do that make sure that the right hand side sidebar is visible.
  25. In the left hand side sidebar make sure that you have selected the new Swift file with the code you have written in there.
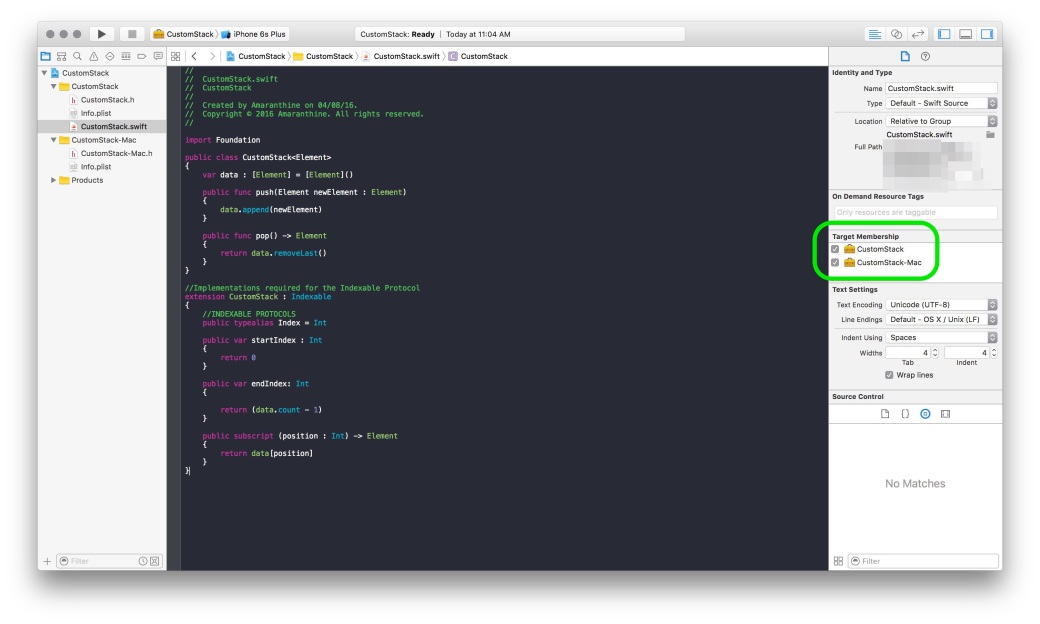
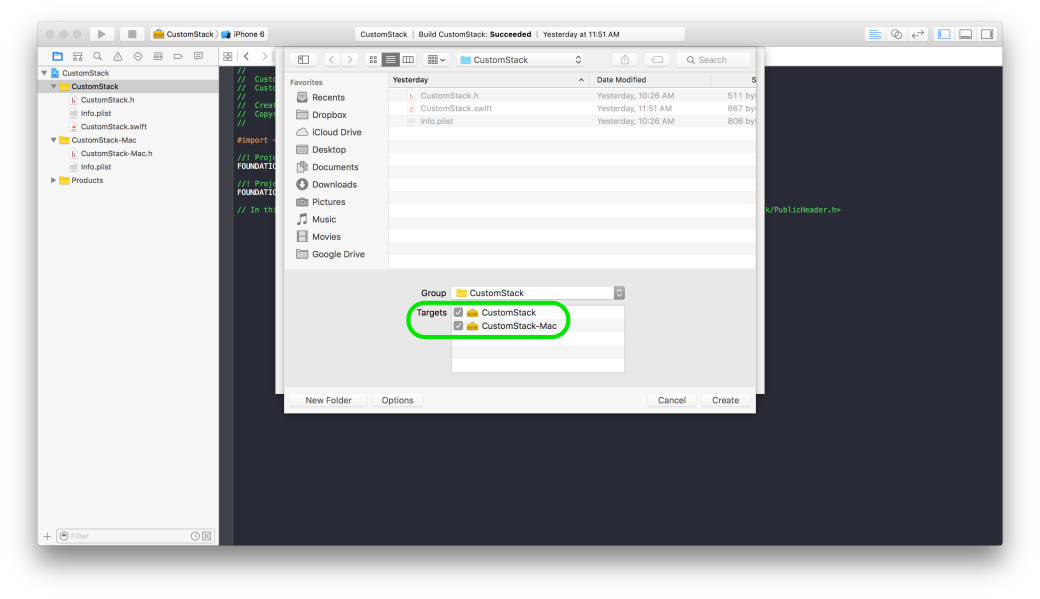
  26. In the right hand side sidebar select the Document Inspector.
  27. Under Target Membership make sure that both the Targets are checked. The target for iOS should already be checked.IMG_3520
  28. Thats it. If you do not wish to make your code available for both iOS & OS X then skip steps 19 – 27.
  29. The next part is building the framework. We will be building this framework for use internally. We will first build the iOS framework.
  30. From the tool bar, make sure the target selected is for iOS. For the device you can select any device that you wish.
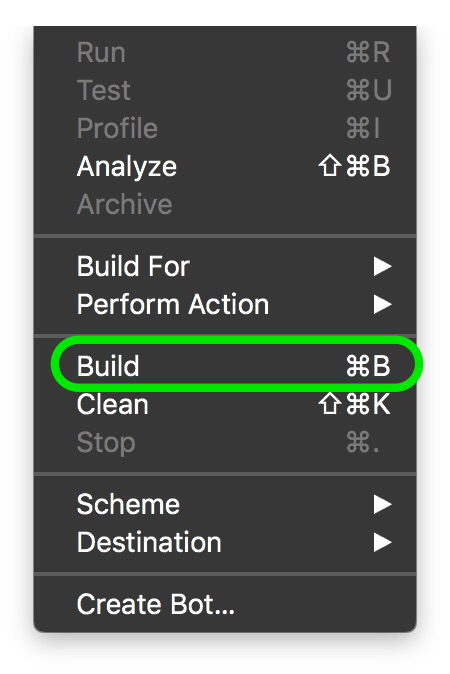
  31. Then click on Product > Build to build the framework. If all goes well then you should get the message Build Succeeded on your screen.
    IMG_3519
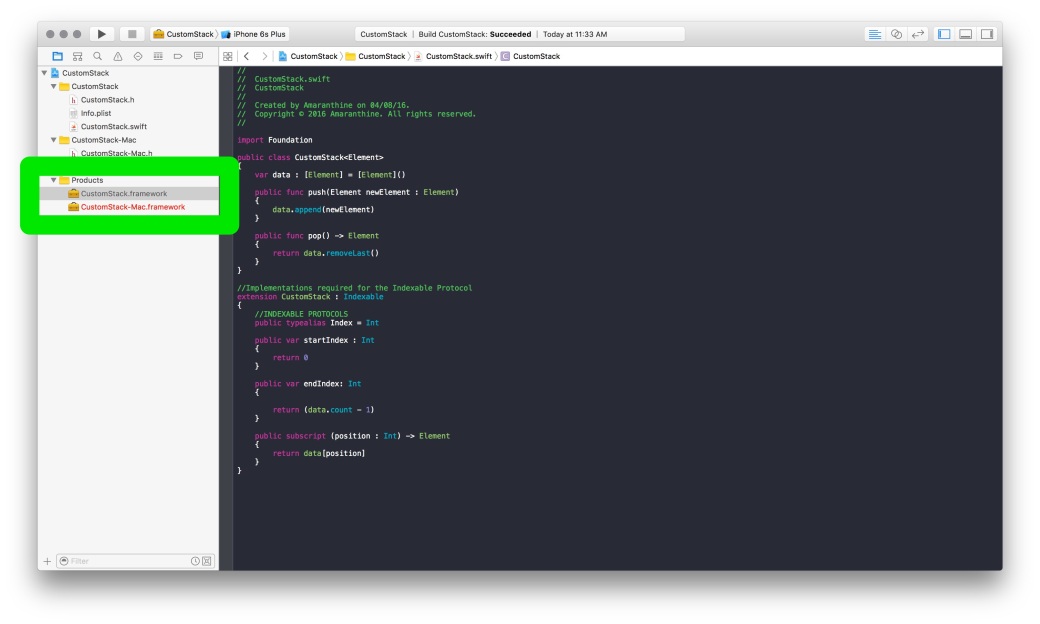
  32. To get hold of the framework, expand the product folder from the left hand side sidebar.
  33. Select the Framework you have just built. Note that it should be black in colour. If you have opted to make a framework for OS X, then you should see that framework listed too, it should be in red colour. The red colour indicates that it has not yet been built.IMG_3524
  34. Control-click on the iOS version of the framework and select Show in Finder.
  35. This will take you directly to the folder containing the framework. Copy paste it to the desktop or to any other location to easily access it when required.
  36. Repeat steps 30 – 34 to build the OS X version of the Framework. Make sure that the target selected is OS X.
  37. Once we have done that, we need to test the framework we just created.
  38. Create a dummy iOS Project for testing.
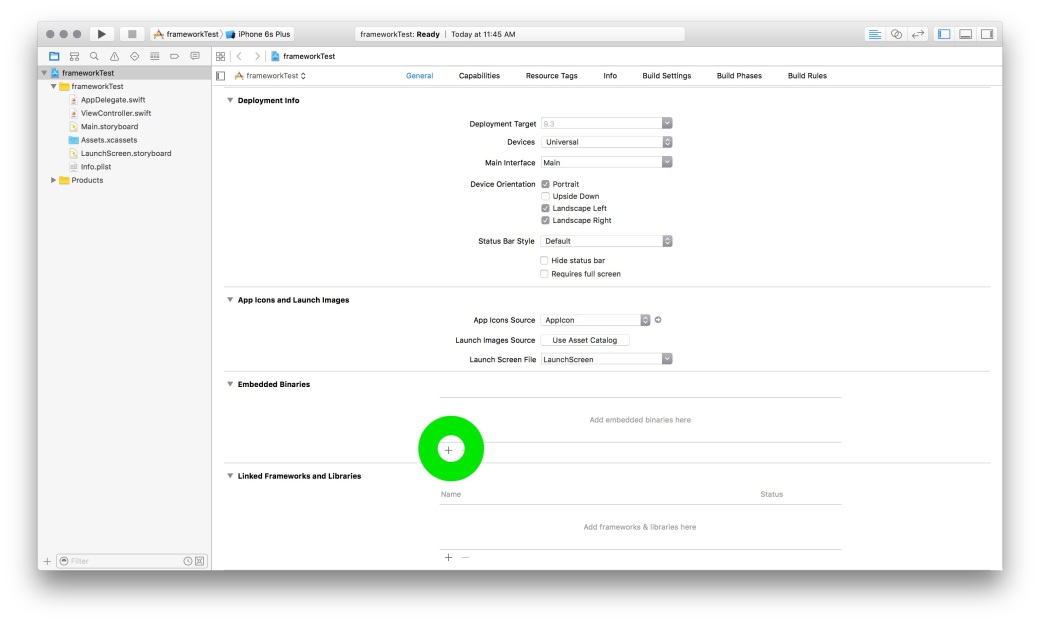
  39. From the left hand side project navigator make sure that the blue project settings file is selected.
  40. Make sure that the Target is selected within the settings screen.
  41. Under the General tab scroll down to the Embedded Binaries section.
  42. Click on the ‘+’ sign to add a framework.IMG_3523
  43. Click on Add other
  44. Navigate to the folder where you saved the Framework and select it.
  45. Click Open
  46. Select Copy Items if needed
  47. The framework should be added to your project.
  48. In the ViewController.swift file import your Framework: import CustomStack
  49. Replace CustomStack with your frameworks name.
  50. Try to write the code which uses the elements you have packaged within the framework.

Creating Mixed Frameworks (Swift & Objective-C)

The process of creating a mixed library is straightforward. Its almost the same as above with some minor differences.

  1. Follow the steps mentioned above to add your Swift Code.
  2. Add your objective-C files to the project.
  3. While adding the files make sure that the checkbox for the targets is selected appropriately. Screen Shot 2016-08-05 at 1.20.37 PM
  4. Write the code that you wish to write in Objective-C. Of course, if you are including prewritten files then you do not need to do this.
  5. To make the Objective-C code accessible in Swift you need to make the following changes:
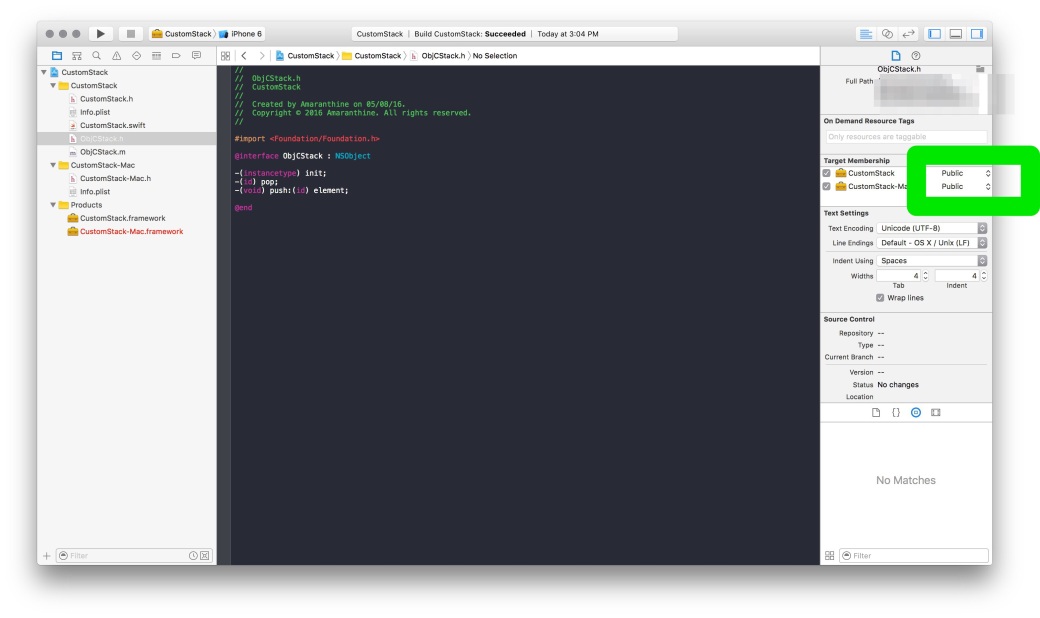
    1. In the umbrella header of your framework add the line to import the header
      #import "<FrameworkName>/<HeaderName>.h
    2. Modify the access property located within the target membership of the Objective-C header file. IMG_3527
  6. This should make your Objective-C code accessible to the Swift files.
  7. Test the changes by accessing your Objective-C code in your Swift files within the framework.
  8. Test the changes further by embedding your mixed language framework into a project & then try to access both the Swift as well as Objective-C versions of the code in your new project.
  9. To make your Swift code accessible to Objective-C File make the following changes:
    1. Make sure that your Swift code is compatible with Objective-C. There are 2 ways of doing this. One you can make your Swift class inherit from NSObject. The second way is to use the @objc keyword before your class declaration.
    2. In the Objective-C header file add the line to add the bridging header which is auto generated. You do not need to create your own bridging header.
      #import "<FrameworkName>/<FrameworkName>-Swift.h"

      Replace the word FrameworkName with the name of your Framework.

    3. This should allow you to access your Swift code in your Objective-C header file within the same Framework Project.
  10. This way you can make a single framework which contains code written in both Swift & Objective-C.


What to do before buying/selling Apple devices?

Apple’s devices are getting more and more popular by the day. People are really excited to get hold of the newest product that comes out of its stable. This guide walks you through some of the things you need to keep in mind while buying used devices or selling your existing device. This may not apply when buying a new product from the store for the first time, however, its still good to know these things & run your device through a checklist.

Note the checklist provided below is by no means comprehensive nor is it complete. There might be other things to keep in mind before buying &/or selling used devices, depending on the geographic area, situation, and circumstances.

Buying

Before buying a used products run them through this checklist. Some items are device specific.

  • Make sure there is no physical damage to the device. Dents, scratches, cracks, missing screws.
  • Start the device & make sure it loads up as expected.
  • Check the different user interface elements: touch screen, 3d touch, keyboard, iSight camera, speakers, home button, Microphone
  • Check the different ports: USB, Ethernet, FireWire, Thunderbolt, USB-C, HDMI, Audio-out, SD card reader, lightning connector, 30-pin connector
  • Check the power cord, adapter & charging port
  • Note the version of the OS. Eg: OS X 10.10.3
  • Note the build number
  • Check the model number. This is important for Software Upgrades/Hardware upgrades. Older hardware may have an upper limit on the hardware expansion capability &/or the ability to run latest software optimally.
  • Check the Support Coverage for your device. This is important, especially if you have to take your device in for repairs.
    https://checkcoverage.apple.com/in/en/
    https://support.apple.com/en-us/HT204308 – Find your devices Serial Number
  • Note down the serial number
  • Make sure that the device does not contain any personal data belonging to the seller. While it is the sellers responsibility to ensure this, it still is a good idea to verify that there are no accounts are signed into. This is VERY IMPORTANT for iOS Devices due to its implications on Activation Lock.
    Activation lock is used to prevent anyone from using a stolen device: https://support.apple.com/en-us/HT201365
  • Before buying please check the Activation lock status: https://www.icloud.com/activationlock/
  • Make sure there is no personal digital content in the form of Apps/Song/Movies or documents.
  • For Mac, make sure that there is no Firmware Password that is set.

Selling

The list above should give you a good idea on what you need to do while planning to sell your Apple device.

  • Delete all personal data. Make sure you have a backup of the same.
  • Remove any applications you may have installed.
  • Sign out of all accounts: Gmail, Hotmail, Facebook, iCloud, Apple ID…
  • Delete any user accounts you may have created. Leave a single admin account.
  • If you have used any Encryption service then make sure you turn off encryption before selling the device. This is more of a precaution to prevent issues that may arise in the future.
  • This article illustrates what to do if you are selling giving away iOS Devices: https://support.apple.com/en-in/HT201351
  • As a good measure, delink your Apple ID from your device. You can do this by:
    • Go to http://www.icloud.com
    • Sign in with your Apple ID
    • Click on Settings
    • Select the device you want to give away: IMG_2941
    • Click on the cross to remove it from your Apple IDIMG_2978
  • De-register from iMessage.
  • Remove any custom settings, passwords (Firmware Password) that may compromise your security or prevent the user from fully using the device.
  • As a good measure completely erase the hard drive of your device.
  • Document items such as OS Version, Serial Number for your own reference.

Enterprises may take additional steps

  • To ensure data security, Enterprises may perform Secure Erase or drive replacement to prevent recovery of corporate information, when assigning devices to employees or selling them out in the market.
  • Enterprises should also protect against Activation lock. When collecting iOS Devices, assigned to an employee who is leaving the organisation, always check to make sure that the device is not locked to the employees Apple ID.

These are some of the things that you can do to make the transaction easy on both the sides.


Writing Swift Programs on Linux

xc7-swiftlogo_2x1Swift Programming on Linux

The steps below walk you through the process of downloading, installing & using the Swift Programming language on Linux. For this I will be using Ubuntu Linux 14.04.3 LTS version.

Setup & Configuration

  1. Downloading Swift
    The first step is to download Swift from the link given below. Select the correct version of the OS.
    https://swift.org/download/#latest-development-snapshots
  2. Install clang
    The next step is to get hold of clang which is  a compiler front end for C,C++,Objective-C & Objective-C++. For more information on clang:
    https://en.wikipedia.org/wiki/Clang
    http://clang.llvm.org
    To install clang run the command:
    sudo apt-get install clang
  3. Extract the Swift files you downloaded and place them in a folder of your choice.
  4. Next we will add swift to our path. Do that by running the command:
    export PATH=/path to your swift folder/usr/bin/:”${PATH}”
  5. Verify whether it works by trying the following 2 commands
    which swift
    swift –version

Testing the REPL

  1. Next we try the REPL for swift. To invoke this just type the command:
    swift
  2. Write something like let myName : String = “Swift Code”
    and then hit enter.
  3. Follow it by print(myName) and then hit enter.
  4. You should see the output printed. This is a nice way to test individual Swift statements.

Creating a Single File Project

  1. To create a file based project:
    1. Create a folder of your choice, lets call it Hello World:mkdir HelloWorld
    2. Create a manifest file for the Package with the command: touch Package.swift
    3. The source files for all your projects must be in the Sources folder, let’s create that: mkdir Sources
    4. Create a file called main.swift using an editor of your choice. Place the statement print(“Hello, World”) in it.
    5. Step out of the sources folder and then run the command to build the project: swift build
    6. The executable will be inside a hidden folder called .build/debug
    7. The name of the executable will be the same as the name of the project folder.
    8. To run it simply type: .build/debug/HelloWorld

Creating a multi file project

  1. Create a folder of your choice, lets call it Hello World:mkdir CentigradeToFahrenheit
  2. Create a manifest file for the Package with the command: touch Package.swift
  3. The source files for all your projects must be in the Sources folder, let’s create that: mkdir Sources
  4. Create a file called converter.swift using an editor of your choice.
  5. Write the following code in it.:
    //note the code below is for demonstrating multi file projects & may not necessarily be accurate or correct
    func centigrade_to_fahrenheit(temperatureInCentigrade : Float) -> Float

    {
              return ((temperatureInCentigrade*9.0/5.0)+32.0)
    }
    func string_to_float(input : String) -> Float
    {
              var number : Float = 0.0;
              var result : Float = 0.0
              for charac in input.characters
              {
                        switch charac
                        {
                                  case “0”:
                                            number = 0.0;
                                  case “1”:
                                            number = 1.0;
                                  case “2”:
                                            number = 2.0;
                                  case “3”:
                                             number = 3.0;
                                  case “4”:
                                            number = 4.0;
                                  case “5”:
                                            number = 5.0;
                                  case “6”:
                                            number = 6.0;
                                  case “7”:
                                            number = 7.0;
                                  case “8”:
                                            number = 8.0;
                                  case “9”:
                                            number = 9.0;
                                  default:
                                            break
                        }
                        result = (result * 10.0) + number;
              }
              return result
    }
  6. Create a second file called main.swift
  7. Write the following code in it:
    if Process.arguments.count != 2
    {
              print(“USAGE: centigradeToFahrenheit 33.4”)
              print(“You are missing an argument”)
    }
    else
    {
              let temperatureInCentigrade = string_to_float(Process.arguments[1])
              print(“\(temperatureInCentigrade) is equal to \(centigrade_to_fahrenheit(temperatureInCentigrade))”)
    }
  8. Step out of the sources folder and then run the command to build the project: swift build
  9. The executable will be inside a hidden folder called .build/debug
  10. The name of the executable will be the same as the name of the project folder.
  11. To run it simply type: .build/debug/CentigradeToFahrenheit 100
    1. Try with different input values and no input value.
  12. That’s it. You are now ready to start typing code in Swift.


OS X and iOS troubleshooters toolkit

This article covers some of the things troubleshooters would need during their everyday work. I’ve also listed links to some products and applications as an example. It is by no means an endorsement of the same.

OS X Install Disk: This is probably one of the most important tool that a troubleshooter must carry around with him/her. Ideally it would be one disk with multiple versions, each corresponding to a specific version of the OS. Exactly how many versions depends on the situation, for example one can have all instances of the present and previous 2 versions of the OS (For example OS X Mavericks 10.9, 10.9.1, 10.9.2, 10.9.3, 10.9.4, 10.9.5 OS X Yosemite 10.10, 10.10.1, 10.10.2, 10.10.3, 10.10.4, 10.10.5 OS X El Capitan 10.11, 10.11.1)

Thunderbolt & FireWire Cables: These come in handy when it comes to transferring data. These cables  are necessary when you wish to  perform target disk mode troubleshooting. Make sure you have the correct version of the cable.

http://www.apple.com/shop/product/MD862LL/A/apple-thunderbolt-cable-05-m

Portable Storage Device: Along with the cables mentioned earlier having a portable storage device with a large capacity is useful. Mainly when it comes to taking a back up. The user may or may not have a storage device available for this. (Ideally, taking a backup of the data should be done by the user on his/her own storage device.)

http://www.lacie.com/as/en/products/mobile-storage/rugged-thunderbolt/

http://www.apple.com/shop/product/HE154VC/A/promise-pegasus2-r8-24tb-8-by-3tb-thunderbolt-2-raid-system

http://www.promise.com/Products/Pegasus

Internet access via USB Dongle: Yet another important tool. Application & OS upgrades require internet access. This will also come in handy when you are trying to perform network troubleshooting. Make sure there is sufficient data available for upload/download. Optionally one can carry multiple Internet dongles from different vendors.

Portable Power Bank: This is more useful for portable devices. Carry one with a large capacity, enough for multiple recharges or charging multiple devices.

Display adapters: Necessary to troubleshoot when the main display isn’t working or to heck the display ports. Carry all combinations HDMI to VGA, MiniDisplay to VGA, MiniDisplay to HDMI, HDMI to HDMI and any others depending on the device to be connected to.

http://www.apple.com/shop/product/H9139VC/B/kanex-atv-pro-x-hdmi-to-vga-adapter-with-audio-support

http://www.apple.com/shop/product/MB572Z/B/mini-displayport-to-vga-adapter

Secondary Display: This might not be practical as displays tend to be very large and not necessarily portable. However, one can carry a small pocket projector. A secondary display is always handy as it reduces dependency on the user/client to provide one.

Power adapters: Not strictly required but can come in handy. Useful for checking if the user’s power cord is functioning properly. Make sure you carry all the different versions of the power cords.

Lightning & 30 pin cables: Again not strictly necessary but would be useful for checking if the user’s power cord is functioning properly. Make sure you carry all the different versions of the power cords.

MacBook Pro &/or iPad: Carrying your own Mac & iPhone/iPad is very important. Load these devices with various tools required to diagnose and/or fix issues.

https://itunes.apple.com/in/app/inettools-network-diagnose/id561659975?mt=8

https://itunes.apple.com/us/app/inet-network-scanner/id340793353?mt=8

Disk Drill: http://data-recovery-software-review.toptenreviews.com/mac-recovery-software/mobile/disk-drill-pro-review.html

Airport Utility: https://support.apple.com/kb/DL1664

Airport Utility: AirPort Utility by Apple

https://appsto.re/in/YJ7Dz.i

Managing all your data on iOS devices

In todays interconnected world managing all your data is quite important. Most of us end up having more than one smart device that we use everyday. As time goes on we will buy a newer version of the device. It is not necessary that we will get a newer version of each smart computer that we own simultaneously. This means that we have to pay special attention to making sure that our data stays up to date on all the devices & that there is no accidental loss of data.

There are various solutions available to users which easily takes care of data management problems commonly faced by multiple users. One of the most common solutions is to make sure that all your data is available on the cloud. I have given a brief overview on the different cloud services available in my previous article.

However, storing information on the cloud is not enough. Some effort still needs to be done on the users end to ensure that the data is there everywhere they want it. In this article I will be talking about managing your data, migrating your data & backing up your data on your iOS devices.

The starting point for this is the iCloud service. It is a free service provided by Apple & is a must for iPhones & iPads.

Through this article I will be referring to the iOS device as iPhone, however, the steps apply to any iOS device. A few settings & options may change depending on the version of the OS on your computer & your mobile device. The steps mentioned below would be applicable for iOS 8. They may be applicable for earlier versions, but all features may not be available.


Moving your data (migrating) from your old iPhone to your new iPhone

This is a very common situation. Most people have a devices for a few years & place a lot of data on it. Once they purchase a new device getting the same data onto the new device is the challenge. This involves a few steps.

STEP 1

  1. Make sure your iCloud service is turned on. By default iCloud provides sync capabilities for the information enumerated below. Note that not all services needn’t be on. But its a good idea to make sure that it is on at the very least for migration purposes.
    1. Contacts
    2. Calendar Events
    3. Reminders
    4. Photos
    5. Notes
    6. Documents for Keynote/Numbers/Pages
    7. Any documents you might have placed in the iCloud Drive (iOS 8 & later).
    8. Passbook
  2. Data provided by other services such as Google, Microsoft & any other provider will be taken care of by their respective accounts.
  3. Prepare a list of apps that don’t take advantage of the iCloud service or any other cloud based service. Note: Some apps do take advantage of iCloud but need the feature to be turned on explicitly. You may have to back this data up manually. If there are online accounts associated with the app, then make sure you are signed in & that the account offers data retrieval at a later point in time.
  4. Take a backup of your phone on your computer using iTunes.

STEP 2:

  1. Turn on your new iPhone & follow the screen steps.
  2. When asked “if you would like to setup the iPhone as a new phone or not” choose the option to restore from backup (do this only if you plan to restore from a backup taken via iTunes or from iCloud).
  3. This will prompt you to connect your iPhone to the computer where you last backed up your old iPhone.
  4. Once the restore is complete simply sign in with your Apple ID & start using your new iPhone from where you had left off.
  5. All the Apps, songs, movies, books purchased using your Apple ID will be available on your new iPhone. Apps will be available subject to OS Version compatibility.

For those who do not have a computer based backup or don’t have a computer can choose to backup their phone onto iCloud. Note that this will require sufficient free space available on the cloud. When they are prompted to restore users will have to sign in with their Apple ID & restore the backup from there.


Moving data from your computer to your new iPhone or Moving from another smartphone to iPhone

This is for first time buyers or people switching to the iPhone. No matter which is the case there is one important thing to be done. You have to move your data onto a cloud service which is compatible with iPhone.

From a computer

iCloud is available for iOS Devices, Macs & Windows. So if you are moving your data from Windows onto your iPhone you could consider running iCloud for Windows. Additionally the iCloud service is also accessible from the browser. So you can access many documents across both the platforms.

Apart from this you can also use iTunes for Windows to move your data from the computer to the iPhone.

From another smartphone

This will mean that you will have to use a third party cloud service. Good choices for something like this would be Google Drive or Dropbox. Other services such as Evernote could also be used for the same.

  1. On your current device transfer as much content as you can to the cloud service. Note that apps & media purchased on the smartphone may not necessarily be available due to compatibility reasons.
  2. On your new iPhone sign in with the same cloud service & pull in all your data.

Backing up your iPhone/iPad

Backing up data is very important. This is a step missed quite often by many users. A common mistake made is in believing that they can restore all their data from the iCloud whenever they wish. While that is true, iCloud is not meant to act as a backup. You can choose to save your backup on iCloud, but this is simply using the iCloud storage space for holding the backup & is not otherwise accessible.

There are 2 options to backing up your iPhones data. One is to back it up onto your computer using iTunes, the other is to back it up onto iCloud.

Backing up onto iCloud

Pros

  • Your backup is immediately available.
  • No need to have a separate computer just for this.
  • Backup can be restored from any location as long as internet connection is available.

Cons

  • A very good internet connection would be required.
  • The backup is restricted by the amount of space available on the cloud.
Backing up using iTunes

Pros

  • There is no storage limit. Your backup can be very large.
  • You can have multiple large backups.
  • Optional encryption capability.
  • With WiFi, based syncing the backups happen automatically.

Cons

  • You have to be physically connected to the computer using cable or WiFi to perform the backup.
  • You have to be physically connected to the computer using cable or WiFi to restore the backup.

Backing up your WhatsApp messages using iCloud

Its a safe assumption that most of us use WhatsApp for our everyday communication. In fact, it is one of the most widely used methods of communication.

People use it for all kinds of things: Staying in touch with friends, family. Collaborating with people on an office project, conducting team meetings, communicating with a client. This means that our conversations are of utmost importance to us. So one should take care & back these messages up on a regular basis. The big advantage with backup is that one can even restore past conversations from the backup when the user switches from one iOS device to the other.

Use the following steps to backup your messages to iCloud

  1. First make sure you have turned on iCloud.

  2. Open Settings > iCloud

  3. Sign in with your Apple ID

  4. Switch to Whatsapp

  5. Click on Settings

  6. Click on Chat SettingsIMG_0063

  7. Click on Chat BackupIMG_0064

  8. Here you can set the auto backup feature or manually take a backup.IMG_0071

  9. Thats it, your Whatsapp messages are now being backed up.

While restoring the process is straightforward.

  1. Make sure you are signed into iCloud.

  2. Install Whatsapp.

  3. Enter your Phone number to verify.

  4. Enter the Code sent via SMS to your phone.

  5. You will be asked whether you want to restore your previous chats from iCloud.IMG_0067

  6. Just click restore.IMG_0068 IMG_0069 IMG_0070

  7. All your previous conversations should come up now.

iOS Device guide for App Developers

Developers making iOS Apps regularly come across situations where they need to find out the dimensions of the screen or the icons. This guide should give a better idea about the same.

iphones

iPhone 5S/SE iPhone 6/6S/7/8 iPhone 6+/6S+/7+/8+ iPhone X
Display Points

320×568

375×667

414×736

375×812

Pixels

640×1136

750×1334

1242×2208

1125×2436

Display Points to Pixels Ratio

1:2

1:2

1:3

1:3

Pixel Density

326 ppi

326 ppi

401 ppi

458ppi

App Icon Size in pixels

120×120

120×120

180×180

180×180

Aspect Ratio

16:9

16:9

16:9

19.5:9

ipads

  iPad Mini 2,3,4 iPad Air/iPad Air 2/iPad Pro 9.7” iPad Pro 10.5 iPad Pro 12.9”
Display Points

1024×768

1024×768

1112×834

1366×1024

Pixels

2048×1536

2048×1536

2224×1668

2732×2048

Display Points to Pixels Ratio

1:2

1:2

1:2

1:2

Pixel Density

326 ppi

264ppi

264ppi

264ppi

App Icon Size in pixels

152×152

152×152

167×167

167×167

Aspect Ratio

4:3

4:3

16:9

16:9


Clarifying Swift & Objective-C

swiftApple made a surprising announcement at the recent WWDC held between June 2-6 2014. While everyone was looking forward to the launch  of the new OS for both the Mobile as well as Mac platforms, Apple also announced a new programming language for developers. SWIFT.

It was described as Objective-C without C. Over the past few months I have gone over the features of the language & even converted many of the apps into Objective-C. While the initial learning curve is there, it is a fairly easy language to pick up. I will be going over a few interesting features of the language in this article. But what I will also be touching upon is the future & relevance of Objective-C.

Reduction in Lines of code: One of the first things that you will notice once you start programming in Swift is the reduction in the number of lines of code. Swift does away with the long syntax which you find in Objective-C. This makes the code look a lot more compact & less intimidating.

Lets take the example of creating an object in Swift & compare the syntax with that of Objective-C

Objective – C version: NSString *myString = [[NSString alloc] initWithString:@”This is a string”];

Swift version: var myString : String = String(“This is a string”)

As we can see, there is a great deal of simplicity that comes along. Reduction in the number of lines of code is of great importance to software developers. This means more compact code & improves readability. However, this comes at a price. While Objective-C code was more elaborate & did use many more lines of code it was far easier to understand by simply reading through it. In case of Swift the code will have to be complemented with details comments about what it does.

Single File: Another new feature there in Swift is the lack of header files. People coming from a Java background would find this familiar. The declaration of classes & implementation of its functions is done in .swift file now. This removes the necessity of having to import various header files. In case, certain frameworks need to be used all that needs to be done is to import that framework at the top of the file.

import framework

Replace the keyword framework with the name of the framework you wish to include.

Mixed Language Programming: Unlike Objective-C, Swift does not work well with other languages. In fact, Swift only works with Objective-C. So if you have any API’s or pieces of code that you have written in C or C++, you will have to create Objective-C wrapper classes for that C/C++ code so that you can incorporate it into your project.

This means that Objective-C is not going to be deprecated any time soon. Also, it will be equally important to learn Objective-C & can’t be ignored by people.

COMMON QUESTIONS:

– I already know Objective-C should I also learn Swift?
There is no pressing need to immediately learn Swift, though it would be a good idea to learn it anyways. None of the apps you have already made will stop working. However, you may come across code written in Swift or would need to incorporate programs written in Swift, so having knowledge of the same would be a good idea.

– I don’t know Swift or Objective-C which should I learn?
Again, as in the previous question knowing both is a really good idea. If you are confident that you will be making apps using Swift only, then you can learn just that for starters. If you feel that there is a good chance of having to read/modify or write Objective-C code then learning Objective-C before Swift makes more sense.

CONCLUSION: Swift is a very easy to use language & will sit nicely on familiar eyes. A lot of the code that will be written in the coming apps will definitely use Swift. However, this does not mean the end of the road for Objective-C. Nor does it mean that Objective-C will become redundant or obsolete. A developer can choose to use any of the languages to make the app. It will be nice for a new developer to first learn Objective-C & then move on to Swift as it will give the user a more all round understanding of the entire development framework .