Adding formatted text to Swift in Xcode

Formatting in Playgrounds and Xcode projects is achieved using Markups in comments. The following article describes some of the things that you can do. Note that there are many more ways of acheiving some of the effects shown here.

The idea behind markups is to make your code more readable whether you are using Playgrounds or Xcode.

If you can only see the commented code in playgrounds and not the rendered markup then click on Editor > Show Rendered Markup to view the rendering. You can use this option to toggle back and forth.

Formatting in Playgrounds

Plain Text

There are different kinds of text you can place in a Playground. Let us look at the code below to see what all is achieved.

//: # Documentation
//: ## Contents
//: * Text Description
//: * Documentation for Functions
//: * Documentation for Types
//: * Formatting Text
//:  - Code
//:  - Italics
//:  - Bold
//: * Inserting Items
//: * Links
//: * Assets
//: * Callouts

The comments here are in the format //:.

Rendered Output

This is how the rendered output looks.

Line 1 shows how to render a Title Text. This is achieved using the # before the text.
Line 2 shows how to get a lower sized text by using ## instead of #. We can achieve more levels if we wish.

For multi line text with bullets use the *, +, – symbols. This is seen on lines 7-13.

It is also possible to create numbered lists too. Simply type the numbered list & it renders accordingly.

//: * Inserting Items
//: 1. Links
//: 2. Assets
//: 3. Callouts

This renders as:

Screen Shot 2017-11-08 at 11.25.27 AM

Playground Pages

It is possible to have multiple pages in Playgrounds. This way we can create a more readable experience that makes the code structured, compartmentalised and easier to understand.

To do that open a playground and then simply add a playground by clicking File > New > Playground Page.

To move from one page to the next simply write the comment.

//: [Next Topic](@next)

This will automatically place a link to jump to the next page.

Similarly you can add a link to move to the previous page.

//: [Previous](@previous)

Code block

We can even show a code block in the text. It is formatted in a different manner to tell the user that it is a code block.

//: ### Code block
/*:
Loop to print characters
````
for char in "Arun Patwardhan"
{
    print(char)
}
*/

This is how it appears:

Screen Shot 2017-11-08 at 11.30.45 AM

Function Help

There is also some formatting that can be done for functions, types and other pieces of code written in a playground. This also appears on the quick help of the sidebar.

We will look at how to create formatted markup for playgrounds.

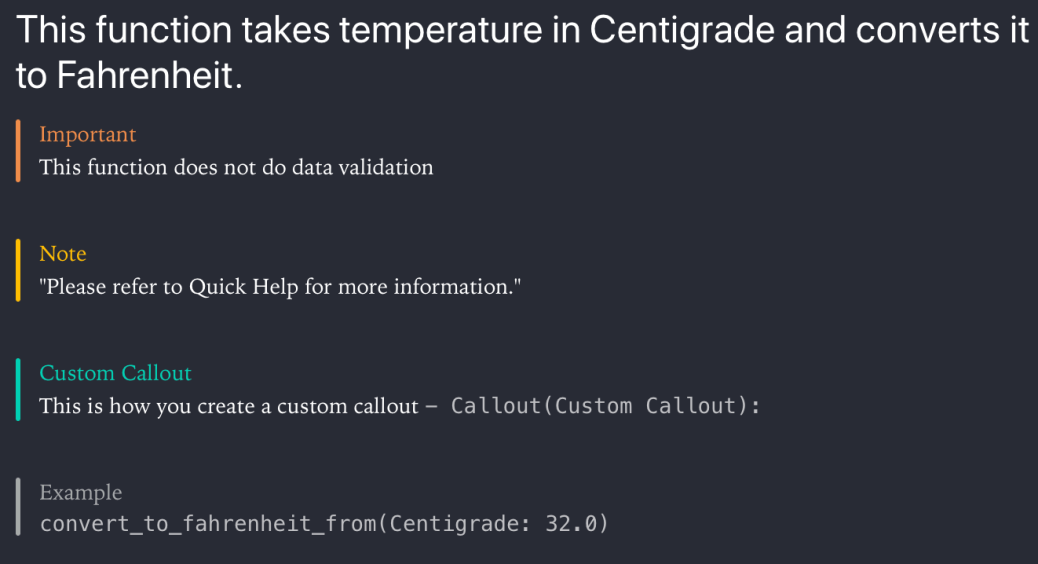
/*:
## This function takes temperature in Centigrade and converts it to Fahrenheit.
- important: This function does not do data validation
*/
/*:
- Note: "Please refer to Quick Help for more information."
*/
/*:
- Callout(Custom Callout): This is how you create a custom callout ` - Callout(Custom Callout):`
*/
/*:
- Example: `convert_to_fahrenheit_from(Centigrade: 32.0)`
*/

This renders as:

Formatted Markup for Functions

Formatted Markup for Functions.

We will look at formatting the comments to appear in Quick Help in the Formatting for Xcode section.

Inserting Links

The last bit is related to inserting links. We have already seen how to insert links for moving between Playground pages.

Redirecting to URL

/*:
For more articles on Programming, see [Programming articles @ arunpatwardhan.com](https://arunpatwardhan.com/category/programming/)
*/

This renders as:

Screen Shot 2017-11-09 at 11.14.24 AM

Formatting for Xcode

Function Help

As we saw in the earlier section we can create a lot of documentation for Functions. The approach is similar to the one we used in Playgrounds. We will be using callouts to provide information. We will use some callouts for Playgrounds, however, there are many more callouts available for Xcode Symbol Documentation as compared to Playground. The main difference here is the fact that the comments begin with /** instead of /*:.

“The code shown below will work in both, regular Xcode projects as well as Playgrounds.”

/**
This function takes temperature in Centigrade and converts it to Fahrenheit.
- important: This function does not do data validation
- parameter temp: This is the temperature in Centigrade. It can be a negative value too.
- returns: This is the temperature in Fahrenheit.
- requires: `temp > -273.0 && temp < 1000.0` - Note: The requirement mentioned is not enforced. - Since: iOS 11 - author: Arun Patwardhan - copyright: Copyright (c) Amaranthine 2015 - version: 1.0 */
func convert_to_fahrenheit_from(Centigrade temp : Float) -> Float
{
    return ((temp * 9.0 / 5.0) + 32.0)
}

This renders as:

Formatted Markup for Playgrounds as well as Quick Help

Formatted Markup for Playgrounds as well as Quick Help

Note that the quick help appears in the Right hand side sidebar. That too only after you select the function.

As we can see this makes the function a lot more readable. The real advantage of Quick Help comes in the fact that the documentation is now easily accessible no matter which file we are in within the project. The also helps the developer put in the right kind of information, required for proper usage of the function, in the help section.

Note that the rendered markup for Playgrounds will only appear in Playgrounds. 

Inserting Links

Just like in the previous section where we introduced links we can add links to the symbol documentation.

/**
   For more articles on Programming [Programming articles @ arunpatwardhan.com (https://arunpatwardhan.com/category/programming/)
*/
func recursiveFunction(count : inout Int)
{
   while 0 <= count
   {
      count -= 1
      recursiveFunction(count: &count)
   }
}

This renders in Quick Help as:

Screen Shot 2017-11-09 at 11.26.53 AM

Callouts supported by Playgrounds

  • Custom Callout
  • Example

Callouts supported by Symbol Documentation

  • Attention
  • Author
  • Authors
  • Bug
  • Complexity
  • Copyright
  • Date
  • Invariant
  • Precondition
  • Postcondition
  • Remark
  • Requires
  • See Also
  • Since
  • Version
  • Warning

Callouts supported by both Playgrounds & Symbol Documentation

  • Experiment
  • Important
  • Note

Programming Style Guide: Code Refactoring

One of the key attributes towards code that is readable and easy on the eyes is code that is split into appropriately sized pieces. Code refactoring is does exactly that. It is very easy to write a program as one big piece of code. Of course, any program that grows becomes increasingly complicated and highly inefficient. If not controlled, it will soon reach a point where it is highly unreadable, extremely difficult to maintain & filled with bugs. Not to mention that it is inefficient too.

Refactoring code and breaking it down into smaller reusable chunks is the key. The objective is:

  1. To make code easier to read
  2. To make reusable components so that we can save on duplication of code. This will reduce the code count and make sure that any changes to the reused code are available everywhere.
  3. To lend a structure to the application. Tasks now have their own space.
  4. Build scalable and maintainable code.
  5. Build bug free code.

Let us look at an example.

Screen Shot 2017-10-16 at 11.26.26 AM

Bad Code

This code is clearly written poorly. Its difficult to read. There aren’t good whitespaces. No consistency. Even the naming conventions are poor.

The fix would be :

  • Break it down into different functions
  • Separate tasks into their own files
  • Name the different elements of the code properly.

This is how the code looks now. It has been broken down into different files.

main.cpp

#include <iostream>
#include "MathOperations.hpp"
#include "Choices.hpp"

int main(int argc, const char * argv[])
{
     float number1           = 0.0;
     float number2           = 0.0;
     Choices selectedOption  = CLEAR;
     float answer            = 0;
     float integralAnswer    = 0;

     while(EXIT != selectedOption)
     {
          //Welcome message
          std::cout<<"Welcome to Calculator Program"<<std::endl;
          std::cout<<"Choose between the following options"<<std::endl;
          std::cout<<"1. Add\n2. Subtract\n3. Multiply\n4. Divide\n5. Remainder\n6. Percentage"<<std::endl;

          //User choice
          std::cout<<"Choice: ";                               std::cin>>selectedOption;

          //Chance to enter first number
          std::cout<<"Number 1: ";                               std::cin>>number1;

          //Chance to enter second number
          std::cout<<"Number 2: ";                               std::cin>>number2;

          switch (selectedOption)
          {
               case ADDITION:
                    answer = addition(number1, number2);
                    std::cout<<"The addition of "<<number1<<" & "<<number2<<" = "<<answer<<std::endl;
                    break;
               case SUBTRACTION:
                    answer = subtraction(number1, number2);
                    std::cout<<"The subtraction of "<<number1<<" & "<<number2<<" = "<<answer<<std::endl;
                    break;
               case MULTIPLICATION:
                    answer = multiplication(number1, number2);
                    std::cout<<"The multiplication of "<<number1<<" & "<<number2<<" = "<<answer<<std::endl;
                    break;
               case DIVISION:
                    answer = division(number1, number2);
                    std::cout<<"The division of "<<number1<<" & "<<number2<<" = "<<answer<<std::endl;
                    break;
               case REMAINDER:
                    integralAnswer = remainder((int)number1, (int)number2);
                    std::cout<<"The remainder of "<<number1<<" divided by "<<number2<<" = "<<integralAnswer<<std::endl;
                    break;
               case PERCENTAGE:
                    answer = percentage(number1, number2);
                    std::cout<<"The percentage of "<<number1<<" out of "<<number2<<" = "<<answer<<span 				data-mce-type="bookmark" 				id="mce_SELREST_start" 				data-mce-style="overflow:hidden;line-height:0" 				style="overflow:hidden;line-height:0" 			></span><std::endl;
                    break;
               default:
                    break;
          }
     }
     return 0;
}

Choices.hpp

#ifndef Choices_hpp
#define Choices_hpp

#include <stdio.h>
#include <iostream>

enum Choices : unsigned short int { ADDITION = 1, SUBTRACTION, MULTIPLICATION, DIVISION, REMAINDER, PERCENTAGE, CLEAR, EXIT};

typedef enum Choices Choices;

std::istream& operator >>(std::istream &is, Choices& enumVar);

#endif

Choices.cpp

#include "Choices.hpp"

std::istream& operator >>(std::istream &is, Choices& enumVar)
{
    unsigned short int intVal;
    is>>intVal;
    switch (intVal) {
        case 1:
            enumVar = ADDITION;
            break;
        case 2:
            enumVar = SUBTRACTION;
            break;
        case 3:
            enumVar = MULTIPLICATION;
            break;
        case 4:
            enumVar = DIVISION;
            break;
        case 5:
            enumVar = REMAINDER;
            break;
        case 6:
            enumVar = PERCENTAGE;
            break;
        default:
            enumVar = EXIT;
            break;
    }
    return is;
}

MathOperations.hpp

#ifndef MathOperations_hpp
#define MathOperations_hpp

#include <stdio.h>

//Addition
float addition(float number1, float number2);

//Subtraction
float subtraction(float number1, float number2);

//Multiplication
float multiplication(   float number1, float number2);

//Division
float division(float number1, float number2);

//Remainder
int remainder(int number1, int number2);

//Percentage
float percentage(float number1, float number2);

#endif

MathOperations.cpp

#include "MathOperations.hpp"

//Addition
float addition(float number1, float number2)
{
    return number1 + number2;
}

//Subtraction
float subtraction(float number1, float number2)
{
    return number1 - number2;
}

//Multiplication
float multiplication(   float number1, float number2)
{
    return number2 * number1;
}

//Division
float division(float number1, float number2)
{
    if (number2 > 0) {
        return number1 / number2;
    }
    return 0.0;
}

//Remainder
int remainder(int number1, int number2)
{
    return number1 % number2;
}

//Percentage
float percentage(float number1, float number2)
{
    if (number2 > 0) {
        return (number1 / number2) * 100.0;
    }
    return 0.0;
}

Let us look at how this looks for Swift.
main.swift

import Foundation

var number1 : Float             = 0.0
var number2 : Float             = 0.0
var selectedOption : Choices    = Choices.CLEAR
var answer : Float              = 0.0
var integralAnswer : Int        = 0

func readNumbers(One firstNumber : inout Float, Two secondNumber : inout Float)
{
     //Chance to enter first number
     print("Number 1: \n")
     firstNumber = Choices.inputNumbers()

     //Chance to enter second number
     print("Number 2: \n")
     secondNumber = Choices.inputNumbers()
}

while(Choices.EXIT != selectedOption)
{
     //Welcome message
     print("Welcome to Calculator Program")
     print("Choose between the following options")
     print("1. Add\n2. Subtract\n3. Multiply\n4. Divide\n5. Remainder\n6. Percentage")

     //User choice
     print("Choice: \n")
     selectedOption = Choices.inputChoices()
     switch (selectedOption)
     {
          case Choices.ADDITION:
               readNumbers(One: &number1, Two: &number2)
               answer = addition_of(_value: number1, with_value: number2)
               print("The addition of \(number1) & \(number2) = \(answer)")
               break
          case Choices.SUBTRACTION:
               readNumbers(One: &number1, Two: &number2)
               answer = subtraction_of(_value: number1, from_value: number2)
               print("The subtraction of \(number1) & \(number2) = \(answer)")
               break
          case Choices.MULTIPLICATION:
               readNumbers(One: &number1, Two: &number2)
               answer = multiplication_of(_value: number1, with_value: number2)
               print("The multiplication of \(number1) & \(number2) = \(answer)")
               break
          case Choices.DIVISION:
               readNumbers(One: &number1, Two: &number2)
               answer = division_of(_value: number1, by_value: number2)
               print("The division of \(number1) & \(number2) = \(answer)")
               break
          case Choices.REMAINDER:
               readNumbers(One: &number1, Two: &number2)
               integralAnswer = remainder_of(_value: Int(exactly:number1)!, <span 				data-mce-type="bookmark" 				id="mce_SELREST_start" 				data-mce-style="overflow:hidden;line-height:0" 				style="overflow:hidden;line-height:0" 			></span>divided_by_value: Int(exactly: number2)!)
               print("The remainder of \(number1) divided by \(number2) = \(integralAnswer)")
               break
          case Choices.PERCENTAGE:
               readNumbers(One: &number1, Two: &number2)
               answer = percentage_of(_value: number1, with_respect_to_value: number2)
               print("The percentage of \(number1) out of \(number2) = \(answer)")
               break
          default:
               selectedOption = .EXIT
               break
     }
}

Choices.swift

import Foundation

enum Choices { case ADDITION, SUBTRACTION, MULTIPLICATION, DIVISION, REMAINDER, PERCENTAGE, CLEAR, EXIT}

//CLI Reading Capability
extension Choices
{
    static func inputChoices() -> Choices
    {
        let ip : String? = readLine()
        let choice : String = String(ip!)

        switch choice {
        case "1":
            return .ADDITION
        case "2":
            return .SUBTRACTION
        case "3":
            return .MULTIPLICATION
        case "4":
            return .DIVISION
        case "5":
            return .REMAINDER
        case "6":
            return .PERCENTAGE
        default:
            return .EXIT
        }
    }

    static func inputNumbers() -> Float
    {
        let ip : String? = readLine()

        let numberFormatter = NumberFormatter()
        let number = numberFormatter.number(from: ip!)

        let num : Float? = number?.floatValue
        return num!
    }
}

MathOperations.swift

import Foundation

//Addition
func addition_of(_value number1 : Float, with_value number2 : Float) -> Float
{
    return number1 + number2;
}

//Subtraction
func subtraction_of(_value number2 : Float, from_value number1 : Float) -> Float
{
    return number1 - number2;
}

//Multiplication
func multiplication_of(_value number1 : Float, with_value number2 : Float) -> Float
{
    return number2 * number1;
}

//Division
func division_of(_value number1 : Float, by_value number2 : Float) -> Float
{
    if (number2 > 0) {
        return number1 / number2;
    }
    return 0.0;
}

//Remainder
func remainder_of(_value number1 : Int, divided_by_value number2 : Int) -> Int
{
    return number1 % number2;
}

//Percentage
func percentage_of(_value number1 : Float, with_respect_to_value number2 : Float) -> Float
{
    if (number2 > 0) {
        return (number1 / number2) * 100.0;
    }
    return 0.0;
}

Discussion on Swift Extensions

As we can see that most of the code in Swift is very similar to C++. Most of the differences are basic syntactic differences. However, there is 1 feature of Swift that greatly aids code refactoring that I would like to talk about, Extensions.

Extensions allow us to add new functionality to the existing type. As the name says the type is extended. This allows us to add changes to a type in a consistent & clearly demarcated way. Developers can now neatly separate newly added components. This greatly helps in understanding the evolution of types.

“This is often referred to as versioning.”

Extensions can be used in the following ways to implement code refactoring:

  • Different sections of a type reside in their own extensions
  • Changes made to a type are made by keeping them in their own extensions
  • Step by step build up of code is done by representing each step as an independent extension. This gives clarity on how a certain end result was achieved.

Conclusion

As we can see from the sample code above (for both C++ & Swift) the program is much more readable. Code is carefully compartmentalised. Its a lot easier to read. It is a lot easier to scale too.

The reader may point out that the amount of code to achieve the same result is significantly higher, that however is a small price to pay in the long run. The biggest advantage is the scalability & the ease with which it can be done. Simply breaking code down into separate files & functions makes a huge difference. Here are some other benefits:

  • Individual files can be modified. This means one can now have a team working on different parts of the code.
  • Code is less cluttered. Changes are now spread across files & are easier to track.

We will now see how we can further improve this code in upcoming articles.

macOS & iOS IT Tool List

This list is based on questions that I have been asked by various IT admins.

It is more of a collection of tools (mainly software, but a few hardware tools too) that Enterprise IT Teams might find useful while supporting/managing Macs & iPhones in the enterprise. Some of the tools are free, while others are paid. Also, it is not necessary that all the tools will be required. Of course, some tools are not meant for troubleshooting but provide a service themselves.

The below list is not an endorsement or recommendation of any of the products mentioned. These are just some of the products I have come across. You may have to do your own research to see which tool fits your organisation’s needs. The author is not responsible for any damages or loss of data that might occur from usage of these tools.

*This list is not a complete list but an ongoing project. Feel free to share your comments on tools that you may have used & I will add them to this list.

DEPLOYMENT

DeployStudio

Munki

macOS Server – NetInstall Service. To be used along with System image Utility

PACKAGE MANAGEMENT

Iceberg

pkgbuild

Suspicious Package

REMOTE MANAGEMENT

RealVNC

TeamViewer

Apple Remote Desktop

LogMeIn

BACKUPS

macOS Server – Time Machine Service

Retrospect

Carbon Copy Cloner

Chronosync

Crash Plan

DEVICE MANAGEMENT

Centrify

JAMF Casper Suite

AirWatch

Mobile Iron

macOS Server – Profile Manager Service

Apple Configurator 2

Heat LANRev

Cisco Meraki

filewave

Absolute Software

BoxTone

Maas 360 – IBM

Tangoe

Lightspeed Systems

VIRTUALIZATION

Parallels Desktop

VMWare Fusion

Oracle VirtualBox

DISK MANAGEMENT

Tuxera

Disk Drill

APPLE APPLICATIONS FOR THIRD PARTY OS

iTunes

iCloud Control Panel

Move to iOS from Android

Migration Assistant

AUTOMATION

Workflow for iOS

Automator – Built in app for creating Workflows.

AppleScript

Command Line Script

NETWORK TROUBLESHOOTING

iNetTools

Network Diagnostics

Network Ping

Wireshark

DISPLAY

Air Squirrel

SYSTEM TROUBLESHOOTING

Install Disk – I will be talking about how to create a multi-OS install disk in a later article.

SOFTWARE MANAGEMENT

macOS Server – Caching Service

Reposado

AutoPKG

Munki

HARDWARE

Thunderbolt 1,2,3 Cables
Thunderbolt 1,2
USB-C Cable

FireWire 400/800 Cables

Portable disk with macOS installed on it. Not the same as install disk. Its an external bootable hard drive with the OS installed on it. You can plug this into any Mac & boot from the external HDD.

VGA to MiniDisplay adapter

HDMI to HDMI Cable

Thunderbolt Ethernet Bridge

USB Ethernet Bridge

Adapters for the different ports supported by Macs & iPhones

Lightning Cables

Creating multi-OS Install Disk

In this article we are going to look at how to create a multi-OS Install Disk. We are going to look at the example of creating a multi-OS Install Disk for the following versions of the OS:

  • 10.9.1
  • 10.10
  • 10.10.4
  • 10.11.5
  • 10.12
  • 10.12.1
  • 10.12.2
  • 10.12.3

The idea is to have a single disk with multiple versions of the Install Disk on it. The versions should reflect the need of the organisation.

REQUIREMENTS

  1. USB Drive at least 75GB in Size. This depends on the number of Install drives you wish to have. At the very least there should be enough space to create 2 partitions of 8 GB each. 
    While I have mentioned USB drive, it need not be restricted to that interface. You can use Thunderbolt, FireWire or even an SDXC slot for this. Ideally the port should be one that is supported on maximum possible computers.
  2. Install setup for each version of the OS for which you want to create the install disk. The setup must match the version desired.
  3. A Mac running the same major version of the OS. You can only create an install disk for 10.9.x on a Mac running OS X 10.9.x, the same applies for the other versions of the OS.

The process is the same. It’s just that it needs to be repeated.

STEPS

  1. Create 8 partitions on a USB Drive. Assume that the USB Drive is called Recovery Drive. Give the partitions names Partition 1, Partition 2,….
  2. Connect the USB Drive to a Mac running 10.9.1 or later.
  3. Make sure that the OS Installer setup is located in the Applications folder.
  4. Run the following command in the command line.
    sudo /Applications/Install\ OS\ X\ Mavericks.app/Contents/Resources/createinstallmedia --volume /Volumes/Partition\ 1 --applicationpath  /Applications/Install\ OS\ X\ Mavericks.app
  5. Rename the partition as Install disk for OS X 10.9.1, if necessary.
  6. Once completed eject the USB Drive & connect it to a Mac running 10.10
  7. Make sure that the OS Installer setup is located in the Applications folder.
  8. Run the following command in the command line.
    sudo /Applications/Install\ OS\ X\ Yosemite.app/Contents/Resources/createinstallmedia --volume /Volumes/Partition\ 2 --applicationpath  /Applications/Install\ OS\ X\ Yosemite.app
  9. Rename the partition as Install disk for OS X 10.10, if necessary.
  10. Once completed eject the USB Drive & connect it to a Mac running 10.10.4
  11. Make sure that the OS Installer setup is located in the Applications folder.
  12. Run the following command in the command line.
    sudo /Applications/Install\ OS\ X\ Yosemite.app/Contents/Resources/createinstallmedia --volume /Volumes/Partition\ 3 --applicationpath  /Applications/Install\ OS\ X\ Yosemite.app
  13. Rename the partition as Install disk for OS X 10.10.4, if necessary.
  14. Once completed eject the USB Drive & connect it to a Mac running 10.11.5 or later.
  15. Make sure that the OS Installer setup is located in the Applications folder.
  16. Run the following command in the command line.
    sudo /Applications/Install\ OS\ X\ El\ Capitan.app/Contents/Resources/createinstallmedia --volume /Volumes/Partition\ 4 --applicationpath  /Applications/Install\ OS\ X\ El\ Capitan.app
  17. Rename the partition as Install disk for OS X 10.11.5, if necessary.
  18. Once completed eject the USB Drive & connect it to a Mac running 10.12 or later.
  19. Make sure that the OS Installer setup is located in the Applications folder.
  20. Run the following command in the command line.
    sudo /Applications/Install\ macOS\ Sierra.app/Contents/Resources/createinstallmedia --volume /Volumes/Partition\ 5 --applicationpath  /Applications/Install\ macOS\ Sierra.app
  21. Rename the partition as Install disk for OS X 10.12., if necessary.
  22. Once completed eject the USB Drive & connect it to a Mac running 10.12.1 or later.
  23. Make sure that the OS Installer setup is located in the Applications folder.
  24. Run the following command in the command line.
    sudo /Applications/Install\ macOS\ Sierra.app/Contents/Resources/createinstallmedia --volume /Volumes/Partition\ 6 --applicationpath  /Applications/Install\ macOS\ Sierra.app
  25. Rename the partition as Install disk for OS X 10.12.1., if necessary.
  26. Once completed eject the USB Drive & connect it to a Mac running 10.12.2 or later.
  27. Make sure that the OS Installer setup is located in the Applications folder.
  28. Run the following command in the command line.
    sudo /Applications/Install\ macOS\ Sierra.app/Contents/Resources/createinstallmedia --volume /Volumes/Partition\ 7 --applicationpath  /Applications/Install\ macOS\ Sierra.app
  29. Rename the partition as Install disk for OS X 10.12.2, if necessary.
  30. Once completed eject the USB Drive & connect it to a Mac running 10.12.3 or later.
  31. Make sure that the OS Installer setup is located in the Applications folder.
  32. Run the following command in the command line.
    sudo /Applications/Install\ macOS\ Sierra.app/Contents/Resources/createinstallmedia --volume /Volumes/Partition\ 8 --applicationpath  /Applications/Install\ macOS\ Sierra.app
  33. Rename the partition as Install disk for OS X 10.12.3, if necessary.

The commands shown above might be different from what appears on your screen. A lot will depend on what you have named your partitions as, the name you may have given to the OS Installer file, and the location of the OS Installer.

The process of renaming the partitions post creation of the install disk is not necessary, but very useful because that will help you identify the appropriate partition when using the drive.

The above process is very scalable & can be done for even more versions of the OS if required.

Screen Shot 2017-04-17 at 11.11.39 AM
This diagram illustrates the layout of the different partitions on a single USB Drive.

COLLECTION TYPE, SEQUENCE TYPE & INDEXABLE TYPE – Update

This is an update to the topic covered earlier. You can read about the Protocols in detail in the original article. Collection Type, Sequence Type & Indexable Type

Most of the things are the same here are some of the changes:

  1. The Indexable protocol is now not necessarily required. All the aspects of the indexable protocol now fall under the Collection Protocol
  2. The names of the protocols have changed from SequenceType & CollectionType to Sequence & Collection
  3. The keyword Generator has been renamed to Iterator. Accordingly the generate function has been renamed makeIterator function.
  4. The collection protocol now requires the implementation of the function index, this function returns the value of the next index.

The sample code below should clarify

class CustomStack
{
    var data : [Element] = [Element]()

    func push(Element newElement : Element)
    {
        data.append(newElement)
    }

    func pop() -> Element
    {
        return data.removeLast()
    }
}

//Additional Implementations - not strictly required
extension CustomStack
{
    typealias Index = Int

    var startIndex : Index
    {
        return 0
    }

    var endIndex: Index
    {
        return (data.count - 1)
    }

    subscript (position : Index) -> Element
    {
        return data[position]
    }
}

extension CustomStack : Sequence
{
    typealias Iterator = AnyIterator

    func makeIterator() -> Iterator
    {
        var index = 0
        return AnyIterator({() -> Element? in
            if index < self.data.count
            {
                let res =  self.data[index]
                index += 1
                return res
            }
            return nil
        })
    }
}

extension CustomStack : Collection
{
    typealias SubSequence = CustomStack

    subscript (bounds: Range) -> CustomStack.SubSequence
    {
        let newStack : CustomStack = CustomStack()

        for i in bounds.lowerBound...bounds.upperBound
        {
            newStack.push(Element: data[i])
        }
        return newStack
    }

    /// Returns the position immediately after the given index.
    /// - Parameter i: A valid index of the collection. `i` must be less than
    ///   `endIndex`.
    /// - Returns: The index value immediately after `i`.
    func index(after i: Int) -> Int
    {
        if i < endIndex
        {
            return i + 1
        }
        return i
    }
}

When to use Swift & when to use Objective-C?

Over the past few years I have received a number of questions with regards to Swift & Objective-C. Specifically related to the future of the 2. I will try to address those questions in the form of an FAQ.

Should I learn Swift or Objective-C?

This is a question that I get from developers new to iOS/macOS App Development. Ideally speaking, you should learn Swift. As that is going to become the main language for App development on Apple’s ecosystem. However, the reality is a little different. There are a large number of applications that are written in Objective-C. You are likely to encounter them at your workplace. You may also have to maintain, upgrade & improve those apps. In such a case, it makes sense to learn Objective-C too.

Can I mix Swift & Objective-C in the same project?

Yes! But remember that you should check for feature compatibility between the 2 languages. Adding Swift code to an Objective-C project may not be very beneficial as only those features that are compatible with Objective-C can be written in Swift.

Going the other way round is not a problem. You can read more about that here:Mixing Swift & Objective-C

Will Objective-C be deprecated in the future?

That is an interesting question. There is no formal announcement from Apple stating the Objective-C is going to be deprecated. However, one can expect more attention to be paid to Swift. That is where most of the newest techniques, tools & technologies are going to be available. Objective-C will keep running as it is as of now.

Can I mix Swift with other Programming Languages?

Swift can easily be mixed with Objective-C. If you wish to incorporate C++ or C code in your Swift Project then wrapping them in Objective-C code allows you to achieve this.

Apart from that Swift does support working with C code code. You can read about that here:Interacting with C APIs.

Swift does not provide interoperability support for any other languages as of now.

Which version of Swift should I use?

It is recommended that you use the latest available version of Swift. However, the actual version that you work on depends on many other factors like: compatibility with OS Versions, support & business related choices.

Why shouldn’t we just convert all our Objective-C code to Swift and keep things simple?

A very tempting proposition. However, practical realities prevent us from doing this. The process of converting from Objective-C to Swift is time consuming. Apart from having to convert the syntax, the code also needs to be optimised taking into account the new features that are available. This will mean extensive testing and quality assurance. Most companies will not invest their resources into this endeavour.

A better approach is to migrate to Swift gradually. Here are some ways to do this:

  1. If its a brand new product/app that you are creating, start it in Swift.
  2. Any new reusable code components that are being created should be done in Swift (they should be Objective-C compatible if you intend to use this code in Objective-C projects).
  3. If any part of a product is going to undergo heavy change, either due to a bug fix or a new feature. This is a good time to convert it into Swift.

A good example is how Apple is approaching the process of migrating to Swift. They are doing it component by component.

I have been developing apps in Objective-C for some time. I am able to create any reasonably complicated app now. If Objective-C hasn’t been deprecated then should I start making apps in Swift?

This is a choice that you have to make. It is recommended that new apps (at the very least) be made in Swift as that is the language that will undergo the maximum amount of changes & improvements in the future.

What do you suggest as a trainer?

Another question that I get very often. It depends on the situation. I would say learn both Swift & Objective-C. You can skip learning Objective-C if you are confident that you will not have to work with any projects written in that language.

If I am starting on a brand new project I would use Swift. But if its an Objective-C project I would stick to Objective-C.

Can Swift development only be done on macOS?

No! Swift development can also be done on Linux. However, iOS/macOS/tvOS/watchOS App Development can only be done on macOS through Xcode.

How should I migrate to Swift?

There are different approaches that one can use. It all depends on the situation and needs of your organisation. Here are some things that you can do:

  • Start development of brand new apps (from scratch) in Swift.
  • If you are creating a brand new library which will be used for future projects then go ahead with Swift.
  • If a major component of an existing app is going to be changed significantly then you can go ahead with Swift.

You can do all or some of the above. There may be other strategies too. You should also factor in the cost of migration from one language to another.


Collection Type, Sequence Type & Indexable Type

This is for Swift Version 2.2 & earlier. I will be adding the snippet of code for the changes the Swift 3.x have introduced.

What are the Collection Type & Sequence Type Protocols?

The Collection Type, Sequence Type & Generator Type Protocols define rules that govern how different data structures or collections of data can be used, interacted with and operated within the Swift programming language. The CollectionType is a special case of the SequenceType.

Why do we need such Protocols?

Lets take the example of the Swift For-Loop.

var arrOfStrings : [String] = [String]()

arrOfStrings.append("Jill")
arrOfStrings.append("Jack")
arrOfStrings.append("John")
arrOfStrings.append("Jane")

for name in arrOfString
{
     print("The name is \(name)")
}

Now, if we have created our own data type. We would not be able to use the above for-loop as it would not conform to the … type protocols. The for-loop is expecting a data structure that acts and behaves in a way that is governed by the … protocols.

Just like the for-loop example above there are many other features within the Swift Programming Language that expect data structures to act and behave in a particular way. By designing our data structures to conform to these protocols we can make the easily compatible with the existing code and language features out there.

How do we use these protocols for our own data structures?

First we need to decide what kind of collection are we making. For the sake of this example I will create a Custom Stack.

class CustomStack<Element>
{
    var data : [Element] = [Element]()

    func push(Element newElement : Element)
    {
        data.append(newElement)
    }

    func pop() -> Element
    {
        return data.removeLast()
    }
}

The above code is very simple for the purpose of this exercise. Its a stack. Which is internally really an Array. It has functions to push data and pop data. We are now going to convert this type to a collection to conform to the CollectionType protocol.

Implementing the Indexable Protocol methods

As a first step we are going to make our CustomStack conform to the Indexable Protocol.

extension CustomStack : Indexable
{
    //INDEXABLE PROTOCOLS
    typealias Index = Int

    var startIndex : Int
    {
        return 0
    }

    var endIndex: Int
    {
        return (data.count - 1)
    }

    subscript (position : Int) -> Element
    {
        return data[position]
    }
}

The above change makes the data structure conform to the Indexable protocol. This is a requirement for it to be of type CollectionType. In order to conform to the Indexable protocol we need to implement a few computed properties. Let us look at the changes

typealias Index = Int

This line informs the system that the Indexing type for my data structure is an Int.

var startIndex : Int
{
    return 0
}

var endIndex: Int
{
    return (data.count - 1)
}

The next 2 are computed properties. Each provides the implementation of the startIndex  and endIndex properties. Note that the type for both is Int as we have declared the Index type earlier as Int.

subscript (position : Int) -> Element
{
    return data[position]
}

The last implementation is of subscript. This provides the implementation to access an Element from the Stack using the Subscript operator.

Implementing the Sequence Type Protocol

Next we will implement the Sequence Type Protocol methods.

extension CustomStack : SequenceType
{
    typealias Generator = AnyGenerator<Element>
    
    func generate() -> Generator
    {
        var index = 0
        
        return AnyGenerator(body: {() -> Element? in
            if index < self.data.count
            {
                let res =  self.data[index]
                index += 1
                return res
            }
            return nil
        })
    }
}

Let us examine this code line by line.

typealias Generator = AnyGenerator<Element>

Objects of type Generator allow us to navigate through our collection. Quite like how iterators  work in C++. This line specifies the type to be AnyGenerator for Elements.

func generate() -> Generator

Next we start the implementation of the generate function. This is required as part of the SequenceType protocol.

var index = 0

This index variable is used to track the element that is currently being accessed.

return AnyGenerator(body: {() -> Element? in
            if index < self.data.count
            {
                let res =  self.data[index]
                index += 1
                return res
            }
            return nil
        })

The return statement is the main statement. Here we are creating an object of type AnyGenerator. As an argument to the constructor call we are passing in a closure that will be used to iterate through the sequence. Note that the closure captures the index variable and holds a reference to its value even though we have left the original function.

Implementing the Collection Type Protocol

Next we will implement the Collection Type Protocol methods. We don’t really need to implement a lot in order to conform to the CollectionType protocol. In fact, if we just conform to the CollectionType protocol and use the implementations of the previous 2 extensions we should be just fine. However, for the sake of demonstration we are implementing the subscript functionality within the CollectionType.

extension CustomStack : CollectionType
{
    typealias SubSequence = CustomStack<Element>
    
    subscript (bounds: Range<CustomStack.Index>) -> CustomStack.SubSequence
    {
        let newStack : CustomStack<Element> = CustomStack<Element>()
        
        for i in bounds.startIndex...bounds.endIndex
        {
            newStack.push(Element: data[i])
        }
        return newStack
    }
}

Let us look at the code line by line.

typealias SubSequence = CustomStack<Element>

Again, as before this line indicates that the SubSequence type is actually a CustomStack.

subscript (bounds: Range<CustomStack.Index>) -> CustomStack.SubSequence

Here we start the implementation of the subscript functionality.

let newStack : CustomStack<Element> = CustomStack<Element>()
        
for i in bounds.startIndex...bounds.endIndex
{
     newStack.push(Element: data[i])
}
return newStack

The rest of the code is the implementation of the subscript range behaviour. One can have different implementations to achieve the same result.

CollectionType Video

Conclusion

As we can see, by designing our data structure to conform to a particular set of protocols. We have made it possible for our data structure to take advantages of the different features, functionalities and even API’s available within the Swift Language and the Frameworks used as a part of iOS, macOS, watchOS & tvOS development.