Configuring/Troubleshooting OS X Using Command Line

The following are some commands that you can use for Configuration &/or Troubleshooting. This list is by no means exhaustive. Do check the man pages for more information. This article assumes familiarity with Terminal commands. If you are new to the Terminal Application, please read the following articles before reading this one.

Terminal Commands for OS X – Basic
Terminal Commands for OS X – Part 2
Terminal Commands for OS X – Part 3

SYSTEM SETUP

softwareupdate

This command is used to install software updates remotely. View the following support article for more information.

dscl

This command is used to manage the different Users & Groups on your Mac. Using this command one can create, modify & view the different settings related to Users & Groups locally on the Mac. Amongst the other things, User Authentication through passwords can also be managed from here. View the man page for more information on the options available.

createhomedir

This command is used to create & populate home folders on the Mac. View the man page for more information on the options available.

systemsetup

As the name says, this command is used to setup the system. One of the more generic commands, using this we can set the date/time, energy preferences & various other settings. View the man page for more information on the different options available.
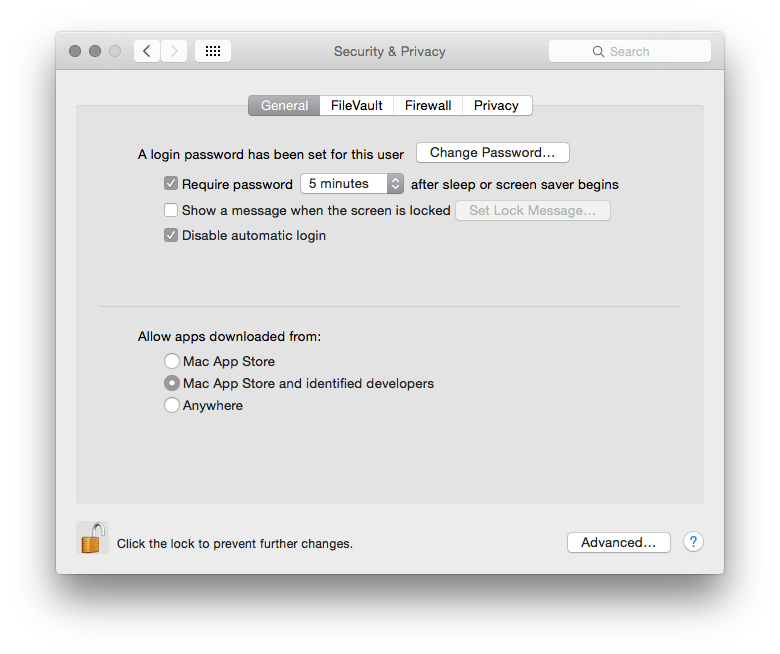
SECURITY

security

This is the command line version of the GUI application Keychain Access. Use this command to manage your Keychain. Some of the things that can be done using this command include: creating keychains, locking/unlocking keychains, finding your secure information within the Keychain. View the man page for more information on the options available.

FILE SYSTEM TROUBLESHOOTING

fsck

This command is used for running File System Checks. View the man page for more information on the options available.
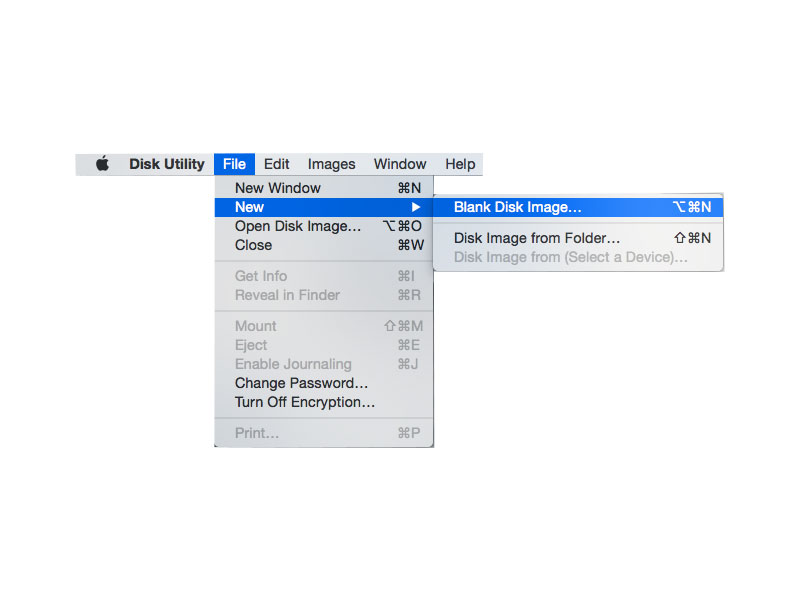
diskutil

This command is used to run disk utility options. This is the command line equivalent of  the Disk Utility application. There are many operations available within this command line utility that are not available directly in the GUI version of the tool. View the man page for more information on the options available.
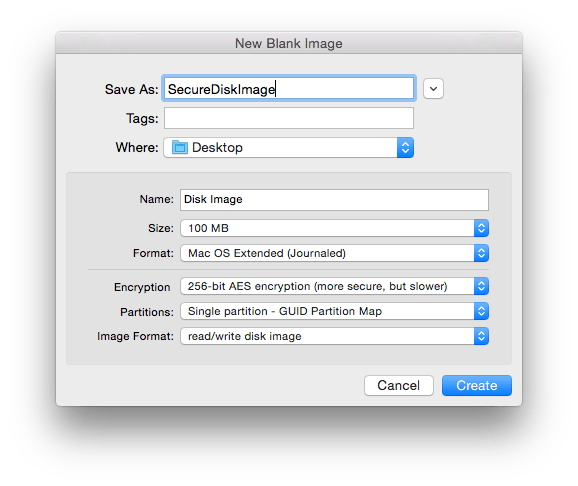
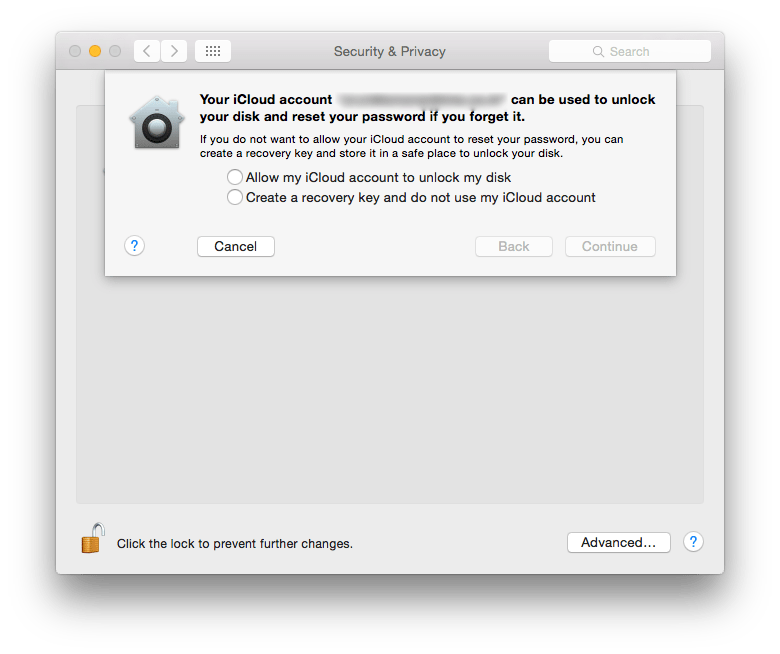
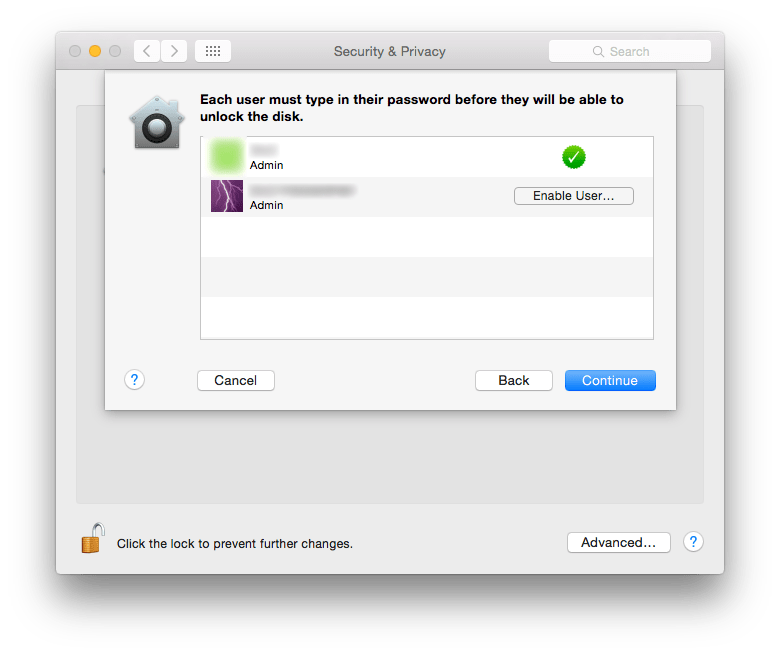
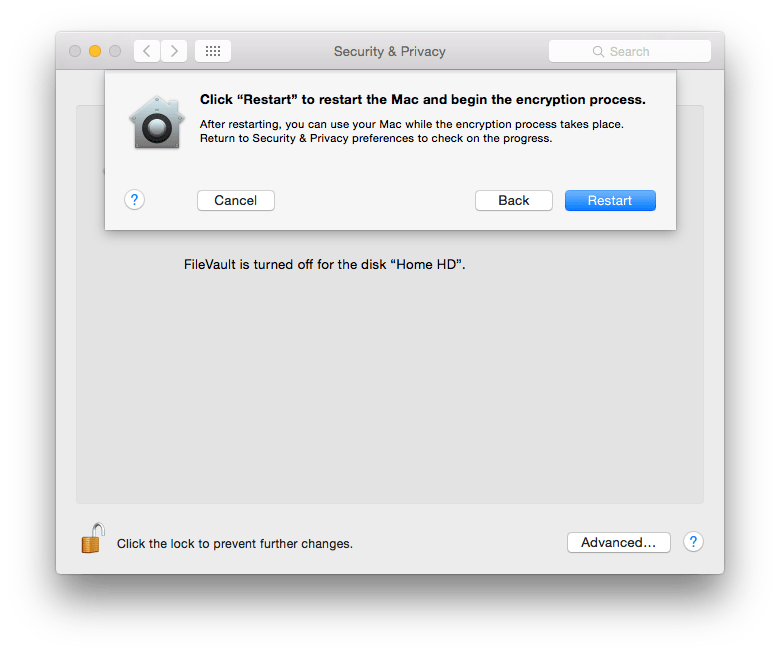
fdesetup

This command is used to control the FileVault settings on the Mac. Again, like the distil command this utility gives a lot more options than the GUI version of the Mac. Including the ability to change the recovery keys. View the man page for more information on the options available.

chmod

This command is used to modify permissions to files & folders. View the man page for more information on the different options available.

ln

This is the command used to create both hard links & soft links in the terminal. View the man page for more information on the different options available.

xattr

This command is used to examine &/or modify the attributes/metadata for a given file or folder. View the man page for more information on the different options available.
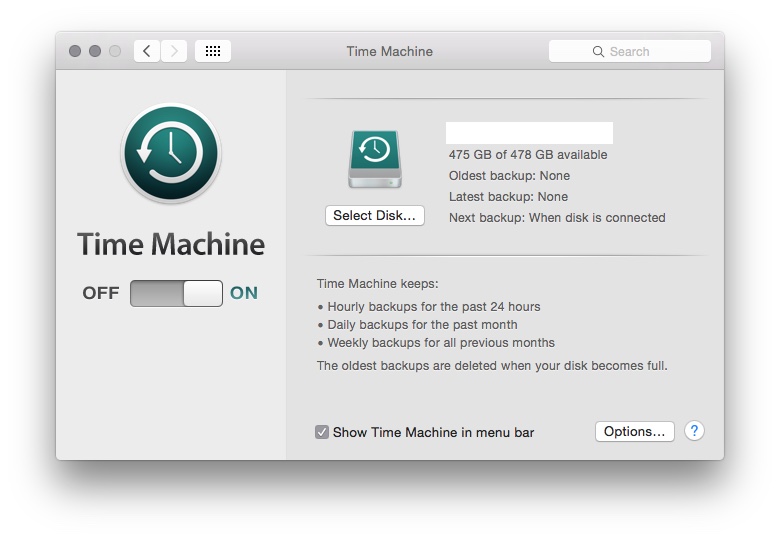
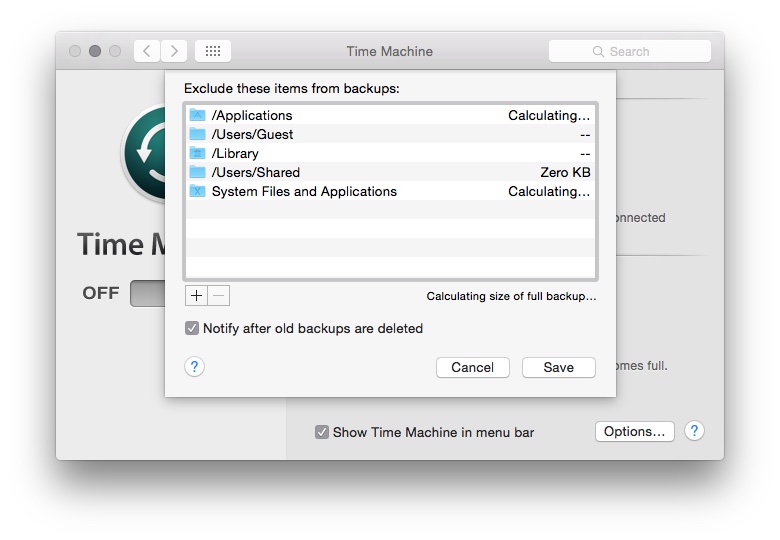
tmutil

This command allows you to configure &/or setup the Time Machine service. This is the command line version of the Time Machine settings located within System Preferences. View the man page for more information on the different options available.

locate

This command is used to search for files on the Mac. View the man page for more information on the different options available.
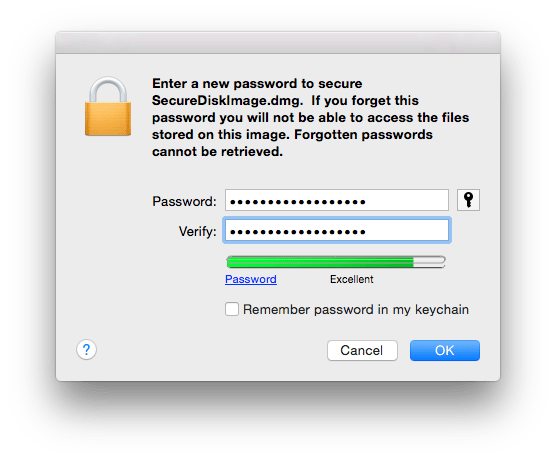
hdiutil

This command is also used to manage storage devices & Filesystems. The diskutil & hdiutil are command line versions of the Disk Utility app. View the man page for more information on the different options available.

NETWORK SETTINGS & TROUBLESHOOTING

networksetup

This command is used to set up & configure your network settings. This is the command line equivalent of the Network Preferences located under System Preferences. View the man page for more information on the different options available.

ipconfig

This command lets you view & control the IP configuration settings. View the man page for more information on the different options available.

ifconfig

This command is used to configure the Network Interface parameters. View the man page for more information on the different options available.

route

This command allows you to manually manipulate the routing tables. View the man page for more information on the different options available.

ping

Used to send ping diagnostic requests. View the man page for more information on the different options available.

scutil

Used to manage the System Configuration parameters. View the man page for more information on the different options available.

START/SLEEP/SHUTDOWN

shutdown

This command is used to shut down the Mac from the command line. View the man page for more information on the options available.

sleep

This command is used to put the system to sleep. View the man page for more information on the options available.

reboot/halt

This command is used for restarting the system. View the man page for more information on the options available.

caffeinate

Used to prevent the system from sleeping. View the man page for more information on the options available.

FILE EDITING

There are various editors available for command line. I am just listing a few. A lot of the editing can also be done in the GUI but in some cases the changes have to be done as a Super User. In Such situations loading one of the following editors using the sudo command can come in handy.

Emacs

https://en.wikipedia.org/wiki/Emacs
https://www.gnu.org/software/emacs/
http://www.xemacs.org

Vi

https://en.wikipedia.org/wiki/Vi

Vim

https://en.wikipedia.org/wiki/Vim_(text_editor)
http://www.vim.org

GEdit

https://en.wikipedia.org/wiki/Gedit

Simple steps for securing your Mac

Continuing on from the previous post, where we learnt to secure our iOS devices, we will now apply similar steps on the Mac.

The security of a computer is easy to maintain if physical access to the device is restricted to yourself as far as possible. If any unauthorised person has physical access to your computer then all bets on security are off. While it’s easy for us to say that no one else is going to use the computer, one must always take some precautions. The following are just some of the steps one could take to secure their Mac.

User Accounts

This is the simplest way of ensuring very basic security. If more than one person is using a Mac one can have different accounts for each user. The account type that can be used for other users are:

  • Standard Users: This is a basic account that is used everyday. This accounts limits the user to his own files & folders only. The user has the option to install applications too.
  • Managed Users: They are standard users with restrictions. An administrator can specify what the user can or cannot do. This includes time limits, restrictions on applications & websites.
  • Guest User: This is the simplest of the lot. Good for people who wish to access their emails & leave no data behind.

User Account Password

This is the simplest form of security. It is the password that you use to login to the computer. Having a strong password goes a long way in securing your Mac.

Setting a password

A password to your account will very likely be set when it was first created.

Changing the password

This can be changed at any point in time.

  1. Open System Preferences
  2. Click on Users & Groups
  3. If necessary unlock the padlock icon and authenticate as the administrator on your Mac.
  4. Select your user account
  5. On the right hand side click on change password

The other approach towards changing the password is:

  1. Open System Preferences
  2. Click on Security & Privacy
  3. Click on the General tab
  4. Click on the “Change Password” button next to the sentence: “A login password has been set for this user”

Note: for both the approaches you must know your existing password.

To create a strong password use the built in Password Assistant 

Encrypted Disk Images

This offers a convenient approach towards storing your files securely. Disk Images are created using Disk Utility. To create encrypted disk images:

  1. Open Disk Utility. It’s located in the Applications > Utilities  folder.
  2. Click File > New > Blank Disk Image.step2
  3. Don’t select the ‘Disk Image from Folder ‘ option.
  4. Specify the size of the image.
  5. In the Image Format select ‘Read/Write’
  6. Under security select the level of encryption desired.
  7. Provide a name and click create.Screen Shot 2015-08-15 at 11.44.19 am
  8. Choose where you wish to save the disk image, provide an appropriate password.Screen Shot 2015-08-15 at 11.45.22 am
  9. Once the image is created, open the image.
  10. It mounts as a virtual disk, you will be prompted to enter the password you set earlier.
  11. Now you can add files you wish to secure.
  12. Once you are done simply eject the volume.
  13. The next time you wish to access the files simply open the image and authenticate with the password.

This ensures that your information is completely safe.

Firewall

Firewall OptionsThe firewall option is nice if you want to secure your communications over the network. From here you can control which applications can communicate over the internet or receive communications over the network. Simply turn on the Firewall & control access to the computer.

To customise the access to a network:

  1. Click on Firewall Options
  2. You can then click on the +/- buttons to add or remove applications from your firewall list. You can also modify whether a particular application is blocked.Screen Shot 2015-09-18 at 11.13.50 am

FileVault

Disk images provide the option of securing some of your files. But what if there is a lot of secure information that you have? Disk images maybe used but it can become tedious if there are too many files. In such situations using FileVault to secure your files is preferable.

FileVault encrypts your main partition, that is, the partition from where you boot your OS from. Most users would have a single partition on their disk, for them it would mean that FileVault encrypts the whole hard disk. So anything you create on the encrypted partition is automatically secured.

To turn on FileVault:

  1. Open System Preferences > Security & Privacy > FileVault Tab.
  2. Click ‘Turn on FileVault’.Screen Shot 2015-08-15 at 12.10.02 pm
  3. Authenticate as the administrator if necessary.
  4. You will be asked where you wish to save the ‘Recovery Key’? This key is important because you would need the recovery key to reset your account password if all administrator users forget their password.Screen Shot 2015-08-15 at 12.10.09 pm
  5. You can choose to save it to your iCloud Account
  6. Click continue.
  7. Choose the users who will have the privilege of decrypting the system for daily use.Screen Shot 2015-08-15 at 12.10.16 pm
  8. Click Continue.
  9. Click Restart to start the Encryption process.Screen Shot 2015-08-15 at 12.10.24 pm

Logout & Sleep

If you are leaving the computer idle or unattended for a period of time, then it is a good idea to make sure that the computer itself is locked automatically. These settings can easily be set from System Preferences:

  1. Open System Preferences > Security & Privacy
  2. Click on the General Tab.Screen Shot 2015-09-18 at 11.20.10 am
  3. Check the box for “Require password after sleep or screen saver begins“. This way the user will have to enter his/her password to start using the computer again. Specify the time duration after which this can happen.
  4. Click on “Advanced
  5. Select the check box to log out after a certain period of inactivity. Specify the time duration.Screen Shot 2015-09-18 at 11.20.15 am

Find My Mac

This feature has more to do with locating a device that is missing. While it is called Find My Mac, one can locate both OS X as well as iOS devices. There are a few things to keep in mind:

  • All the devices to be tracked should be signed in with the same Apple ID.
  • The device must be connected to the Internet.

Setting up Find My Mac is easy:

  1. Open System Preferences > iCloud.
  2. Make sure you are signed in.
  3. On the service list, located on the right hand side, scroll down to the checkbox for Find My Mac.
  4. Select the checkbox for Find My Mac if it is not already selected.
  5. You may need to grant access to location services.

Locating a device using Find My Mac:

  1. On any computer visit www.icloud.comicloud1
  2. Sign in with the same Apple ID/iCloud ID you had signed in with on your Mac.
  3. Once you log in click on the Find My iPhone app. Remember, even if it is called Find my iPhone, you can search for any iOS or OS X device.icloud2
  4. The page should now load with a map of all your devices which are currently online.
  5. You can select a specific device & perform various actions such as: Play Sound, Lock Device, Erase Device. Select the activity appropriate for your needs.icloud4

Privacy

it is possible to restrict access to a particular set of data on your Mac. Through the privacy tab within System Preferences > Security & Privacy.

From here once can give access to your data at an application level. The kind of data that can be moderated are:

  • Contacts
  • Calendar events
  • Location
  • Reminders
  • Facebook/Twitter credentials

Certain resources such as Location & Diagnostics are controlled by the administrator.

Firmware Password

A Firmware Password is a Logic Board level password. The main purpose of a Firmware Password is to prevent unauthorised modification of the startup process of a Mac. It doesn’t secure your data. But it makes sure that no one can gain access to your computer by changing the boot sequence. It becomes difficult for people to boot your Mac off a network or an external disk.

The process of setting up a Firmware Password is a bit technical. Please consult with a member from the IT Department of your company or contact an Apple Certified Support Professional. You can also approach an Apple Authorised Service Centre for the same. If you have forgotten one, then you will have to approach an Apple Authorised Service Centre for the same. Here are the steps.

Managing all your data on iOS devices

In todays interconnected world managing all your data is quite important. Most of us end up having more than one smart device that we use everyday. As time goes on we will buy a newer version of the device. It is not necessary that we will get a newer version of each smart computer that we own simultaneously. This means that we have to pay special attention to making sure that our data stays up to date on all the devices & that there is no accidental loss of data.

There are various solutions available to users which easily takes care of data management problems commonly faced by multiple users. One of the most common solutions is to make sure that all your data is available on the cloud. I have given a brief overview on the different cloud services available in my previous article.

However, storing information on the cloud is not enough. Some effort still needs to be done on the users end to ensure that the data is there everywhere they want it. In this article I will be talking about managing your data, migrating your data & backing up your data on your iOS devices.

The starting point for this is the iCloud service. It is a free service provided by Apple & is a must for iPhones & iPads.

Through this article I will be referring to the iOS device as iPhone, however, the steps apply to any iOS device. A few settings & options may change depending on the version of the OS on your computer & your mobile device. The steps mentioned below would be applicable for iOS 8. They may be applicable for earlier versions, but all features may not be available.


Moving your data (migrating) from your old iPhone to your new iPhone

This is a very common situation. Most people have a devices for a few years & place a lot of data on it. Once they purchase a new device getting the same data onto the new device is the challenge. This involves a few steps.

STEP 1

  1. Make sure your iCloud service is turned on. By default iCloud provides sync capabilities for the information enumerated below. Note that not all services needn’t be on. But its a good idea to make sure that it is on at the very least for migration purposes.
    1. Contacts
    2. Calendar Events
    3. Reminders
    4. Photos
    5. Notes
    6. Documents for Keynote/Numbers/Pages
    7. Any documents you might have placed in the iCloud Drive (iOS 8 & later).
    8. Passbook
  2. Data provided by other services such as Google, Microsoft & any other provider will be taken care of by their respective accounts.
  3. Prepare a list of apps that don’t take advantage of the iCloud service or any other cloud based service. Note: Some apps do take advantage of iCloud but need the feature to be turned on explicitly. You may have to back this data up manually. If there are online accounts associated with the app, then make sure you are signed in & that the account offers data retrieval at a later point in time.
  4. Take a backup of your phone on your computer using iTunes.

STEP 2:

  1. Turn on your new iPhone & follow the screen steps.
  2. When asked “if you would like to setup the iPhone as a new phone or not” choose the option to restore from backup (do this only if you plan to restore from a backup taken via iTunes or from iCloud).
  3. This will prompt you to connect your iPhone to the computer where you last backed up your old iPhone.
  4. Once the restore is complete simply sign in with your Apple ID & start using your new iPhone from where you had left off.
  5. All the Apps, songs, movies, books purchased using your Apple ID will be available on your new iPhone. Apps will be available subject to OS Version compatibility.

For those who do not have a computer based backup or don’t have a computer can choose to backup their phone onto iCloud. Note that this will require sufficient free space available on the cloud. When they are prompted to restore users will have to sign in with their Apple ID & restore the backup from there.


Moving data from your computer to your new iPhone or Moving from another smartphone to iPhone

This is for first time buyers or people switching to the iPhone. No matter which is the case there is one important thing to be done. You have to move your data onto a cloud service which is compatible with iPhone.

From a computer

iCloud is available for iOS Devices, Macs & Windows. So if you are moving your data from Windows onto your iPhone you could consider running iCloud for Windows. Additionally the iCloud service is also accessible from the browser. So you can access many documents across both the platforms.

Apart from this you can also use iTunes for Windows to move your data from the computer to the iPhone.

From another smartphone

This will mean that you will have to use a third party cloud service. Good choices for something like this would be Google Drive or Dropbox. Other services such as Evernote could also be used for the same.

  1. On your current device transfer as much content as you can to the cloud service. Note that apps & media purchased on the smartphone may not necessarily be available due to compatibility reasons.
  2. On your new iPhone sign in with the same cloud service & pull in all your data.

Backing up your iPhone/iPad

Backing up data is very important. This is a step missed quite often by many users. A common mistake made is in believing that they can restore all their data from the iCloud whenever they wish. While that is true, iCloud is not meant to act as a backup. You can choose to save your backup on iCloud, but this is simply using the iCloud storage space for holding the backup & is not otherwise accessible.

There are 2 options to backing up your iPhones data. One is to back it up onto your computer using iTunes, the other is to back it up onto iCloud.

Backing up onto iCloud

Pros

  • Your backup is immediately available.
  • No need to have a separate computer just for this.
  • Backup can be restored from any location as long as internet connection is available.

Cons

  • A very good internet connection would be required.
  • The backup is restricted by the amount of space available on the cloud.
Backing up using iTunes

Pros

  • There is no storage limit. Your backup can be very large.
  • You can have multiple large backups.
  • Optional encryption capability.
  • With WiFi, based syncing the backups happen automatically.

Cons

  • You have to be physically connected to the computer using cable or WiFi to perform the backup.
  • You have to be physically connected to the computer using cable or WiFi to restore the backup.

File types in OS X

This Article is for those new to the Mac or for those who have questions about the different file types in OS X. The lists below aren’t complete and in many cases may require the user to install additional Apple software or third party tools.

File Extensions

The table below lists some of the commonly encountered file types. Note that in certain situations, like creating & extracting from zip files, the related application is not directly invoked.

Common extensions in OS X

Common extensions in OS X


The table below shows some of the popular third party file types that once can access on OS X. Note many of them may require users to install 3rd party applications to open/edit the files. Do note that the list below is not a complete list.

Popular file types

Popular file types


Showing File Extensions

Here are the steps to show file extensions.

1) Look at the Application running. Make sure the Finder Application is running by viewing the upper left hand corner of the screen.

1

2) Click on Finder

2

3) Click on Preferences

4) Click on the ‘Advanced’ Tab. Look at the selection for File Extensions.

4

5) Make sure the checkbox to show file extensions is selected.

5

Managing all your data on your Mac

One of the single most important aspects of using a computer is Data Management. In this article I will be going over the various features available & steps that you can take to manage your data in a safe, secure & efficient way.

TimeMachineBACKUP

It happens ever so often that we are faced with a situation where we need a file to which we no longer have any access to. The reasons may be varied: lost computer, damaged or lost hard drive, accidental deletion. While there are applications that do retrieve lost files, they only work if the storage media is available & do not guarantee 100% recovery. The best solution to this is to backup your data.

The most common approach used is to manually copy the file onto an external storage. While this is easy, it can be tedious for the user & is error prone.

One of the easiest solutions is to use a backup tool called Time Machine. This is built right into OS X. You don’t need to install anything new. Just connect the hard drive where you would want to store all your backups. The OS will periodically backup all your data every hour as long as your backup drive is connected to the Mac. Many a times you are prompted to choose an external drive for backup, but that pops up only when you connect a new hard drive or a hard drive which isn’t used for backup.Once you have this activated you can then navigate back in time (just as you would expect from a time machine) and look for a file that you have lost.

Steps to Backup using Time Machine:

1) Connect the Hard drive you want to use as a backup destination.

2) Click on System Preferences > Time Machine to customise your backup.
TimeMachine

3) Click on Options to select the folders to exclude from Time Machine Backups.

TimeMachineOptionsThere are other third party tools which you could use if you wish. Retrospect and Carbon Copy Cloner are 2 of the many 3rd party tools available for this.

icloudDriveSYNCHRONISATION

In todays world most of us are using more than one device for our daily activities. This means that we would like to have most of the information on all the devices. This can be achieved through various applications that are available to manage our portables such as smart phones & tablets. But by far the easiest approach is to take advantage of Cloud Services.

If you have an iPhone &/or an iPad which you use along with your Mac then the best service for this is iCloud. However if you use a mix of platforms such as Android or Windows for your smart phones & tablets then using any third party service such as Google Drive, Drop Box, OneDrive will help you ensure that your information is available via the cloud across all devices.

Steps to turn on iCloud Services on your Mac:

1) Click on System Preferences > iCloud.

2) Sign in with your iCloud ID & password.

3) You should come to the iCloud panel where you can configure different iCloud Services.

iCLoud

4) Select the different content you want managed under iCloud.

SECURITY

This is one area which is increasingly gaining more importance. An important aspect of data management is keeping your data secure. While there is no such thing as a completely secure computer, one can definitely take steps to make sure that one’s information is kept as secure as possible.

ACCOUNT PASSWORDS: This is probably your first line of defence. Having a good strong password goes a long way in securing your data. There is a nice built in tool that evaluates & rates the passwords that you create, called as password assistant.

Password Assistant can be found on any screen within the Mac that prompts for a Password. Like the screen shot below when we are creating a new user for the Mac.

The key icon is to be clicked to launch Password Assistant.

The key icon is to be clicked to launch Password Assistant.

The Password Assistant itself gives you a lot of options when it comes to choosing your password type.

Use the drop down to select the password type.

Use the drop down to select the password type.


KEYCHAIN ACCESS NOTES: Keychain access is a builtin application that manages your secrets such as passwords, keys & certificates. There is also an option to save a note. Information within the note is saved in an encrypted way thereby securing it.

ENCRYPTION: This is the most secure way of saving information. There is a builtin encryption feature called FileVault which encrypts all the data on your system. There are 3rd party tools that can do this for you too: GPGAES Crypt, PGP to name a few.

Once can use a combination of the 3 or all 3 depending on the level of security required. It is also a good idea to keep your backup secure. Securing your computer but not the backup is a bad idea.

STORAGE

Yet another common issue that a lot of us face. Most computers that have come in over the past few years offer very large built in storage space & in most cases it is sufficient. But with the growing number of photographs, movies & songs we often find that space on our computers isn’t sufficient. This is not an easy problem to solve.

A simple approach is to keep only those things we require on the Mac. Also using cloud services to store information that we don’t need to access frequently is a good idea. Compressing data using zip files is also a good approach. But a better option, especially for large amounts of data, is to compress them into ReadWrite disk images. External storage can also be considered for placing extra data.

One area where storage management is not looked at but is equally important is related to the backup drive. Overtime as your backup drive fills up it starts removing older backs (in case of Time Machine). To ensure you have as long a history of backups, make sure that you only backup those things that you need. For example there isn’t a pressing need to backup all the OS files & applications, one can reduce the backup size by eliminating unnecessary items from the backup.

Cloud Services Demystified

A lot of us use cloud services. Here we will talk about some of the popular services & how to use them to maximise your advantage.

What is Cloud?

Cloud Service is a technology that makes your data available across multiple devices. Depending on service provider this may even be cross platform. This is great as in todays day & age most of us make use of at least 2 smart devices. A common confusion amongst a lot of users is that cloud is a backup technology. This is not strictly true. As I mentioned earlier, when you enable cloud services they ensure that your data across all devices is the same. So if for example, you delete a file on one device, it is deleted across all the devices. It is not possible to go & retrieve the file back from the cloud. To protect yourself from such problems you should look into a cloud based backup technology.

What are the advantages?

There are numerous advantages with cloud based solutions.

  1. Firstly, your data is immediately accessible across multiple devices without your manual intervention.
  2. Storage management especially handling portable storage drives is no longer required.
  3. It is highly cost effective. In most cases the data that we consume is fairly small. The free version for most of the services does provide at least 2Gb of data. In most cases there is the option of purchasing additional storage space if needed.
  4. Its easy to use, with no major technical requirements.
  5. Most of the providers support multiple platforms & devices.

Common Cloud Service Providers & services offered

googleDrive

Google Drive: The google drive is a free account that every user gets along with their gmail account. With unto 15GB free storage this is an ideal option for those who want to store large amounts of data. It is also an ideal option for those who wish to share files & collaborate with other users. Works best when used within the Google ecosystem.

WebLink: drive.google.com


onedrive

Similar to google drive. Microsofts OneDrive allows you to store files on the cloud. This comes free with your existing hotmail.com or outlook.com accounts.  Works best when used within the Microsoft Ecosystem.

WebLink: https://onedrive.live.com/about/en-us/


dropbox

Yet another popular cloud storage & sharing service. While it has limited capacity of 2Gb it has the advantage of being accessible across multiple platforms. The storage capacity does increase for shared collaborative accounts.

WebLink: http://www.dropbox.com


evernote

Evernote is a popular app for storing information on the cloud. Apart from just offering cloud services for documents it also has a lot of other built in features such as card reader, calendar, notes that makes it a very popular app. The fact that it runs on almost all the most commonly used platforms only adds to its value. There are paid options available but they are for additional features rather than more storage explicitly.

WebLink: https://evernote.com


icloudDrive

This is Apple’s cloud solution primarily for OS X & iOS devices. Just like Google drive it ensures that the data across your OS X & iOS devices is the same. The fact that it is accessible via the web make it useful. This service is not available on all the platforms barring the desktop version of Windows for which a free download is available. Works best when used within the Apple ecosystem.

WebLink: http://www.icloud.com


Owncloud

Unlike the other services available this one is OpenSource. It has numerous advantages that make it a very attractive option, especially for businesses thinking of providing cloud services to their employees.

The main advantage is the fact that you can configure & host your own cloud services (as the name says). This means that you have control over the amount of space allocated for users & importantly security.

Apart from that there are native apps available along with a web portal to access all your data from almost all devices anywhere. This means that it is very easy to deploy without the headache of compatibility issues.


The following table gives a basic comparison on what all is offered, note that there maybe more services provided which I may have skipped, the table only highlights the most important points.

Cloud Services Comparison

Cloud Services Comparison

Making a case for OS X Server

Almost everyone is aware of the OS running on Apple Computers. Its called OS X & each version gets a name from a location in California (they used cat names earlier). But what is little know is about the Server that is also made available from Apple. Its called as OS X Server. Not only is it little know but it is also under utilised. I am going to make a case for using this product as compared to some of the other solutions that are available out there.

Installing

Firstly, lets talk about getting hold os OS X Server. Earlier there used to be a dedicated version of the OS which was made available for the server. But starting OS X 10.7 (Lion) that approach was discontinued. If you wanted an OS X Server, you would have to first upgrade your Mac to the consumer version of the OS & then install the Server.app. All you have to do This greatly simplified the whole process of setting your Mac up as a server.

The big advantage with this is that you no longer need to purchase a separate “server” version of the OS.  The other big advantage is that all the services being offered by the server are no located in a single application, in a nice collected manner.

Requirements

Typically most servers require an advanced hardware configuration to run. This is also the case for OS X Server. The recommended products for this would be the Mac Pro or the Mac Mini Server. The Mac Mini Server is a Mac Mini that comes with the Server App included as a part of the setup. This is a product configured to be used as a server. While the 2 products mentioned above are ones used most frequently as a server, you are not limited to them. Any Mac with a minimum of 10GB storage space & 2GB of RAM can run OS X Server. Though in reality you would need much larger specs than the ones mentioned above.

Services Offered

The OS X Server works best in an all Apple product environment. However, it also works well in mixed environments too. Especially when it comes to managing Macs & iOS Devices while taking advantage of other services being offered. In fact, a solution commonly used is the “Magic Triangle” which allows you to used an Active Directory Server along with OS X Server.

Basic Networking Services

Basics Networking Services such as DNS, DHCP, VPN are easily available & configured. Most of them don’t require a lot of configuring to do. Also the Caching Service & Software Update services can also be easily configured for managing the bandwidth usage in the organisation.

Collaboration & Communication

As a part of the collaboration & communication services provided you have the ability to host your own Mail service, Messages service, Website service, Wiki service, Calendar & Contacts Service.

Sharing

The file sharing service & ftp services are available for users to more easily share files & folders across the network.

Management

From a device management point of view there are plenty of services available. You have the Netinstall service which allows you to remote install OS X over the network or allow clients to boot using an image which is hosted on the server. Then there is the Open Directory Service which allows the management of various user accounts over the network. These users accounts then work along with the Time Machine service, which allows you to back up a Mac onto the server itself. Finally, the Profile Manager service works along with the domain users to provide device management for the different devices (OS X & iOS Devices).

Tools

Server App

LINK:https://itunes.apple.com/in/app/os-x-server/id714547929?mt=12
This is the main app that you will use to configure the different services that your server will be offering. The advantage with the app is it also allows you to remotely administer your server using the app itself.

Workgroup Manager

LINK:http://support.apple.com/kb/dl1698
The Workgroup Manager is a utility which can be downloaded from Apple’s support page. This application was used to create users & groups & apply managed preferences to them for earlier versions of the server. It is possible to create users & groups for the current version of the server using this app.

System Image Utility

This tool is required to create the different types of NetInstall images which are used for mass deployment. All OS X computers come with this application preinstalled.

Directory Utility

This utility also comes built into the OS & is used while binding your Mac to a Directory Service.

Apple Remote Desktop

LINK:https://itunes.apple.com/in/app/apple-remote-desktop/id409907375?mt=12
This is a very powerful tool. Available on the Mac App Store as a paid app. This tool allows you to remotely monitor & administer all the Macs within your organisation. It has many report generation tools to help in the management of your Macs.

Apple Configurator

LINK:https://itunes.apple.com/in/app/apple-configurator/id434433123?mt=12
This is another application available on the app store. This is a free app to configure different iOS Devices. It is used to perform a manual configuration of the devices.

Ticket Viewer

The Ticket Viewer Application is a built in application that is used to help in examining tickets used under kerberos.

Recovery Disk Assistant

LINK:http://support.apple.com/kb/dl1433
A free tool that is available online which allows an administrator to create an external bootable recovery drive to perform various troubleshooting tasks. OS X: About Recovery Disk Assistant

Disk Utility

This is a built in utility that is used to maintain different storage devices. It allows you to partition & format various drives.

Why to use the OS X Server

There are many reasons why an OS X Server would make a good option.

  • Cost: The cost of OS X Server itself is low. The hardware for running OS X Server would ideally be the Mac Mini which starts around $999 (including the Server App itself). If you already have a Mac with you, you just need to purchase the Server App for $20. This is ideal for organisations on a budget.
  • Simplicity: The Server is very easy to configure. Many of the services being provided are extremely easy to configure & maintain. From an administrators point of view, it involves providing basic information & a few clicks.
  • Features: The Server provides many basic services used everyday & many administrative options that combine the power of modern day servers with the simplicity needed.
  • Works well along with other Servers such Windows Server.

Ideal Situations to use OS X Server

The OS X Server is ideal for small organisations which use Mac or iOS Devices. The low cost & simplicity makes it an ideal choice for such organisations. Also if you are an organisation which uses a lot of Macs & iOS Devices then managing them is a lot easier with OS X Server, here again the cost & simplicity ensures that it is a viable option.

The server may not be a good choice for organisations with a very large user base or very few Mac/iOS devices. While other computers can easily work with OS X Server, other Servers may prove much better for such scenarios.

Here are some points to consider while deciding whether to use an OS X Server.

  • Does your organisation use a lot of Macs &/or iOS Devices?
  • Do you need to perform various administrative & configuration tasks on your Apple devices?
  • Is your user base small? Approximately 10 – 150 odd employees?
  • Do you need to provide very basic services without worrying too much about platforms being used? (Especially if directory services are not required).

If the answer to a combination of questions above is Yes, then the OS X Server might be the right choice for you.

Below are a list of some scenarios where the OS X Server might be ideal

  • Small Medium Enterprises
  • Schools & Educational Institutions
  • All Mac & iOS Environments
  • Home

Conclusion

The OS X Server is best if you are predominantly using Apple computers & mobile devices. The ability to manage them & configure them is best served by the Server app. However, for larger organisations this may not be the only criteria. The server can work along with windows server, however, most Apple computers & mobile devices can also work with other solutions.

If cost is a major consideration & simplicity is a must then the OS X Server is a good bet. If you are looking for a feature heavy server which offers a wide variety of services with lots of room for customisation then this might not be the right solution.

All in all the Server App is a very good app. It will definitely be something work considering when you are managing the IT infrastructure.

Terminal Commands for OS X – Part 2

Continuing from the previous post on.

RENAMING FILES & FOLDERS
The way files/folders are renamed is by using the mv command. In the mv command make sure that the destination folder is the same as the source folder for your target, its just the target name that changes.

So if we have a folder called Documents & inside it we have a folder called Files. To rename Files to OfficeFiles we run the following command.

mv Files OfficeFiles

MODIFYING PERMISSIONS
Top modify the basic UNIX or POSIX permissions on a Mac we need to use the chmod command. The standard permissions apply to Users, Group & Everyone else. Each of these entities has 3 flags assigned to it: rwx Read-Write-Execute. Each flag is a boolean flag holding either true or false, indicated by 1 or 0.

So for example if we wanted to modify the permissions of the OfficeFiles folder to be read-write only for the user & read only for group & everyone else then the command would need the following information.
User: rwx = 110 -> 6
Group: rwx = 000 -> 0
Everyone else: rwx = 000 -> 0

So the command would look like: chmod 600 OfficeFiles
FOLDER PATHS & NAVIGATING FOLDERS
A good understanding of the folder structure within a Mac is necessary while dealing with terminal commands.
All folders with the Mac begin at root indicated by ‘/’
Root contains the following folders
Applications
Library
Systems
Users

rootFolderMost of the work that is done is done within the Users folder. In most cases users would not need to go to the other folders for their day to day work.

homeFolder

As you can see from the screenshots, the terminal shows more folders than are visible through finder.

rootFolderInTerminal

homeFolderInTerminal

Within the Users folder all the Home Folders for the different users on the machine are listed. Again, users typically have access only to their own login folder.

Each users Home Folder contains the following Folders
Documents
Downloads
Music
Pictures
Public
Desktop

Depending on your usage you may see a different view from the one shown below.

The following are some examples of navigating the File System.

1)Accessing the root folder

cd /

2)Accessing the home folder. Example home folder called admin

cd /Users/<home folder name>

cd /Users/admin

or cd ~/

NOTE: the ‘~/’ is a shortcut for accessing the home folder directly. Using the shortcut access will only be given to the home folder for the user currently logged in.

3)To access the OfficeFiles folder

cd ~/Documents/OfficeFiles

or

cd /Users/admin/Documents/OfficeFiles
EDITORS
There are a number of built in editors available within the Mac. Apart from TextEdit, which is a GUI based editor, there are many editors available for direct use from the terminal too.

Emacs:
Emacs is a basic text editor that is built into the mac. There are various versions available but those may not be built in. You may need to download them manually.

Here are some common emacs commands to perform operations. For an even bigger list visit http://www.cse.iitb.ac.in/~br/courses/cs699-autumn2013/refs/emacs-commands2.html

http://www.gnu.org/software/emacs/manual/html_mono/emacs.html#Commands

Vi:
This is yet another editor that is built into most UNIX like OS. This is the editor that is used when running the less or more commands.

Here are some common commands used in Vi.
http://www.tutorialspoint.com/unix/unix-vi-editor.htm

Apart from this there are other editors such as gedit & xemacs which has a GUI interface.

NETWORKING RELATED TERMINAL COMMANDS
1)ping
Used to test connectivity to a particular IP address
ping http://www.google.com

2)traceroute
Used to check the hop trace between your machine & destination
traceroute http://www.google.com

3)ipconfig
Used to get network interface related information
ipconfig getoption en1 <option>
There is a lot more information that can be gleaned using ipconfig. For a full list run the man command for ipconfig

4)ifconfig
Used to configure ifnormation related to network interface
ifconfig en0 inet <ip address> netmask <subnet mask>

5)lookup
There are different ways to get the forward & reverse lookup to happen
nslookup <domain name>
nslookup <ip address>

dig <domain name>
dig -x <ip address>
NOTE: Please use the man command to get more information.

Sign PDF Documents in Preview on a Mac

One often encounters a situation where we would like to sign a document that we have received over email & send it across back. Or it may just be the case that we have created a PDF document & now need to sign it & send it back. This post illustrates how we can do this without printing the document.

This feature is built into the ‘Preview’ application. There may be other applications that do this, but the advantage that ‘Preview’ has over other applications is that it is built into the OS.

The first step is to create a whole new signature that is saved with ‘Preview’

  1. Open the ‘Preview’ application.
  2. Launch the preferences window. This can be done using the comma keys or by clicking on Preview > Preferences in the toolbar, which is located at the topmost corner of the screen.1
  3. Click on the signatures tab.2
  4. Click on the create signature button.3
  5. You will see a window for capturing the signature that comes up. This window turns on the built-in iSight camera for capturing the signature.4
  6. Sign the signature you want on a blank white paper. Hold the white paper in such a way that the signature appears just above the white line. You should see a preview in the signature preview window.7
  7. Once you are satisfied with the signature preview click the accept button. You should see your signature listed in the signature tab. More signatures can be added if needed.9

Thats it. Now you have successfully added a signature to the ‘Preview’ application.

Now that we have added the signature lets use it.

  1. Open a PDF document in ‘Preview’.5
  2. In the toolbar located at the top of the screen click Tools > Annotate > Signature. A new toolbar will appear.6
  3. Click on the blue ‘S’ located on the toolbar. Select the signature you want, in case you have multiple signature.
  4. Drag the crosshair arrow at the place where you want the signature. You will see your signature come up. You can fine-tune the location & size of the signature by dragging the edges or moving the image with the mouse.
  5. Once you are done. Save the document.8

Done! You have now successfully signed a PDF document. You can now do this on any other document you wish. Once you have added a signature to the ‘Preview’ application you can use it again & again.