Creating Frameworks for iOS/OS X App Development

Creating Swift Frameworks

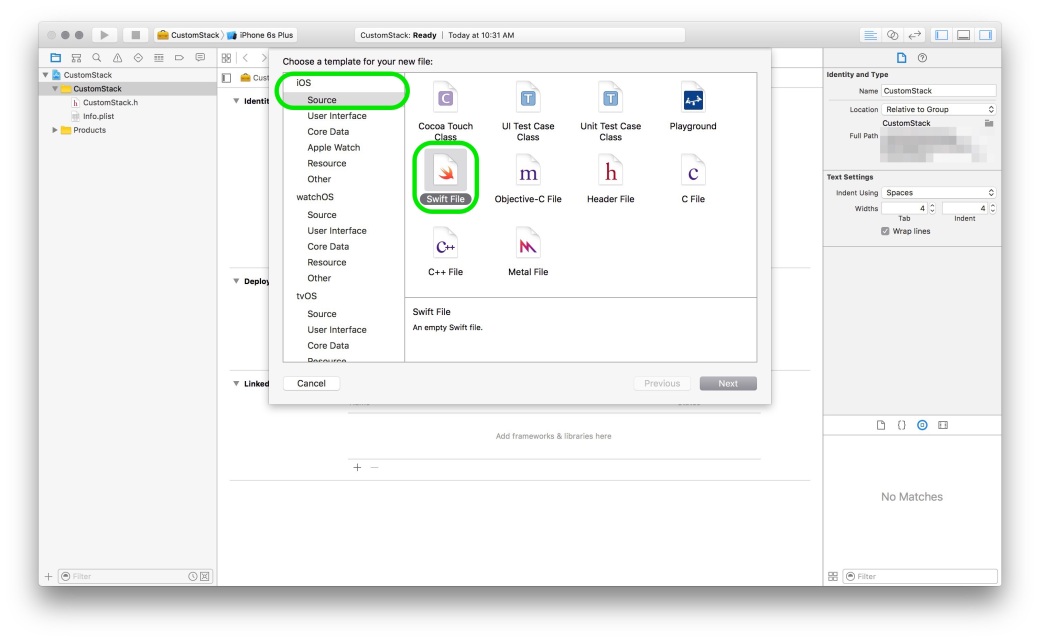
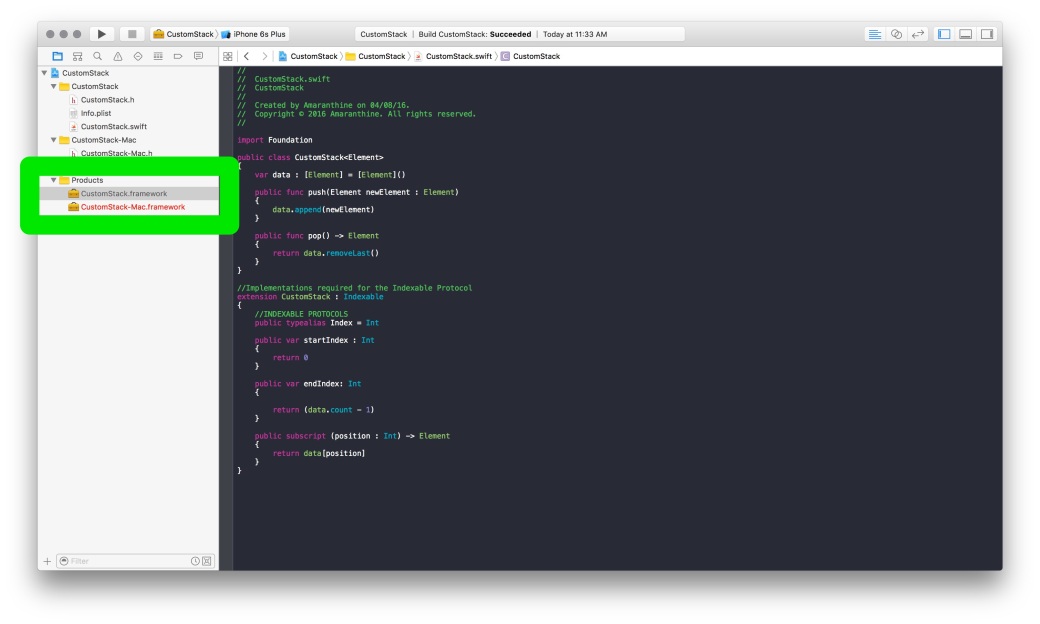
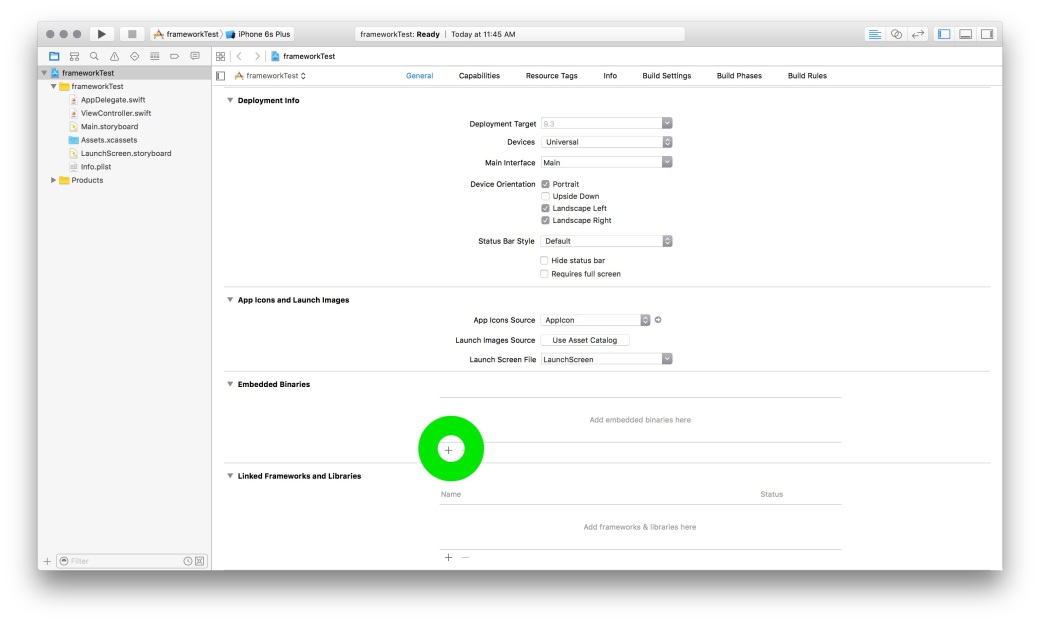
Creating Swift Frameworks is easy. The steps below walk you through creating a Swift Framework. The steps below have been performed on Xcode 7.3

  1. Launch Xcode.
  2. Select Create New Project. Or from the menu bar select File > New > Project
  3. From the Template chooser select the Framework & Library  Option under iOS
  4. Select Cocoa Touch Framework1
  5. Give your project a name.
  6. Make sure the language selected is Swift.
  7. Feel free to enter values of your choice for organisation name and organisation identifier.
  8. Save your project. Optionally, if you have a version control repository like Git you may save it there.
  9. In left hand side bar make sure you have selected the Project Navigator.
  10. Within the Project Navigator make sure you have selected the folder named after your project.
  11. Click on File > New > File.
  12. Make sure iOS Source is selected on the left hand side.
  13. Select the file type as Swift.IMG_3525
  14. Write down the code that you want to make available through a framework.
  15. Now this is the key point. Place the keyword public before all the elements that you want to make publicly accessible.Why do we need to do this? To understand this we need to understand the scope of different elements within a typical Swift project. IMG_3521

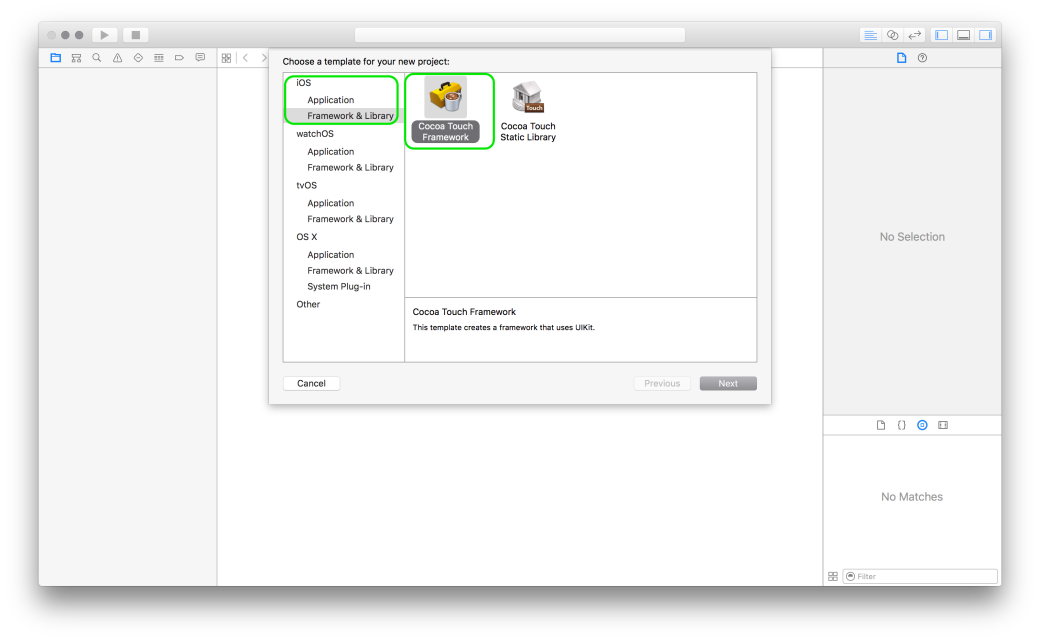
    Different variables/classes/functions that are declared within a module are accessible freely within the module. Swift files contain code & are themselves found within Swift modules. So a module can mean project or a framework.So, to access the variables/functions/classes from module A in module B, we have to make those elements of module A public in order to access them in module B.

    For more information, do read Apple’s Swift Documentation.

  16. The next steps depend on what your ultimate objective is. If you wish to build a framework for distribution then you need to follow a process that is similar to distributing an app. You need to get the code signing done & prepare the project for distribution.
  17. If however, you plan to release it internally, or even just test it. Then you can follow the steps below.
  18. Firstly, our objective is to make this framework run on both OS X(macOS) as well as iOS.
  19. To do that we will be adding a new target. Click on File > New > Target.
  20. Select OS X & the Frameworks & Libraries from the sidebar.
  21. Select Cocoa Touch Framework
  22. Give your framework a unique name. Something that indicates this framework is for OS X(macOS).
  23. Now, we don’t need to rewrite the code for the Mac. We can simply make the file we have written a member for the OS X Framework Target.
  24. To do that make sure that the right hand side sidebar is visible.
  25. In the left hand side sidebar make sure that you have selected the new Swift file with the code you have written in there.
  26. In the right hand side sidebar select the Document Inspector.
  27. Under Target Membership make sure that both the Targets are checked. The target for iOS should already be checked.IMG_3520
  28. Thats it. If you do not wish to make your code available for both iOS & OS X then skip steps 19 – 27.
  29. The next part is building the framework. We will be building this framework for use internally. We will first build the iOS framework.
  30. From the tool bar, make sure the target selected is for iOS. For the device you can select any device that you wish.
  31. Then click on Product > Build to build the framework. If all goes well then you should get the message Build Succeeded on your screen.
    IMG_3519
  32. To get hold of the framework, expand the product folder from the left hand side sidebar.
  33. Select the Framework you have just built. Note that it should be black in colour. If you have opted to make a framework for OS X, then you should see that framework listed too, it should be in red colour. The red colour indicates that it has not yet been built.IMG_3524
  34. Control-click on the iOS version of the framework and select Show in Finder.
  35. This will take you directly to the folder containing the framework. Copy paste it to the desktop or to any other location to easily access it when required.
  36. Repeat steps 30 – 34 to build the OS X version of the Framework. Make sure that the target selected is OS X.
  37. Once we have done that, we need to test the framework we just created.
  38. Create a dummy iOS Project for testing.
  39. From the left hand side project navigator make sure that the blue project settings file is selected.
  40. Make sure that the Target is selected within the settings screen.
  41. Under the General tab scroll down to the Embedded Binaries section.
  42. Click on the ‘+’ sign to add a framework.IMG_3523
  43. Click on Add other
  44. Navigate to the folder where you saved the Framework and select it.
  45. Click Open
  46. Select Copy Items if needed
  47. The framework should be added to your project.
  48. In the ViewController.swift file import your Framework: import CustomStack
  49. Replace CustomStack with your frameworks name.
  50. Try to write the code which uses the elements you have packaged within the framework.

Creating Mixed Frameworks (Swift & Objective-C)

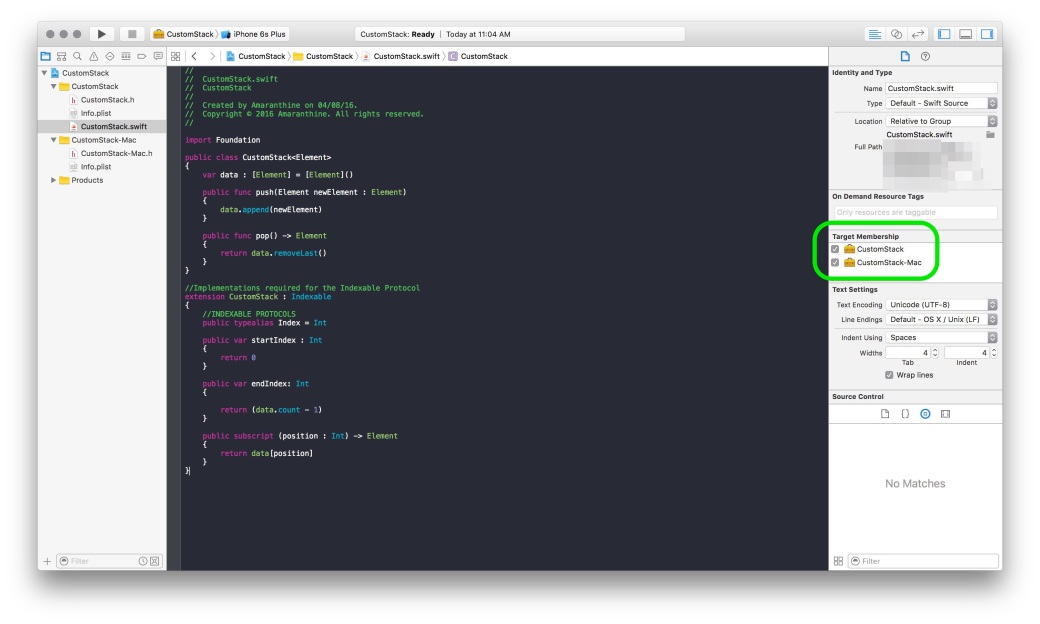
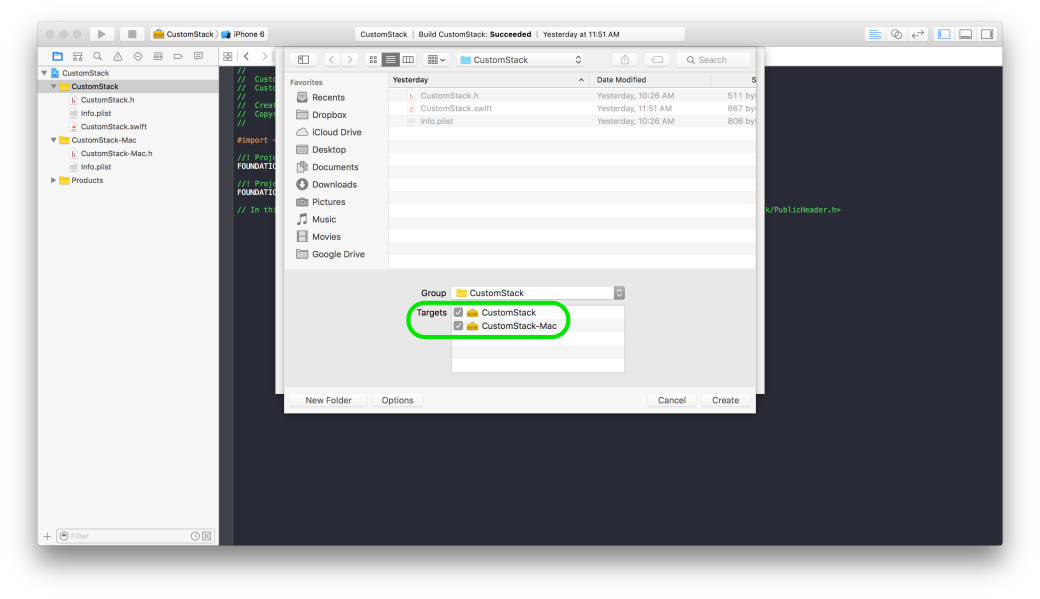
The process of creating a mixed library is straightforward. Its almost the same as above with some minor differences.

  1. Follow the steps mentioned above to add your Swift Code.
  2. Add your objective-C files to the project.
  3. While adding the files make sure that the checkbox for the targets is selected appropriately. Screen Shot 2016-08-05 at 1.20.37 PM
  4. Write the code that you wish to write in Objective-C. Of course, if you are including prewritten files then you do not need to do this.
  5. To make the Objective-C code accessible in Swift you need to make the following changes:
    1. In the umbrella header of your framework add the line to import the header
      #import "<FrameworkName>/<HeaderName>.h
    2. Modify the access property located within the target membership of the Objective-C header file. IMG_3527
  6. This should make your Objective-C code accessible to the Swift files.
  7. Test the changes by accessing your Objective-C code in your Swift files within the framework.
  8. Test the changes further by embedding your mixed language framework into a project & then try to access both the Swift as well as Objective-C versions of the code in your new project.
  9. To make your Swift code accessible to Objective-C File make the following changes:
    1. Make sure that your Swift code is compatible with Objective-C. There are 2 ways of doing this. One you can make your Swift class inherit from NSObject. The second way is to use the @objc keyword before your class declaration.
    2. In the Objective-C header file add the line to add the bridging header which is auto generated. You do not need to create your own bridging header.
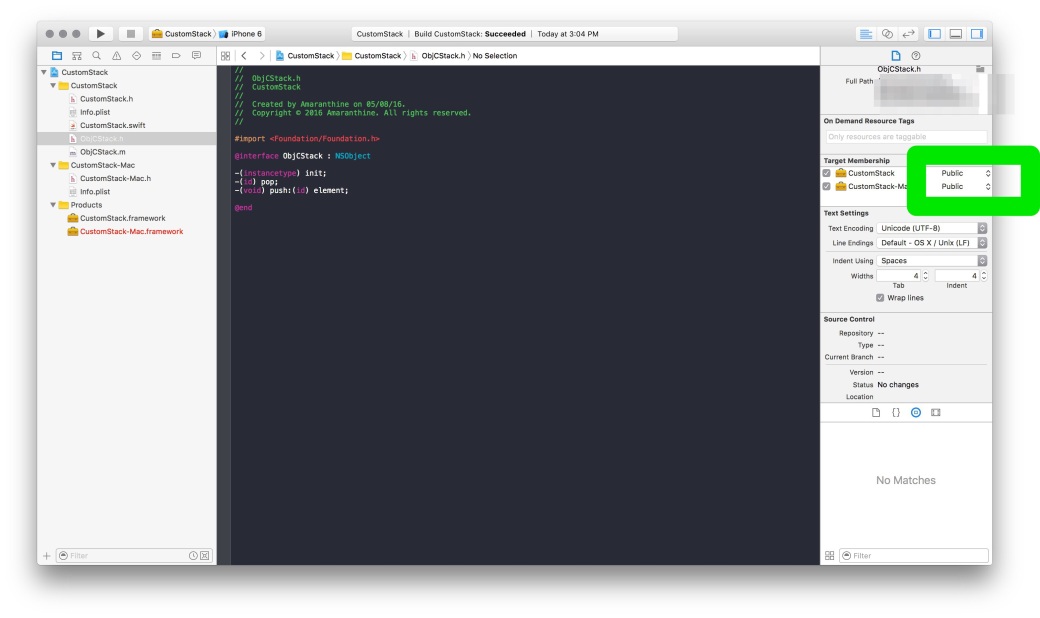
      #import "<FrameworkName>/<FrameworkName>-Swift.h"

      Replace the word FrameworkName with the name of your Framework.

    3. This should allow you to access your Swift code in your Objective-C header file within the same Framework Project.
  10. This way you can make a single framework which contains code written in both Swift & Objective-C.


What to do before buying/selling Apple devices?

Apple’s devices are getting more and more popular by the day. People are really excited to get hold of the newest product that comes out of its stable. This guide walks you through some of the things you need to keep in mind while buying used devices or selling your existing device. This may not apply when buying a new product from the store for the first time, however, its still good to know these things & run your device through a checklist.

Note the checklist provided below is by no means comprehensive nor is it complete. There might be other things to keep in mind before buying &/or selling used devices, depending on the geographic area, situation, and circumstances.

Buying

Before buying a used products run them through this checklist. Some items are device specific.

  • Make sure there is no physical damage to the device. Dents, scratches, cracks, missing screws.
  • Start the device & make sure it loads up as expected.
  • Check the different user interface elements: touch screen, 3d touch, keyboard, iSight camera, speakers, home button, Microphone
  • Check the different ports: USB, Ethernet, FireWire, Thunderbolt, USB-C, HDMI, Audio-out, SD card reader, lightning connector, 30-pin connector
  • Check the power cord, adapter & charging port
  • Note the version of the OS. Eg: OS X 10.10.3
  • Note the build number
  • Check the model number. This is important for Software Upgrades/Hardware upgrades. Older hardware may have an upper limit on the hardware expansion capability &/or the ability to run latest software optimally.
  • Check the Support Coverage for your device. This is important, especially if you have to take your device in for repairs.
    https://checkcoverage.apple.com/in/en/
    https://support.apple.com/en-us/HT204308 – Find your devices Serial Number
  • Note down the serial number
  • Make sure that the device does not contain any personal data belonging to the seller. While it is the sellers responsibility to ensure this, it still is a good idea to verify that there are no accounts are signed into. This is VERY IMPORTANT for iOS Devices due to its implications on Activation Lock.
    Activation lock is used to prevent anyone from using a stolen device: https://support.apple.com/en-us/HT201365
  • Before buying please check the Activation lock status: https://www.icloud.com/activationlock/
  • Make sure there is no personal digital content in the form of Apps/Song/Movies or documents.
  • For Mac, make sure that there is no Firmware Password that is set.

Selling

The list above should give you a good idea on what you need to do while planning to sell your Apple device.

  • Delete all personal data. Make sure you have a backup of the same.
  • Remove any applications you may have installed.
  • Sign out of all accounts: Gmail, Hotmail, Facebook, iCloud, Apple ID…
  • Delete any user accounts you may have created. Leave a single admin account.
  • If you have used any Encryption service then make sure you turn off encryption before selling the device. This is more of a precaution to prevent issues that may arise in the future.
  • This article illustrates what to do if you are selling giving away iOS Devices: https://support.apple.com/en-in/HT201351
  • As a good measure, delink your Apple ID from your device. You can do this by:
    • Go to http://www.icloud.com
    • Sign in with your Apple ID
    • Click on Settings
    • Select the device you want to give away: IMG_2941
    • Click on the cross to remove it from your Apple IDIMG_2978
  • De-register from iMessage.
  • Remove any custom settings, passwords (Firmware Password) that may compromise your security or prevent the user from fully using the device.
  • As a good measure completely erase the hard drive of your device.
  • Document items such as OS Version, Serial Number for your own reference.

Enterprises may take additional steps

  • To ensure data security, Enterprises may perform Secure Erase or drive replacement to prevent recovery of corporate information, when assigning devices to employees or selling them out in the market.
  • Enterprises should also protect against Activation lock. When collecting iOS Devices, assigned to an employee who is leaving the organisation, always check to make sure that the device is not locked to the employees Apple ID.

These are some of the things that you can do to make the transaction easy on both the sides.


Writing Swift Programs on Linux

xc7-swiftlogo_2x1Swift Programming on Linux

The steps below walk you through the process of downloading, installing & using the Swift Programming language on Linux. For this I will be using Ubuntu Linux 14.04.3 LTS version.

Setup & Configuration

  1. Downloading Swift
    The first step is to download Swift from the link given below. Select the correct version of the OS.
    https://swift.org/download/#latest-development-snapshots
  2. Install clang
    The next step is to get hold of clang which is  a compiler front end for C,C++,Objective-C & Objective-C++. For more information on clang:
    https://en.wikipedia.org/wiki/Clang
    http://clang.llvm.org
    To install clang run the command:
    sudo apt-get install clang
  3. Extract the Swift files you downloaded and place them in a folder of your choice.
  4. Next we will add swift to our path. Do that by running the command:
    export PATH=/path to your swift folder/usr/bin/:”${PATH}”
  5. Verify whether it works by trying the following 2 commands
    which swift
    swift –version

Testing the REPL

  1. Next we try the REPL for swift. To invoke this just type the command:
    swift
  2. Write something like let myName : String = “Swift Code”
    and then hit enter.
  3. Follow it by print(myName) and then hit enter.
  4. You should see the output printed. This is a nice way to test individual Swift statements.

Creating a Single File Project

  1. To create a file based project:
    1. Create a folder of your choice, lets call it Hello World:mkdir HelloWorld
    2. Create a manifest file for the Package with the command: touch Package.swift
    3. The source files for all your projects must be in the Sources folder, let’s create that: mkdir Sources
    4. Create a file called main.swift using an editor of your choice. Place the statement print(“Hello, World”) in it.
    5. Step out of the sources folder and then run the command to build the project: swift build
    6. The executable will be inside a hidden folder called .build/debug
    7. The name of the executable will be the same as the name of the project folder.
    8. To run it simply type: .build/debug/HelloWorld

Creating a multi file project

  1. Create a folder of your choice, lets call it Hello World:mkdir CentigradeToFahrenheit
  2. Create a manifest file for the Package with the command: touch Package.swift
  3. The source files for all your projects must be in the Sources folder, let’s create that: mkdir Sources
  4. Create a file called converter.swift using an editor of your choice.
  5. Write the following code in it.:
    //note the code below is for demonstrating multi file projects & may not necessarily be accurate or correct
    func centigrade_to_fahrenheit(temperatureInCentigrade : Float) -> Float

    {
              return ((temperatureInCentigrade*9.0/5.0)+32.0)
    }
    func string_to_float(input : String) -> Float
    {
              var number : Float = 0.0;
              var result : Float = 0.0
              for charac in input.characters
              {
                        switch charac
                        {
                                  case “0”:
                                            number = 0.0;
                                  case “1”:
                                            number = 1.0;
                                  case “2”:
                                            number = 2.0;
                                  case “3”:
                                             number = 3.0;
                                  case “4”:
                                            number = 4.0;
                                  case “5”:
                                            number = 5.0;
                                  case “6”:
                                            number = 6.0;
                                  case “7”:
                                            number = 7.0;
                                  case “8”:
                                            number = 8.0;
                                  case “9”:
                                            number = 9.0;
                                  default:
                                            break
                        }
                        result = (result * 10.0) + number;
              }
              return result
    }
  6. Create a second file called main.swift
  7. Write the following code in it:
    if Process.arguments.count != 2
    {
              print(“USAGE: centigradeToFahrenheit 33.4”)
              print(“You are missing an argument”)
    }
    else
    {
              let temperatureInCentigrade = string_to_float(Process.arguments[1])
              print(“\(temperatureInCentigrade) is equal to \(centigrade_to_fahrenheit(temperatureInCentigrade))”)
    }
  8. Step out of the sources folder and then run the command to build the project: swift build
  9. The executable will be inside a hidden folder called .build/debug
  10. The name of the executable will be the same as the name of the project folder.
  11. To run it simply type: .build/debug/CentigradeToFahrenheit 100
    1. Try with different input values and no input value.
  12. That’s it. You are now ready to start typing code in Swift.


Configuring/Troubleshooting OS X Using Command Line

The following are some commands that you can use for Configuration &/or Troubleshooting. This list is by no means exhaustive. Do check the man pages for more information. This article assumes familiarity with Terminal commands. If you are new to the Terminal Application, please read the following articles before reading this one.

Terminal Commands for OS X – Basic
Terminal Commands for OS X – Part 2
Terminal Commands for OS X – Part 3

SYSTEM SETUP

softwareupdate

This command is used to install software updates remotely. View the following support article for more information.

dscl

This command is used to manage the different Users & Groups on your Mac. Using this command one can create, modify & view the different settings related to Users & Groups locally on the Mac. Amongst the other things, User Authentication through passwords can also be managed from here. View the man page for more information on the options available.

createhomedir

This command is used to create & populate home folders on the Mac. View the man page for more information on the options available.

systemsetup

As the name says, this command is used to setup the system. One of the more generic commands, using this we can set the date/time, energy preferences & various other settings. View the man page for more information on the different options available.

SECURITY

security

This is the command line version of the GUI application Keychain Access. Use this command to manage your Keychain. Some of the things that can be done using this command include: creating keychains, locking/unlocking keychains, finding your secure information within the Keychain. View the man page for more information on the options available.

FILE SYSTEM TROUBLESHOOTING

fsck

This command is used for running File System Checks. View the man page for more information on the options available.

diskutil

This command is used to run disk utility options. This is the command line equivalent of  the Disk Utility application. There are many operations available within this command line utility that are not available directly in the GUI version of the tool. View the man page for more information on the options available.

fdesetup

This command is used to control the FileVault settings on the Mac. Again, like the distil command this utility gives a lot more options than the GUI version of the Mac. Including the ability to change the recovery keys. View the man page for more information on the options available.

chmod

This command is used to modify permissions to files & folders. View the man page for more information on the different options available.

ln

This is the command used to create both hard links & soft links in the terminal. View the man page for more information on the different options available.

xattr

This command is used to examine &/or modify the attributes/metadata for a given file or folder. View the man page for more information on the different options available.

tmutil

This command allows you to configure &/or setup the Time Machine service. This is the command line version of the Time Machine settings located within System Preferences. View the man page for more information on the different options available.

locate

This command is used to search for files on the Mac. View the man page for more information on the different options available.

hdiutil

This command is also used to manage storage devices & Filesystems. The diskutil & hdiutil are command line versions of the Disk Utility app. View the man page for more information on the different options available.

NETWORK SETTINGS & TROUBLESHOOTING

networksetup

This command is used to set up & configure your network settings. This is the command line equivalent of the Network Preferences located under System Preferences. View the man page for more information on the different options available.

ipconfig

This command lets you view & control the IP configuration settings. View the man page for more information on the different options available.

ifconfig

This command is used to configure the Network Interface parameters. View the man page for more information on the different options available.

route

This command allows you to manually manipulate the routing tables. View the man page for more information on the different options available.

ping

Used to send ping diagnostic requests. View the man page for more information on the different options available.

scutil

Used to manage the System Configuration parameters. View the man page for more information on the different options available.

START/SLEEP/SHUTDOWN

shutdown

This command is used to shut down the Mac from the command line. View the man page for more information on the options available.

sleep

This command is used to put the system to sleep. View the man page for more information on the options available.

reboot/halt

This command is used for restarting the system. View the man page for more information on the options available.

caffeinate

Used to prevent the system from sleeping. View the man page for more information on the options available.

FILE EDITING

There are various editors available for command line. I am just listing a few. A lot of the editing can also be done in the GUI but in some cases the changes have to be done as a Super User. In Such situations loading one of the following editors using the sudo command can come in handy.

Emacs

https://en.wikipedia.org/wiki/Emacs
https://www.gnu.org/software/emacs/
http://www.xemacs.org

Vi

https://en.wikipedia.org/wiki/Vi

Vim

https://en.wikipedia.org/wiki/Vim_(text_editor)
http://www.vim.org

GEdit

https://en.wikipedia.org/wiki/Gedit

OS X and iOS troubleshooters toolkit

This article covers some of the things troubleshooters would need during their everyday work. I’ve also listed links to some products and applications as an example. It is by no means an endorsement of the same.

OS X Install Disk: This is probably one of the most important tool that a troubleshooter must carry around with him/her. Ideally it would be one disk with multiple versions, each corresponding to a specific version of the OS. Exactly how many versions depends on the situation, for example one can have all instances of the present and previous 2 versions of the OS (For example OS X Mavericks 10.9, 10.9.1, 10.9.2, 10.9.3, 10.9.4, 10.9.5 OS X Yosemite 10.10, 10.10.1, 10.10.2, 10.10.3, 10.10.4, 10.10.5 OS X El Capitan 10.11, 10.11.1)

Thunderbolt & FireWire Cables: These come in handy when it comes to transferring data. These cables  are necessary when you wish to  perform target disk mode troubleshooting. Make sure you have the correct version of the cable.

http://www.apple.com/shop/product/MD862LL/A/apple-thunderbolt-cable-05-m

Portable Storage Device: Along with the cables mentioned earlier having a portable storage device with a large capacity is useful. Mainly when it comes to taking a back up. The user may or may not have a storage device available for this. (Ideally, taking a backup of the data should be done by the user on his/her own storage device.)

http://www.lacie.com/as/en/products/mobile-storage/rugged-thunderbolt/

http://www.apple.com/shop/product/HE154VC/A/promise-pegasus2-r8-24tb-8-by-3tb-thunderbolt-2-raid-system

http://www.promise.com/Products/Pegasus

Internet access via USB Dongle: Yet another important tool. Application & OS upgrades require internet access. This will also come in handy when you are trying to perform network troubleshooting. Make sure there is sufficient data available for upload/download. Optionally one can carry multiple Internet dongles from different vendors.

Portable Power Bank: This is more useful for portable devices. Carry one with a large capacity, enough for multiple recharges or charging multiple devices.

Display adapters: Necessary to troubleshoot when the main display isn’t working or to heck the display ports. Carry all combinations HDMI to VGA, MiniDisplay to VGA, MiniDisplay to HDMI, HDMI to HDMI and any others depending on the device to be connected to.

http://www.apple.com/shop/product/H9139VC/B/kanex-atv-pro-x-hdmi-to-vga-adapter-with-audio-support

http://www.apple.com/shop/product/MB572Z/B/mini-displayport-to-vga-adapter

Secondary Display: This might not be practical as displays tend to be very large and not necessarily portable. However, one can carry a small pocket projector. A secondary display is always handy as it reduces dependency on the user/client to provide one.

Power adapters: Not strictly required but can come in handy. Useful for checking if the user’s power cord is functioning properly. Make sure you carry all the different versions of the power cords.

Lightning & 30 pin cables: Again not strictly necessary but would be useful for checking if the user’s power cord is functioning properly. Make sure you carry all the different versions of the power cords.

MacBook Pro &/or iPad: Carrying your own Mac & iPhone/iPad is very important. Load these devices with various tools required to diagnose and/or fix issues.

https://itunes.apple.com/in/app/inettools-network-diagnose/id561659975?mt=8

https://itunes.apple.com/us/app/inet-network-scanner/id340793353?mt=8

Disk Drill: http://data-recovery-software-review.toptenreviews.com/mac-recovery-software/mobile/disk-drill-pro-review.html

Airport Utility: https://support.apple.com/kb/DL1664

Airport Utility: AirPort Utility by Apple

https://appsto.re/in/YJ7Dz.i

Simple steps for securing your Mac

Continuing on from the previous post, where we learnt to secure our iOS devices, we will now apply similar steps on the Mac.

The security of a computer is easy to maintain if physical access to the device is restricted to yourself as far as possible. If any unauthorised person has physical access to your computer then all bets on security are off. While it’s easy for us to say that no one else is going to use the computer, one must always take some precautions. The following are just some of the steps one could take to secure their Mac.

User Accounts

This is the simplest way of ensuring very basic security. If more than one person is using a Mac one can have different accounts for each user. The account type that can be used for other users are:

  • Standard Users: This is a basic account that is used everyday. This accounts limits the user to his own files & folders only. The user has the option to install applications too.
  • Managed Users: They are standard users with restrictions. An administrator can specify what the user can or cannot do. This includes time limits, restrictions on applications & websites.
  • Guest User: This is the simplest of the lot. Good for people who wish to access their emails & leave no data behind.

User Account Password

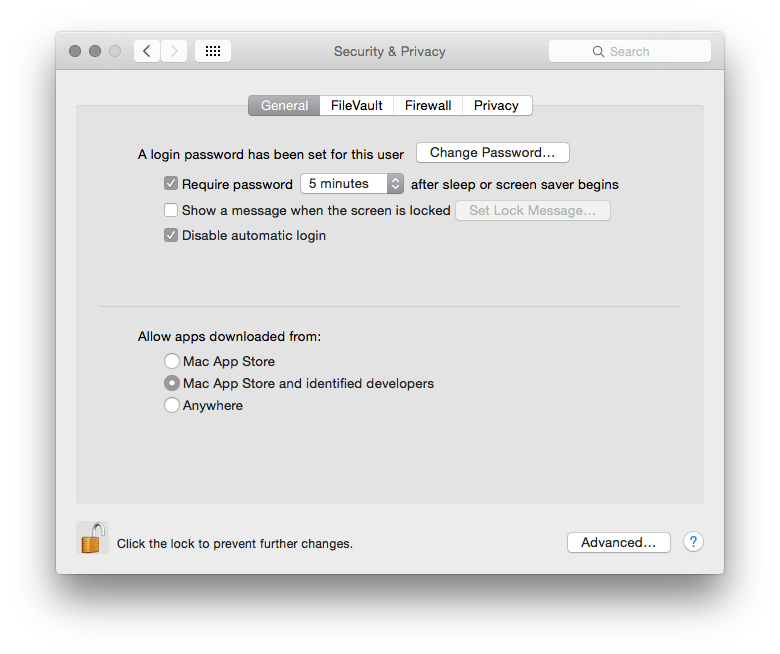
This is the simplest form of security. It is the password that you use to login to the computer. Having a strong password goes a long way in securing your Mac.

Setting a password

A password to your account will very likely be set when it was first created.

Changing the password

This can be changed at any point in time.

  1. Open System Preferences
  2. Click on Users & Groups
  3. If necessary unlock the padlock icon and authenticate as the administrator on your Mac.
  4. Select your user account
  5. On the right hand side click on change password

The other approach towards changing the password is:

  1. Open System Preferences
  2. Click on Security & Privacy
  3. Click on the General tab
  4. Click on the “Change Password” button next to the sentence: “A login password has been set for this user”

Note: for both the approaches you must know your existing password.

To create a strong password use the built in Password Assistant 

Encrypted Disk Images

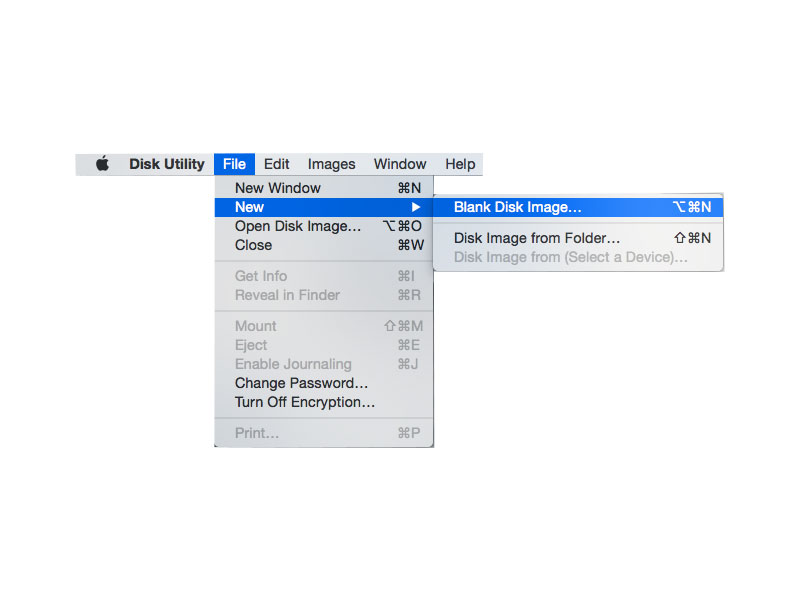
This offers a convenient approach towards storing your files securely. Disk Images are created using Disk Utility. To create encrypted disk images:

  1. Open Disk Utility. It’s located in the Applications > Utilities  folder.
  2. Click File > New > Blank Disk Image.step2
  3. Don’t select the ‘Disk Image from Folder ‘ option.
  4. Specify the size of the image.
  5. In the Image Format select ‘Read/Write’
  6. Under security select the level of encryption desired.
  7. Provide a name and click create.Screen Shot 2015-08-15 at 11.44.19 am
  8. Choose where you wish to save the disk image, provide an appropriate password.Screen Shot 2015-08-15 at 11.45.22 am
  9. Once the image is created, open the image.
  10. It mounts as a virtual disk, you will be prompted to enter the password you set earlier.
  11. Now you can add files you wish to secure.
  12. Once you are done simply eject the volume.
  13. The next time you wish to access the files simply open the image and authenticate with the password.

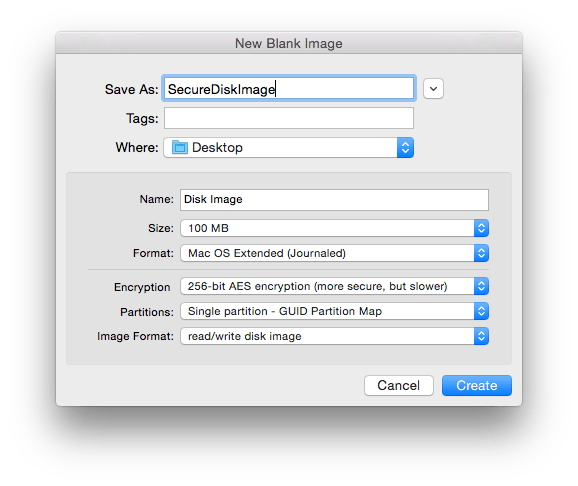
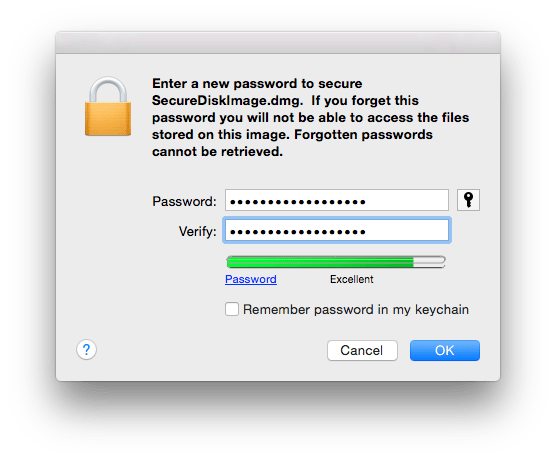
This ensures that your information is completely safe.

Firewall

Firewall OptionsThe firewall option is nice if you want to secure your communications over the network. From here you can control which applications can communicate over the internet or receive communications over the network. Simply turn on the Firewall & control access to the computer.

To customise the access to a network:

  1. Click on Firewall Options
  2. You can then click on the +/- buttons to add or remove applications from your firewall list. You can also modify whether a particular application is blocked.Screen Shot 2015-09-18 at 11.13.50 am

FileVault

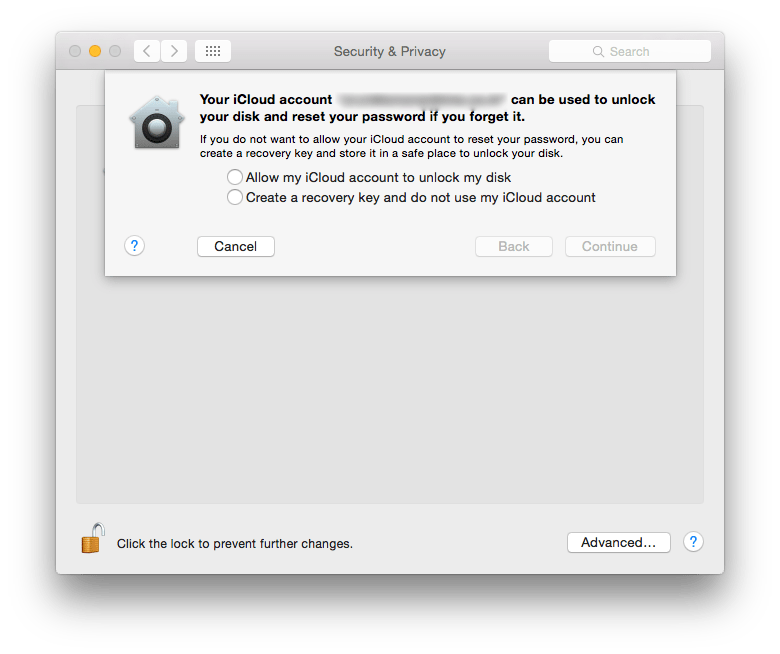
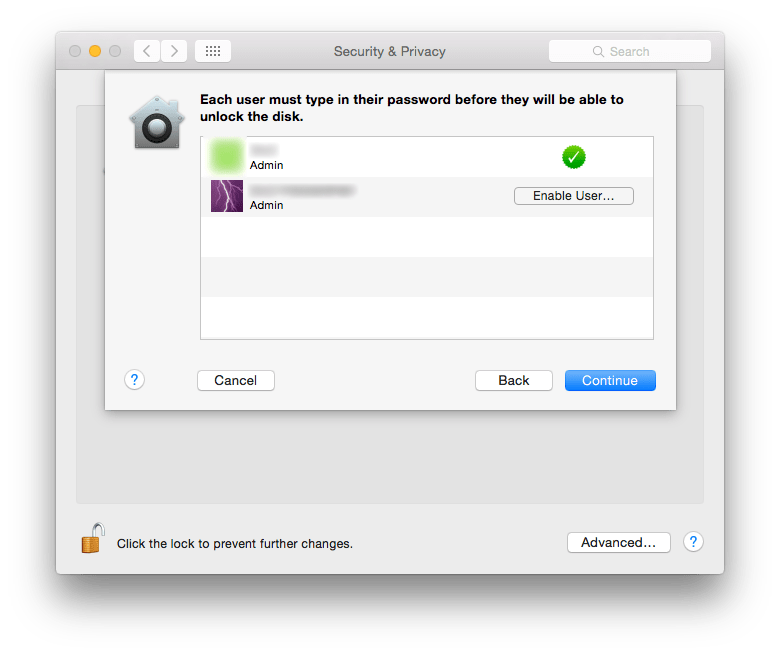
Disk images provide the option of securing some of your files. But what if there is a lot of secure information that you have? Disk images maybe used but it can become tedious if there are too many files. In such situations using FileVault to secure your files is preferable.

FileVault encrypts your main partition, that is, the partition from where you boot your OS from. Most users would have a single partition on their disk, for them it would mean that FileVault encrypts the whole hard disk. So anything you create on the encrypted partition is automatically secured.

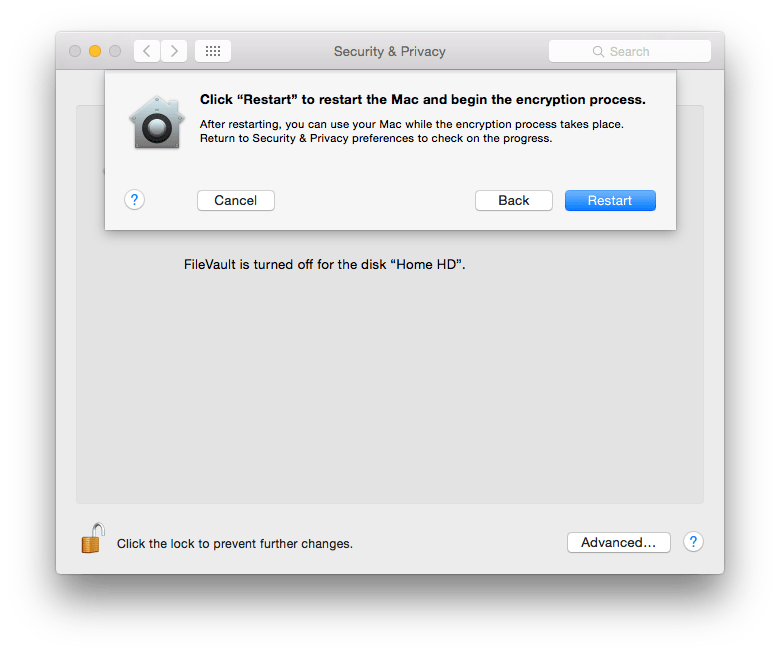
To turn on FileVault:

  1. Open System Preferences > Security & Privacy > FileVault Tab.
  2. Click ‘Turn on FileVault’.Screen Shot 2015-08-15 at 12.10.02 pm
  3. Authenticate as the administrator if necessary.
  4. You will be asked where you wish to save the ‘Recovery Key’? This key is important because you would need the recovery key to reset your account password if all administrator users forget their password.Screen Shot 2015-08-15 at 12.10.09 pm
  5. You can choose to save it to your iCloud Account
  6. Click continue.
  7. Choose the users who will have the privilege of decrypting the system for daily use.Screen Shot 2015-08-15 at 12.10.16 pm
  8. Click Continue.
  9. Click Restart to start the Encryption process.Screen Shot 2015-08-15 at 12.10.24 pm

Logout & Sleep

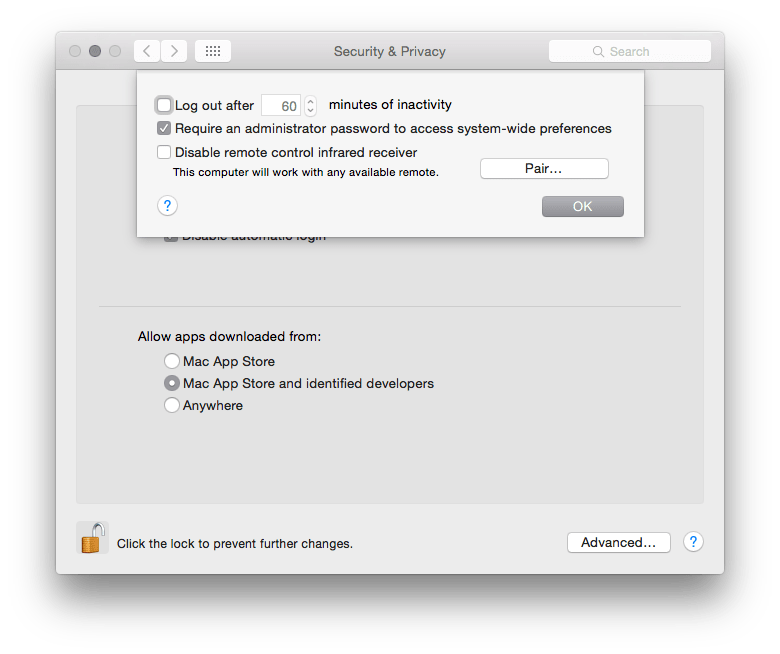
If you are leaving the computer idle or unattended for a period of time, then it is a good idea to make sure that the computer itself is locked automatically. These settings can easily be set from System Preferences:

  1. Open System Preferences > Security & Privacy
  2. Click on the General Tab.Screen Shot 2015-09-18 at 11.20.10 am
  3. Check the box for “Require password after sleep or screen saver begins“. This way the user will have to enter his/her password to start using the computer again. Specify the time duration after which this can happen.
  4. Click on “Advanced
  5. Select the check box to log out after a certain period of inactivity. Specify the time duration.Screen Shot 2015-09-18 at 11.20.15 am

Find My Mac

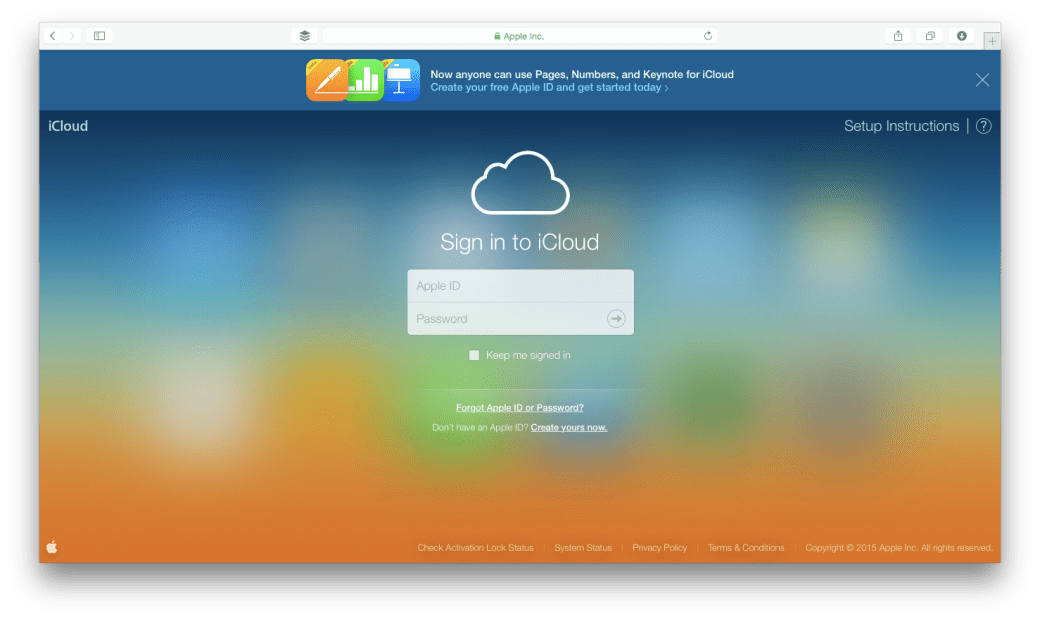
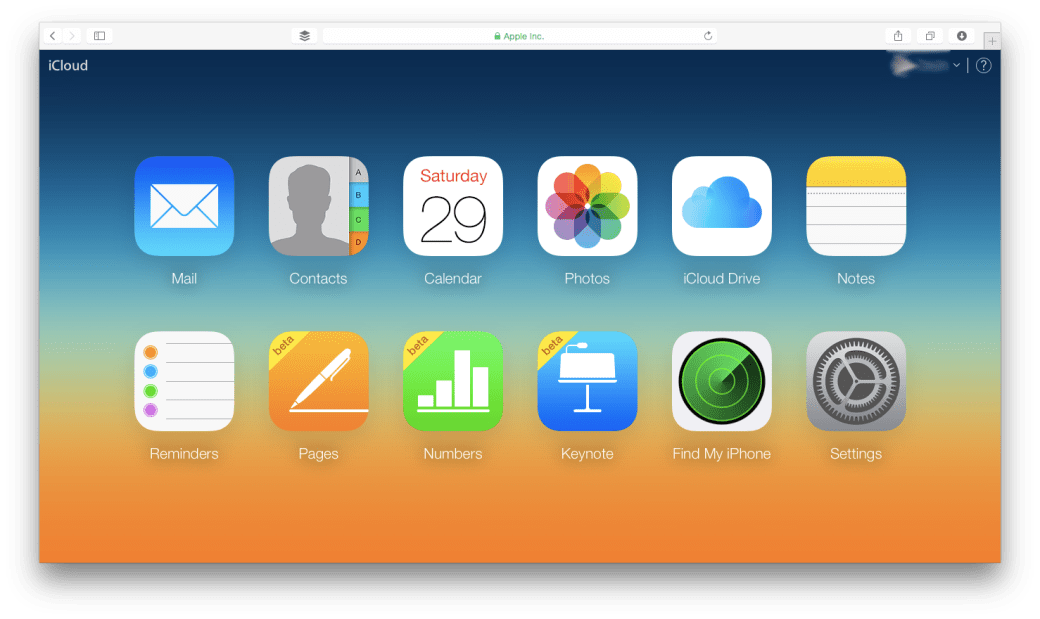
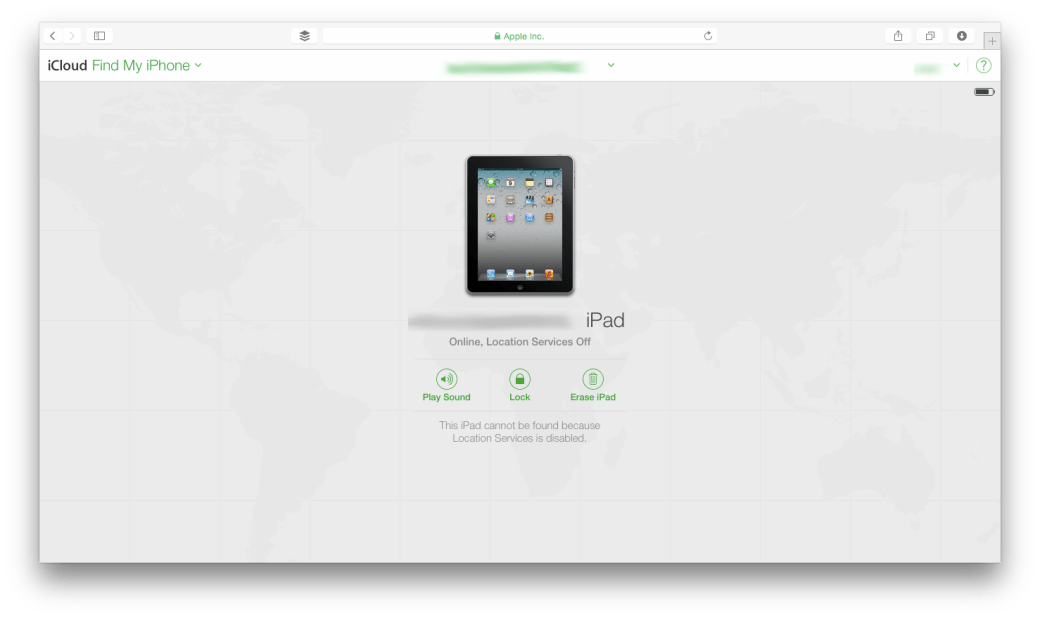
This feature has more to do with locating a device that is missing. While it is called Find My Mac, one can locate both OS X as well as iOS devices. There are a few things to keep in mind:

  • All the devices to be tracked should be signed in with the same Apple ID.
  • The device must be connected to the Internet.

Setting up Find My Mac is easy:

  1. Open System Preferences > iCloud.
  2. Make sure you are signed in.
  3. On the service list, located on the right hand side, scroll down to the checkbox for Find My Mac.
  4. Select the checkbox for Find My Mac if it is not already selected.
  5. You may need to grant access to location services.

Locating a device using Find My Mac:

  1. On any computer visit www.icloud.comicloud1
  2. Sign in with the same Apple ID/iCloud ID you had signed in with on your Mac.
  3. Once you log in click on the Find My iPhone app. Remember, even if it is called Find my iPhone, you can search for any iOS or OS X device.icloud2
  4. The page should now load with a map of all your devices which are currently online.
  5. You can select a specific device & perform various actions such as: Play Sound, Lock Device, Erase Device. Select the activity appropriate for your needs.icloud4

Privacy

it is possible to restrict access to a particular set of data on your Mac. Through the privacy tab within System Preferences > Security & Privacy.

From here once can give access to your data at an application level. The kind of data that can be moderated are:

  • Contacts
  • Calendar events
  • Location
  • Reminders
  • Facebook/Twitter credentials

Certain resources such as Location & Diagnostics are controlled by the administrator.

Firmware Password

A Firmware Password is a Logic Board level password. The main purpose of a Firmware Password is to prevent unauthorised modification of the startup process of a Mac. It doesn’t secure your data. But it makes sure that no one can gain access to your computer by changing the boot sequence. It becomes difficult for people to boot your Mac off a network or an external disk.

The process of setting up a Firmware Password is a bit technical. Please consult with a member from the IT Department of your company or contact an Apple Certified Support Professional. You can also approach an Apple Authorised Service Centre for the same. If you have forgotten one, then you will have to approach an Apple Authorised Service Centre for the same. Here are the steps.