What are Xcode templates?
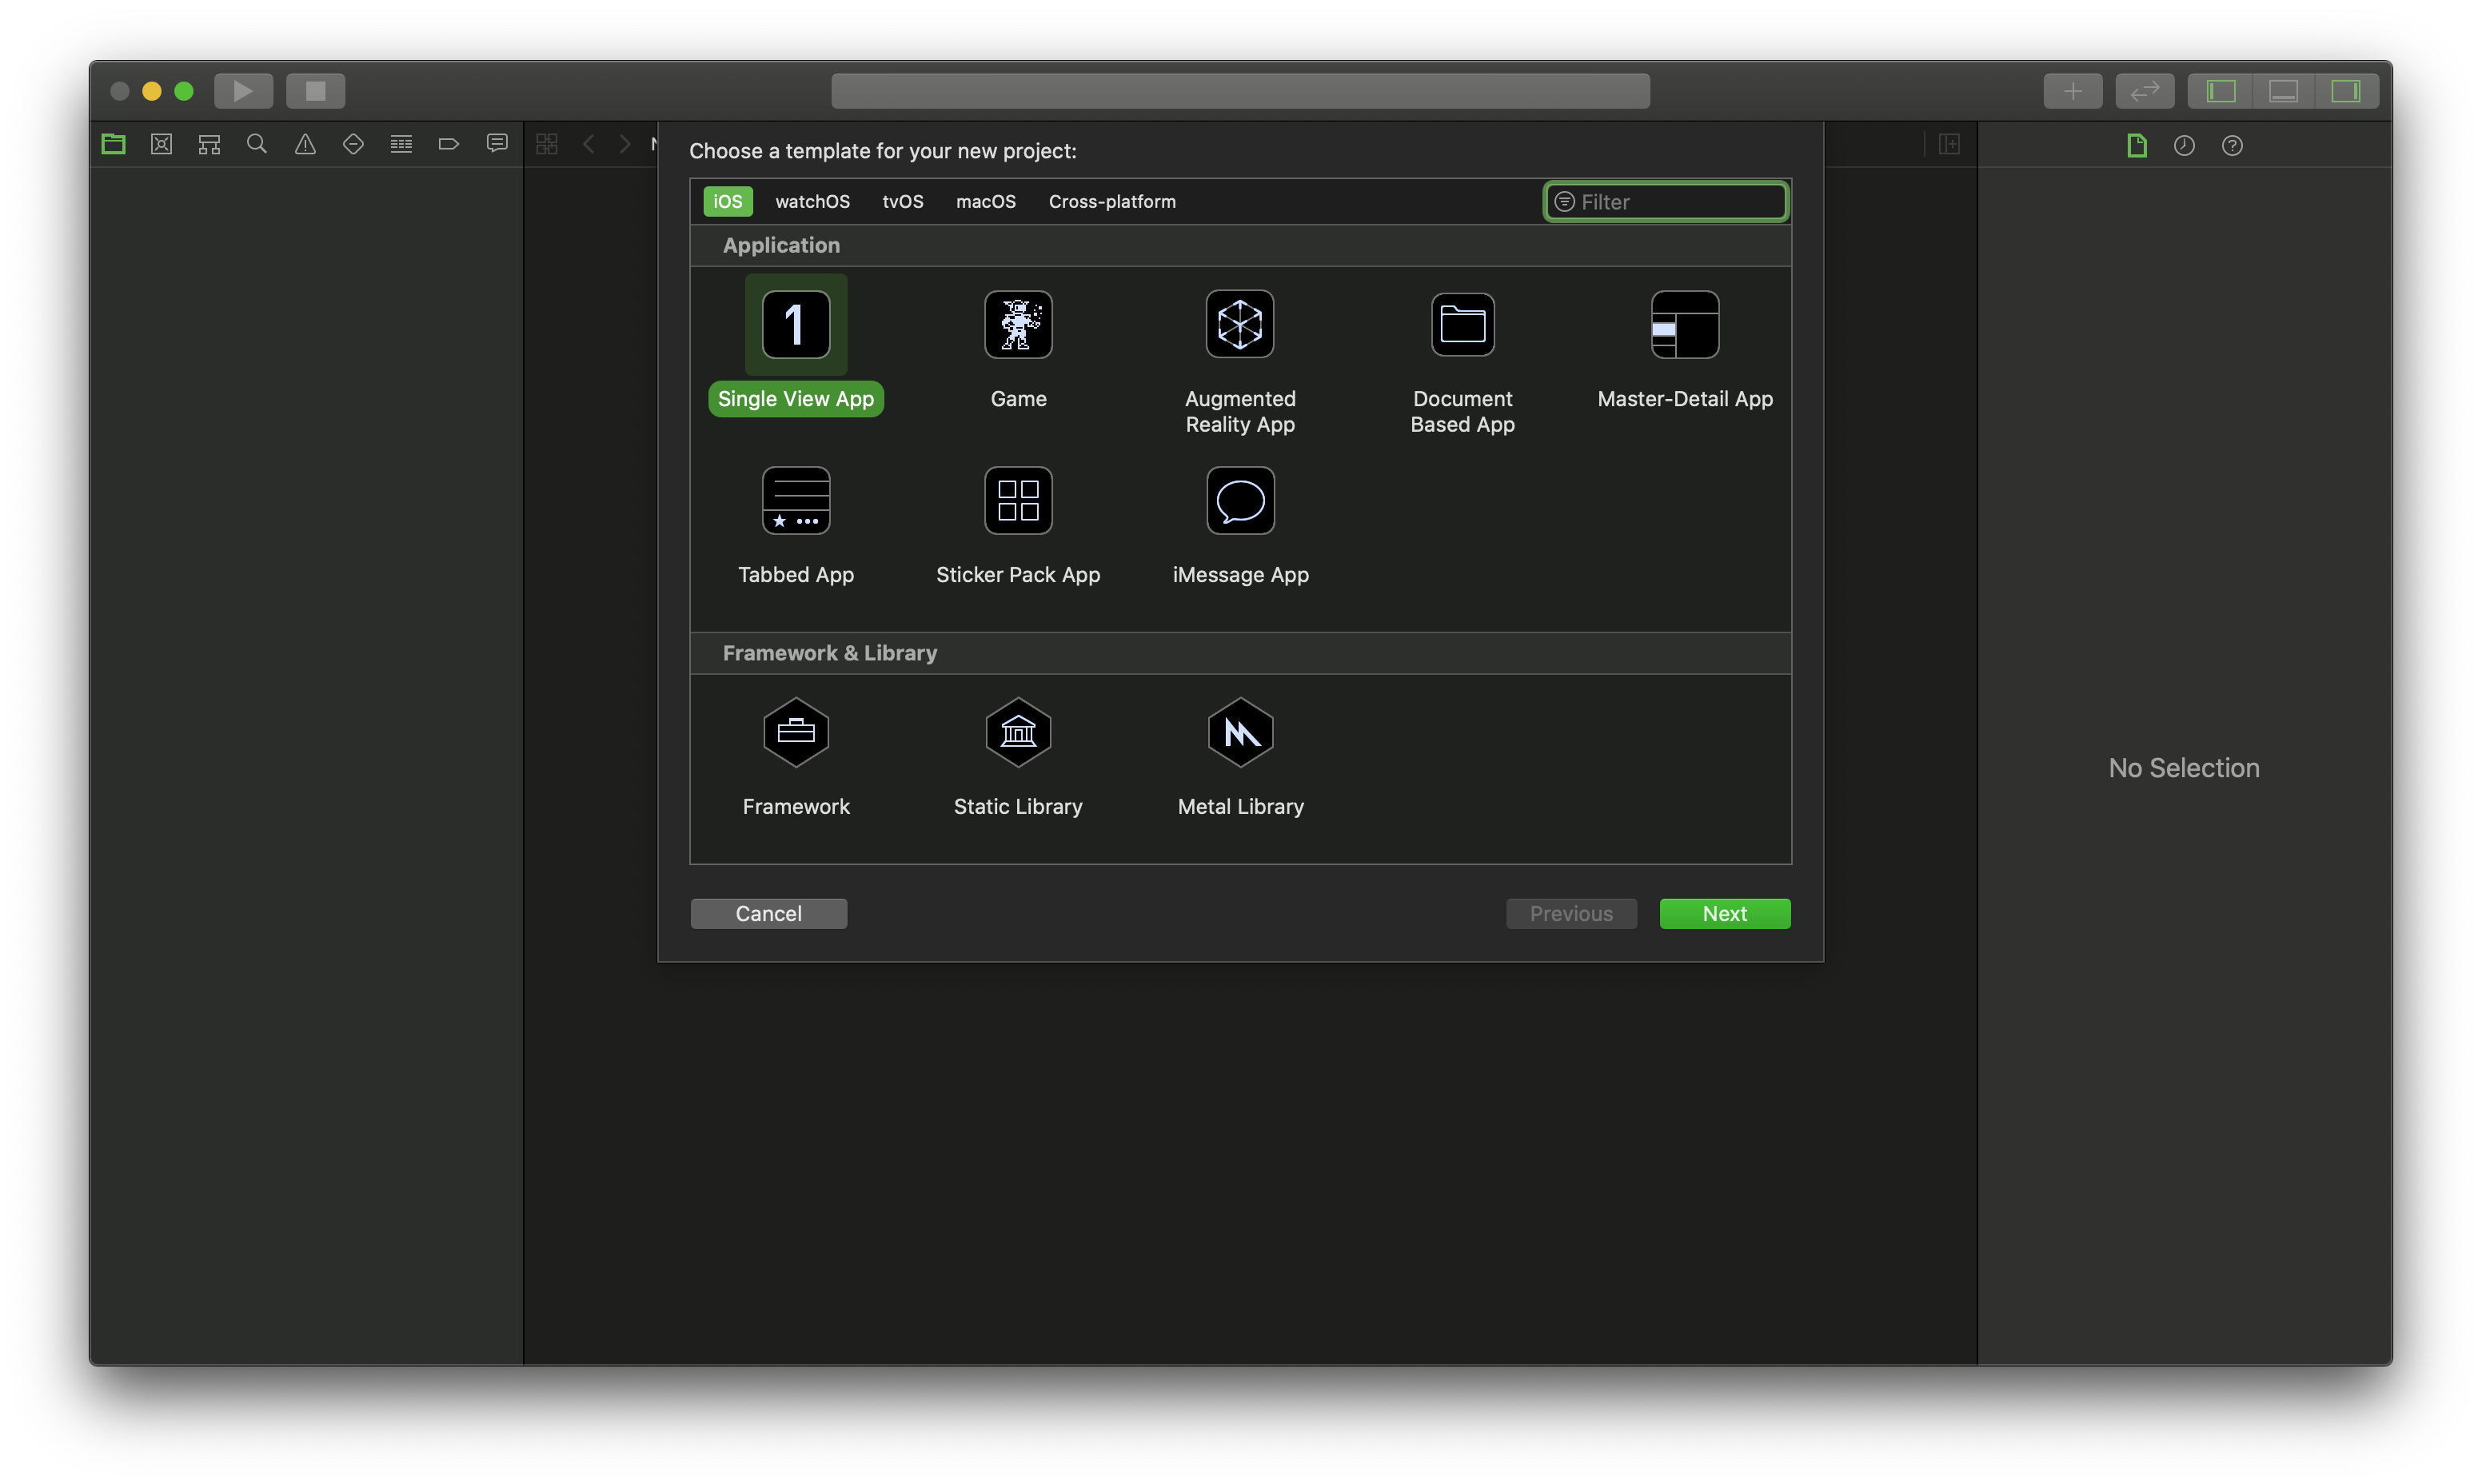
Xcode templates are basically pre-created files which we use when we create new projects or project files. So every time you go through the process of creating a new project File > New > Project > iOS > Single View App you are using the Single View App template.

While most of the templates are good enough we can easily create our own templates.
Why do we need custom templates?
The templates available out of the box are good for common situations. But we find that most of the times we end up creating a lot of file in our project. Sometime we implement common design patterns and architectures on a regular basis.
In such situations creating out own custom templates will help us save a lot of time during development.
The other advantage is that this promotes a more consistent development experience in any organisation.
Now that we know what templates are and why we may need custom templates let us look at how we can create them.
Template Types
Before we go ahead and create templates let us examine what a typical template includes.
Navigate to the following path:
/Applications/Xcode.app/Contents/Developer/Platforms/iPhoneOS.platform/Developer/Library/Xcode/Templates/
Notice that there are 2 folders already created out here. File Templates & Project Templates. Let us browse through these folders.
File Templates
These are the templates used when a developer wishes to add a new file to an existing project. Under file templates you should see different folders in there. Each folder represents a certain category of templates. For example, User Interface is one category. Select it.
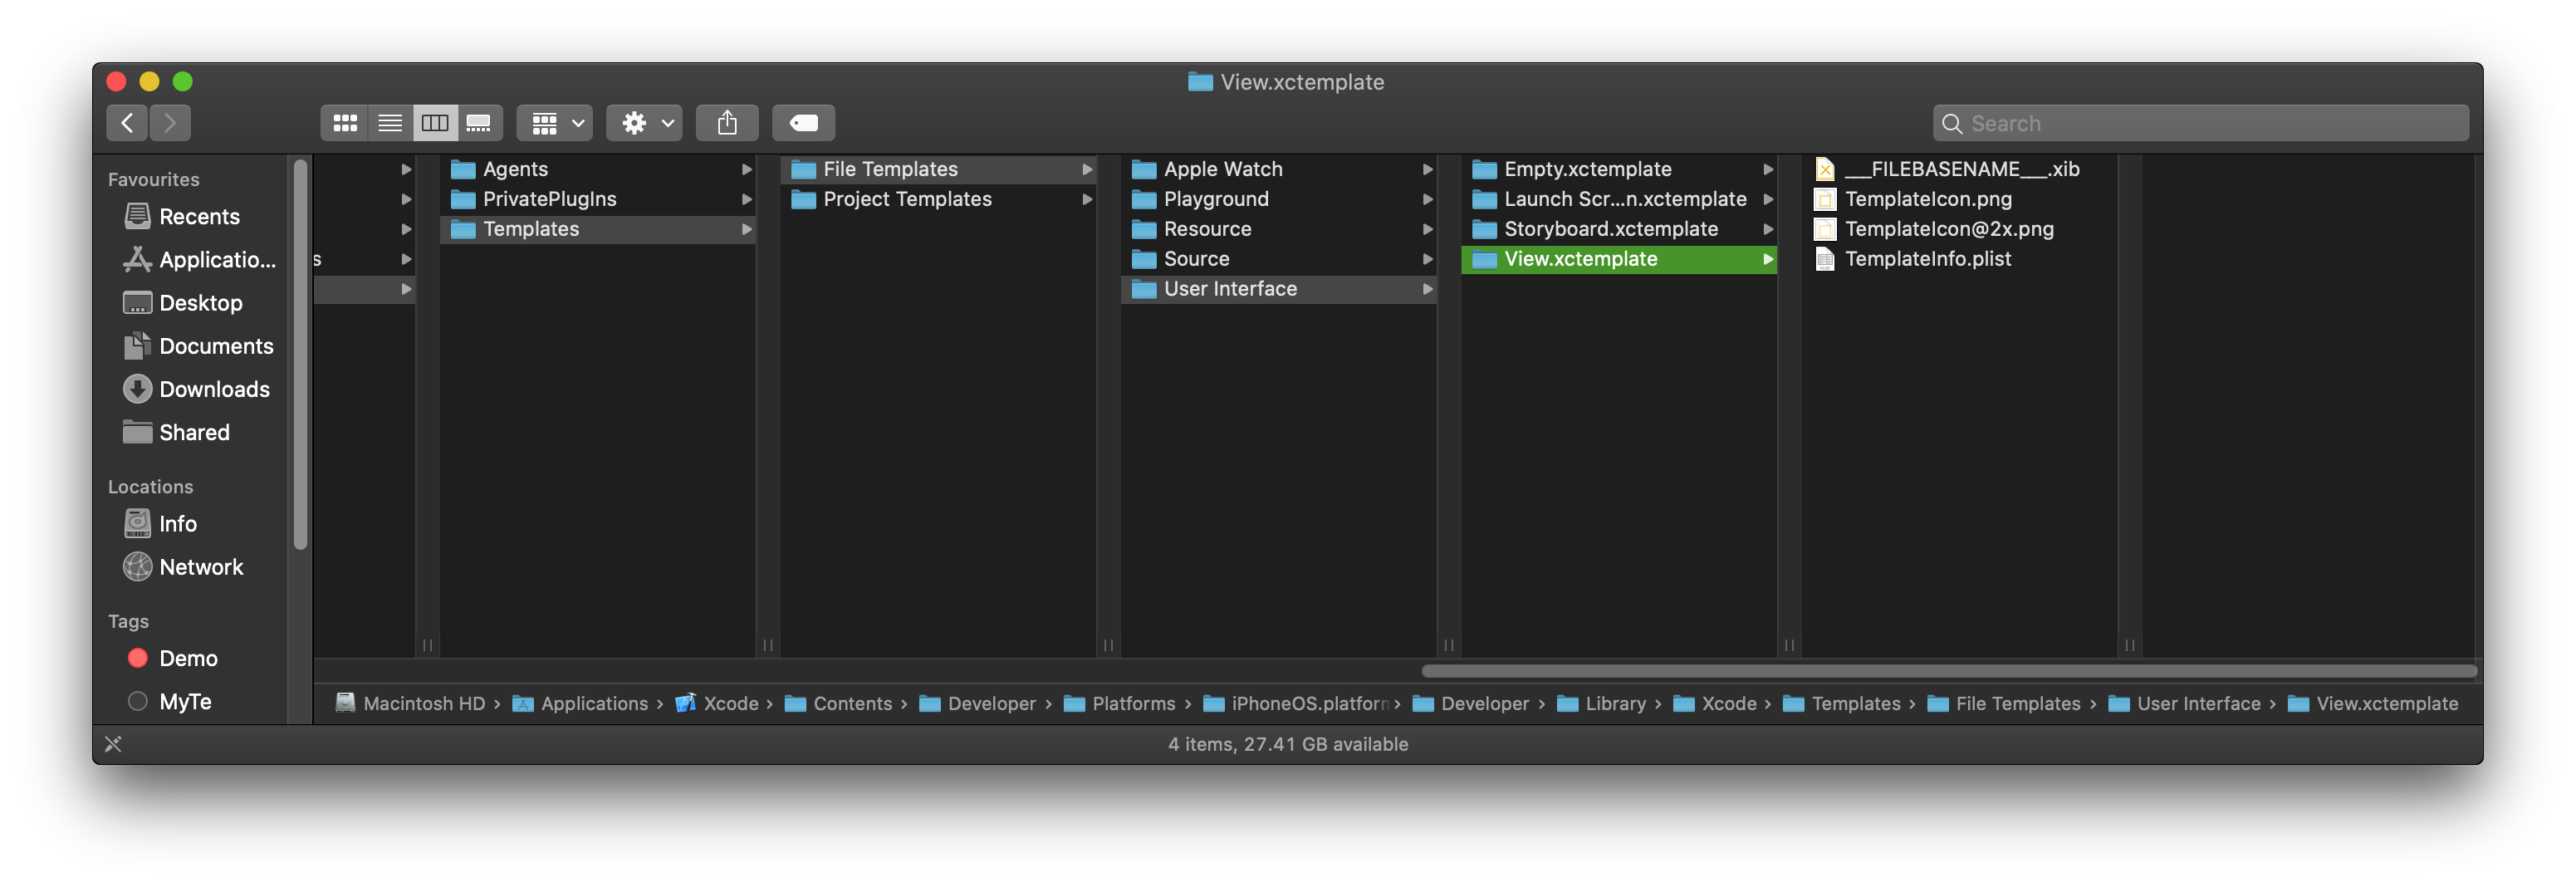
You should see multiple folders under it. The screenshot above shows the View template. As we can see the template itself is a folder with multiple files inside. The template ends with an extensions xctemplate. Let us look at those files.
- ___FILEBASENAME___.xib
- TemplateIcon.png
- TemplateIcon@2x.png
- TemplateInfo.plist
The first one is the XIB file which will be generated by this template. The ___FILEBASENAME___ placeholder will be replaced with an actual name when it is created.
The next 2 are simply images that will be used as icons for the template when we bring up the template wizard in Xcode.
The last one is the more important one. The TemplateInfo.plist. This is where we describe how the file creation process works. This is also where we configure options which will be presented to the user. We will look at this file in greater depth later on when we try to create our own templates.
Project Templates
These are the templates that are used when a developer decides to create a new project. Under project templates you should see different folders in there. Each folder represents a certain category of templates. For example, Application is one category. Select it.

I have the single view app template inside it. This is the most commonly used template when starting out with iOS App Development. You should see other familiar project templates. Feel free to examine the files in the folder. Let us have a look inside the Single View App template folder. You should see these items:
- ContentView.swift
- Main.storyboard
- TemplateIcon.png
- TemplateIcon@2x.png
- Preview Assets.xcassets folder
- TemplateInfo.plist
The first 2 files are the UI related files. One of the 2 will be selected based on the users choice between Storyboard and SwiftUI.
The next 2 are simply images that will be used as icons for the template when we bring up the template wizard in Xcode.
The Preview Assets folder is used with SwiftUI for previewing purposes.
Here too we have the TemplateInfo.plist file which configures the template options at the time of creation. We will explore this file in greater depth when we try to create our own project template.
How can we create them?
In this article we will look at creating 2 types of templates.
- File Templates
- Project Templates
Warning: It may be a good idea to try this out on a test computer so that you do not break anything on the computer you use everyday.
Preparation
Before we get started let us prepare the folders where we will be storing our custom templates.
- Navigate to the following folder.
~/Library/Developer/Xcode/Templates/
Note, you may have to create this folder.
- There should be 2 folders inside: File Templates, Project Templates. If these folders are not there then go ahead and create them.
We will be placing our templates in these folders.
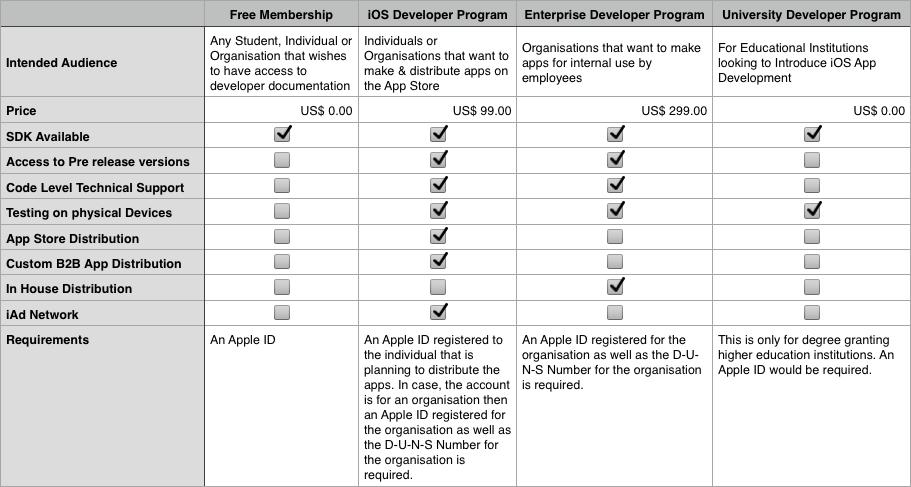
| Topic | Page |
|---|---|
| Creating File templates | 2 |
| Creating Project templates | 3 |
Download
You can download the templates from these links.
Note
This code has been tested on Xcode 11.3.1 on macOS Catalina 10.15.3