Introduction to Server side Swift using Vapor

Table of Contents

What is server side Swift?

Server side Swift is basically a server application implemented using the Swift Programming Language. These applications then talk to different clients just like other server applications.

Why would we want to develop server side applications using Swift?

That is a good question. Why would we want to develop server side applications using Swift? If you are an iOS App developer then the biggest advantage is that there is no need to learn a new language from scratch just to build your own backend.

Also the backend and frontend development can happen at the same time and they can share the same codebase.

Of course, the biggest advantage is that we get all the benefits of Swift: Fast, Expressive, Safe, Interoperable, & Adaptable.

What do we need?

The initial development is typically done on a Mac with Xcode installed. Though you can develop the server on Linux using Swift tools too.

  • Mac computer running the latest macOS
  • Latest version of Xcode
  • Vapor tools installed on the development computer
  • Server to host your web app

Basic setup and configuration

We will now configure our development computer to develop a Vapor based server. This article assumes that you have a Mac computer with Xcode installed.

  1. Open Terminal.
  2. Confirm that you have installed Xcode command line tools.
  3. Run the following command:
brew install Vapor
  1. Confirm that it installed successfully by running the following command:
vapor —help

Creating our first server side app using Swift

  1. Open Terminal.
  2. Navigate to the folder where you wish to create the project. ~/Developer is a popular location. The rest of the activities assume that the project was created in the Developer folder. However, you can create it in any other location.
  3. Once you are in the desired folder run the vapor tool to create the server project
vapor new <server app name> -n
  1. This will create the server as a Swift Package. Navigate into the project folder. The folder name will be the same as the server app name mentioned in the command above.
  2. Open the Package.swift file using the following command. This will open the project using Xcode.
open Package.swift
  1. Once Xcode opens it will immediately start downloading the package dependencies mentioned in the Package file. Wait for those to finish downloading.
  2. Let us confirm that everything is setup well. From the upper left hand corner of Xcode click the ‘Run’ button to start the server.
  3. You should see the following message printed in the console window of Xcode:
[ NOTICE ] Server started on http://127.0.0.1:8080
  1. Now let us confirm if we can reach this site. Open Safari or a browser of your choice.
  2. Type http://127.0.0.1:8080 and press return. It should load a web page with a simple message: “It works!”. You can also visit localhost:8080 and get the same results.
  3. Type http://127.0.0.1:8080/hello and press return. It should load a web page with a simple message: “Hello, world!”.
  4. This confirms that the server has been setup well and configured properly.
  5. Create a new file called CommunicationController.swift under the controllers folder within the project folder. This is where we will implement all the request handlers.
  6. Navigate to the newly created file.
  7. At the top add a line to import the Vapor framework.
import Vapor
  1. Next we will declare a struct called CommunicationController which inherits from RouteCollection. You will get an error message saying that the type does not conform to the protocol. Don’t worry we will add the necessary stubs in a minute. This controller will handle the routing of requests received by the server.
  2. Click on the error to apply the stubs, it will write the code for you or you can manually write the following:
func boot(routes: any Vapor.RoutesBuilder) throws {
       
}
  1. Now we will start implementing the boot. This is where we define the request types and route them to the appropriate function.
let routeGroup = routes.grouped("Source")
  1. Before we can describe the routes we need the functions that handle the respective messages. Implement the following functions in the same struct.
func getMessage(req : Request) throws -> String {
    return "This is a message received from the server."
}
    
func postMessage(req : Request) throws -> HTTPStatus {
    let value = try req.content.decode(String.self)
    
    print(#line, value.name)
    return HTTPStatus.ok
}


The getMessage simply returns a String. The post message prints the value sent to the server.

  1. Add the following two lines to the boot function, after the routeGroup declaration.
routeGroup.get("Receive", use: getMessage)
        
routeGroup.post("Send", use: postMessage)
  1. Your completed struct should look like this:
import Vapor

struct CommunicationController : RouteCollection {
    func boot(routes: any Vapor.RoutesBuilder) throws {
        let routesGroup = routes.grouped("Source")
        
        routesGroup.get("Receive", use: getMessage)
        routesGroup.post("Send", use: postMessage)
    }
    
    func getMessage(req : Request) throws -> String {
        return "This is a message received from the server."
    }
    
    func postMessage(req : Request) throws -> HTTPStatus {
        let value   : String    = try req.content.decode(String.self)
        print(#line, value)
        return HTTPStatus.ok
    }
}

The GET & POST methods have their own respective names “Receive” and “Send”. These will be a part of the URL endpoints which we will need when we are building the client.

  1. Switch to the routes file.
  2. Replace all the code in the routes function with the following statement:
try app.register(collection: CommunicationController())

Testing the server app

We will test our server with the help of a client app. We will quickly create a basic iOS App that can talk to the backend service. You can create any other frontend app that you might be comfortable with.

  1. To test the server we will make a quick iOS App. Create a new iOS App that uses the UI framework of your choice.
  2. Create a swift file called NetworkEngine.swift and write the following code in there:
import Foundation

final class NetworkEngine {
    //MARK: - Singleton
    private static var reference    : NetworkEngine?
    
    private init() { }
    
    static var shared : NetworkEngine {
        if reference == nil {
            reference = NetworkEngine()
        }
        return reference!
    }
    
    typealias NetworkResponseHandler = (Data?, URLResponse?, Error?) -> Void
    
    func communicateWith(Server url : URL, andHandleResponseWith completionHandler : @escaping NetworkResponseHandler) {
        let task = URLSession.shared.dataTask(with: url, completionHandler: completionHandler)
        task.resume()
    }
    
    func communicateWith(Request req : URLRequest, andHandleResponseWith completionHandler : @escaping NetworkResponseHandler) {
        let task = URLSession.shared.dataTask(with: req, completionHandler: completionHandler)
        task.resume()
    }
}


It is a basic wrapper for the URLSession calls.

  1. I am implementing the project as a SwiftUI project. So I will create the ContentViewVM.swift file. 
  2. Declare a constant to hold the URL to the server. Since we are testing on the same computer we will use the self url.
private let targetURL : String = "http://127.0.0.1:8080"
  1. Implement the function to get a message as shown below:
func initiateCommunication(task : @escaping () -> Void) {
        //1) Get the URL
        let destinationURL      : URL                                   = URL(string: "\(self.targetURL)/Source/Receive")!
        var req                 : URLRequest                            = URLRequest(url: destinationURL)
        req.httpMethod                                                  = "GET"
        
        //2) Create the completion handler
        let completionHandler   : NetworkEngine.NetworkResponseHandler  = {(data : Data?, response : URLResponse?, err : Error?) -> Void in
            print(String(data: data!, encoding: String.Encoding.utf8)!)
        }
        
        //3) Start communication
        NetworkEngine.shared.communicateWith(Request: req, andHandleResponseWith: completionHandler)
    }
  1. Implement the function to post a message as shown below:
func sendSomeData(input : String) {
        //1) Get the URL
        let destinationURL  : URL           = URL(string: "\(self.targetURL)/Source/Send")!
        let objToSend       : String        = input
        let jsonEncoder     : JSONEncoder   = JSONEncoder()
        let body                            = try? jsonEncoder.encode(objToSend)
        
        var req             : URLRequest    = URLRequest(url: destinationURL)
        req.httpMethod                      = "POST"
        req.httpBody                        = body
        req.addValue("application/json", forHTTPHeaderField: "content-type")
        
        NetworkEngine.shared.communicateWith(Request: req, andHandleResponseWith: {(data, response, error) in
            print(response!)
        })
    }
  1. Switch to the ContentView.swift file.
  2. Implement the ContentView as shown below:
import SwiftUI

struct ContentView: View {
    var viewModel : ContentViewVM   = ContentViewVM()
    
    var body: some View {
        VStack {
            Button("Get") {
                self.viewModel.initiateCommunication(task: {})
            }
            .padding()
            
            Button("Post") {
                self.viewModel.sendSomeData(input: "Sending this message from the test app on \(Date.now)")
            }
    }
}
  1. Run the iOS app in the simulator.
  2. Tap the ‘Get’ button. See if you get the message from the server. It will be printed in the Xcode console.
  3. Tap the ‘Post’ button. See if you received the message on the server. It will be printed in the Xcode console for the server project.
  4. You have successfully configured basic communication.

Next we will implement basic authentication

  1. Create a new file in the controllers folder. Call it UserAuthenticationLogic.swift.
  2. Declare a struct that represents the user.
import Vapor

struct User : Authenticatable {
    var name : String
}
  1. Now we will implement the struct that handles the authentication.
struct UserAuthenticator : AsyncBasicAuthenticator {
    func authenticate(basic : BasicAuthorization, for request : Request) async throws {
        if basic.username == "test" && basic.password == "secret" {
            request.auth.login(User(name: "Test"))
        }
    }
}


It conforms to the AsyncBasicAuthenticator protocol. Using basic authorisation it checks to see if the username and password match and login the user if it does.

  1. Switch to the CommunicationController.swift file.
  2. Replace the routes group with a group that uses the UserAuthenticator. Update the subsequent get and post statements to use the new group. Your boot function should look like this:
func boot(routes: any Vapor.RoutesBuilder) throws {
        let protectedRoutesGroup = routes.grouped(UserAuthenticator())
        
        protectedRoutesGroup.get("Receive", use: getMessage)
        protectedRoutesGroup.post("Send", use: postMessage)
    }
  1. Add the statement too require login at the start of the getMessage and postMessage functions.
_ = try req.auth.require(User.self).name
  1. To test this we will switch back to our iOS App.
  2. Update the target URL for both the initiateCommunication & sendSomeData functions. Remove the /Source from the URL.
  3. Add the following lines in the initiateCommunication function after the statement where we specify the httpMethod:
let body = "Basic \("test:secret".data(using: .utf8)!.base64EncodedString())"
req.setValue(body, forHTTPHeaderField: "Authorization")
  1. Add the following lines in the sendSomeData function right after the content type is specified for the request.
let authBody = "Basic \("test:secret".data(using: .utf8)!.base64EncodedString())"
req.setValue(authBody, forHTTPHeaderField: "Authorization")
  1. Run both the server as well as our iOS app.
  2. Test the Get and post messages just like the previous task.
  3. Play around by sending an incorrect username &/or password.
  4. The updated function should look like:
func initiateCommunication(task : @escaping () -> Void) {
    //1) Get the URL
    let destinationURL      : URL                                   = URL(string: "\(self.targetURL)/Receive")!
    var req                 : URLRequest                            = URLRequest(url: destinationURL)
    req.httpMethod                                                  = "GET"
    let body                                                        = "Basic \("test:secret".data(using: .utf8)!.base64EncodedString())"
    req.setValue(body, forHTTPHeaderField: "Authorization")
        
    //2) Create the completion handler
    let completionHandler   : NetworkEngine.NetworkResponseHandler  = {(data : Data?, response : URLResponse?, err : Error?) -> Void in
        print(String(data: data!, encoding: String.Encoding.utf8)!)
    }
        
    //3) Start communication
    NetworkEngine.shared.communicateWith(Request: req, andHandleResponseWith: completionHandler)
}

func sendSomeData(input : String) {
    //1) Get the URL
    let destinationURL  : URL           = URL(string: "\(self.targetURL)/Send")!
    let objToSend       : String        = input
    let jsonEncoder     : JSONEncoder   = JSONEncoder()
    let body                            = try? jsonEncoder.encode(objToSend)
        
    var req             : URLRequest    = URLRequest(url: destinationURL)
    req.httpMethod                      = "POST"
    req.httpBody                        = body
    req.addValue("application/json", forHTTPHeaderField: "content-type")
    let authBody                        = "Basic \("test:secret".data(using: .utf8)!.base64EncodedString())"
    req.setValue(authBody, forHTTPHeaderField: "Authorization")
        
    NetworkEngine.shared.communicateWith(Request: req, andHandleResponseWith: {(data, response, error) in
        print(response!)
    })
}

Notice that the endpoint names in the URL have changed a little bit. “Source” is no longer needed.

Hosting the server using DigitalOcean droplets

I will be hosting the server on a DigitalOcean droplet. This will be an Ubuntu server that can run our server application. You can use any other hosting medium that you wish or even use docker for this.

  1. Open DigitalOcean: https://www.digitalocean.com/
  2. Login.
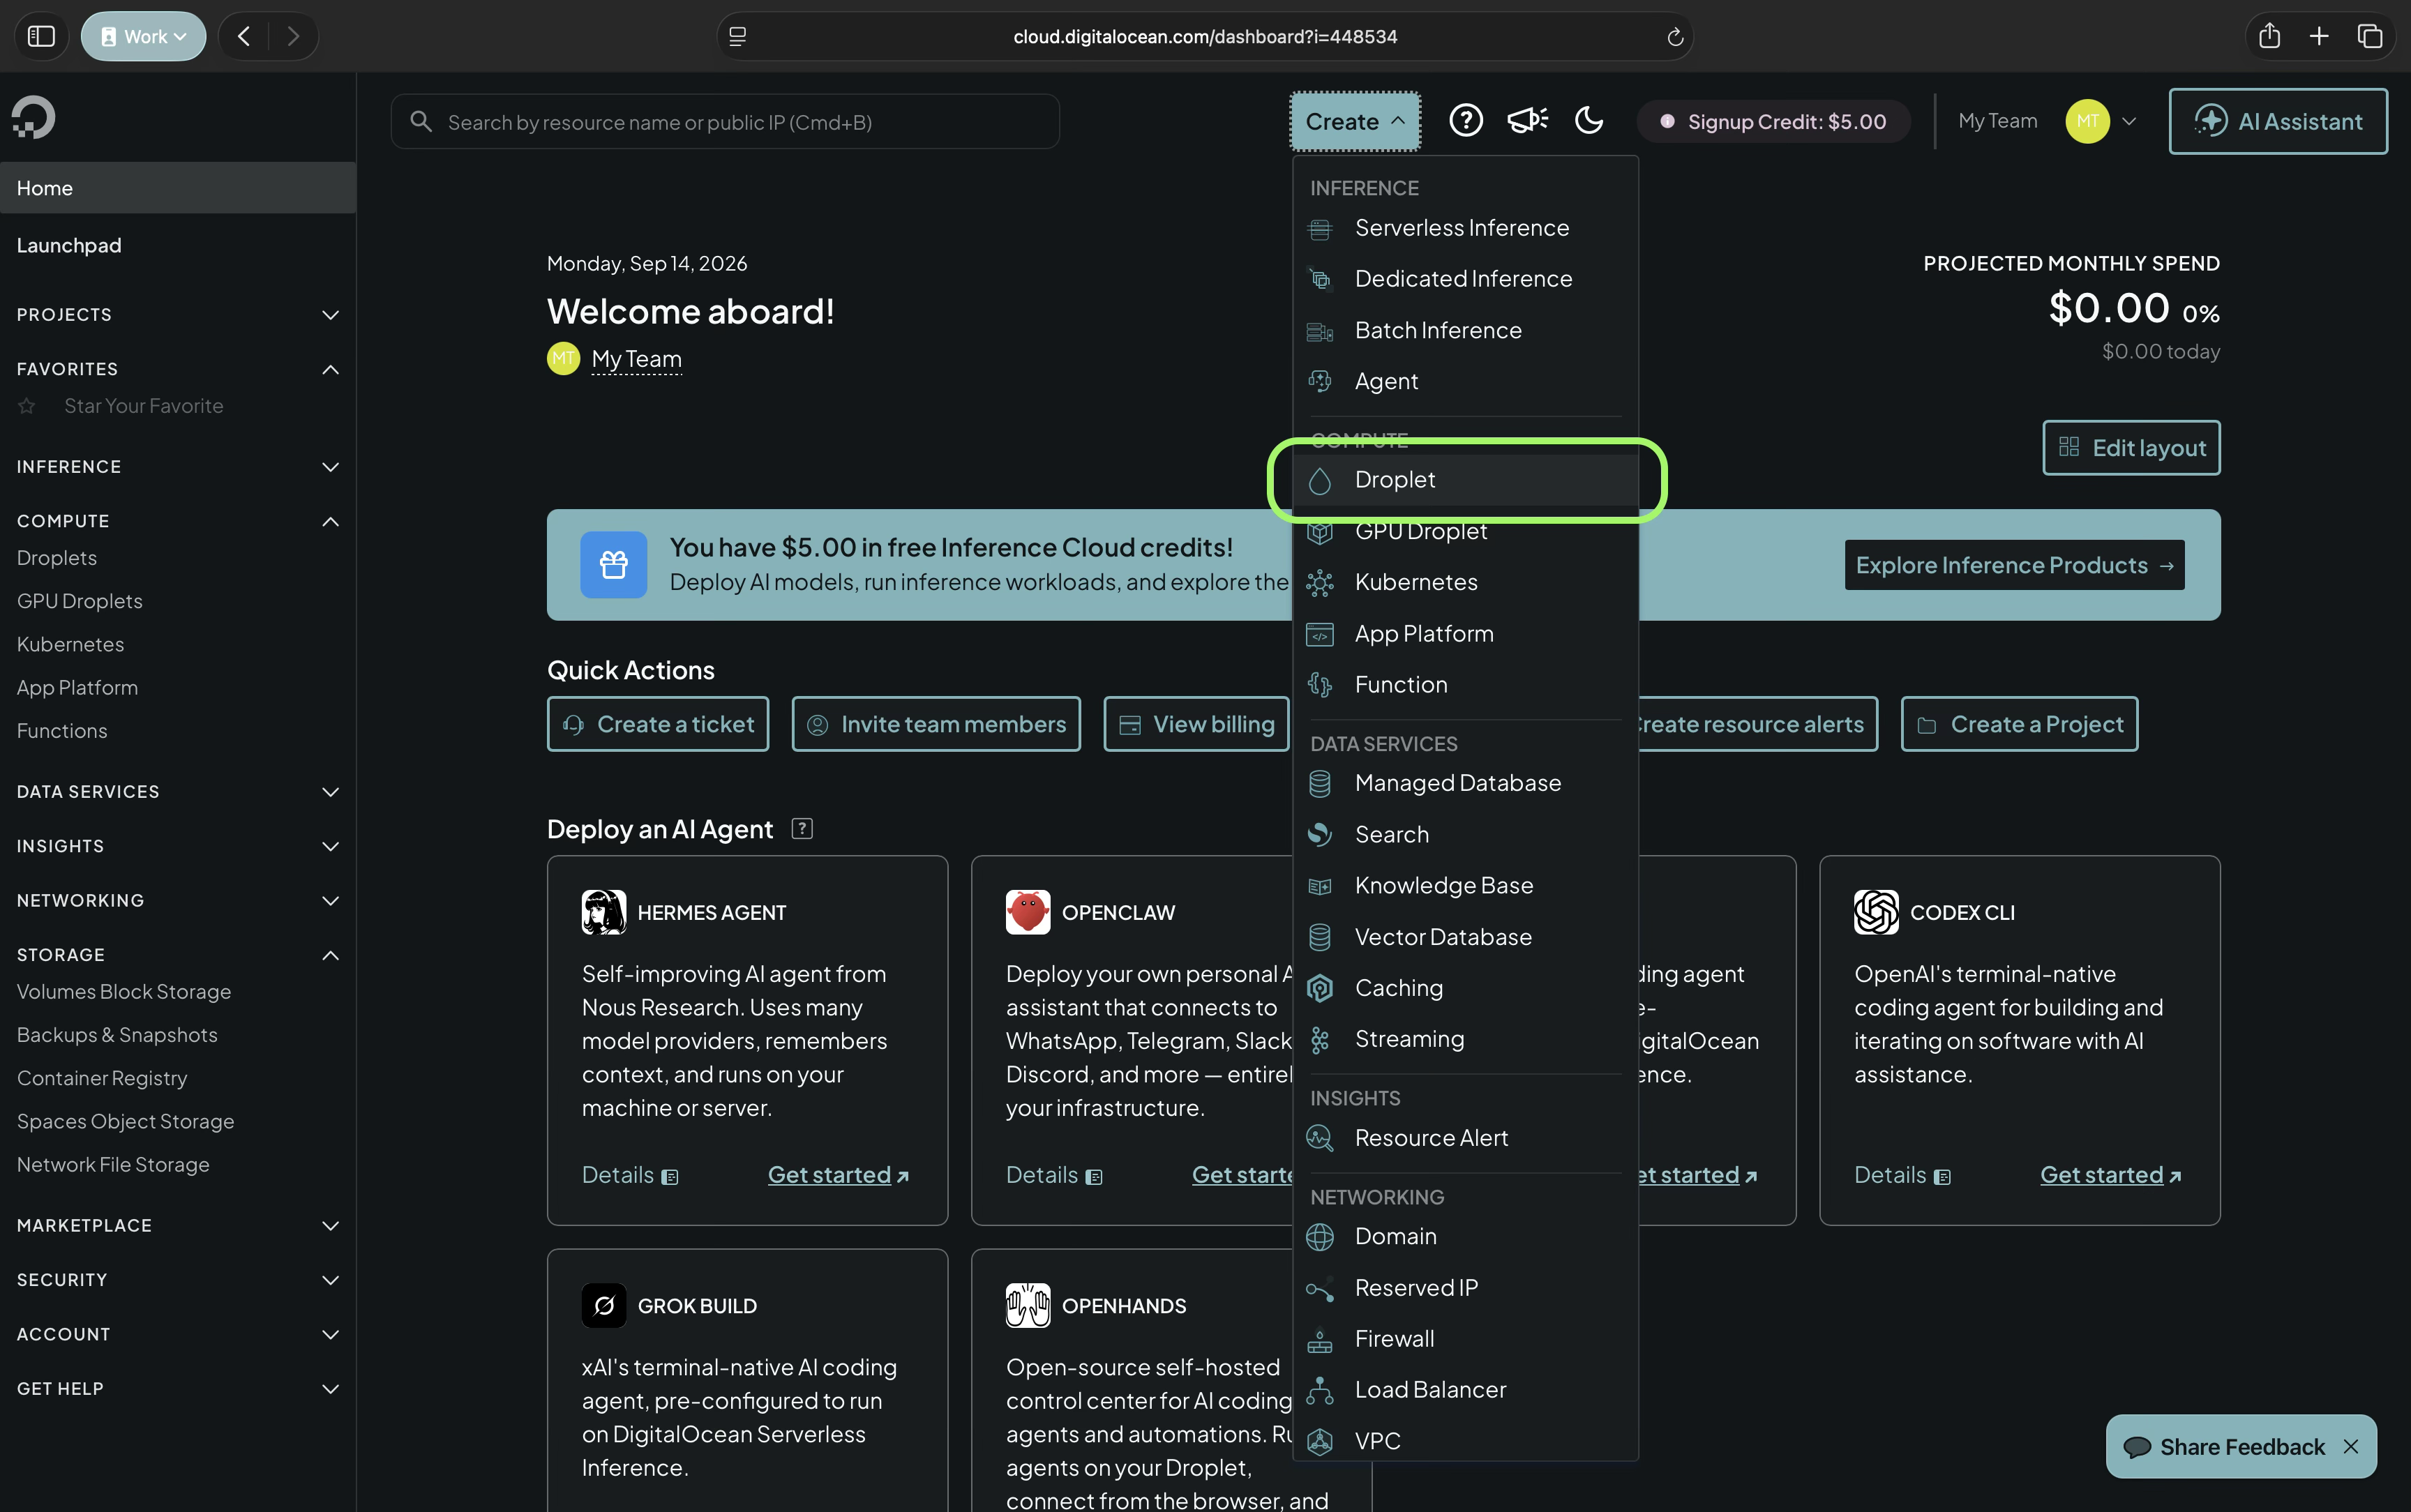
  3. Click on Create > Droplet
  1. Choose the server. This could be any one. I have chosen the one closest to my city.
  2. Choose Ubuntu 22.04 as version. Again, you can pick your preferred one from the choice.
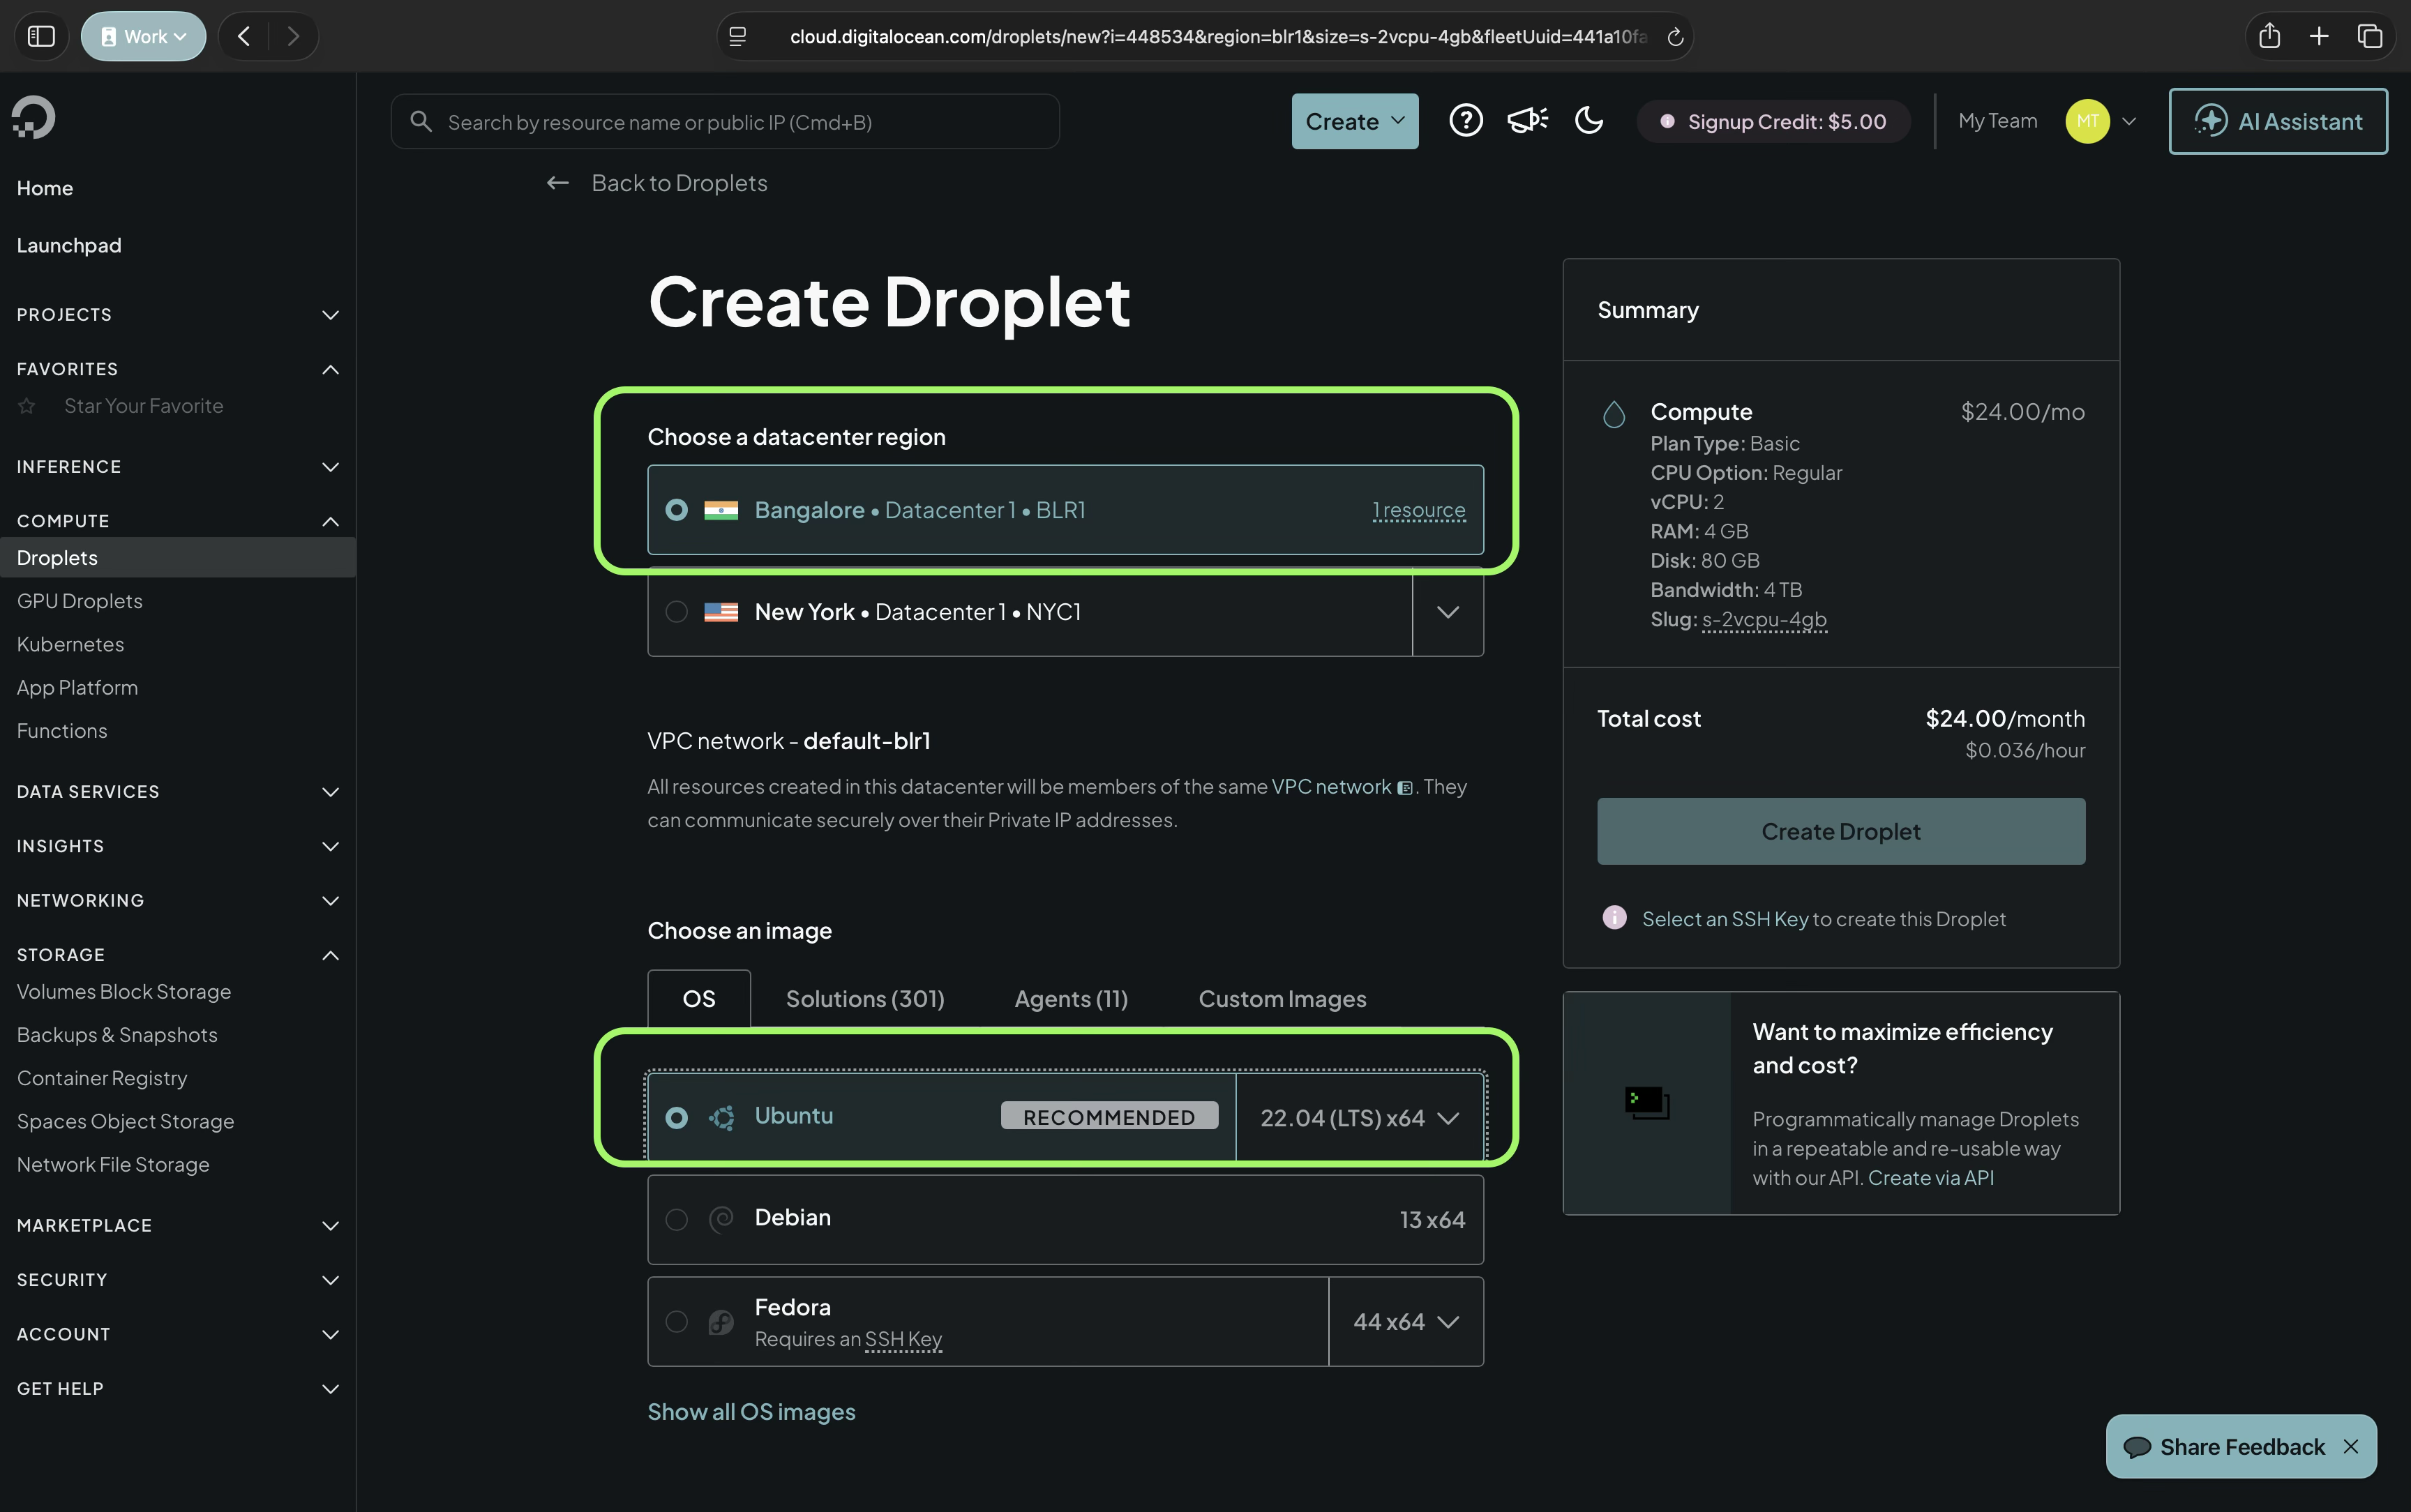
  1. Go fo basic configuration
  2. Choose basic plan. Pick this configuration carefully. It will determine the load that your service can handle.
  1. Under authentication select add keys. You can add as many keys as you want.
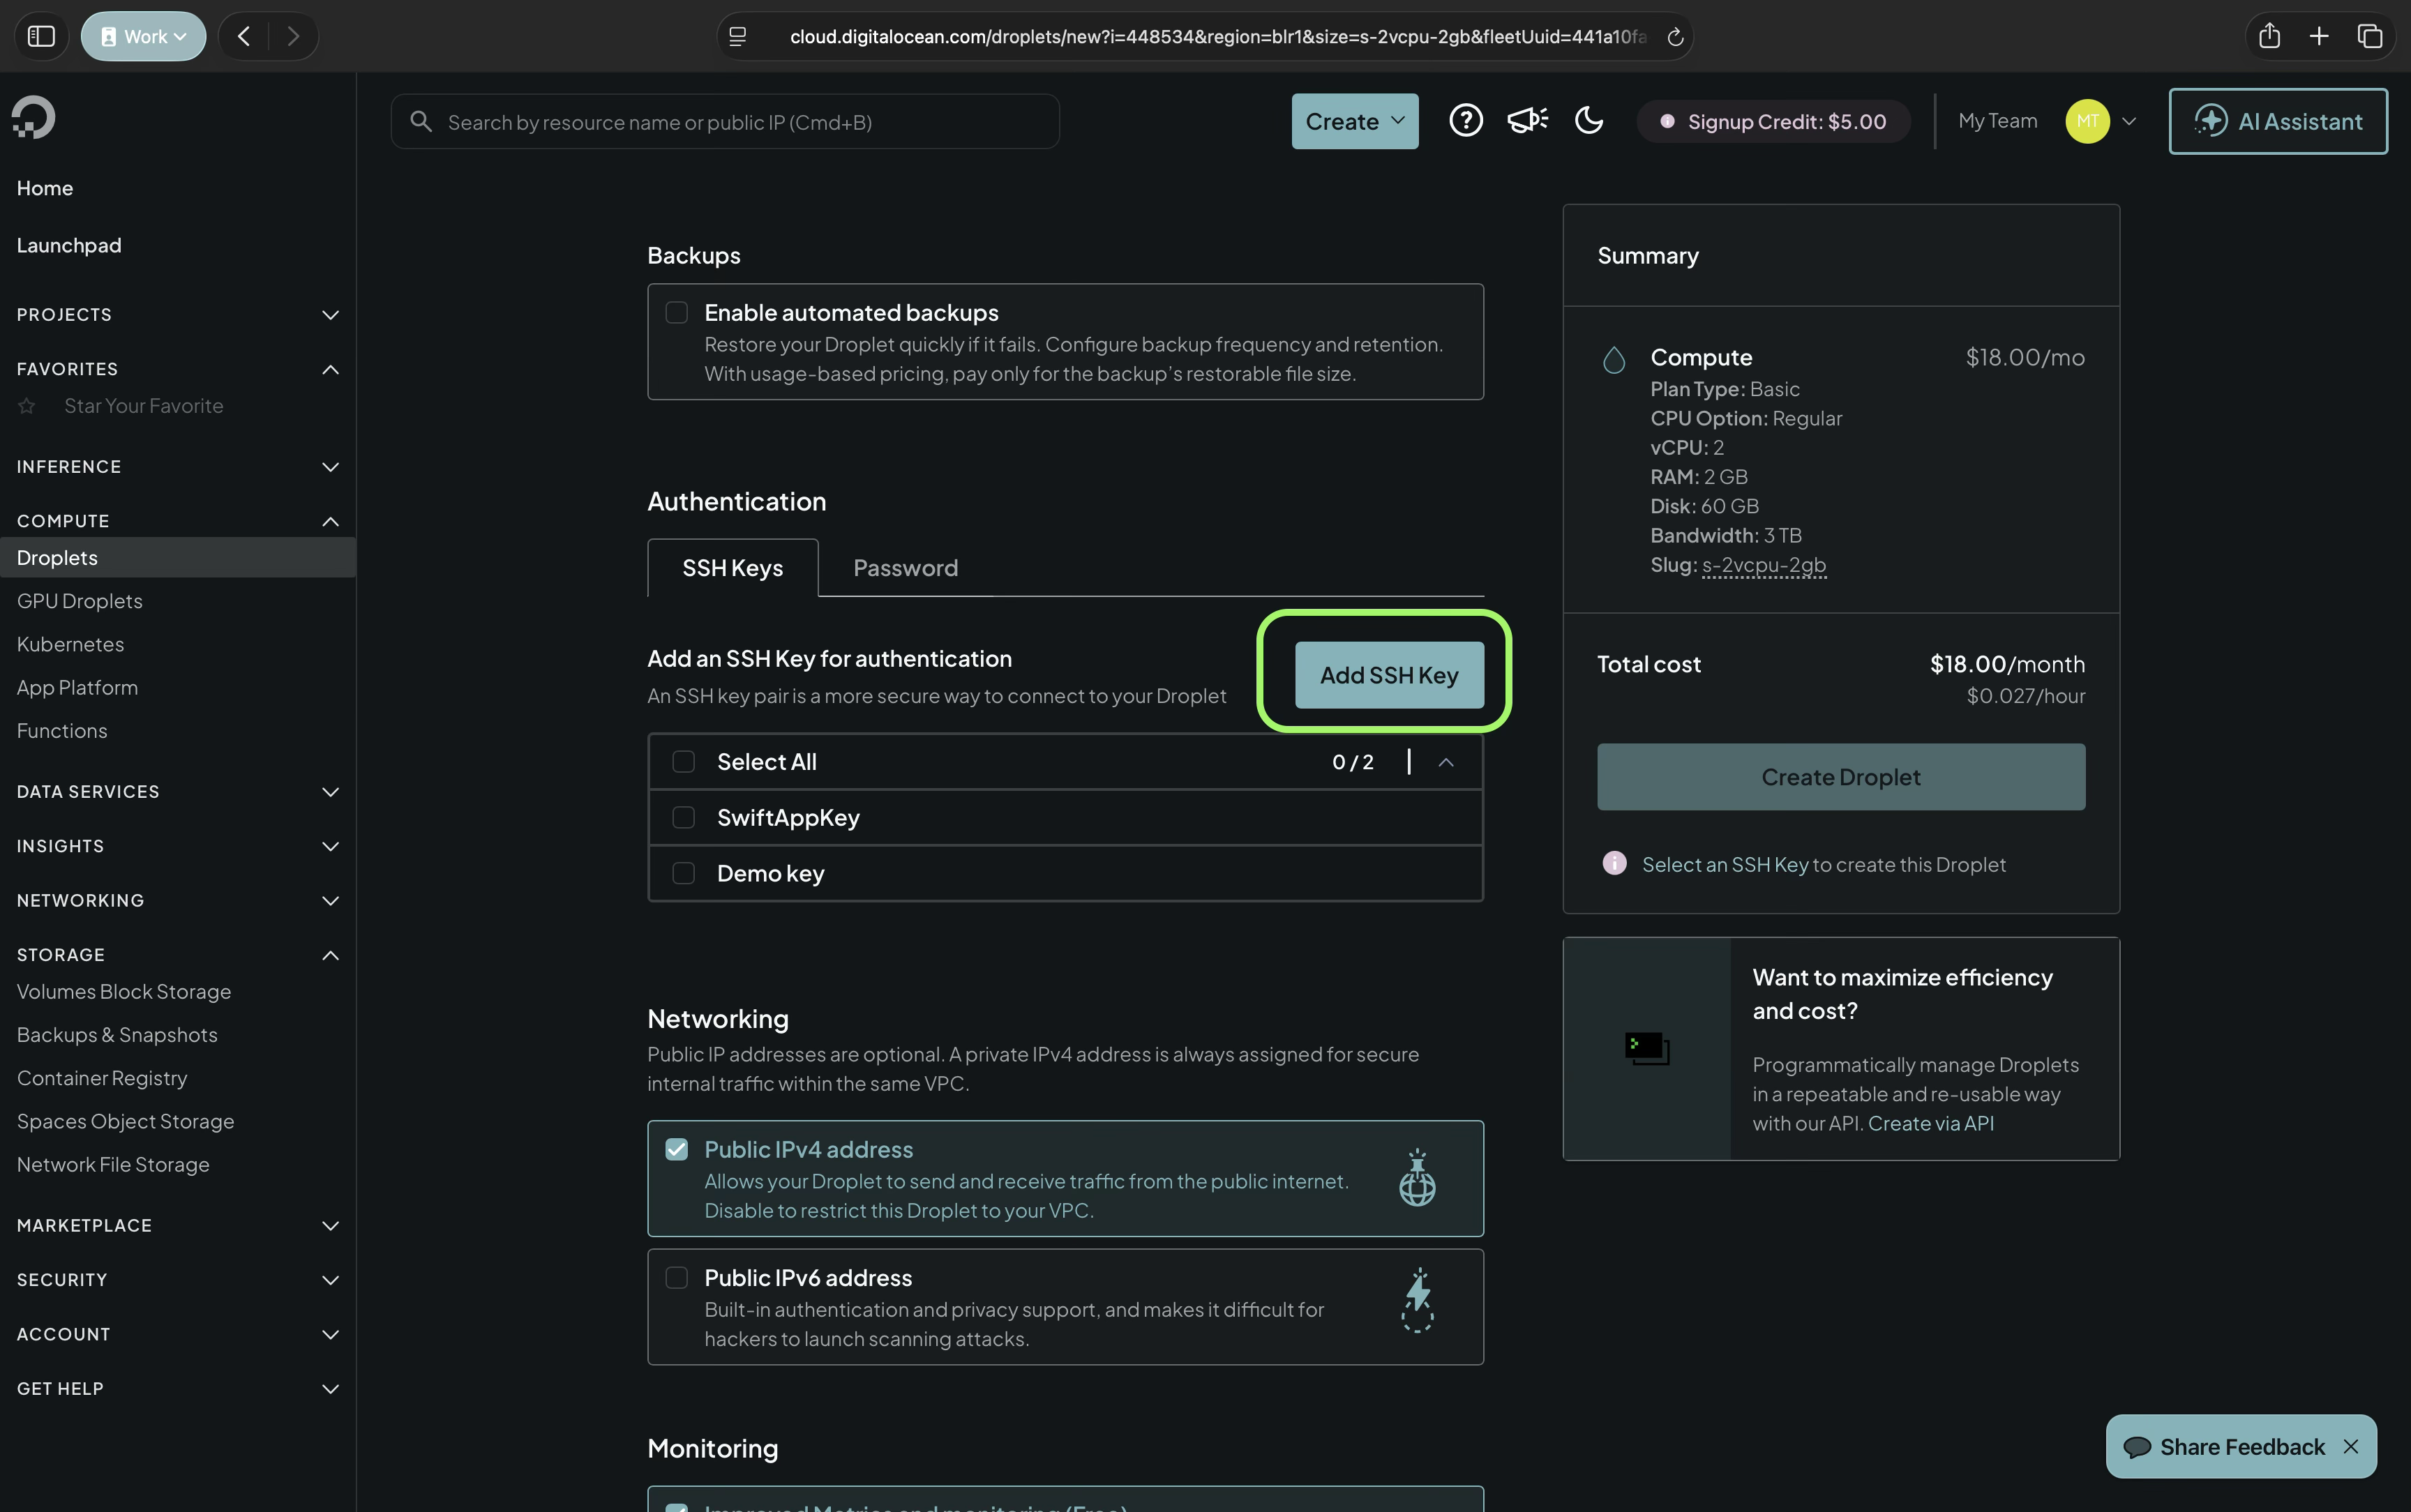
  1. Let us create a key. We will do this from the command line interface of macOS. Switch to terminal.
  2. Navigate to ~/Developer. Create it if it isn’t there already.
  3. Create a hidden folder called .ssh using the command
mkdir .ssh
  1. Navigate inside the hidden folder.
cd .ssh
  1. Create a file named do_id1.txt inside the hidden folder using the command:
touch do_id2.txt


This will hold the key.

  1. Run the command:
ssh-keygen
  1. You will be prompted to enter the path of the file that will hold the key. Enter the path to the hidden folder created in step 11. This will be inside the home folder. Replace ‘demo’ with your home folder name.:
/Users/demo/Developer/.ssh/do_id2.txt
  1. If the file already exists you will be prompted to overwrite. Type yes and press the return key.
  2. You will be prompted to enter a passphrase for your file. Note down this passphrase in a safe place as we will be needing it. Enter a passphrase.
  3. Once done take a screenshot for reference.
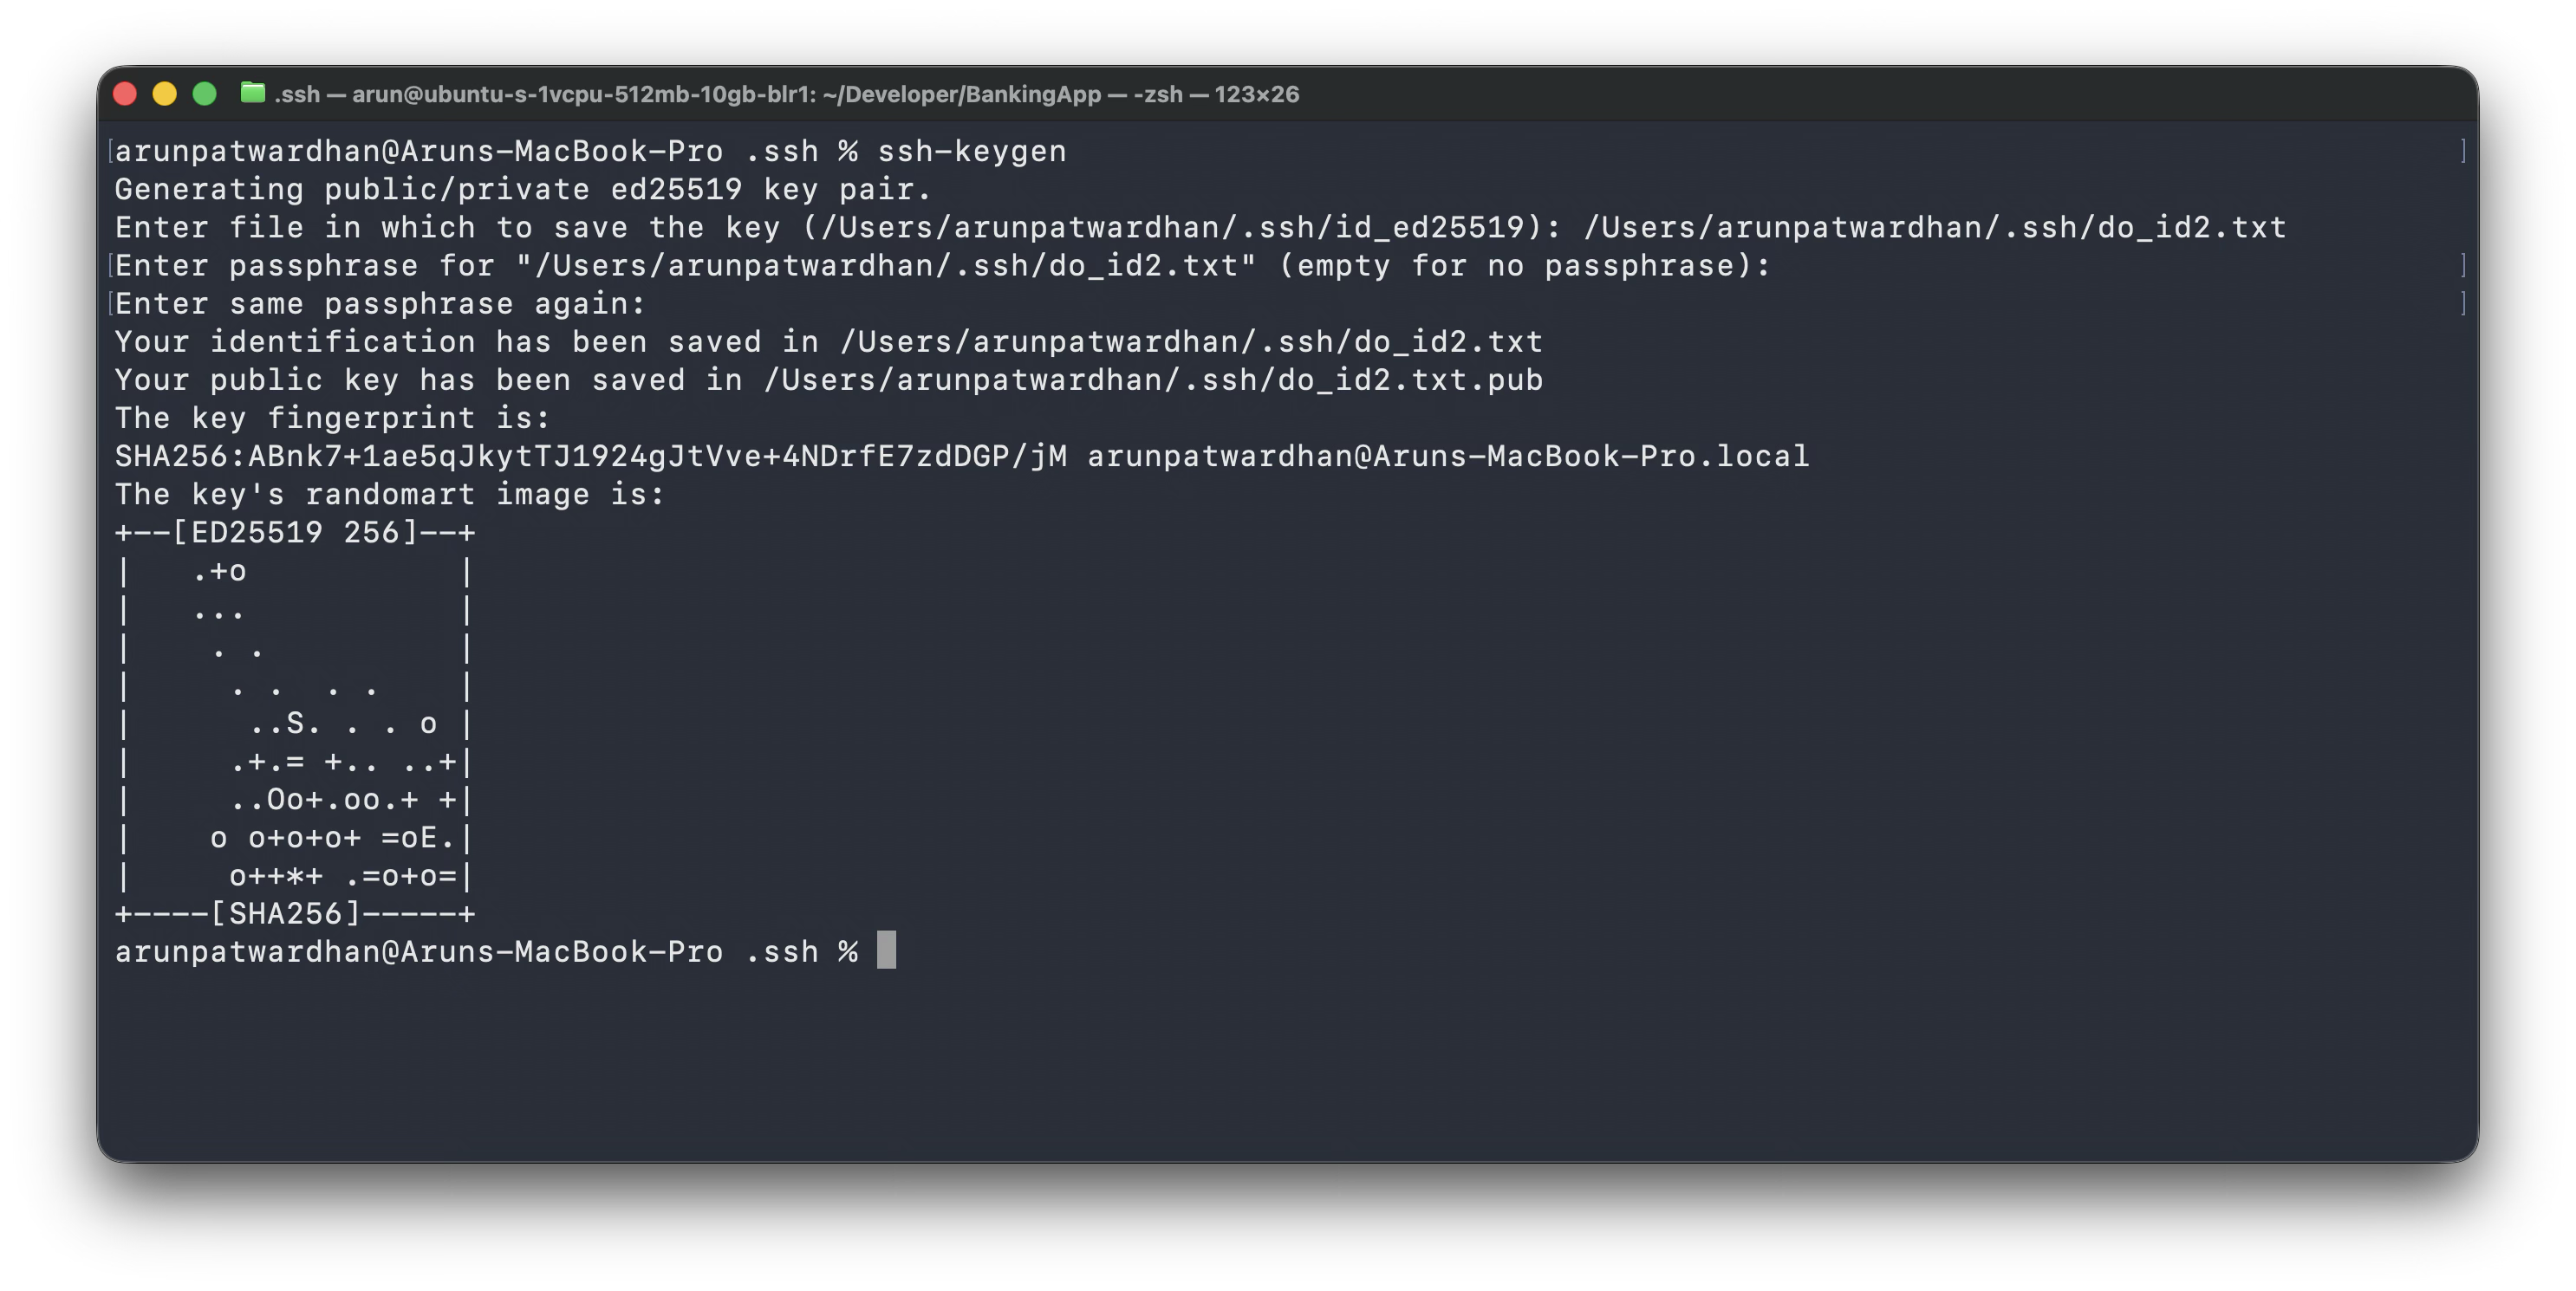
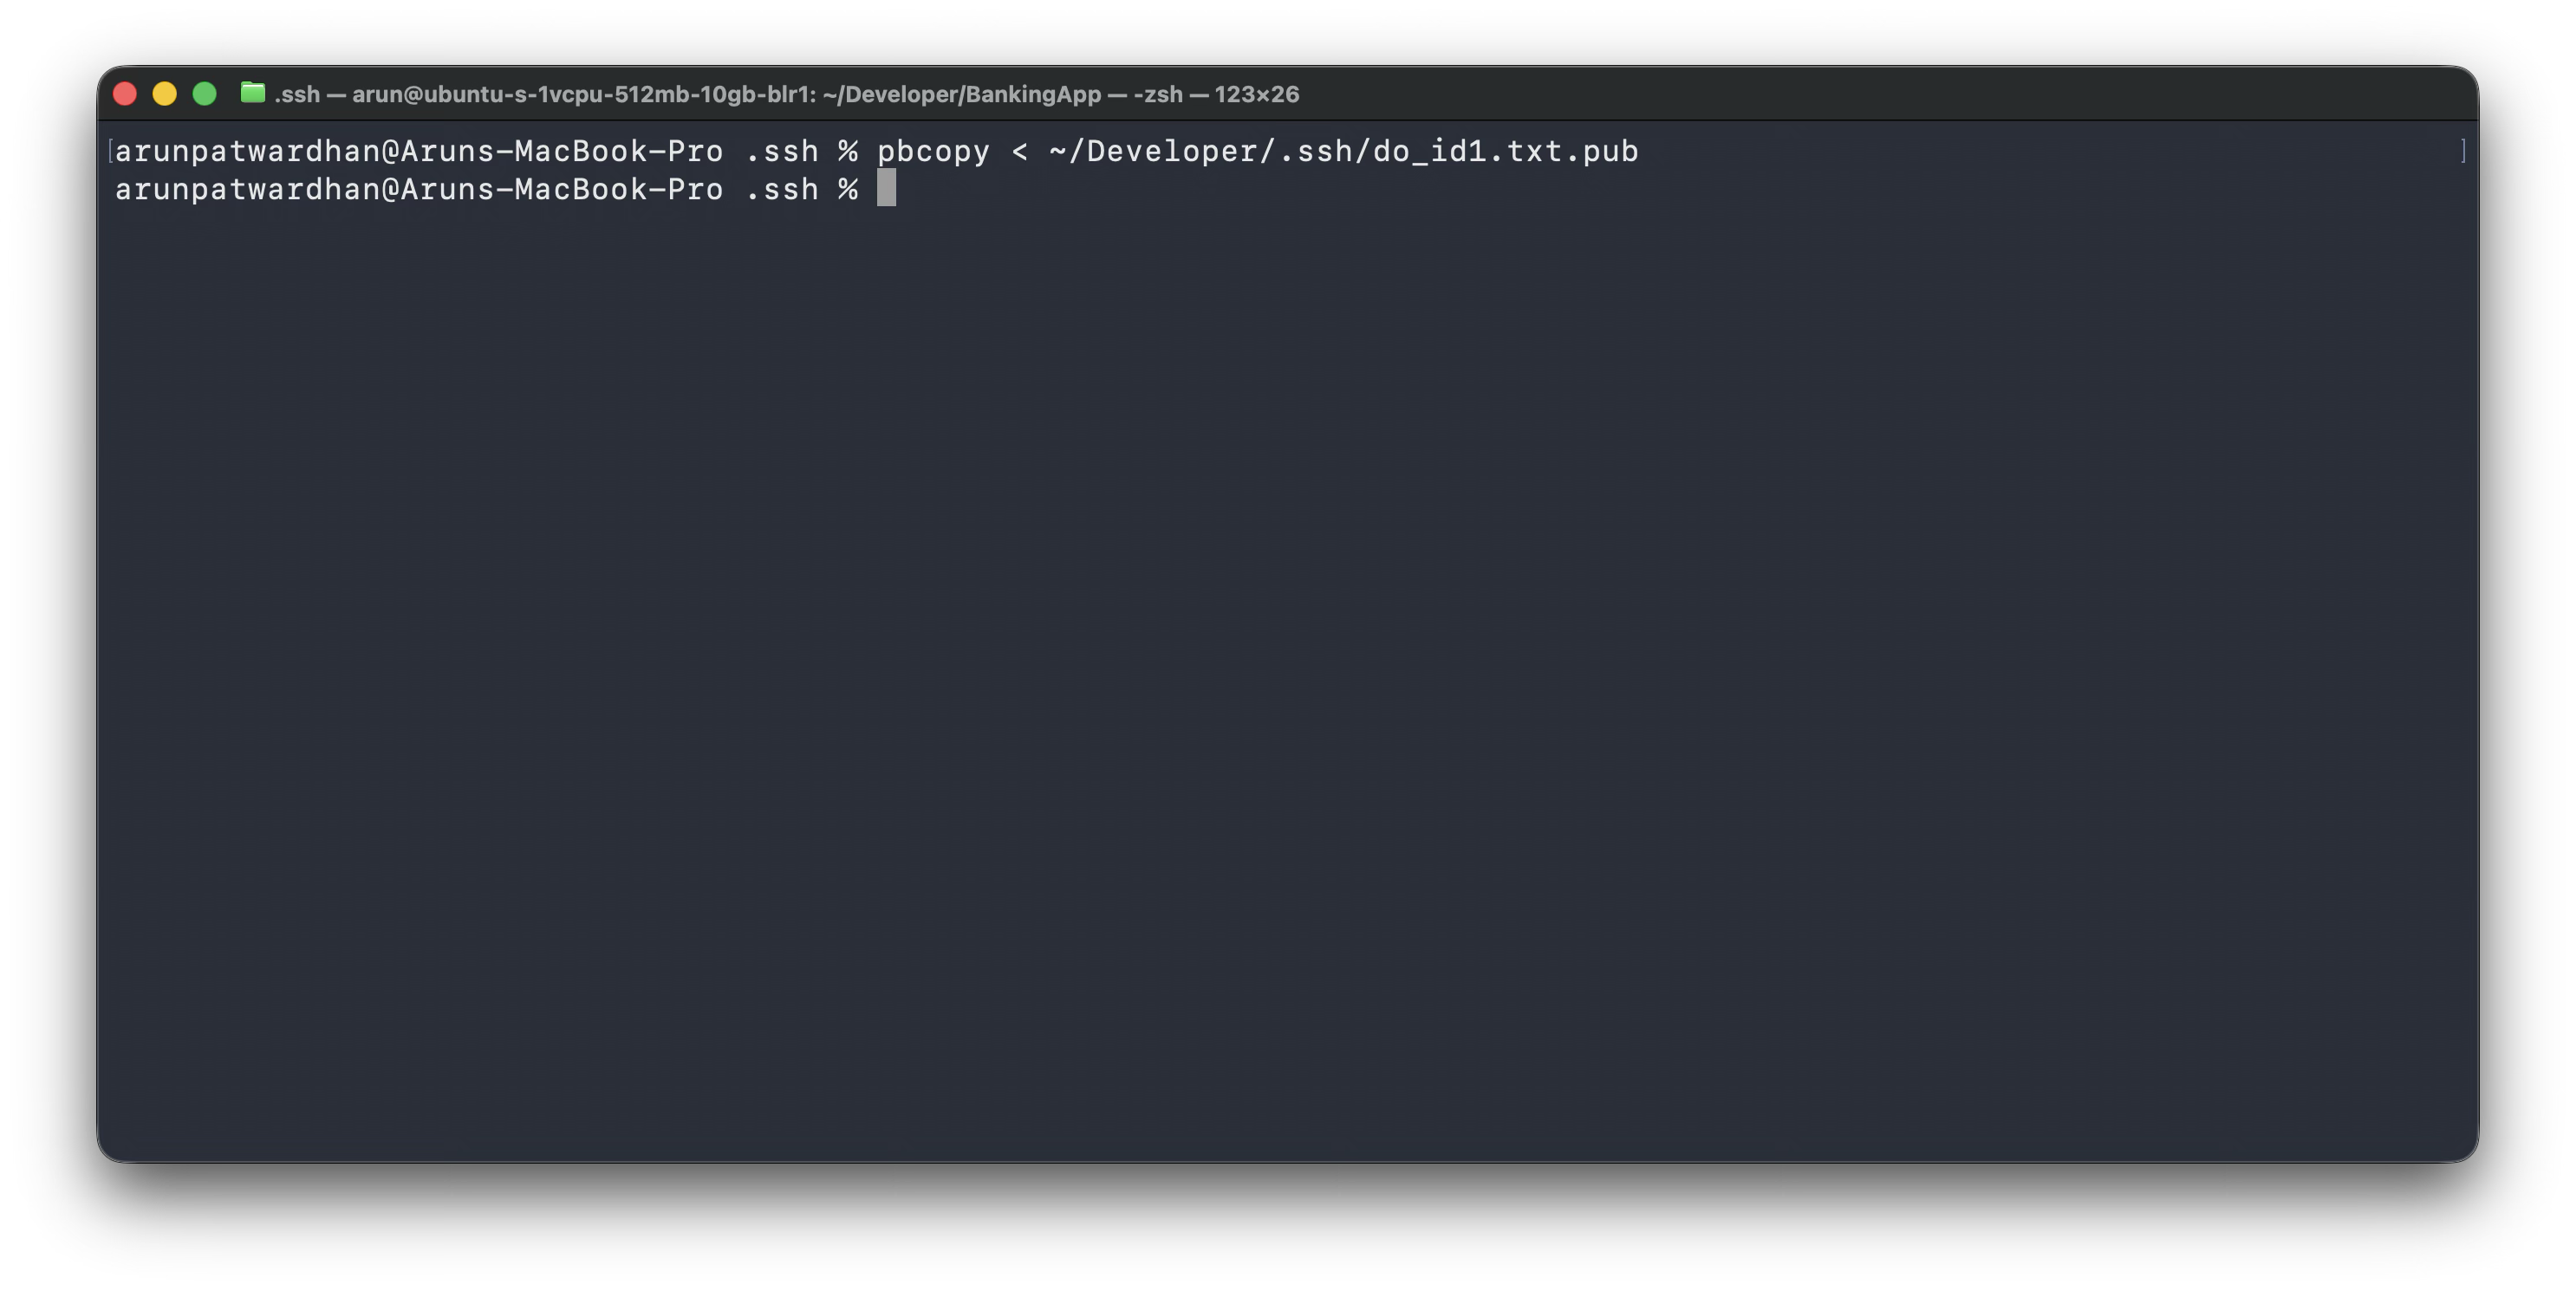
  1. We need to copy the public key and paste it into our DigitalOcean droplet. Run the command
    to copy the public key:
pbcopy < ~/Developer/.ssh/do_id1.txt.pub
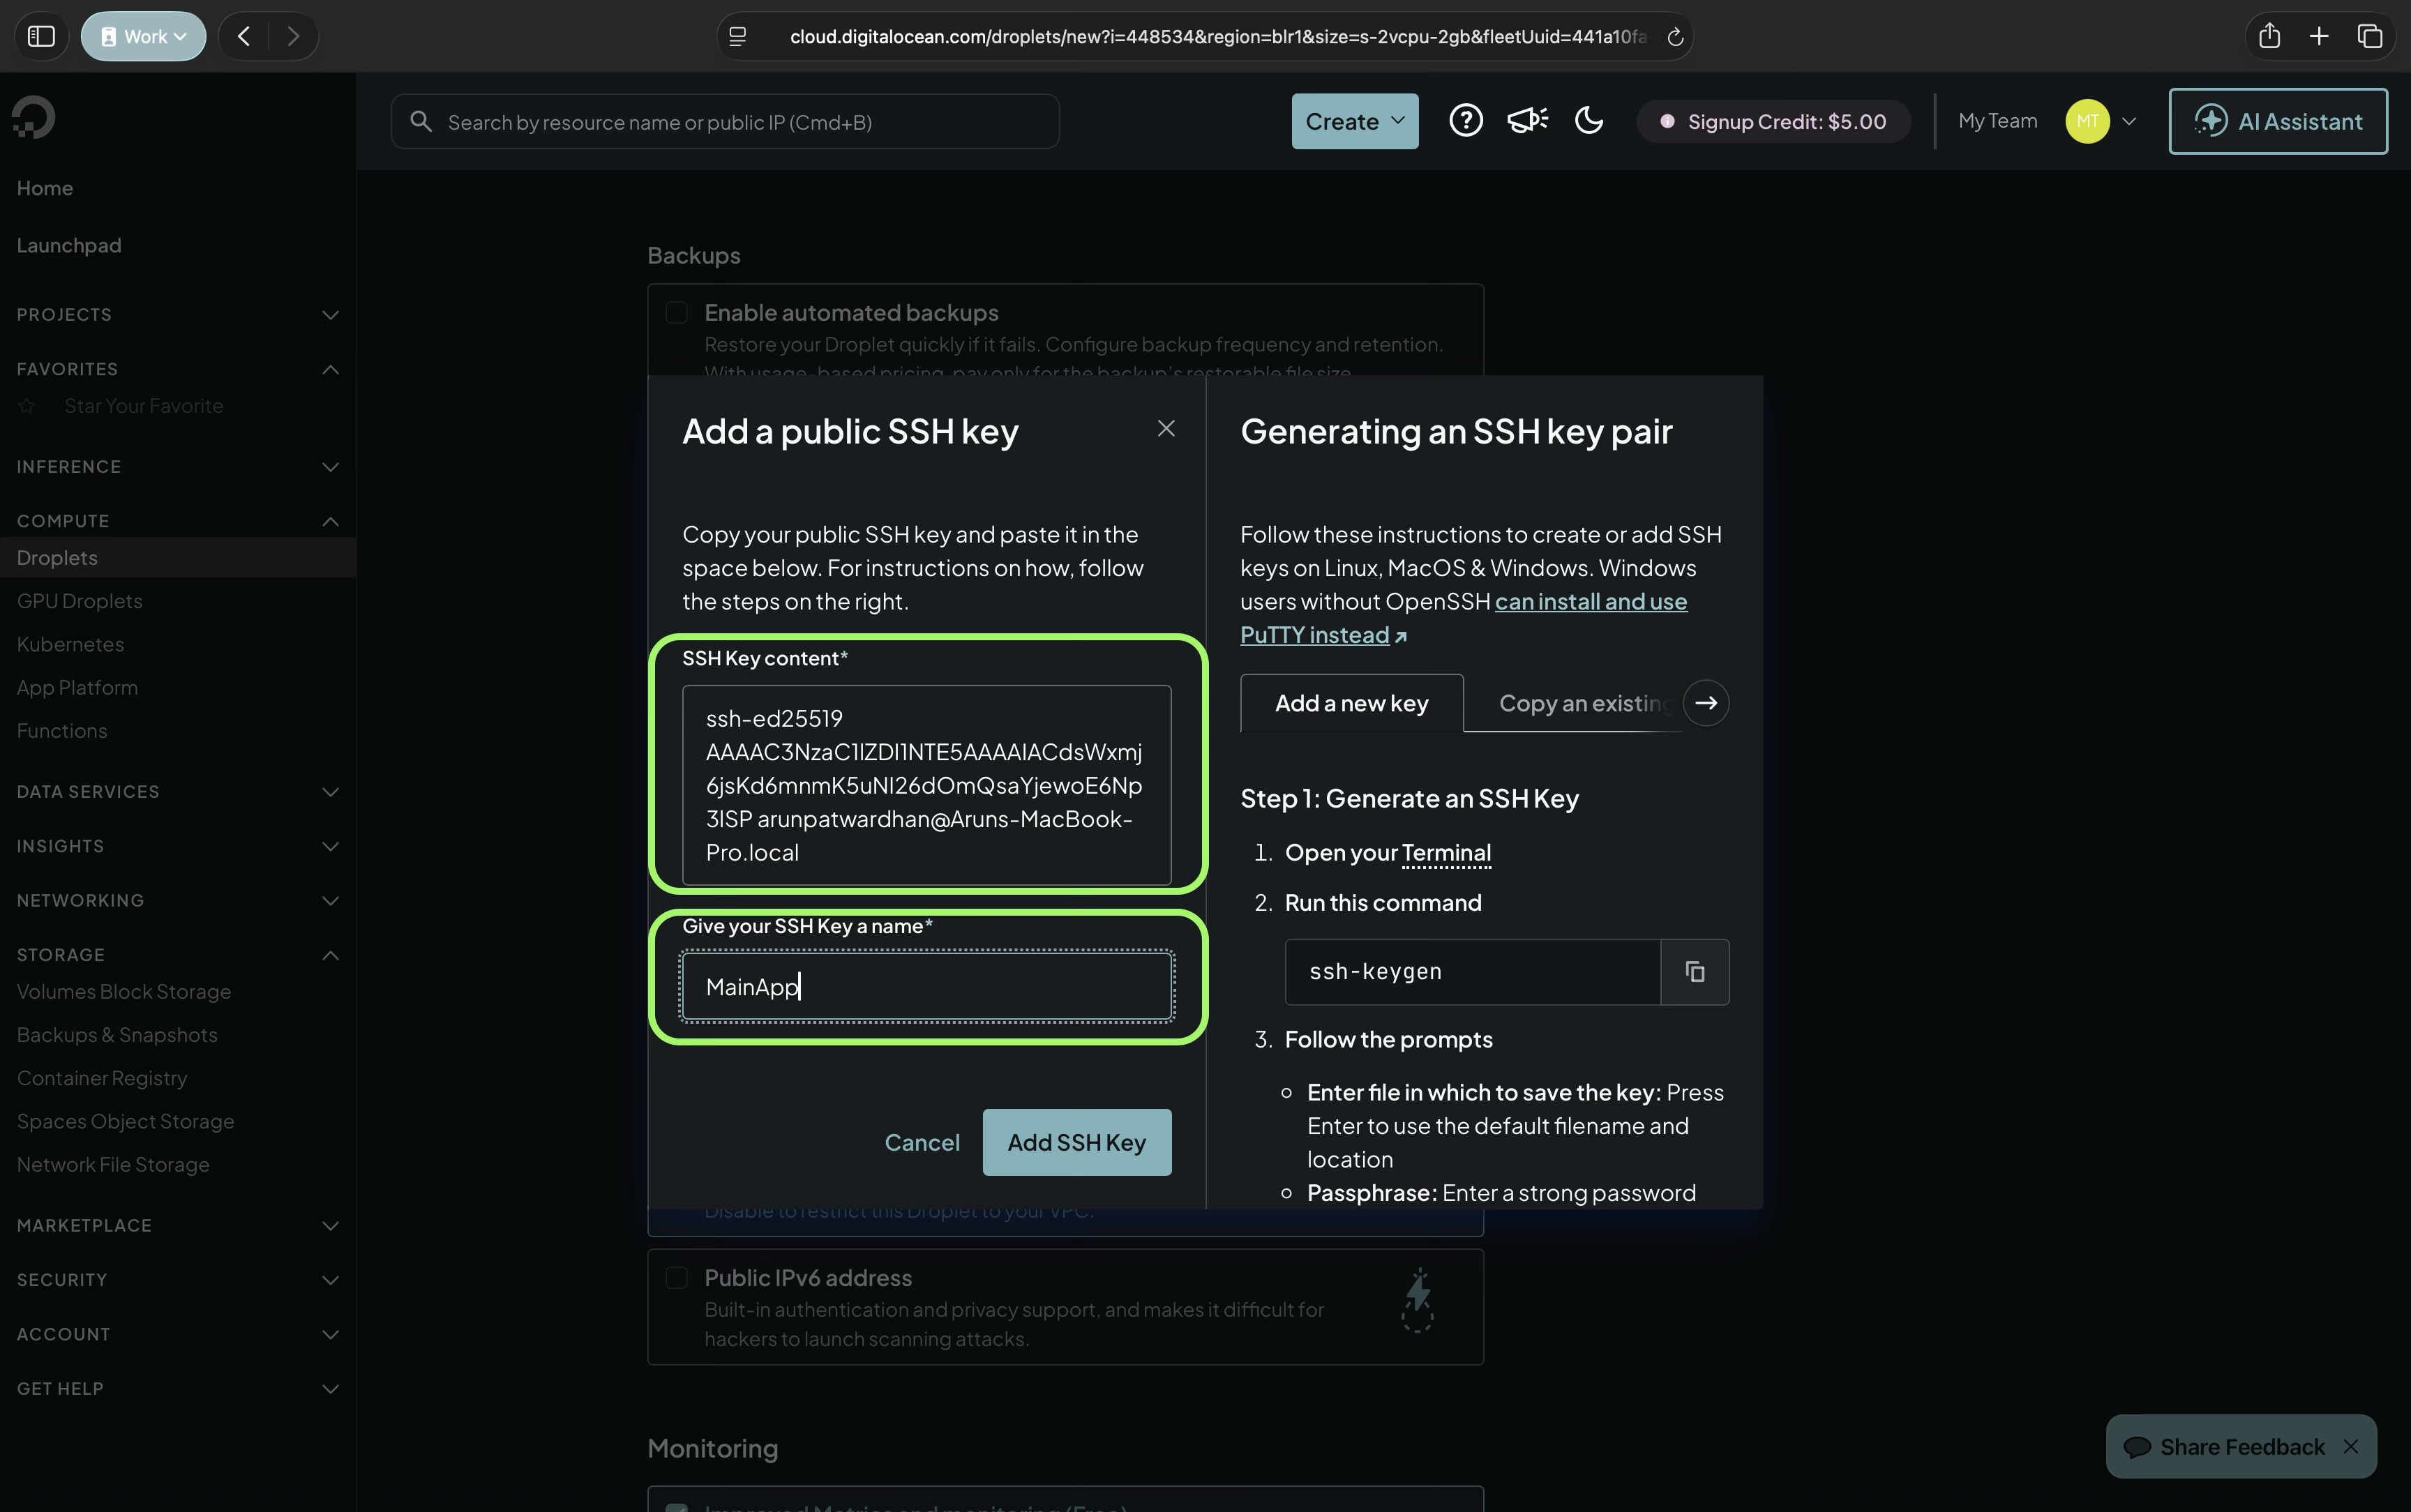
  1. Paste on the DigitalOcean portal.
  2. Give it a name.
  3. Finally click on ‘Add SSH key’.
  1. Select the key and create the droplet.
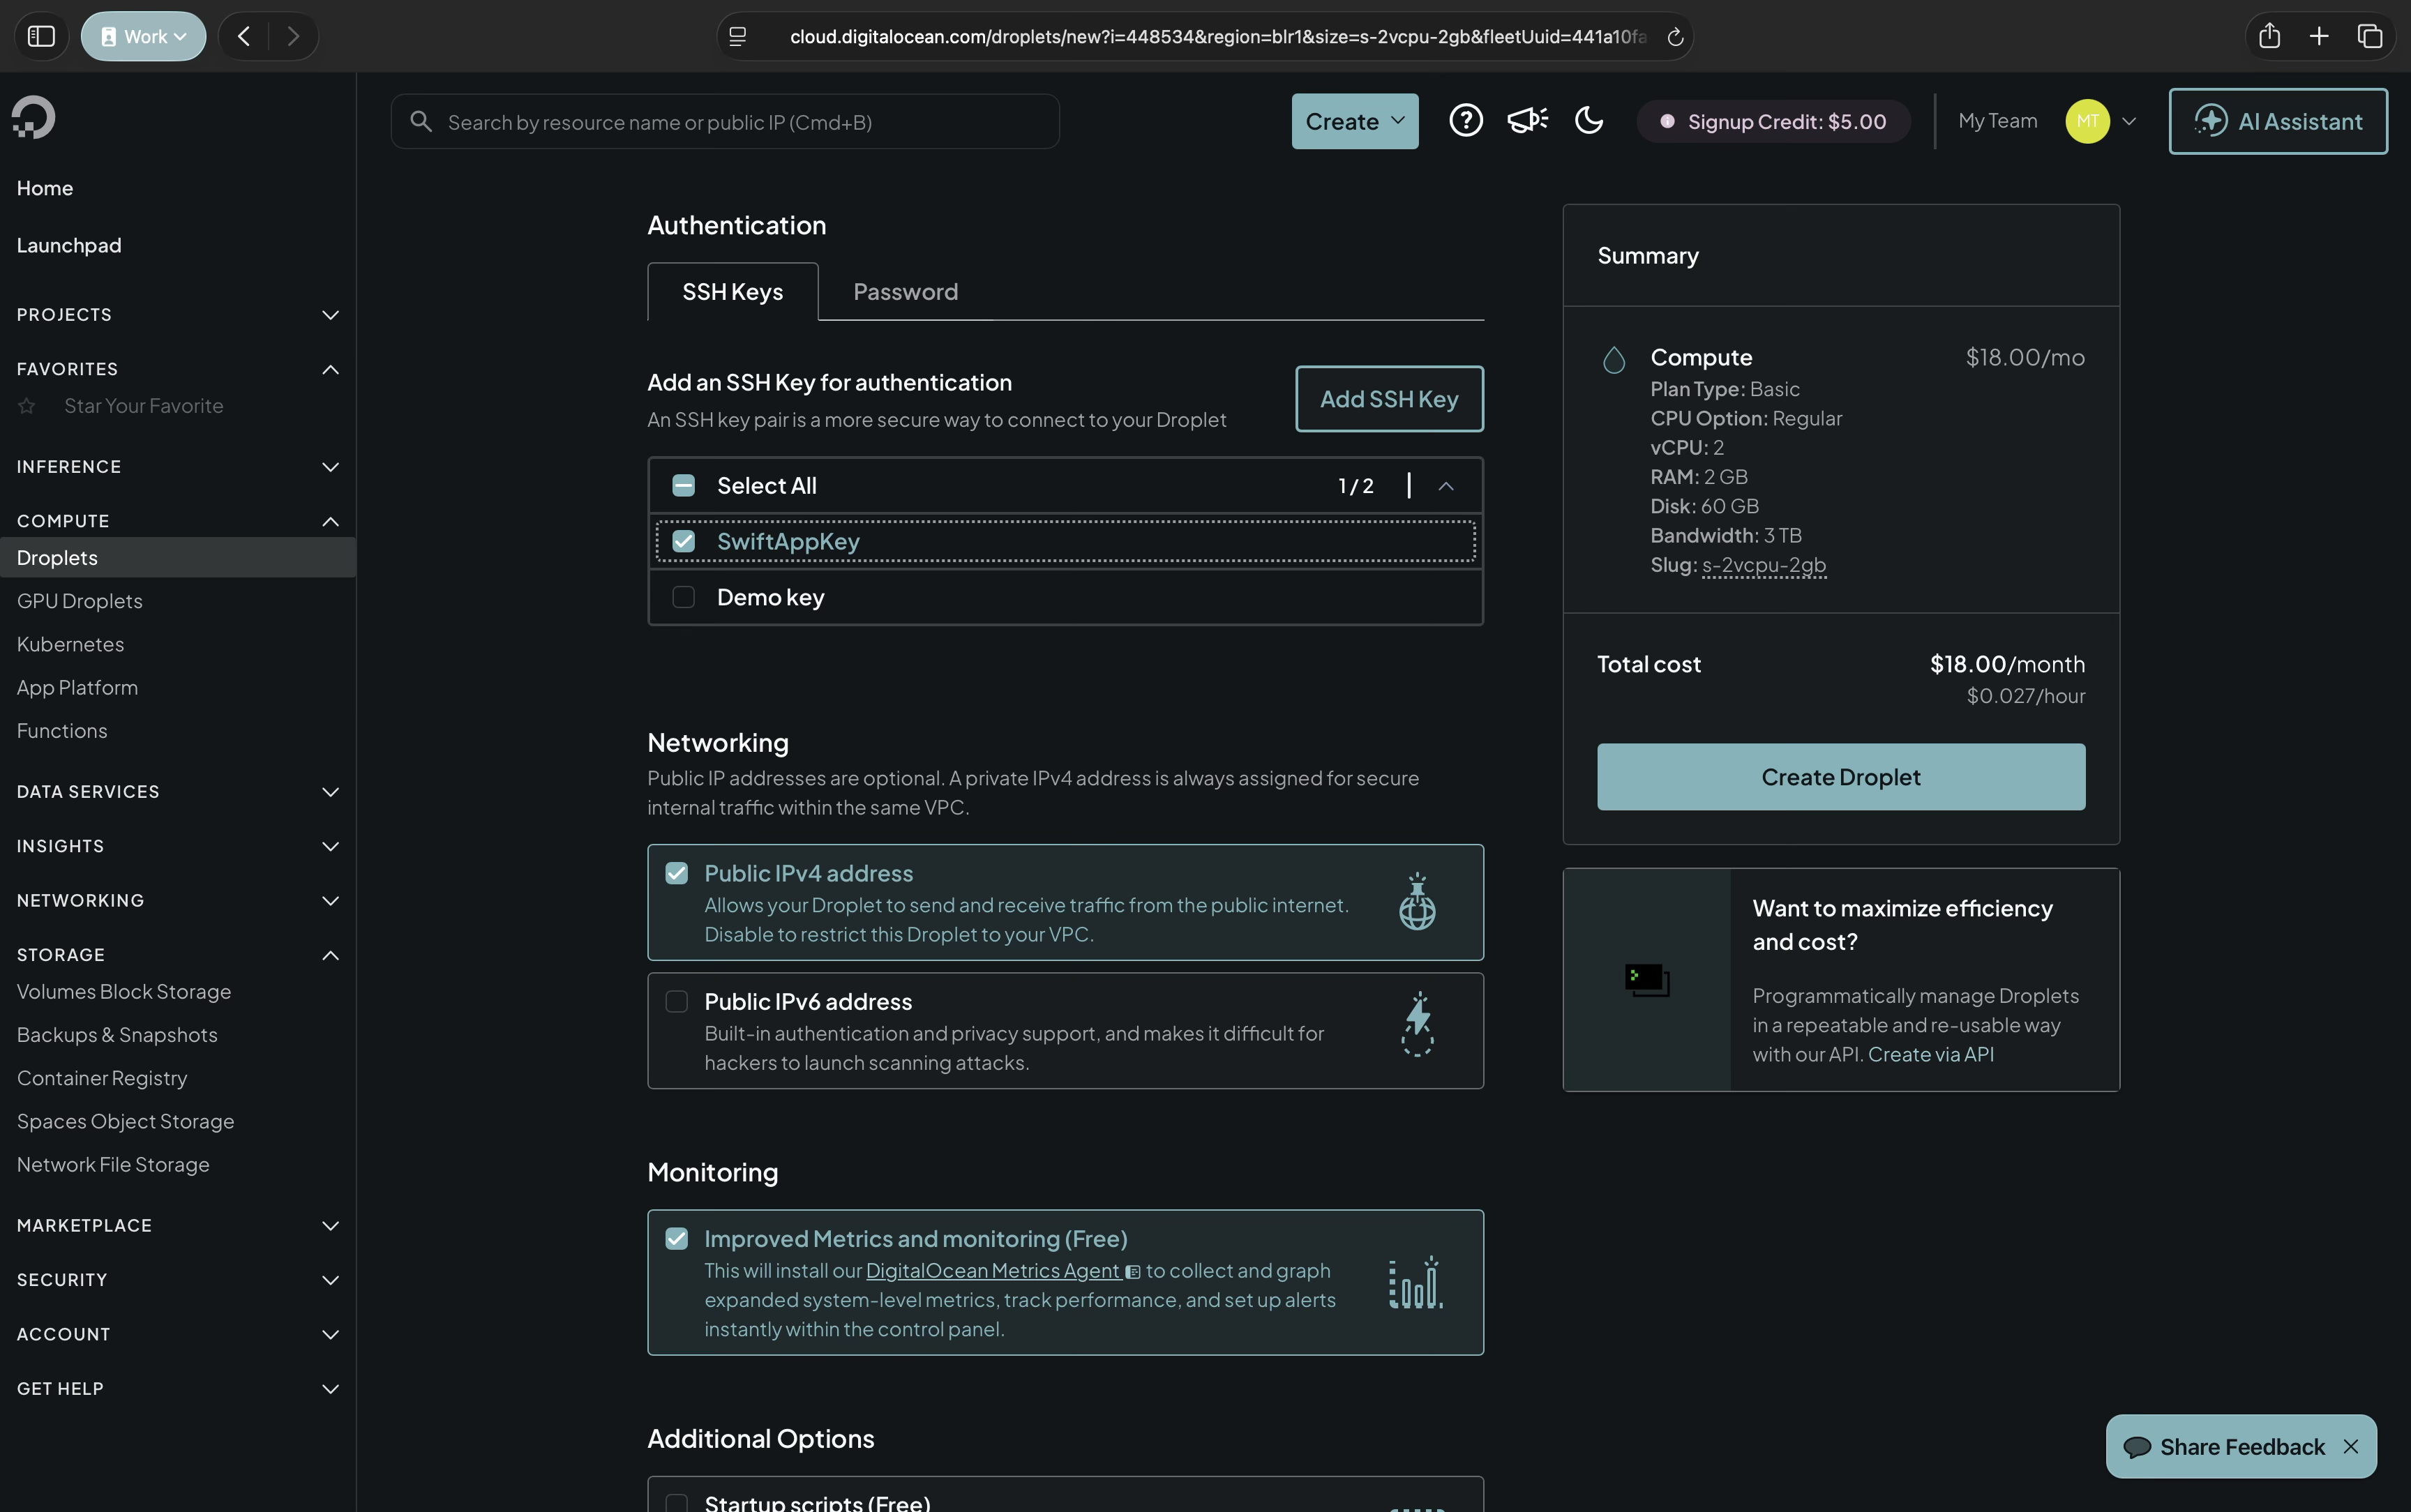
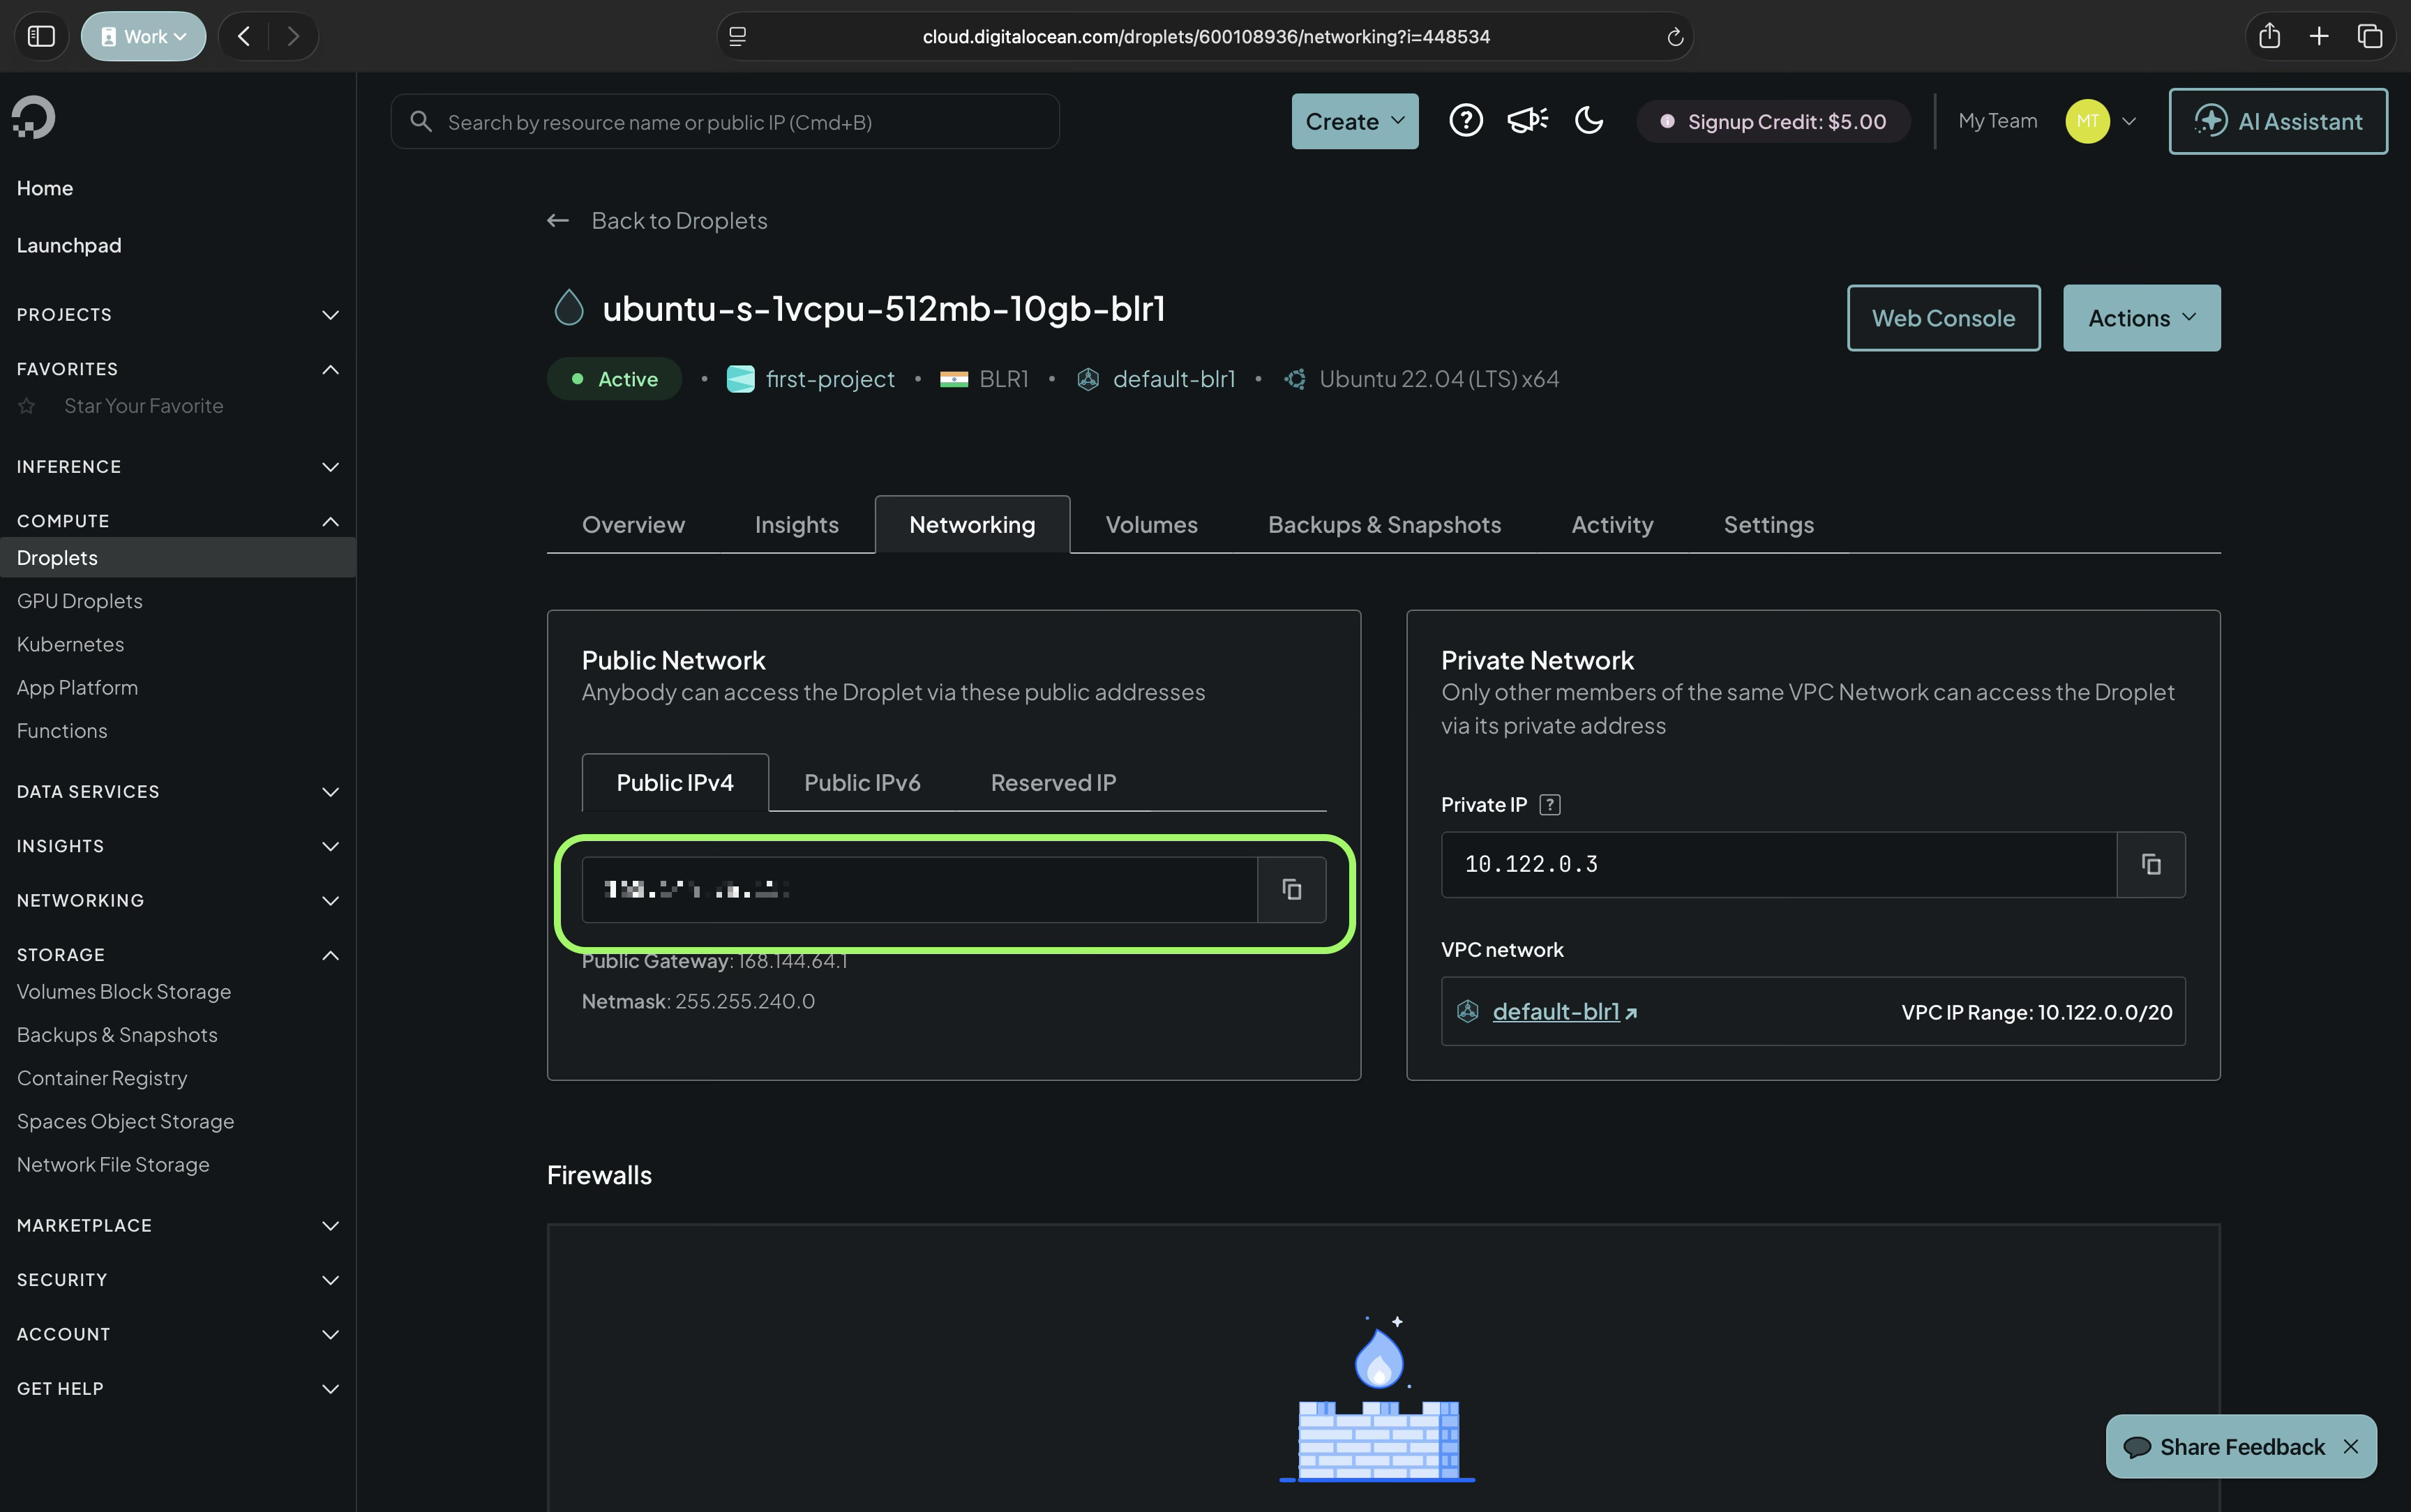
  1. Note down the public ip address.
  1. Now let us log in to our instance using SSH. Switch back to terminal.
  2. Change the permission on the key file to 600:
chmod 600 ~/Developer/.ssh/do_id1.txt
  1. Run the command to login:
ssh -i ~/Developer/.ssh/do_id1.txt root@<ip address> 
  1. Enter the passphrase from step 17
  2. You should have logged in.
  3. Lets create a new account run the command:
adduser arun
  1. Answer the prompts
  2. Add user to sudo group:
usermod -aG sudo arun
  1. Allow OpenSSH through firewall:
ufw allow OpenSSH 
  1. Enable firewall:
ufw enable
  1. Copy the keys from root user to our newly created user:
rsync --archive --chown=arun:arun ~/.ssh /home/arun
  1. Setup done.
  2. Now we will install Swift
  3. Run the command to install Swiftly:
curl -O https://download.swift.org/swiftly/linux/swiftly-$(uname -m).tar.gz && \
tar zxf swiftly-$(uname -m).tar.gz && \
./swiftly init --quiet-shell-followup && \
. "${SWIFTLY_HOME_DIR:-$HOME/.local/share/swiftly}/env.sh" && \
hash -r
  1. Install Vapor we will do this by building from source.:
git clone https://github.com/vapor/toolbox.git
cd toolbox
git checkout 20.0.2
  1. Build Vapor and move the binary into your path.
make install DEST=/usr/local/bin/vapor
  1. Navigate to the folder where you wish to create the project. ~/Developer is a popular location. The rest of the activities assume that the project was created in the Developer folder. However, you can create it in any other location.
  2. Once you are in the desired folder run the vapor tool to create the server project
vapor new <server app name> -n
  1. This will create the server as a Swift Package. Navigate into the project folder. The folder name will be the same as the server app name mentioned in the command above.
  2. Open port 8080 or 443 depending on what you are configuring:
sudo ufw allow 8080
  1. Run the server using the command:
swift run App serve --hostname 0.0.0.0 --port 8080

Our server is ready to host.

Transfering files to our Droplet

In most situations we wll have developed our server on a Mac. We will wish to transfer these files to the Droplet. Let us look at the steps involved in this.

  1. Download and install FileZilla on the computer from where you want to transfer the files. https://filezilla-project.org/download.php?platform=macos-arm64
  2. Open FileZilla
  3. Go to Settings > Connection > SFTP and upload the key txt file.
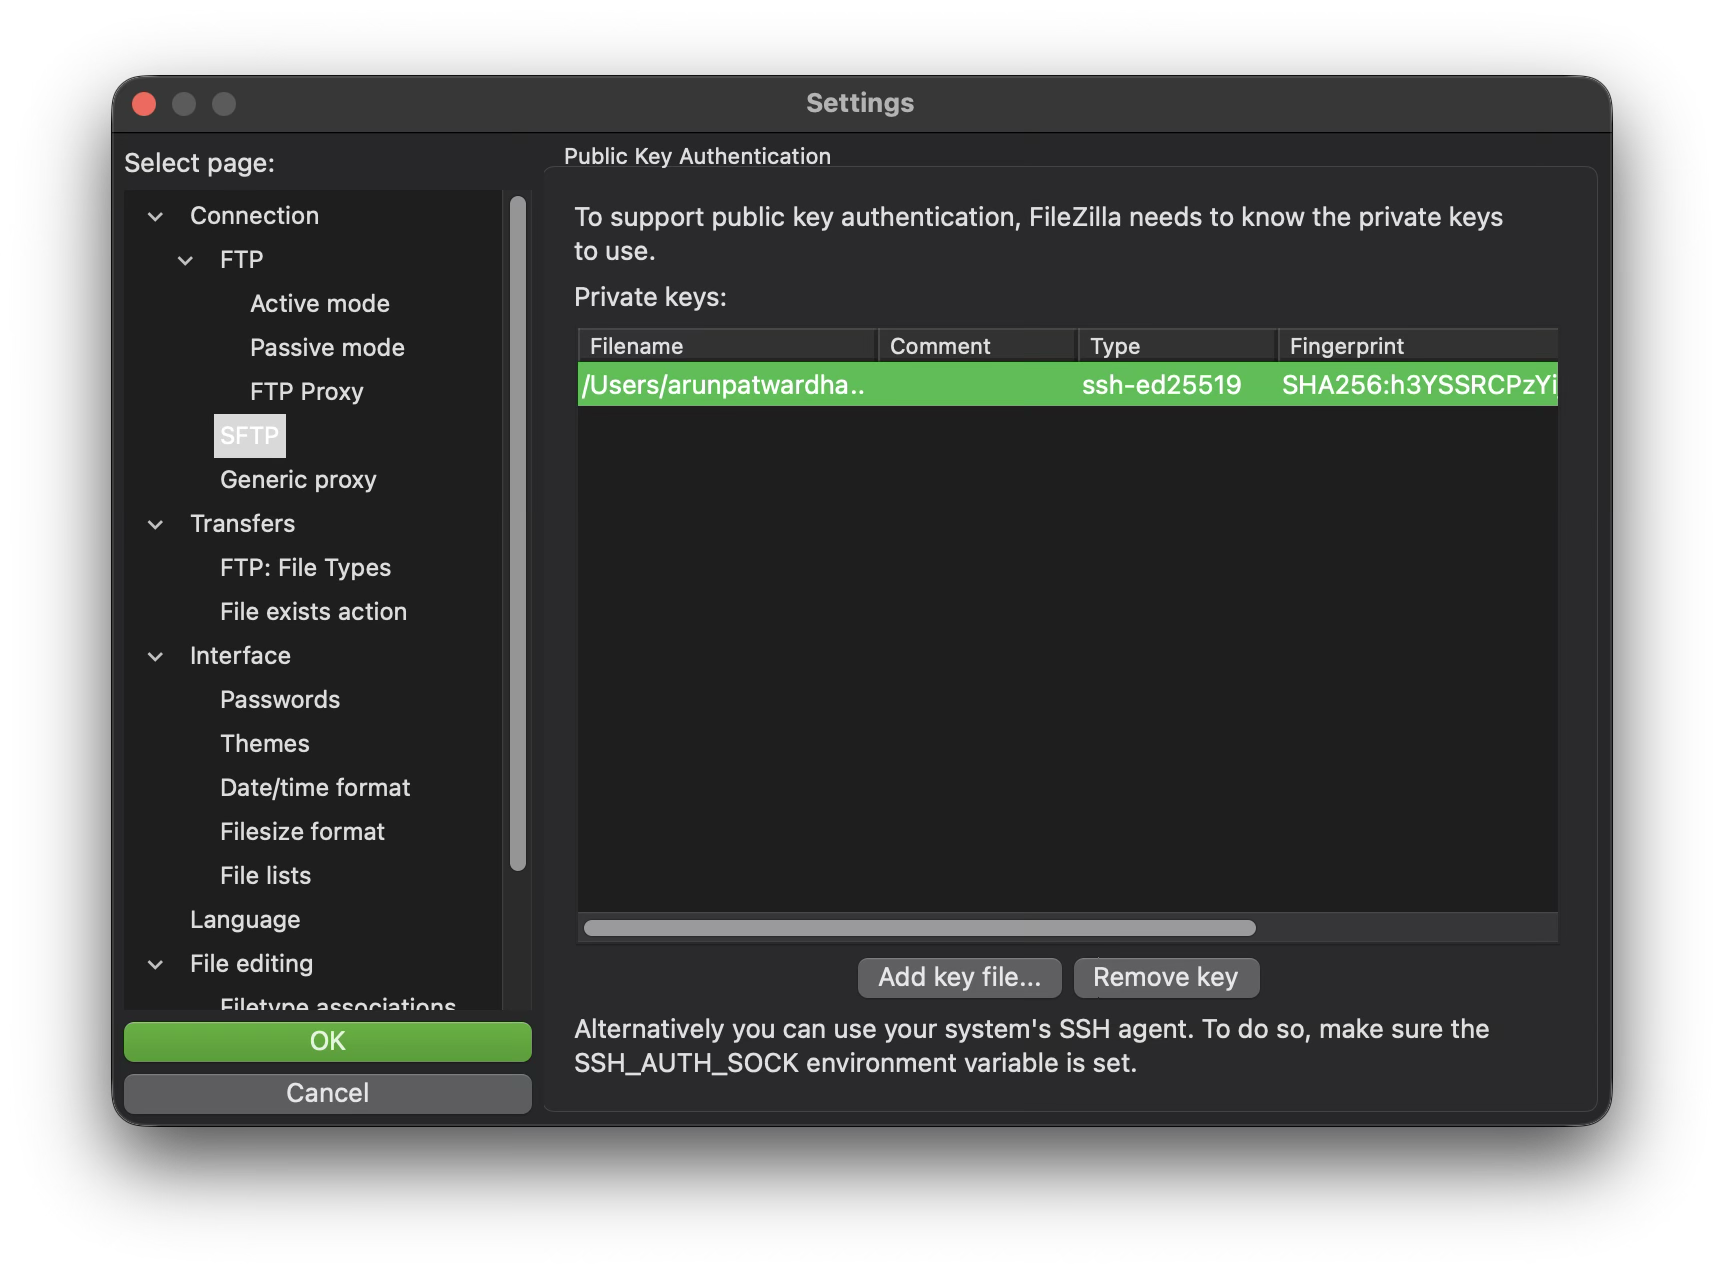
  1. Click ok.
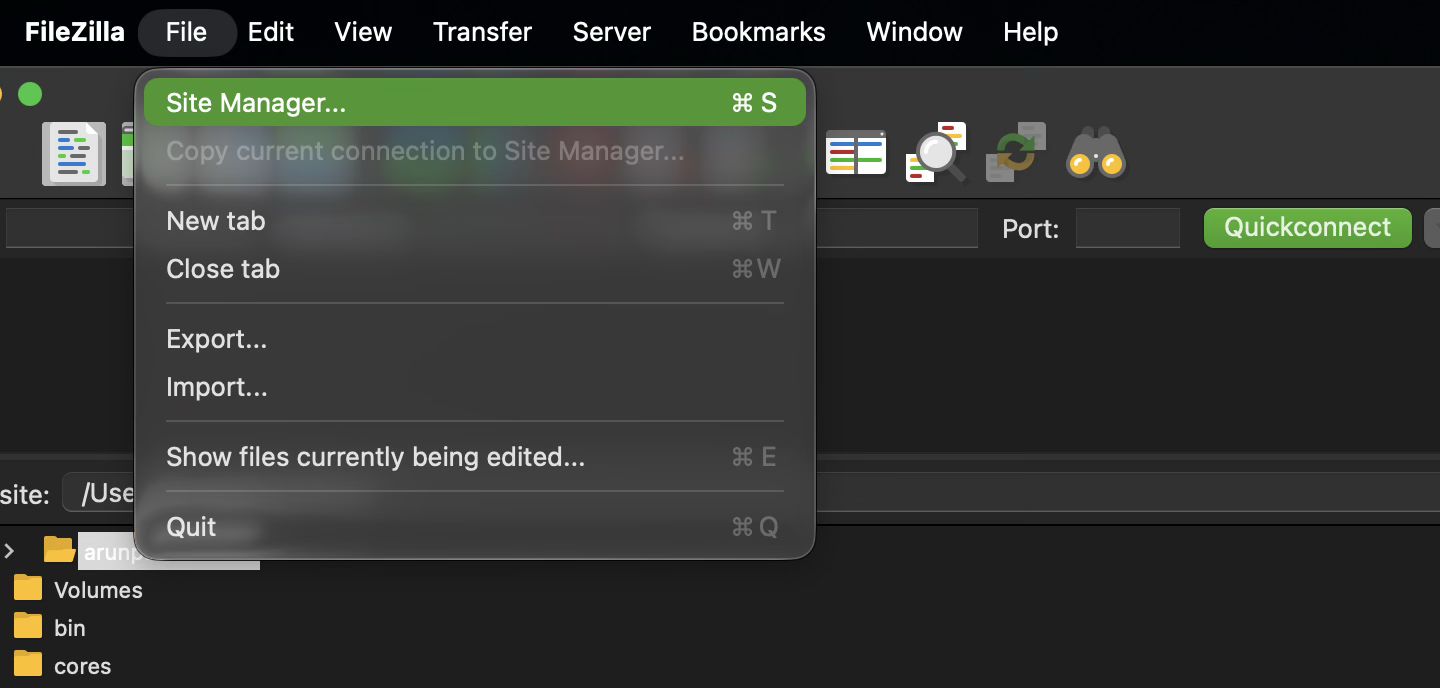
  2. Open Site manager.
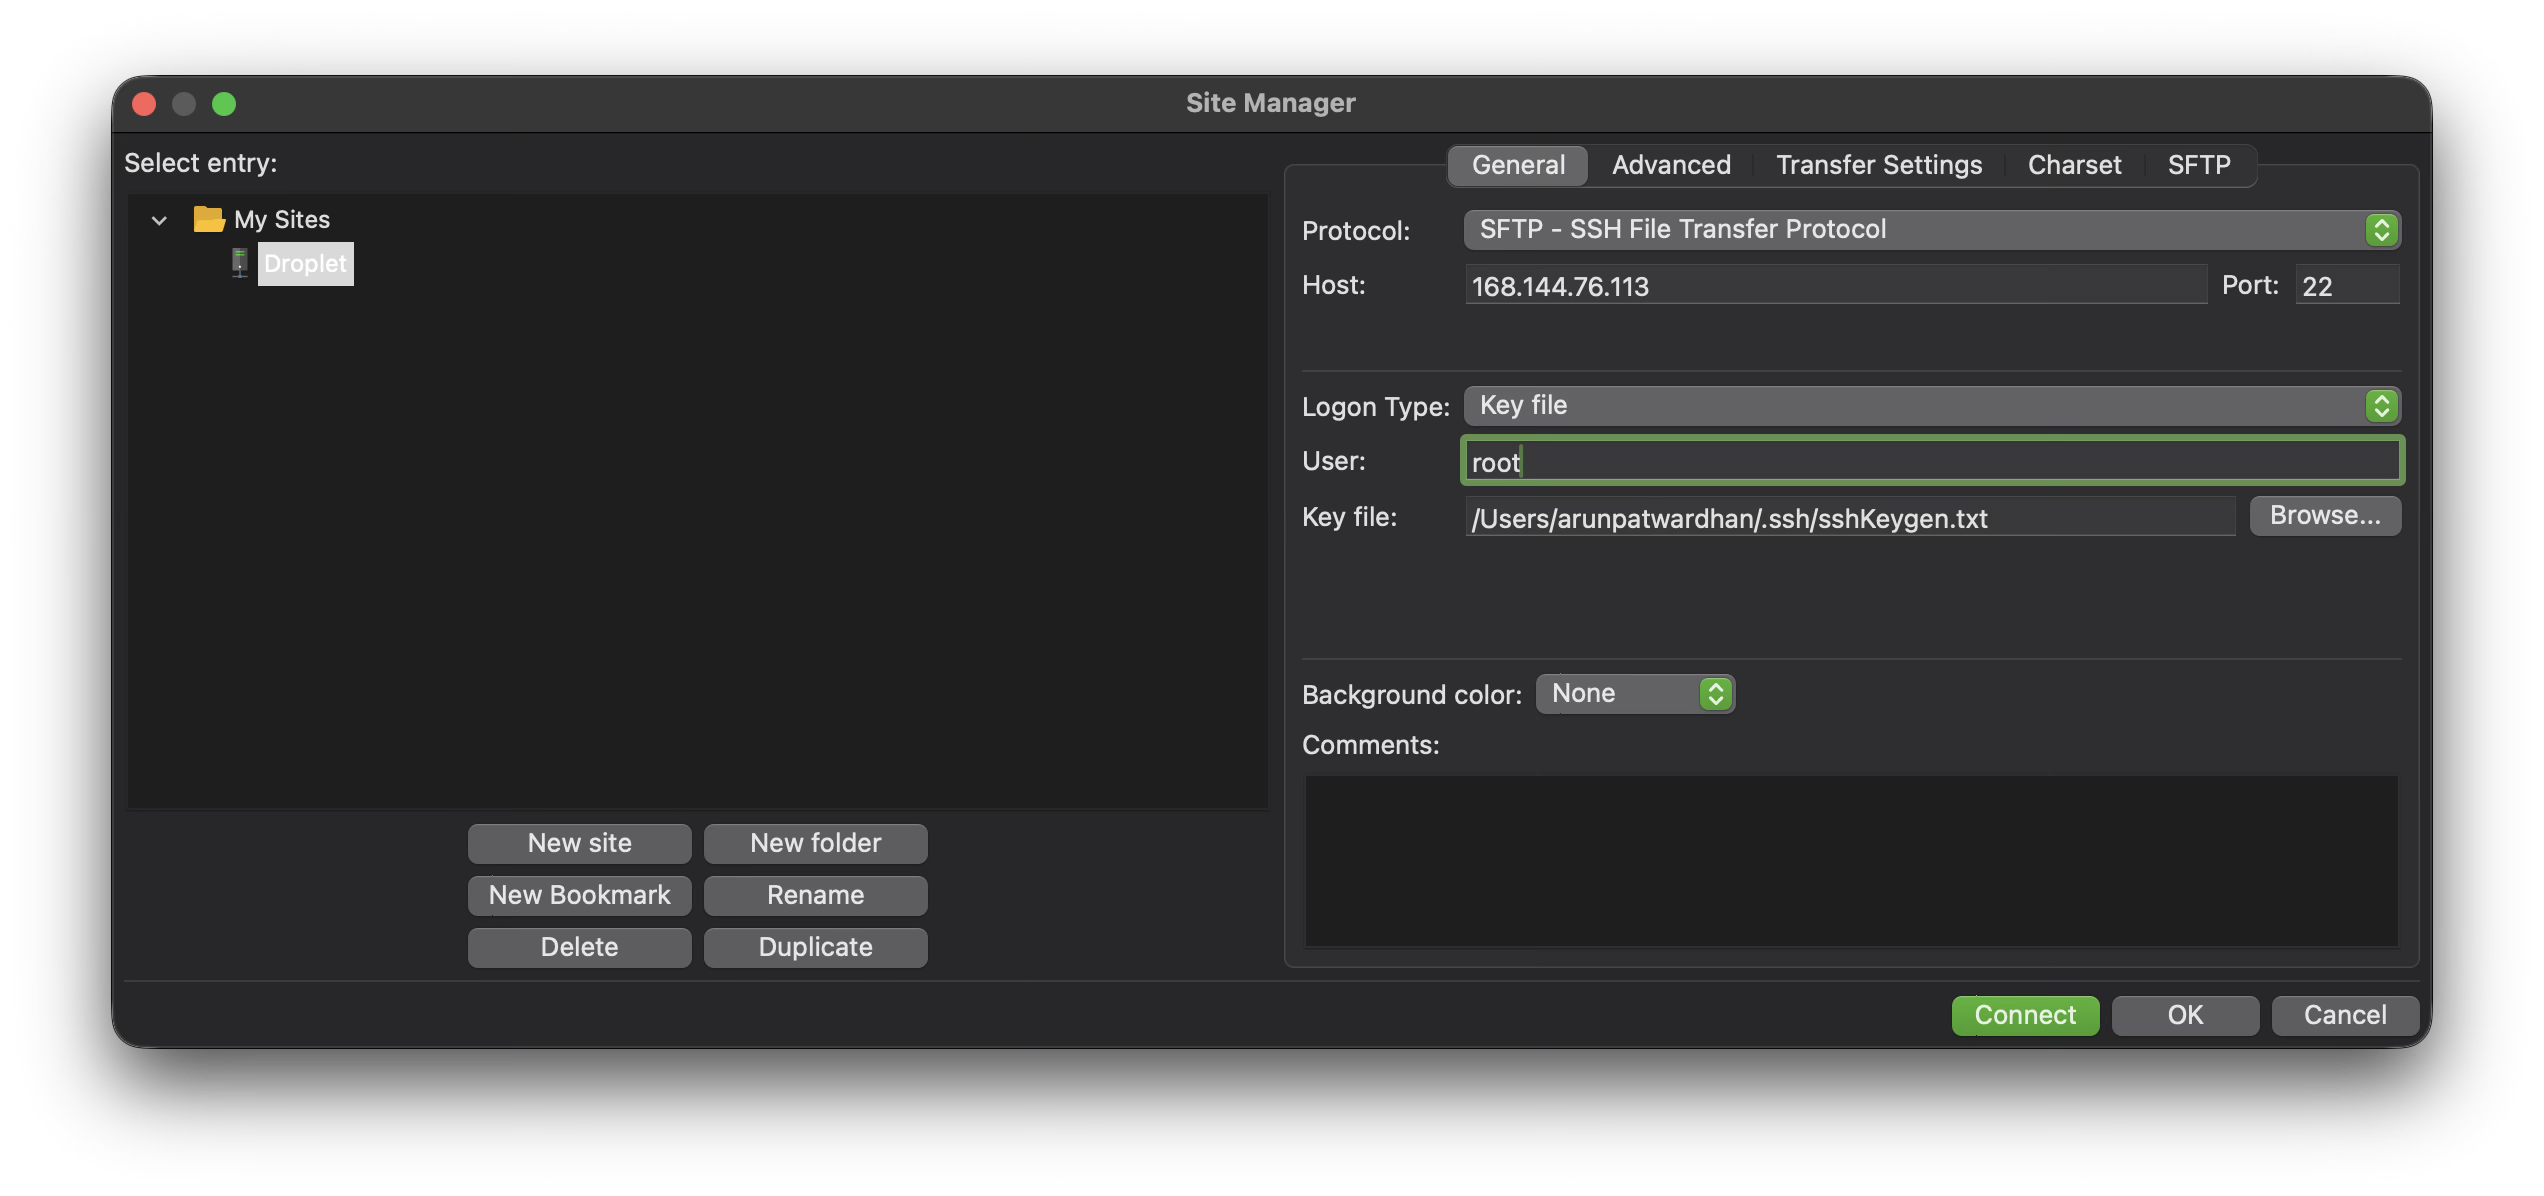
  1. Click on New Site.
  2. Name it droplet
  3. Set the protocol, host name, port, user name and login type, and key file.
  1. Click on Connect.
  2. If prompted to save passwords select “Do not Save”.
  3. If you get an unknown host key simply click ok.
  4. Enter the passphrase which you entered when you created the keys.
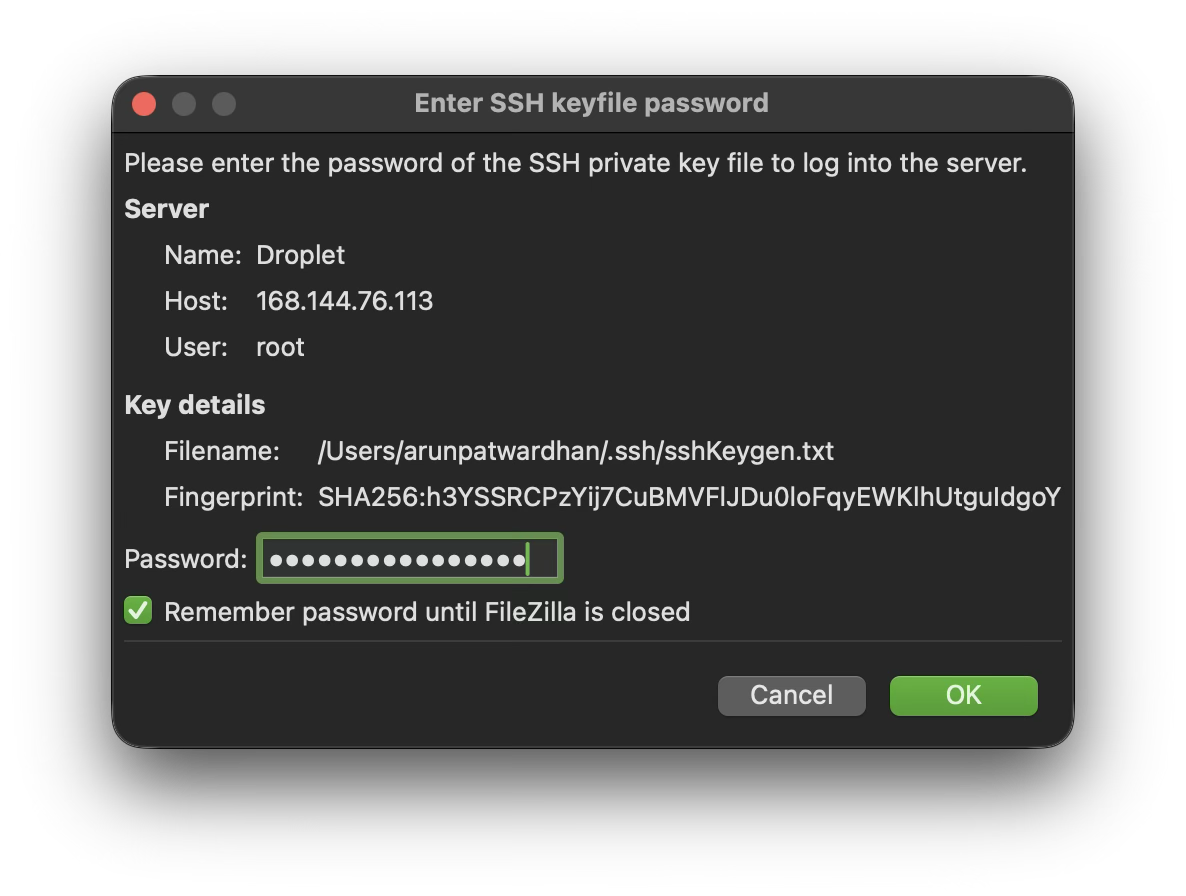
  1. Click ok.
  2. You are connected and should see the folders on the right hand side.
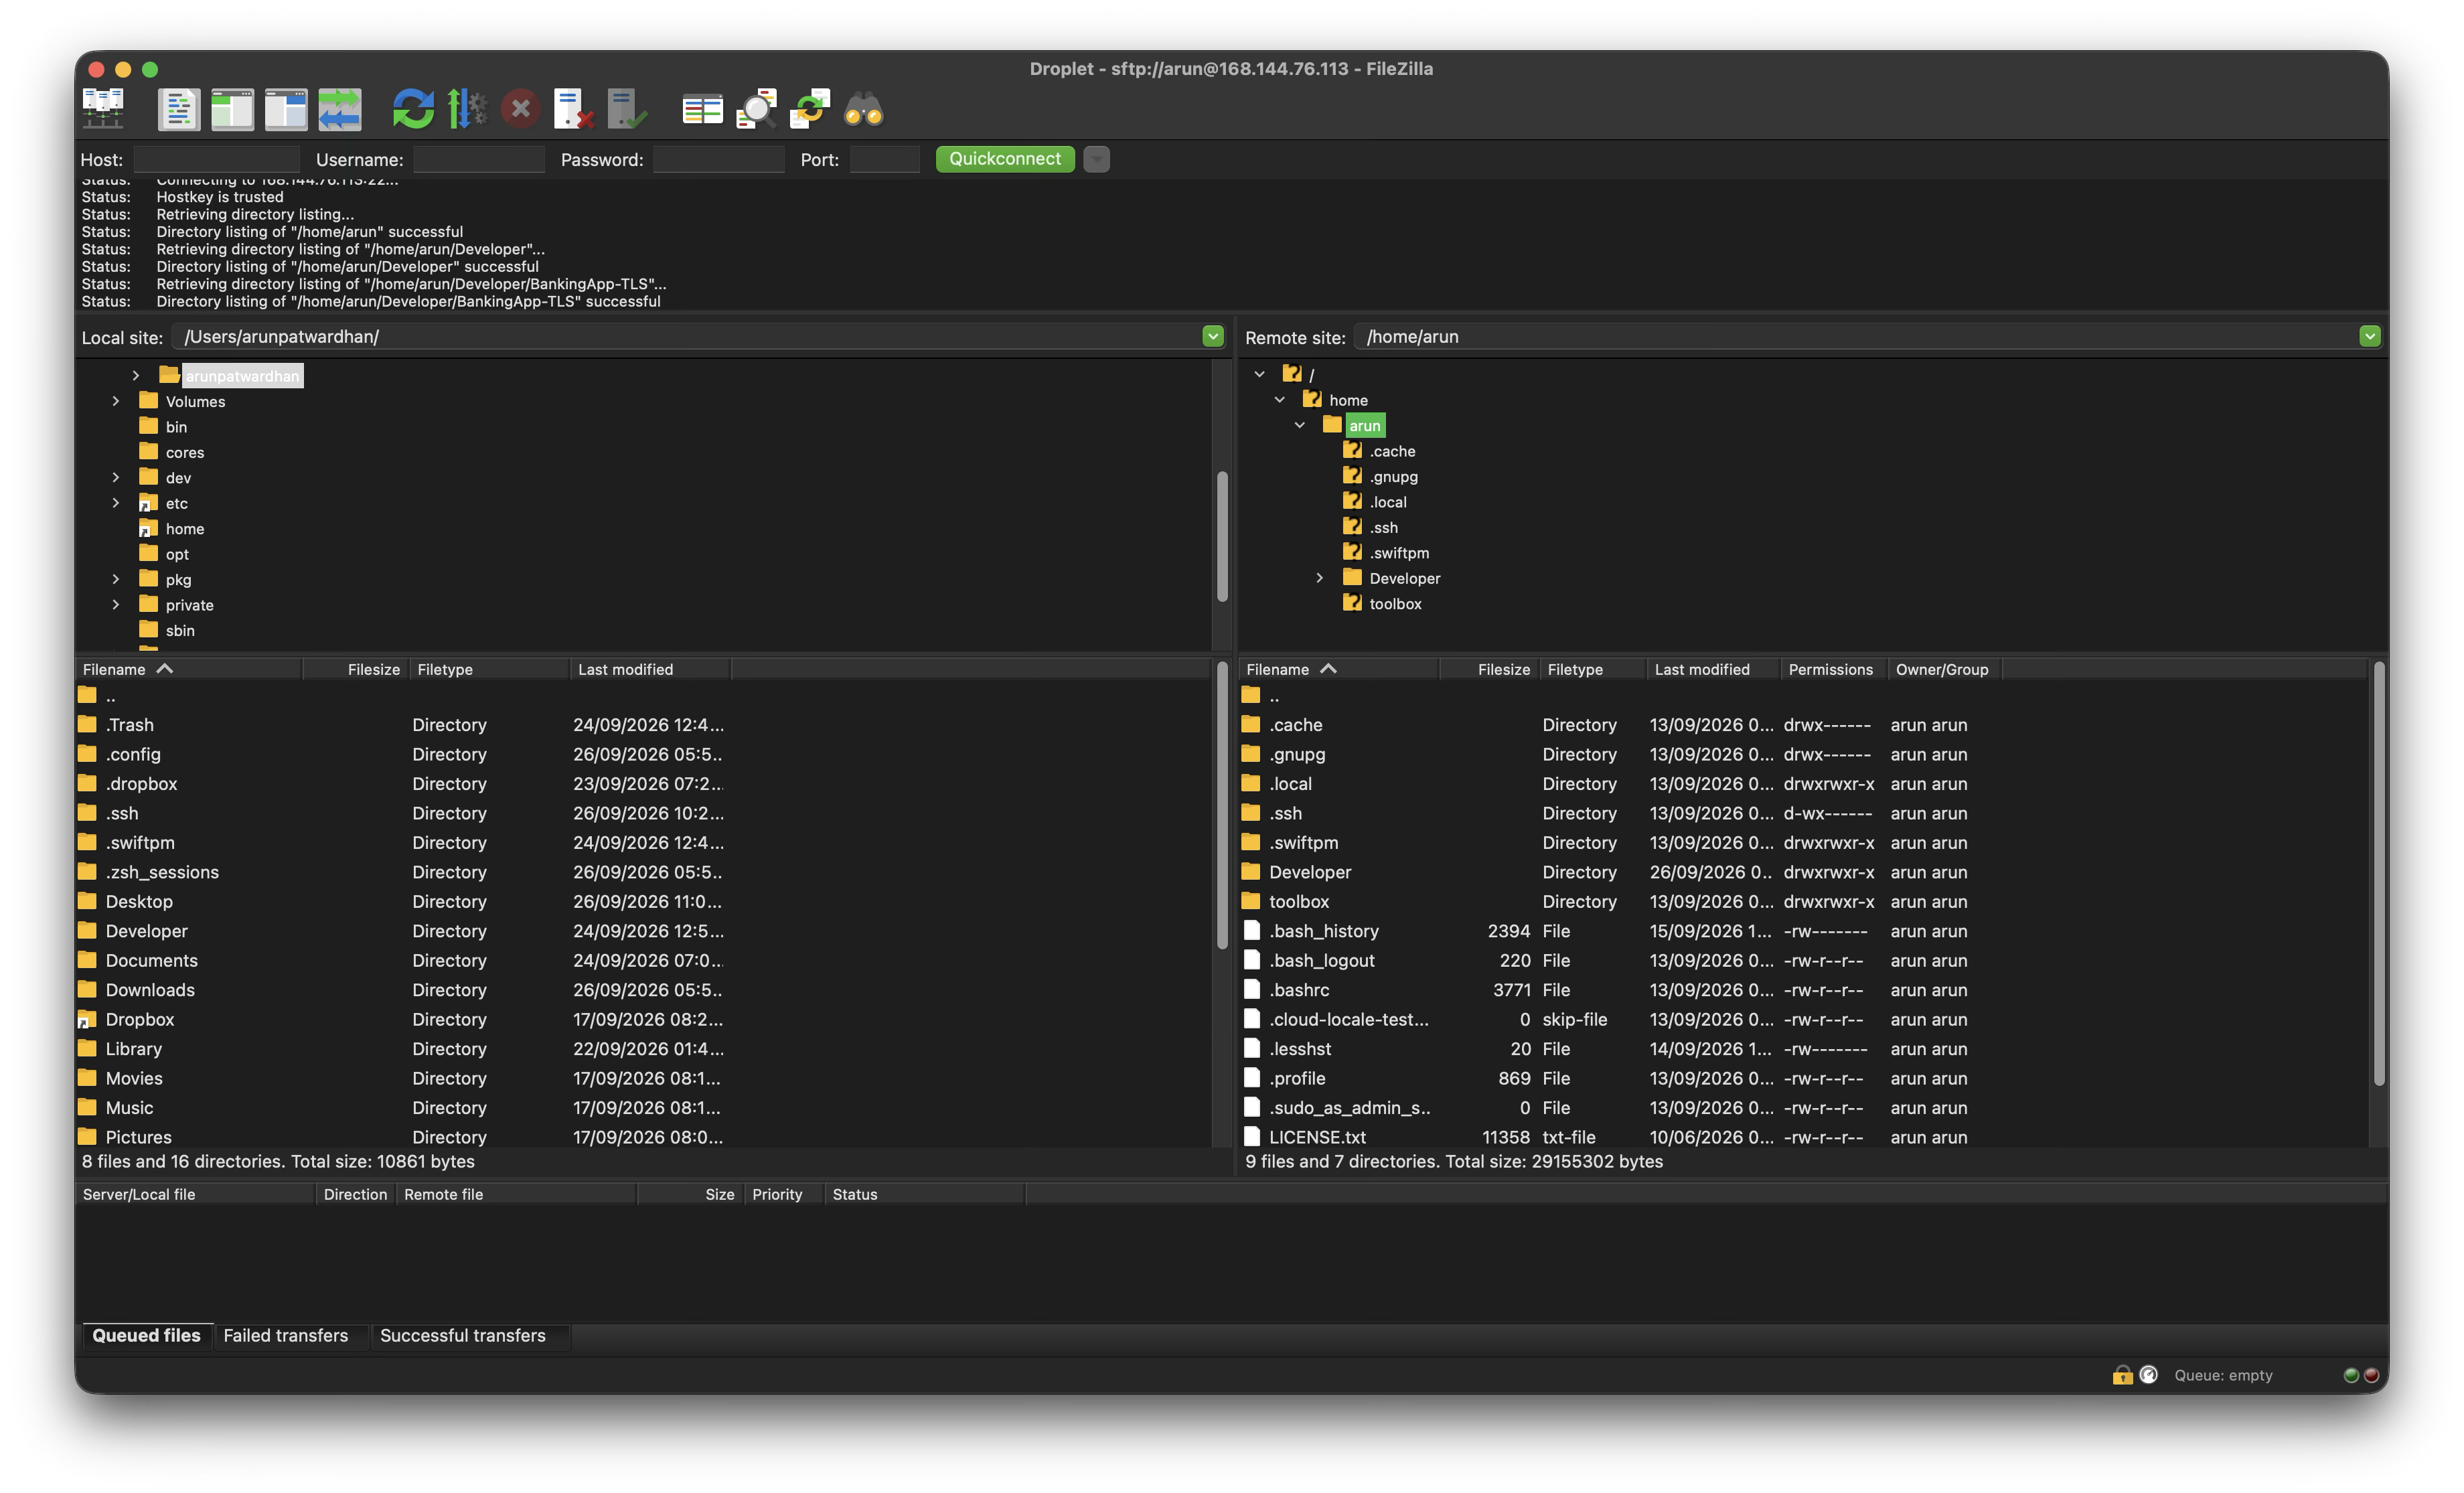
  1. Simply drag the files from the right hand side to the left hand side.
  2. To test the app start the server as show in step 45 on hosting a droplet. Then use the iOS App created earlier. The URL will have to be updated to match the Droplet’s URL. If everything is onfigured well then you should have an app that connects to the server properly.
Vapor Documentation

https://vapor.codes

DigitalOcean droplets

https://www.digitalocean.com/products/droplets

Filezilla

https://filezilla-project.org/download.php?platform=macos-arm64

Installing Swift on Linux

https://www.swift.org/install/linux

You can download the completed projects from the links below.

Sample Vapor server project

https://github.com/AmaranthineTech/CommunicationServer

Sample client app

https://github.com/AmaranthineTech/CommunicationServerClient

iPhone Screen Recording – Part 2

This is an addendum to the earlier topic on Screen and Audio recording on macOS & iOS.

In the earlier article we had discussed how to share the iPhone screen on the project or how to record iPhone screen activities. In this article we are going to see how to use the built in feature of iOS 11 to do the same.

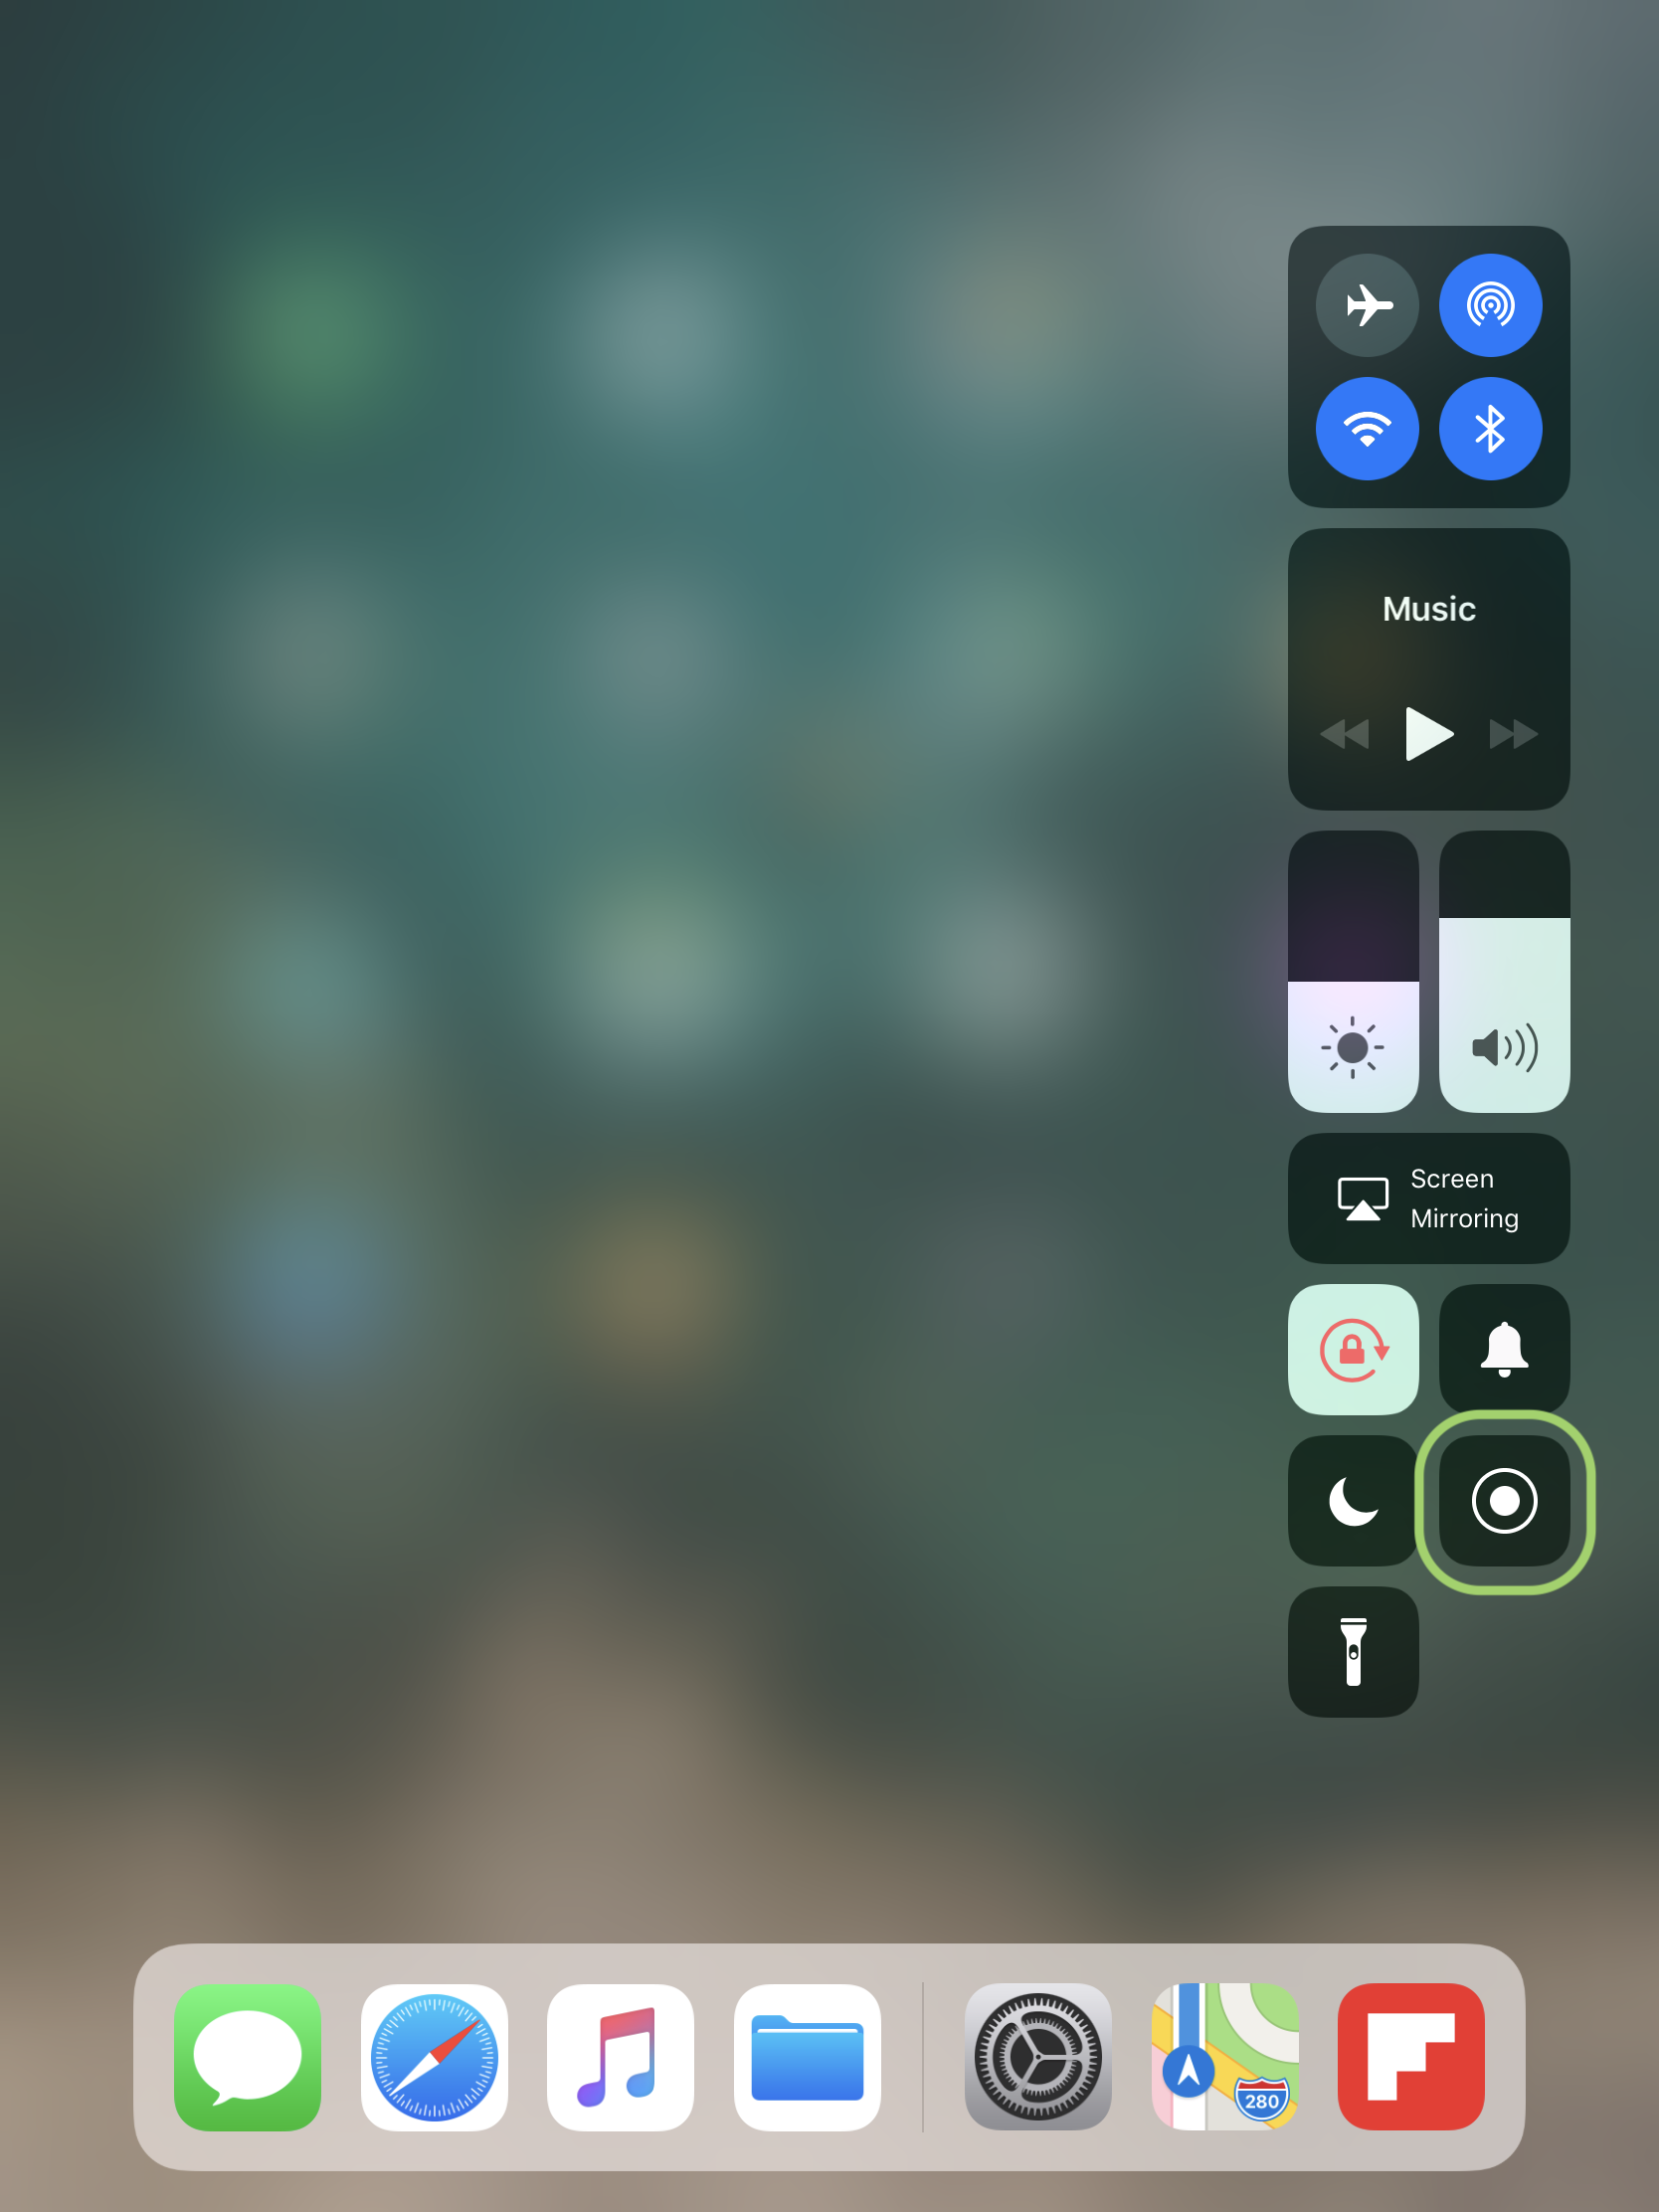
  1. First we must add the button to do this to control centre. Open Settings > Control Centre> Customise Controls .IMG_0134
  2. Tap on the ‘+’ button next to Screen Recording to add Screen Recording to the control centre. Close the Settings App.IMG_0135
  3. Swipe up from the bottom of the screen to bring the control centre options.
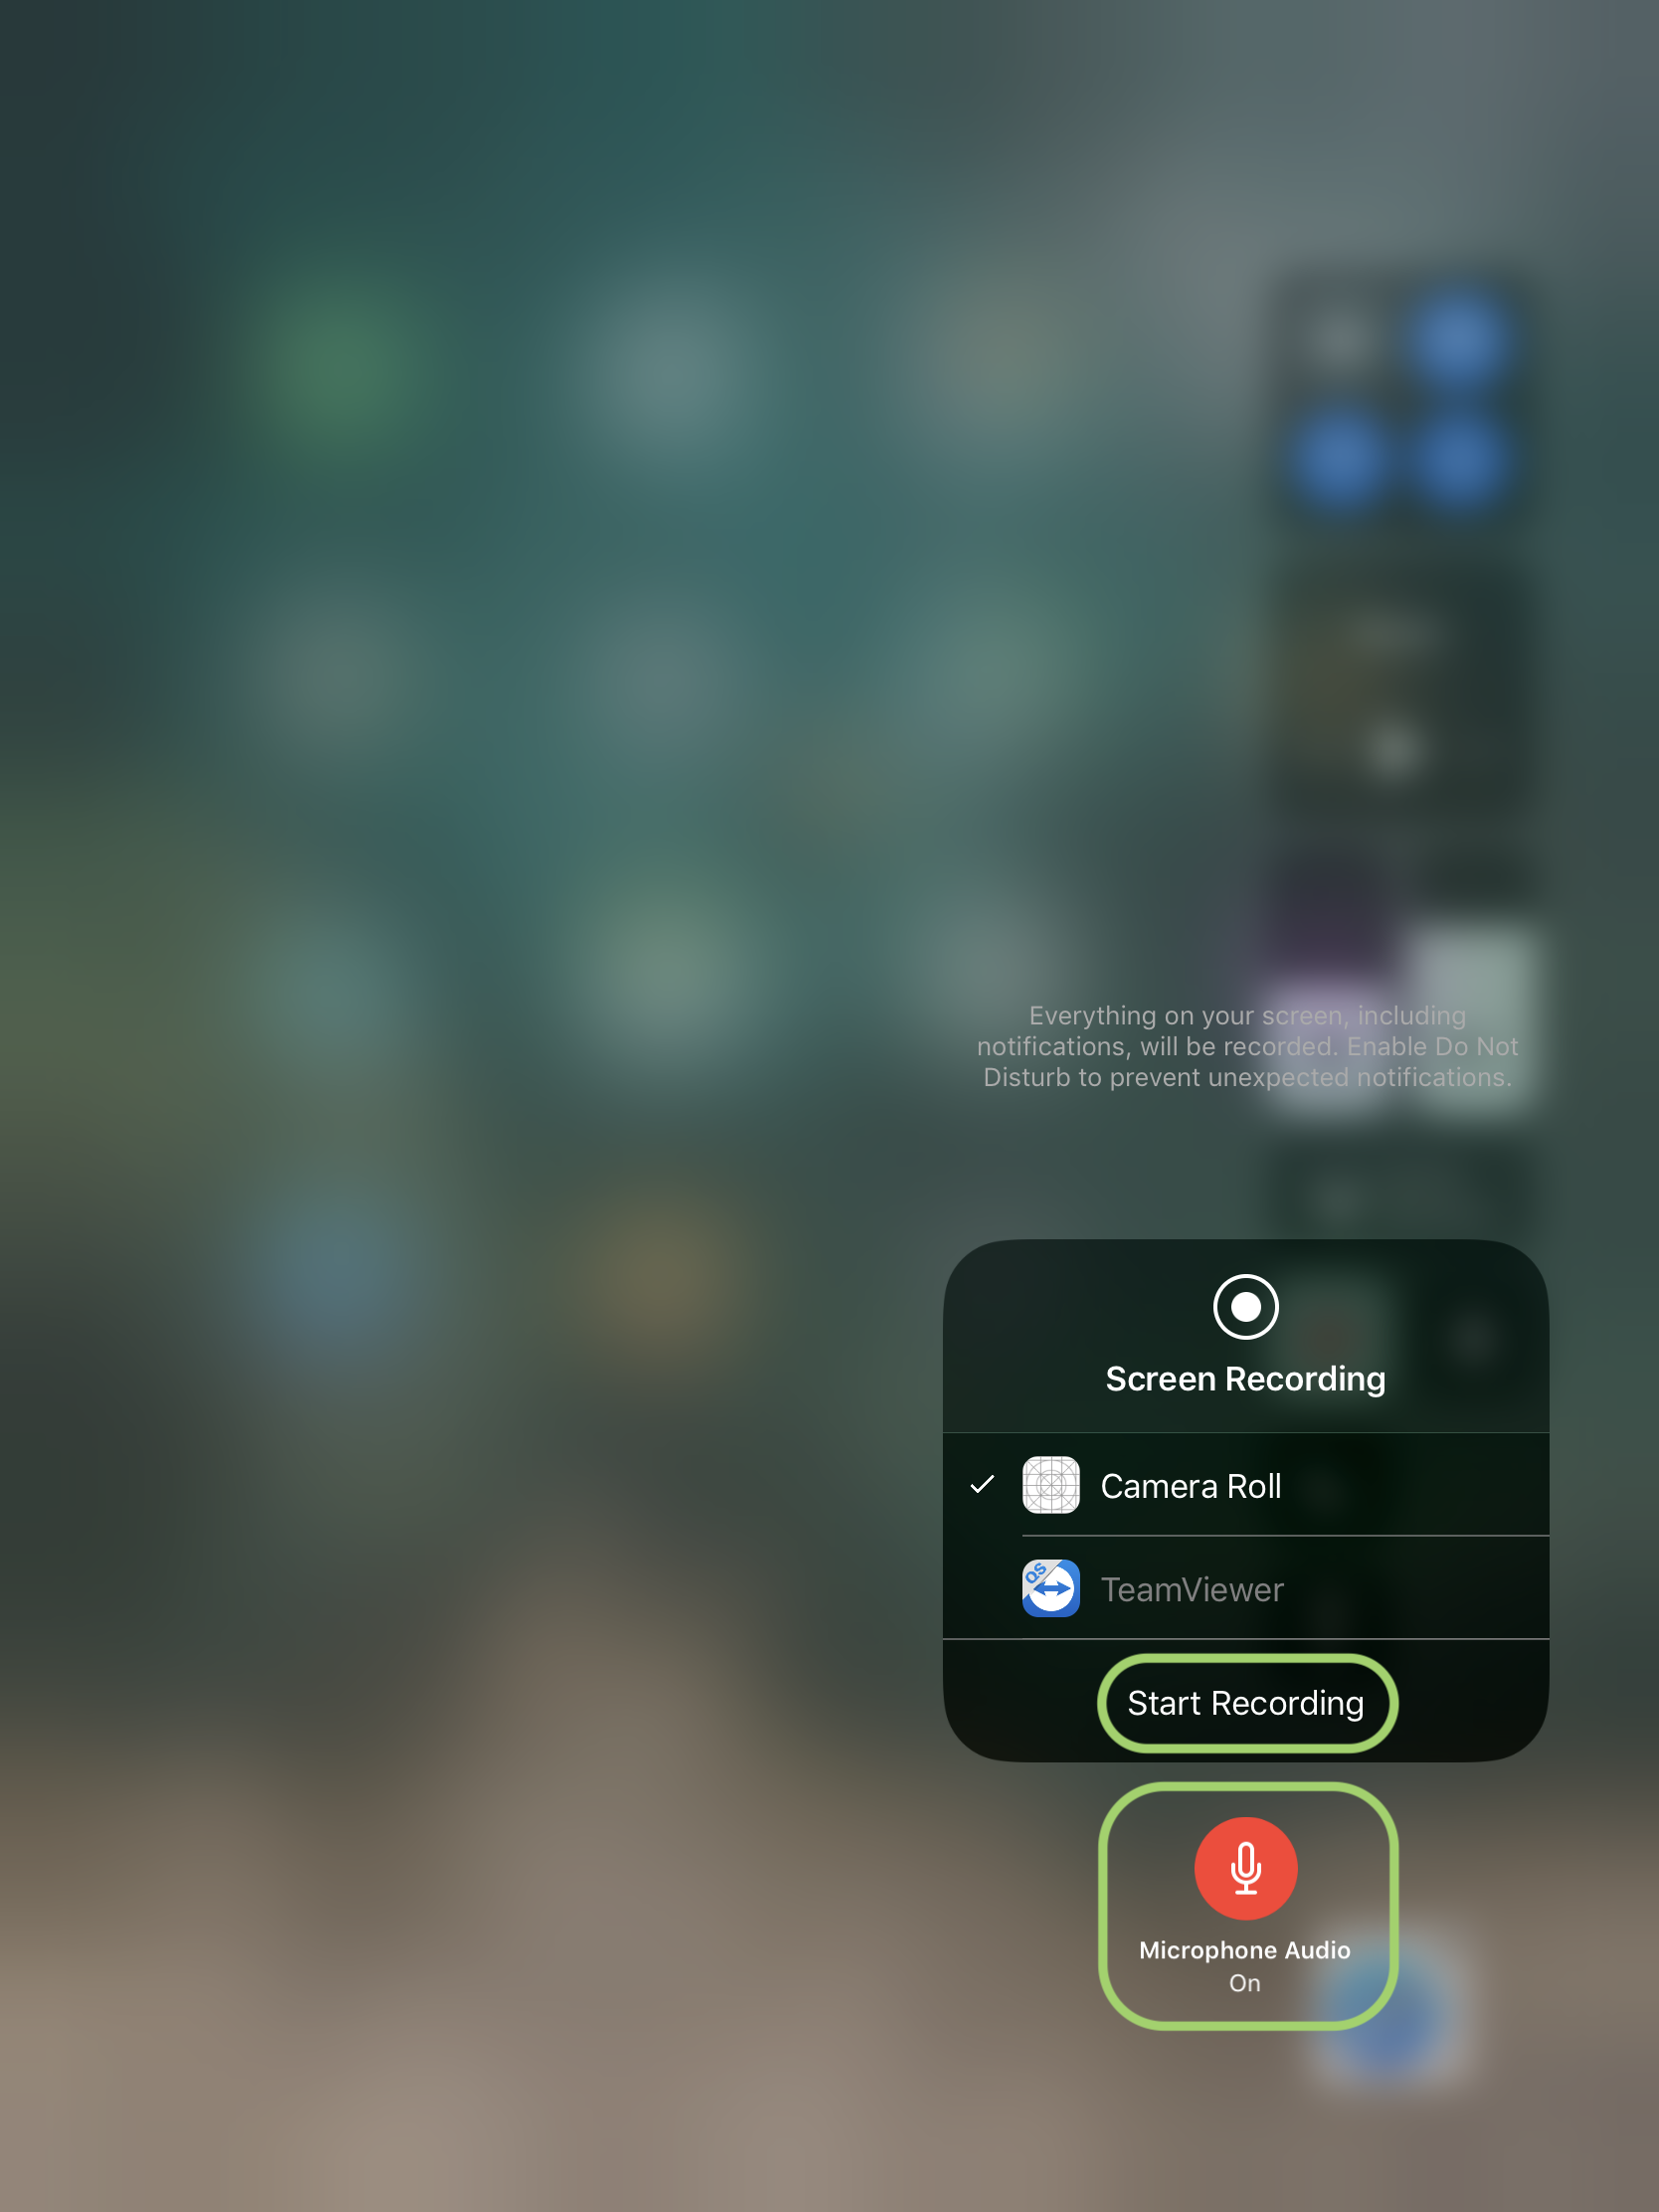
  4. Tap on the Screen record button. Tap the microphone audio button to record audio if you wish.IMG_0136
  5. Tap the “Start Recording” button to start recording. To stop simply tap on the “Stop Recording” button.IMG_0138IMG_0140
  6. The video is saved in the camera roll.

Third Party Applications

This feature is used to provide screen sharing capability via apps such as TeamViewer.


UPDATE: Swift on Linux

This article is an UPDATE for Writing Swift Programs on Linux

This article uses Command Line Interface(CLI) to write Swift Programs. If you are new to CLI then you should read the following articles: Terminal Commands for OS X – Basic, Terminal Commands for OS X – Part 2.

This article has been written using Ubuntu version 16.04 LTS

For the best part the process is still the same.

  1. Download the Swift tools for Linux from: Swift Download Page
  2. Untar the downloaded files
  3. Copy them to a folder of your choice. I have created a folder called “Developer” in my home folder. So I copied the untarred contents there. This is important because we will be needing the location later.
  4. Switch to Terminal on your Ubuntu System.
  5. First we will install clang. Run the command
    sudo apt-get install clang
  6. Next we will make sure we set the PATH to the path where we copied the Swift tools. For example if the Untarred swift folder is called “swift-4.0-DEVELOPMENT-SNAPSHOT-2017-12-04-a-ubuntu16.04/usr/bin:”${PATH}” and it is in the Developer folder I created earlier then the command would be:
    export PATH=/home/admin/Developer/swift-4.0-DEVELOPMENT-SNAPSHOT-2017-12-04-a-ubuntu16.04/

    The folder name will vary from system to system. The path above is just an example.

  7. Let us check to make sure that everything installed okay. We can do this with 2 commands:
    which swift

    This should show you the path to the folder.
    or

    swift --version

    This should print out the swift version.

  8. Next let us test the REPL. Run the command:
    swift

    This will result in a prompt that looks like:

    Welcome to Swift version 4.0.3-dev (2dedb62a0b, Clang ab7472e733, Swift 64ab6903b2). Type :help for assistance.
     1>
    
  9. Type some of the commands mentioned below:
    12 * 8
    let hello = "Welcome to Swift in Linux"
    print(hello)
    
  10. Now that we know that the REPL is working well, let us move on to the next stage. Let us quit from the REPL:
    :q

Creating Single File Projects

  1. Next let us use Swift Package Manager to create a single file project. I will be creating the project in the Developer folder. So I will navigate to it:cd ~/Developer/
  2. Create a folder of your choice, lets call it Hello World:
    HelloWorld
  3. Enter the folder:
    cd HelloWorld
  4. Create a manifest file for the Package with the command:
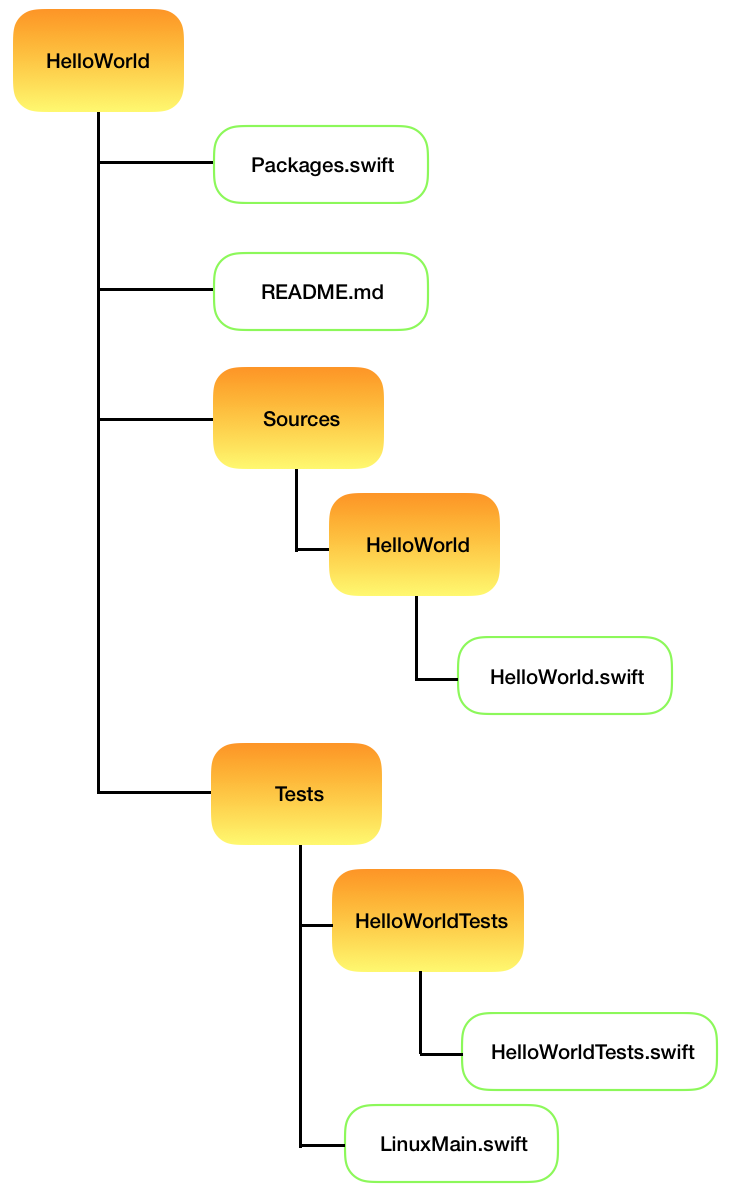
    swift package init

    This will create some content for you. The structure should look as shown below.Screen Shot 2018-03-27 at 10.24.02 AM

  5. If we run the command to build it will simply create a module for us. To do that type and run:
    swift build
  6. But we would like to create an executable application. In the sources folder create a file called main.swift. You can use the command:
    touch main.swift

    to quickly create a new swift file.

  7. Open the main.swift file. Write the following code in there:
    let object : HelloWorld = HelloWorld()
    print(object.text)
    print("End of program...!")
    
  8. To create the executable we will first build our code:
    swift build
  9. Now we will run the executable, assuming that you are still in the HelloWorld folder within the sources folder navigate to a hidden build folder. To do that first we will navigate to our main HelloWorld package folder.
    cd ../..
  10. To view all the folders including the hidden folders run the list command:
    ls -la
  11. Navigate to the hidden folder and the debug folder inside it to locate the executable:
    cd .build/debug/
  12. To run the executable:
    ./HelloWorld
  13. If you want to build and directly run & avoid doing steps 9-13 repeatedly the command is:
    swift run

Next we will see how to create multi file projects

Create Multi File Projects

    1. In the previous project go back to the HelloWorld folder within the Sources folder. Create a file called converter.swift:
      touch converter.swift
    2. Write the following code in that file:
      //note the code below is for demonstrating multi file projects & may not necessarily be accurate or correct
      
      //note the code below is for demonstrating multi file projects & may not necessarily be accurate or correct
      func centigrade_to_fahrenheit(temperatureInCentigrade : Float) -> Float
      {
           return ((temperatureInCentigrade*9.0/5.0)+32.0)
      }
      
      func string_to_float(input : String) -> Float
      {
           var number : Float = 0.0;
           var result : Float = 0.0
           var decimalFound : Bool = false
           var numberOfDigitsAfterDecimal : UInt8 = 0
      
           for charac in input
           {
                switch charac
                {
                     case "0":
                          number = 0.0;
                          result = (result * 10.0) + number;
                     case "1":
                          number = 1.0;
                          result = (result * 10.0) + number;
                     case "2":
                          number = 2.0;
                          result = (result * 10.0) + number;
                     case "3":
                          number = 3.0;
                          result = (result * 10.0) + number;
                     case "4":
                          number = 4.0;
                          result = (result * 10.0) + number;
                     case "5":
                          number = 5.0;
                          result = (result * 10.0) + number;
                     case "6":
                          number = 6.0;
                          result = (result * 10.0) + number;
                     case "7":
                          number = 7.0;
                          result = (result * 10.0) + number;
                     case "8":
                          number = 8.0;
                          result = (result * 10.0) + number;
                     case "9":
                          number = 9.0;
                          result = (result * 10.0) + number;
                     default:
                          decimalFound = true
                          break
                }
                if decimalFound
                {
                     numberOfDigitsAfterDecimal += 1
                }
           }
      
           for _ in 0..<numberOfDigitsAfterDecimal-1
           {
                result = result / 10.0
           }
           return result
      }


  1. Write the following code in the main.swift file:
    let object : HelloWorld = HelloWorld()
    if CommandLine.arguments.count != 2
    {
            print("USAGE: centigradeToFahrenheit 33.4")
            print("You are missing an argument")
    }
    else
    {
            let temperatureInCentigrade = string_to_float(input: CommandLine.arguments[1]) 
    
            print("\(temperatureInCentigrade) is equal to \(centigrade_to_fahrenheit(temperatureInCentigrade: temperatureInCentigrade))")
    }
    print(object.text)
    print("End....!")
    
  2. Build and run the code. To run it while passing arguments in:
    ./HelloWorld 33.4

So that is how you can build single file & multi file Swift applications on Linux.

Buyers Guide for macOS & iOS in the Enterprise

This article is more of a productivity article aimed at getting first time users up and running quickly on their Mac, iPhones or iPads. Anyone looking to buy one of these products or Tech Support teams that help employees with their computers would find this article helpful. The thoughts shared here are personal, readers are welcome to share their own thoughts and experiences.

The article is not a comprehensive guide. Its aim is to give potential users some idea as to how the devices can be used in their work environment. Specifically from an Application perspective.

Macintosh

macFamily


Which one to buy?

This depends on how the device is going to be used. Here are 3 general classifications:

Basic Usage

Basic usage would mean simple day to day tasks. These are the tasks that would qualify for:

  • Checking emails
  • Browsing the web
  • Social Media
  • Listening to Music
  • Watching Movies
  • Composing letters
  • Preparing Presentations & running presentations
  • Note taking

In such a case you may want to consider buying a MacBook or a MacBook Air. If portability is not required then a Mac Mini would also do.

At entry level configurations these devices would do the job very well.

Intermediate Usage

If the tasks being performed are a little more demanding then you may want to consider higher configuration devices. Again in most cases the  MacBook or a MacBook Air would do. If portability is not required then a Mac Mini would also do. In all these cases consider one with slightly higher configuration.

For situations where the compute power is important you may even consider the MacBook Pro. For example, if there are programmers who need to work with a high configuration Mac and they need portability, then you can consider the MacBook Pro.

Pro Usage

This indicates that the tasks being performed are very compute intensive. These are some of the job profiles which may demand compute intensive resources:

  • Programmers
  • Video Editors
  • Audio Editors
  • Post Production Teams
  • Marketing & Creative Teams
  • Scientific Research

For such situations the higher end desktops & MacBook Pros would be required. So the iMac or the highest configuration Mac Mini, or the 15″ MacBook Pro would be best suited for such environments.

In some situations even more powerful computers would be required. The iMac Pro & Mac Pro should then be considered.


Built In Applications that might be useful

Productivity Tools

There are 3 applications which are a part of the suite called iWork that are very useful in organisations.

  • PAGES: Built in word processing application. You can easily created documents, letters, reports and even have them exported in Microsoft Office compatible format.
  • KEYNOTE: Built in presentation applications. Enables you to create powerful presentations from scratch. Like Pages it is possible to create presentations that are compatible with PowerPoint.
  • NUMBERS: Built in spreadsheet application. Enables you to quickly create spreadsheets and export them to Excel if needed.

The other advantage is the fact that these applications are also accessible from the cloud. Tight integration with iCloud means that you can make changes to documents from your Mac, iPhone, iPad, or iCloud.com.

Creative Tools

There are 2 applications which are available for creative purpose. These might be handy for people working in the creative departments.

  • IMOVIE: Quick create movies using videos, audios and photos that you have.
  • GARAGEBAND: A simple Music creation application that comes with a library of different instruments.

Popular Third Party Applications

These are just some of the applications.

Office Suite

Productivity

Cloud

Creative

Security

Communication

Data Backup

Virtualisation (Running Windows or Windows Applications on the Mac)


Some tasks that can be done with built in Applications

  • Scanning Documents using Preview
  • Signing Documents using Preview
  • Record Screen Activity using QuickTime
  • Record a quick movie using QuickTime
  • Automate Tasks & create workflows using Automator
  • Encrypt Data using FileVault
  • Show your iPhone/iPad screen on a projector using QuickTime on Mac
  • Backup data using Time Machine

iPhone/iPad

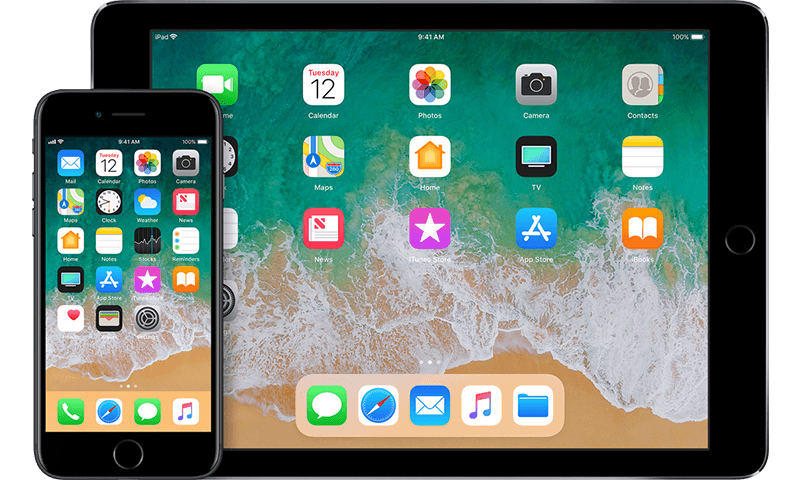
iosFamily


Which one to buy?

The decision on whether to buy the iPhone &/or the iPad depends a lot on what you intend to use it for. As such the major differences between the 2 devices are:

  • iPads tend to have larger screens
  • iPhone has cellular communication capability
  • iPhones are more portable as compared to iPads
  • iPads are better suited for long duration usage
  • iPads tend to be higher powered devices

While it appears that iPads are better than iPhones, that is not necessarily the case. iPhones being smaller and more compact have many advantages too.

Ideally speaking having both, an iPhone and an iPad, is the best thing to do.

To make a decision use the task list below to help find out if you need an iPhone or an iPad or both.

Note, even though I mention that the tasks can be performed easily on an iPhone, many of the tasks can also be done very easily on the iPad. The point is to illustrate ease of use in situations where you have to perform tasks with a single hand or when you are on the move.

Tasks easily performed on an iPhone

  • Making calls
  • Messaging
  • Scheduling activities such as: Reminders, Appointments, Events
  • Taking Photos & Videos
  • Emails
  • Banking Transactions
  • Finding Transit Directions
  • Finding a Taxi
  • Making E-Payments

Tasks easily performed on the iPad

  • Writing letters & blogs
  • Creating Presentations
  • Working with spreadsheets
  • Creating posters, flyers
  • Working with business applications
  • Content creation

If you do a mixture of tasks from both the lists then getting both an iPhone as well as an iPad is a good idea.

A thing to keep in mind is that the Pro version of the iPad also has a nice keyboard accessory as well as the  Pencil available. These 2 products make the whole experience so much better.

Screen size consideration

iPhone and iPad screen sizes vary quite a bit. Here are some tips on the tasks which can be best performed on specific screen sizes.

Creative Work

Generally speaking, creative tasks require a large screensize. So for an iPhone the smallest screen you should have is 4.7″. Similarly for the iPad the smallest screen you should have is the  9.7″.

Documents, letters, spreadsheets

These tasks are better performed on the iPads as such you can go for any screen size in them. Of the lot, its a lot easier to create documents and letters on the phone than spreadsheets. Again, for phones one should the larger the screen size the better.

Presentations

Like documents and spreadsheets presentations are a lot easier to create on the iPad. They can also be created from the phones. The larger the phone the better.

Messaging & Communication

This is one aspect where the screen size is not so much of an issue. In fact, some users may find the smaller screen size a lot better. Typically, the iPhone is a much better device than the iPad for this.

Productivity & General Tasks

This includes calling taxis, ordering food, taking notes, control keynote presentations, setting up appointments and reminders. These tasks are also best performed on iPhones. They can be done well with the iPad too.


Built In Applications that might be useful

Productivity Tools

There are 3 applications which are a part of the suite called iWork that are very useful in organisations.

  • PAGES: Built in word processing application. You can easily created documents, letters, reports and even have them exported in Microsoft Office compatible format.
  • KEYNOTE: Built in presentation applications. Enables you to create powerful presentations from scratch. Like Pages it is possible to create presentations that are compatible with PowerPoint.
  • NUMBERS: Built in spreadsheet application. Enables you to quickly create spreadsheets and export them to Excel if needed.

The other advantage is the fact that these applications are also accessible from the cloud. Tight integration with iCloud means that you can make changes to documents from your Mac, iPhone, iPad, or iCloud.com.

Creative Tools

There are 2 applications which are available for creative purpose. These might be handy for people working in the creative departments.

  • IMOVIE: Quick create movies using videos, audios and photos that you have.
  • GARAGEBAND: A simple Music creation application that comes with a library of different instruments.

Other Apps

  • Notes
  • Voice Memos
  • Files

Popular Third Party Applications

Office Suite

Productivity

Cloud

Creative

Security

Communication


Some tasks that can be done with built in Applications

  • Scanning Documents using Notes
  • Recording Voice Memos
  • Control HomeKit devices
  • Edit PDFs through iBooks
  • Create PDF documents through pages & then edit the PDFs either through iBooks or markup utilities
  • Record and Edit videos using the camera & iMovie

Useful iPad Accessories

 TV

There are a few things that can be done with the  TV. It can be used to mirror both macOS & iOS Devices. In which case apps such as Reflector are not really required.

It is very easy to setup and use. This can make projecting both the iPad screen as well as the iOS Screen very easy & it allows you to move across the room as you are not physically wired to the projector.

Final Word

As we can see there are a wide variety of apps available both for macOS & iOS. These include built in apps as well as Third party apps. The community of developers creating these apps is strong and growing. There are many more apps which can be used for a wide variety of purposes.

This article should give the user a fair idea as to the capabilities of devices such as iPads, MacBooks and the rest of the line up. The good thing is that for enterprise environments its easily possible to create apps that are tailored to the needs of that organisation and this makes the devices much more attractive.

macOS & iOS IT Tool List

This list is based on questions that I have been asked by various IT admins.

It is more of a collection of tools (mainly software, but a few hardware tools too) that Enterprise IT Teams might find useful while supporting/managing Macs & iPhones in the enterprise. Some of the tools are free, while others are paid. Also, it is not necessary that all the tools will be required. Of course, some tools are not meant for troubleshooting but provide a service themselves.

The below list is not an endorsement or recommendation of any of the products mentioned. These are just some of the products I have come across. You may have to do your own research to see which tool fits your organisation’s needs. The author is not responsible for any damages or loss of data that might occur from usage of these tools.

*This list is not a complete list but an ongoing project. Feel free to share your comments on tools that you may have used & I will add them to this list.

DEPLOYMENT

DeployStudio

Munki

macOS Server – NetInstall Service. To be used along with System image Utility

PACKAGE MANAGEMENT

Iceberg

pkgbuild

Suspicious Package

REMOTE MANAGEMENT

RealVNC

TeamViewer

Apple Remote Desktop

LogMeIn

BACKUPS

macOS Server – Time Machine Service

Retrospect

Carbon Copy Cloner

Chronosync

Crash Plan

DEVICE MANAGEMENT

Centrify

JAMF Casper Suite

AirWatch

Mobile Iron

macOS Server – Profile Manager Service

Apple Configurator 2

Heat LANRev

Cisco Meraki

filewave

Absolute Software

BoxTone

Maas 360 – IBM

Tangoe

Lightspeed Systems

VIRTUALIZATION

Parallels Desktop

VMWare Fusion

Oracle VirtualBox

DISK MANAGEMENT

Tuxera

Disk Drill

APPLE APPLICATIONS FOR THIRD PARTY OS

iTunes

iCloud Control Panel

Move to iOS from Android

Migration Assistant

AUTOMATION

Workflow for iOS

Automator – Built in app for creating Workflows.

AppleScript

Command Line Script

NETWORK TROUBLESHOOTING

iNetTools

Network Diagnostics

Network Ping

Wireshark

DISPLAY

Air Squirrel

SYSTEM TROUBLESHOOTING

Install Disk – I will be talking about how to create a multi-OS install disk in a later article.

SOFTWARE MANAGEMENT

macOS Server – Caching Service

Reposado

AutoPKG

Munki

HARDWARE

Thunderbolt 1,2,3 Cables
Thunderbolt 1,2
USB-C Cable

FireWire 400/800 Cables

Portable disk with macOS installed on it. Not the same as install disk. Its an external bootable hard drive with the OS installed on it. You can plug this into any Mac & boot from the external HDD.

VGA to MiniDisplay adapter

HDMI to HDMI Cable

Thunderbolt Ethernet Bridge

USB Ethernet Bridge

Adapters for the different ports supported by Macs & iPhones

Lightning Cables

Creating multi-OS Install Disk

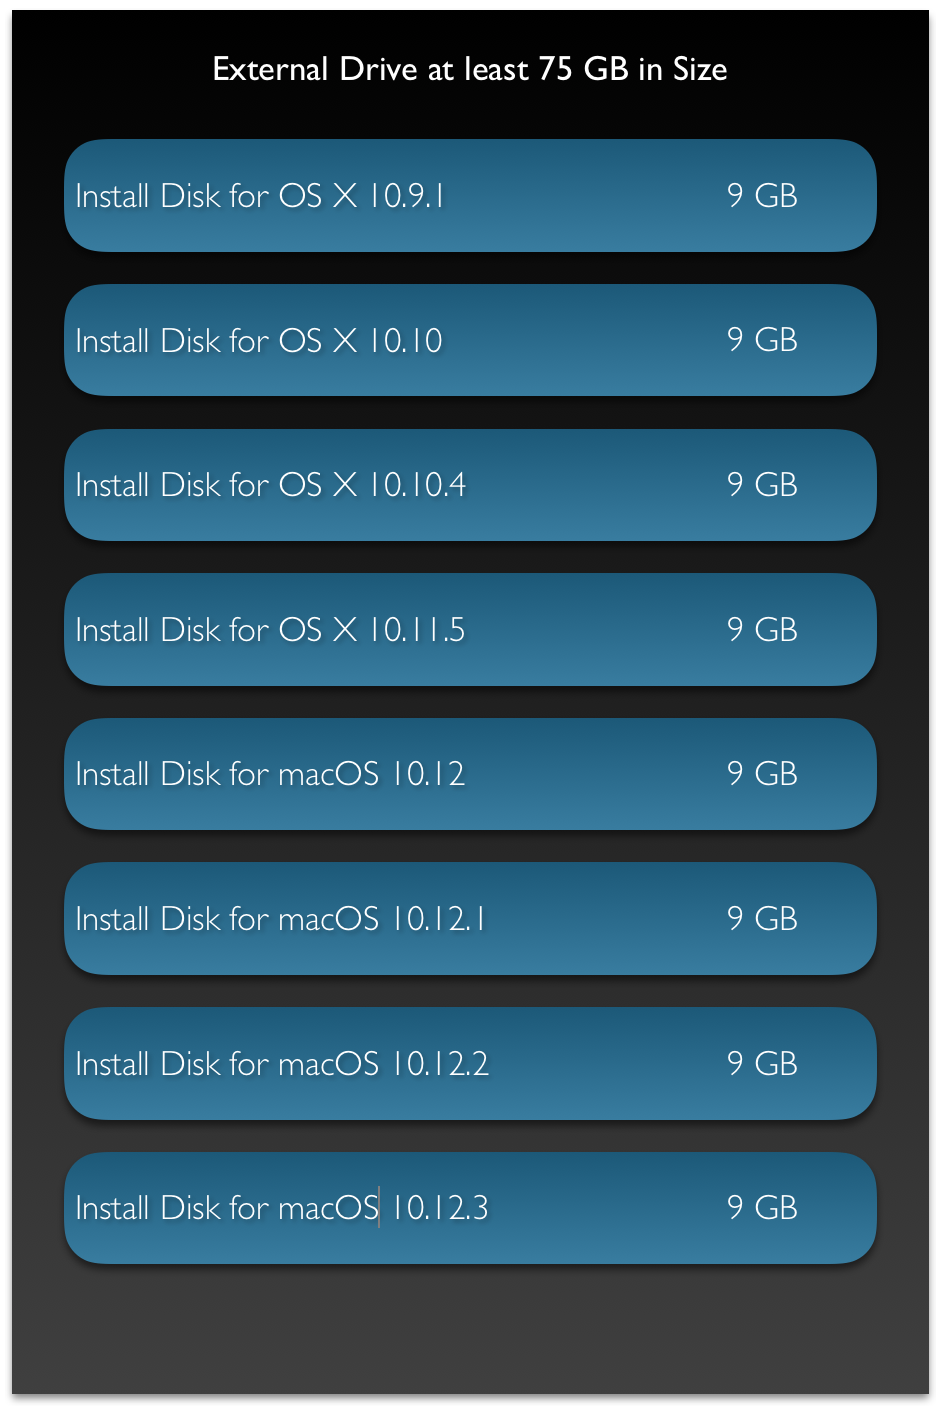
In this article we are going to look at how to create a multi-OS Install Disk. We are going to look at the example of creating a multi-OS Install Disk for the following versions of the OS:

  • 10.9.1
  • 10.10
  • 10.10.4
  • 10.11.5
  • 10.12
  • 10.12.1
  • 10.12.2
  • 10.12.3

The idea is to have a single disk with multiple versions of the Install Disk on it. The versions should reflect the need of the organisation.

REQUIREMENTS

  1. USB Drive at least 75GB in Size. This depends on the number of Install drives you wish to have. At the very least there should be enough space to create 2 partitions of 8 GB each. 
    While I have mentioned USB drive, it need not be restricted to that interface. You can use Thunderbolt, FireWire or even an SDXC slot for this. Ideally the port should be one that is supported on maximum possible computers.
  2. Install setup for each version of the OS for which you want to create the install disk. The setup must match the version desired.
  3. A Mac running the same major version of the OS. You can only create an install disk for 10.9.x on a Mac running OS X 10.9.x, the same applies for the other versions of the OS.

The process is the same. It’s just that it needs to be repeated.

STEPS

  1. Create 8 partitions on a USB Drive. Assume that the USB Drive is called Recovery Drive. Give the partitions names Partition 1, Partition 2,….
  2. Connect the USB Drive to a Mac running 10.9.1 or later.
  3. Make sure that the OS Installer setup is located in the Applications folder.
  4. Run the following command in the command line.
    sudo /Applications/Install\ OS\ X\ Mavericks.app/Contents/Resources/createinstallmedia --volume /Volumes/Partition\ 1 --applicationpath  /Applications/Install\ OS\ X\ Mavericks.app
  5. Rename the partition as Install disk for OS X 10.9.1, if necessary.
  6. Once completed eject the USB Drive & connect it to a Mac running 10.10
  7. Make sure that the OS Installer setup is located in the Applications folder.
  8. Run the following command in the command line.
    sudo /Applications/Install\ OS\ X\ Yosemite.app/Contents/Resources/createinstallmedia --volume /Volumes/Partition\ 2 --applicationpath  /Applications/Install\ OS\ X\ Yosemite.app
  9. Rename the partition as Install disk for OS X 10.10, if necessary.
  10. Once completed eject the USB Drive & connect it to a Mac running 10.10.4
  11. Make sure that the OS Installer setup is located in the Applications folder.
  12. Run the following command in the command line.
    sudo /Applications/Install\ OS\ X\ Yosemite.app/Contents/Resources/createinstallmedia --volume /Volumes/Partition\ 3 --applicationpath  /Applications/Install\ OS\ X\ Yosemite.app
  13. Rename the partition as Install disk for OS X 10.10.4, if necessary.
  14. Once completed eject the USB Drive & connect it to a Mac running 10.11.5 or later.
  15. Make sure that the OS Installer setup is located in the Applications folder.
  16. Run the following command in the command line.
    sudo /Applications/Install\ OS\ X\ El\ Capitan.app/Contents/Resources/createinstallmedia --volume /Volumes/Partition\ 4 --applicationpath  /Applications/Install\ OS\ X\ El\ Capitan.app
  17. Rename the partition as Install disk for OS X 10.11.5, if necessary.
  18. Once completed eject the USB Drive & connect it to a Mac running 10.12 or later.
  19. Make sure that the OS Installer setup is located in the Applications folder.
  20. Run the following command in the command line.
    sudo /Applications/Install\ macOS\ Sierra.app/Contents/Resources/createinstallmedia --volume /Volumes/Partition\ 5 --applicationpath  /Applications/Install\ macOS\ Sierra.app
  21. Rename the partition as Install disk for OS X 10.12., if necessary.
  22. Once completed eject the USB Drive & connect it to a Mac running 10.12.1 or later.
  23. Make sure that the OS Installer setup is located in the Applications folder.
  24. Run the following command in the command line.
    sudo /Applications/Install\ macOS\ Sierra.app/Contents/Resources/createinstallmedia --volume /Volumes/Partition\ 6 --applicationpath  /Applications/Install\ macOS\ Sierra.app
  25. Rename the partition as Install disk for OS X 10.12.1., if necessary.
  26. Once completed eject the USB Drive & connect it to a Mac running 10.12.2 or later.
  27. Make sure that the OS Installer setup is located in the Applications folder.
  28. Run the following command in the command line.
    sudo /Applications/Install\ macOS\ Sierra.app/Contents/Resources/createinstallmedia --volume /Volumes/Partition\ 7 --applicationpath  /Applications/Install\ macOS\ Sierra.app
  29. Rename the partition as Install disk for OS X 10.12.2, if necessary.
  30. Once completed eject the USB Drive & connect it to a Mac running 10.12.3 or later.
  31. Make sure that the OS Installer setup is located in the Applications folder.
  32. Run the following command in the command line.
    sudo /Applications/Install\ macOS\ Sierra.app/Contents/Resources/createinstallmedia --volume /Volumes/Partition\ 8 --applicationpath  /Applications/Install\ macOS\ Sierra.app
  33. Rename the partition as Install disk for OS X 10.12.3, if necessary.

The commands shown above might be different from what appears on your screen. A lot will depend on what you have named your partitions as, the name you may have given to the OS Installer file, and the location of the OS Installer.

The process of renaming the partitions post creation of the install disk is not necessary, but very useful because that will help you identify the appropriate partition when using the drive.

The above process is very scalable & can be done for even more versions of the OS if required.

Screen Shot 2017-04-17 at 11.11.39 AM
This diagram illustrates the layout of the different partitions on a single USB Drive.

COLLECTION TYPE, SEQUENCE TYPE & INDEXABLE TYPE – Update

This is an update to the topic covered earlier. You can read about the Protocols in detail in the original article. Collection Type, Sequence Type & Indexable Type

Most of the things are the same here are some of the changes:

  1. The Indexable protocol is now not necessarily required. All the aspects of the indexable protocol now fall under the Collection Protocol
  2. The names of the protocols have changed from SequenceType & CollectionType to Sequence & Collection
  3. The keyword Generator has been renamed to Iterator. Accordingly the generate function has been renamed makeIterator function.
  4. The collection protocol now requires the implementation of the function index, this function returns the value of the next index.

The sample code below should clarify

class CustomStack
{
    var data : [Element] = [Element]()

    func push(Element newElement : Element)
    {
        data.append(newElement)
    }

    func pop() -> Element
    {
        return data.removeLast()
    }
}

//Additional Implementations - not strictly required
extension CustomStack
{
    typealias Index = Int

    var startIndex : Index
    {
        return 0
    }

    var endIndex: Index
    {
        return (data.count - 1)
    }

    subscript (position : Index) -> Element
    {
        return data[position]
    }
}

extension CustomStack : Sequence
{
    typealias Iterator = AnyIterator

    func makeIterator() -> Iterator
    {
        var index = 0
        return AnyIterator({() -> Element? in
            if index < self.data.count
            {
                let res =  self.data[index]
                index += 1
                return res
            }
            return nil
        })
    }
}

extension CustomStack : Collection
{
    typealias SubSequence = CustomStack

    subscript (bounds: Range) -> CustomStack.SubSequence
    {
        let newStack : CustomStack = CustomStack()

        for i in bounds.lowerBound...bounds.upperBound
        {
            newStack.push(Element: data[i])
        }
        return newStack
    }

    /// Returns the position immediately after the given index.
    /// - Parameter i: A valid index of the collection. `i` must be less than
    ///   `endIndex`.
    /// - Returns: The index value immediately after `i`.
    func index(after i: Int) -> Int
    {
        if i < endIndex
        {
            return i + 1
        }
        return i
    }
}

Attention to Details

One of the most defining things to come out of the Mobility Development revolution is the renewed focus on the User Experience. 

User experience is not a new concept. It has been there around since the beginning. The introduction of GUI (Graphical User Interfaces), & the mouse was one of the first steps taken towards making the users experience better. Its the first thing that people notice. At the launch of a new product people are curious to know how a particular product will look like.

Its the one thing that people say about Apple’s products. “They just look good”. Different companies have tried in their own way to make the User Experience a wonderful experience. But just what makes it click. 

As users we are able to tell when a product looks great & when it doesn’t or lacks in some aspect. This fact is highlighted even more in Mobile Devices. Attention to Detail.

This is most visible in Gaming. Introducing the effects of gravity to give a realistic feel, making sure objects move in the manner & direction in which people expect upon collision, or just moving the screen elements in accordance to the phone. Many of these changes are subtle. We as users would not even realize these things. But we will know for sure if they are absent. It takes some degree of effort to get the attention to detail in place.

A point to note. Im many cases, adding these small features may not improve or enhance the performance/utility at all. But they add a huge advantage in that it gives the user a feeling that he/she is using a great product. Putting in that little extra effort does have an additional value.

BOTTOM LINE: Put in the extra effort to add those nice features to your app. Either something that makes the app look & feel more realistic &/or something that increases the visual appeal of the app.